![]() Even with the bigger hard drives, SSDs, and Fusion drives in modern Macs, it’s still possible to run low on storage space. Especially on the MacBook and MacBook Air with 128GB of SSD storage, storing a lot of video, photographs, and other big files can make you run out of space in a hurry. In this “how to” article, we’ll give you five quick ways to recover some space. (Of course, you can always add additional storage to your Mac.)
Even with the bigger hard drives, SSDs, and Fusion drives in modern Macs, it’s still possible to run low on storage space. Especially on the MacBook and MacBook Air with 128GB of SSD storage, storing a lot of video, photographs, and other big files can make you run out of space in a hurry. In this “how to” article, we’ll give you five quick ways to recover some space. (Of course, you can always add additional storage to your Mac.)
1) Clean Out The Downloads Folder
One place that often accumulates a lot of files is the Downloads Folder. When you download an app installer from a developer that doesn’t use the App Store, it goes into Downloads. Save a picture from a website? Downloads. I even set up my favorite screenshot capture app, SnapzPro X, to save all of the thousands of screenshots I take each month to Downloads. Before I know it, the folder is holding 40 – 50 GB of data!
Unless you do what I do and keep this folder in the Dock, you might not look at it very often. So set a reminder — perhaps a monthly reminder — to open Downloads, check how much space it’s using, and delete those files. From the Finder, either select Go > Downloads or just type Option-Command-L to open the Downloads folder. Once you’re in there, ask yourself if you really need any of those files — if you do, move them somewhere other than Downloads. Don’t need them? Trash them… and then remember to click and hold the trash can icon in the Dock and select Empty Trash to delete them for good. Related Tip: Skip ‘Taking Out the Trash’ When Deleting Files
2) Use iTunes In The Cloud for Movies and TV Shows
HD movies are big files, and anyone who has purchased a lot of movies from iTunes finds that they can quickly take up a lot of storage space. There’s an easy way to recover all that space — stream them instead of storing them by using iTunes in the Cloud.

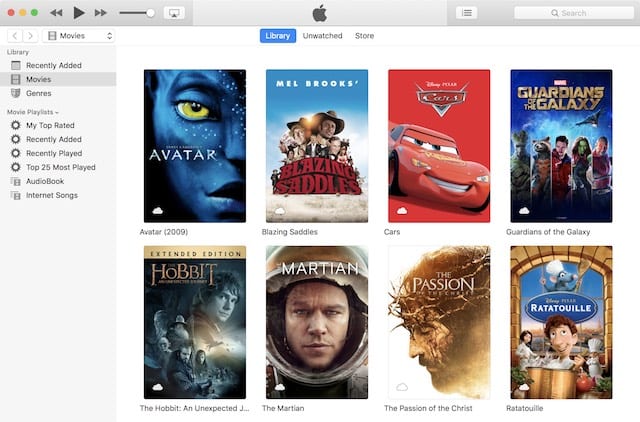
As you can see in the image above, there’s a small cloud icon on the lower left side of each of the movies in this Movies Library. This indicates that the movies are available from the cloud and not on my local drive. For anyone with a decent broadband connection, it’s possible to stream those videos, only downloading them to your Mac if you’re traveling and want to watch them while you’re offline.
To download any of the movies, right click them and select Download. I personally download all of my movies at least once to an external drive, just in case the distributor ever decides to pull them from iTunes at some point. To delete movies that are locally stored, right click the file and delete them; they’re still in the cloud to stream at any time.
3) iCloud Photo Library
My photo library has 49,939 photos and 473 videos in it, and I’d be willing to bet that it grows by 2,500 or more new photos each year. The good thing? Thanks to iCloud Photo Library, it’s possible for me to see all of those photos on all of my devices, Mac and iOS. iCloud Photo Library stores your photos and videos in the cloud, not on your Mac’s drive.
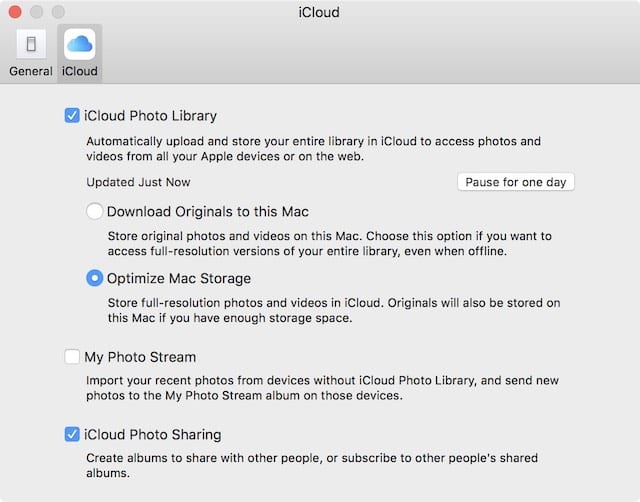
As a precaution, it’s best to make a complete backup of your existing photo library before enabling iCloud Photo Library. Then launch Photos, select Photos > Preferences, click on iCloud and then make sure that iCloud Photo Library is checked (see image below).

Make sure that “Optimize Mac Storage” is selected. What this will do is make sure that the maximum resolution photos and videos are stored in iCloud, and when you open that photo on any device — not just your Mac — it is displayed at the best possible quality.
4) Dump Unused Apps
I recently did a clean install of macOS Sierra on my iMac as it had been acting oddly. Now that Mac is operating so well that I’m thinking that I should do this once a year! One thing that I did before wiping my iMac’s Fusion Drive was to make a quick list of all of the apps that were loaded on it, then determine which ones I hadn’t used in the past six months. Some of those were apps I had reviewed but never found useful, while others were apps that I had a one-time use for. By deleting those unused apps, I was able to clean up a lot of space — about 110GB!
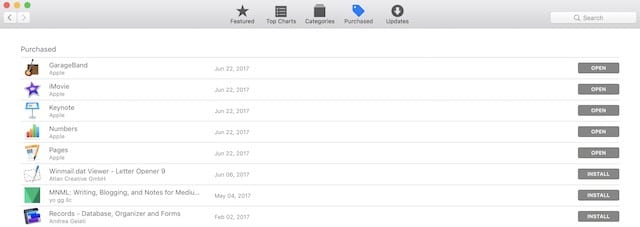
Fortunately, any app you purchase from the Mac App Store is available to re-download simply by launching the Mac App Store, clicking on Purchased, finding the app in question, and then clicking Install. In the screenshot below, Install means that the apps are not on my Mac while Open means that they have been reinstalled and can be opened with a click. Apple’s Developer or Public Betas are listed with the word Download, meaning that they must be downloaded prior to being usable.

What if you didn’t purchase the app from Apple? Just make sure that you have a way to re-download the installer from the developer, or copy the apps to an external drive for future use if needed.
5) Remember to Empty the Trash
I’ve brought this up before, but it bears repeating — remember to empty the Trash on a regular basis. The Mac’s virtual trash can is a lot like a regular trash can — you can keep dumping trash into it (as long as you have space) for as long as you want, and that trash can gets more and more full. Only when you empty the trash (right-click the Trash icon in the Dock, then select Empty Trash) does it finally get removed from your Mac. Think of this action as taking an office trash can and dumping it into a big trash can for collection.
Even better, automate the process of emptying the trash. I covered this earlier and it’s a great way to make sure that your trash can isn’t filled with a growing pile of files. The linked article on The Rocket Yard also discusses the way that Photos and iMovie keep trash for a while before actually deleting it, and how you can empty those trash receptacles as well.
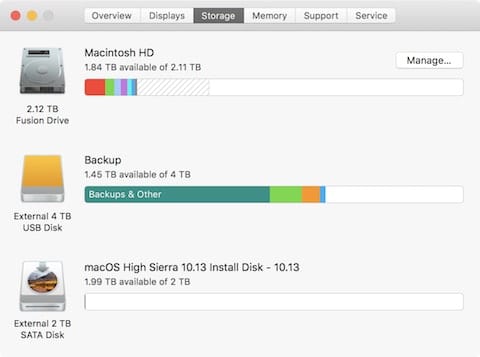
One quick and easy way to enable some of the features mentioned in this post is to go to the Apple menu and select About This Mac. On the window that appears, click Storage — which will also show you how much space is being used — and then click Manage. This tool makes it easy to store files and photos in iCloud, remove iTunes movies and TV shows that have been watched, and more (see screenshot below).

Have any other tips for freeing up disk space on a Mac? Let us know your favorite tips in the comments below.


I’ll just admit it. I hate the cloud. I have utter disdain for it. And Apple’s insistence on its usage raises one’s eyebrows.
Granted, this discussion is stale, but the topic remains relevant. I love Apple, I grew up with macs and have always preferred them to anything Microsoft. But this memory shit is almost enough to make me Benedict Arnold and switch.
They took out the ability to physically add more memory. WHY? I can’t express how much hatred I have for the cloud, and it’s the only real option, save for a bunch of external hard drives, which is the route I’ve been going.
I don’t trust the cloud, for one. It’s ultra common to hear about people casually hacking into it, and that you shouldn’t have anything important or personal on it. Plus, you have to trust that no one from team Apple will ever pilfer through anything. Sure, they have better things to do, presumably, but humans disregarding and invading privacy on any and all levels no longer surprises me anymore.
Having to be connected to the internet is a huge deterrent. Frankly, I’m often in places where there simply is no internet. Which means I’m SOL concerning using it about 50 percent of the time.
I hate how integral your AppleID is. It’s a giant pain in the ass. Every time. And it makes me feel like they’re spying or at least a bot is checking up on things. It’s hard to get behind something that has sinister undertones, even if you’re paying for it.
Speaking of which: It’s not worth the price as it isn’t permanent. Not to mention, SUBSCRIPTIONS are a no-no every single time. I refuse to subscribe to software or the like. I felt equally offended when Microsoft wants money each month just to use Word. I’d like to think these corporations are above such petty and cheap ways to make money, but what I’d like simply isn’t realistic. The ubiquitousness of many of these services and applications is basically monopolizing on the situation, and forcing people to pay each month. I’m looking at you Adobe! And all those damn PDF files.
I didn’t mean for this to be quite so verbose, so in summation, I feel mildly betrayed by a company whom I used to adore, but now after years of loyalty they change the rules on us, and we can either succumb or die, figuratively speaking. The memory issue has left a bad taste in my mouth ever since I bought my Macbook.
Personally, I am a bit paranoid about iCloud usage, especially in light of the fact that Apple can’t seem to keep my password straight. I only keep a few photos there, and it drives me crazy that I keep getting dialog boxes asking for my password, and I have to enter it 3-4 times before I can access the cloud, and a few days later I have to do this all over again. I suppose this is a bit off-subject, but it still gets under my skin.
I highly recommend a utility I use called TechTool Pro and use it to optimize (defragment) all my hard drives after deleting a lot of files and apps. This helps greatly in improving hard drive performance.
Monolingual, removes the hundreds of foreign language support files that are mostly not needed.
Dupefinder is pretty good at finding duplicate files. But be careful, some aren’t the kind of dupes that you delete.
Also, a lot of apps these days just install a whole new thing, and dont depend on or delete the old app.
Run Monolingual to clean out resources you are not using. I didn’t ask for the Russian, Hebrew, Chinese fonts et al to be installed for example. Americans only speak English like they say in the old joke.
Cleans up the font menu too with Font Book app–remove all the ones you don’t use like all UPPERCASE.
https://www.macupdate.com/app/mac/7758/monolingual
Run Grand Perspective, it shows files in a graphics window. The big boxes are big files.