The Rocket Yard recently featured a pair of posts (here and here) discussing how to use Smart Mailboxes to organize emails into custom views. But did you know that Apple Mail on Mac has a much more powerful tool built in for automation of your email workflow? Mail can evaluate Rules for incoming email and perform tasks based on what it finds in a message. Today we’re looking at Mail Rules and how they can be used in your day-to-day work.
Where Are Rules Hidden?
The Rules tool is hidden in Mail > Preferences under the Rules tab. By default, there’s usually a rule that highlights any news that is sent to you containing news from Apple (see screenshot below):
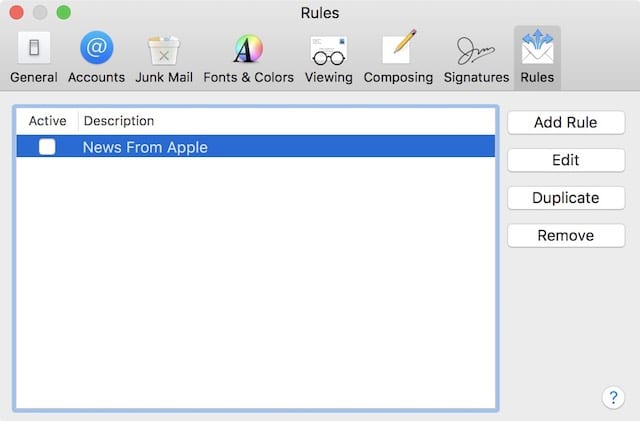
In the screenshot, I’ve highlighted the “News From Apple” rule by clicking on it, which allows me to edit, duplicate or remove the rule using the buttons to the right. To see the details of this rule Apple set up, I can click on the Edit button, which displays the long rule seen below:
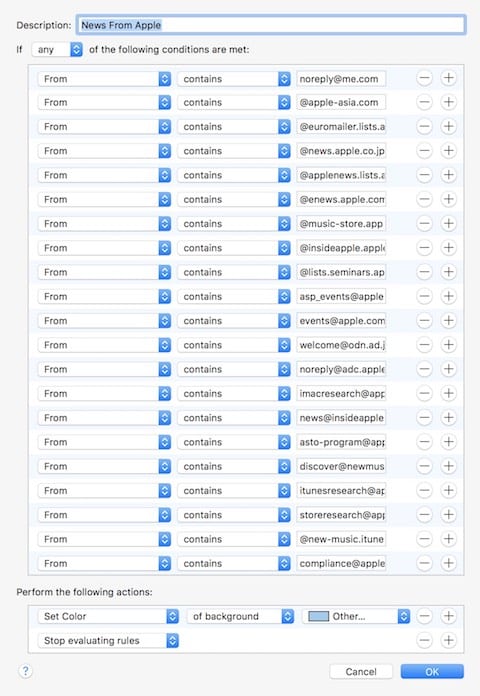
As you can see, the rule has a description (“News From Apple”), then a set of conditions which it tests each email against. In this case, if the email meets the condition that it is from one of 21 Apple email addresses, then it highlights the email in light blue.
Creating A New Rule
Creating a new rule is quite simple. As seen in the first screenshot in this article (“The Rules Tab…”), the Rules dialog contains an “Add Rule” button. Click on it, and you’ll see something similar to this:

The editor inserts a default name (“Rule 2”) and starts by suggesting a condition that the rule should test — in this case, I had an email from “newspublisher@apple.com” highlighted, so it suggested that the rule check to see if future emails came from that address. It also suggests an action if the condition is met: move it to an unspecified mailbox.
Example 1: Let Me Know When The Rocket Yard Weekly Arrives
I don’t know about you, but one of the highlights of my week is when The Rocket Yard Weekly shows up. In this example, I’m going to set up a rule to give me all sorts of notifications that it’s appeared in my mailbox.
1) In the Rule editor (see screenshot above), type the description “The Rocket Yard Weekly Is Here!” in the description field.
2) The only condition that the email has to meet is that it comes from rocketyard@macsales.com. Note that conditions can be stacked — that is, you can add more than one condition and then test whether any of those conditions or all of them have been met. Once the condition is met, it will perform the actions you specify. To set our condition, we select “From”, “contains”, and then type “rocketyard@macsales.com” in the edit field.
3) Let’s get a little ridiculous in our actions. First, when an email arrives from rocketyard@macsales.com, we want to set the color of the background of the message to red. Under “Perform the following actions”, click the default “Move Message” to see a pop-up of all of the possible actions (see screenshot below):
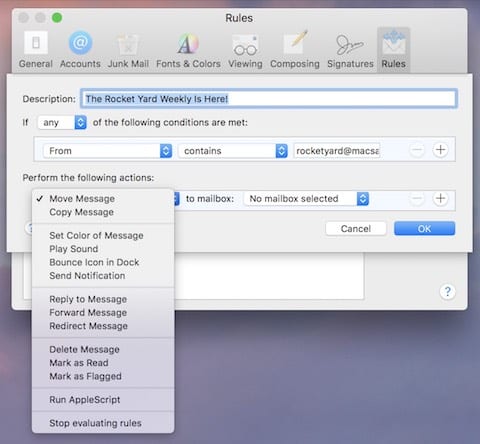
Select “Set Color of Message” from the pop-up, and you’re given a choice of setting the background color or the text color. In this example, I’ll select “of background”. Next, I have a choice of a number of colors, and I’m selecting red.
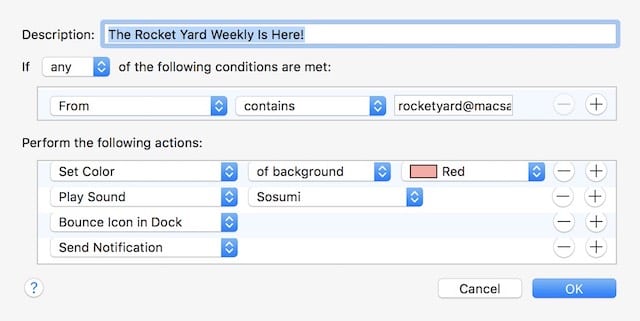
Now, I want more than one action. To add another action to my rule, I click the plus sign ( + ) icon at the far right of the action editor to add a second action. For this action, I am going to have Mail play a sound — the historically-significant “sosumi” sound. Next, let’s have the Mail icon bounce in the Dock when the rule finds a message from rocketyard@macsales.com. to do that, I add another line and select “Bounce Icon in Dock” as the action. Finally, let’s have a Notification sent to Notification Center on our Mac. To do that, add one more line, and select “Send Notification” from the actions. Our rule looks like this:
Lastly, click the OK button. The following alert appears:
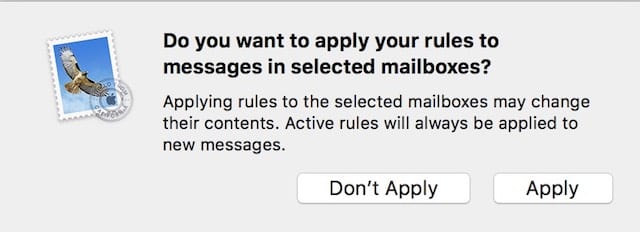
Whenever the Rocket Yard Weekly arrives in my email, I will definitely know. Note that it’s possible to turn rules on and off by checking or un-checking the “Active” checkbox at the front of the rule (see image below):

Example 2: The Junk Mail Exterminator
Our next example is one I actually use; I call it The Junk Mail Exterminator and I’ve used it to handle a series of junk emails that I keep receiving that are not caught by Mail’s usual Junk Mail filtering. In my case, I’ve asked the sender repeatedly to stop sending the emails, but they keep coming in. I’ve hit the “unsubscribe” link in the emails a few dozen times with no success. Finally, I created my own rule to make it so I don’t see those emails at all.
1) Click Add Rule.
2) In the description field, type “The Junk Mail Exterminator”.
3) The condition I’m checking for is that the message is from a certain email address.
4) If that condition is met, I want the message automatically moved to the Junk mailbox and I want Mail to play the “Basso” sound so I know it has caught another email. Here’s what the rule looks like:
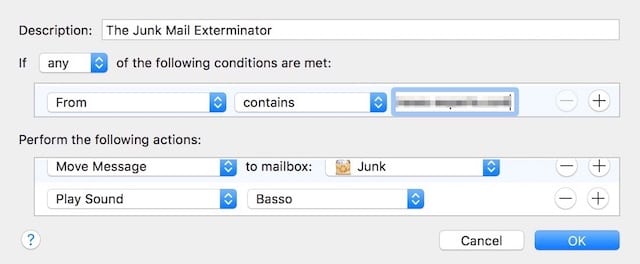
Now I never need to manually move this guy’s emails to Junk — it’s done automatically for me.
A Power Tool
One last tip about Mail Rules: there’s a very powerful action that’s available, and that’s “Run AppleScript”. AppleScript is currently the scripting language that can be used to automate actions in macOS. It may be replaced in the future by a Mac version of the powerful Workflow app for iOS, but at the present time it’s used to create scripts that can be launched automatically or run as apps.
An example of a rule that could be quite useful is one that would shut down a Mac when it received an email with a particular subject line, say “Shut It Down”. The rule would check for the subject, then use the “Run AppleScript” action to run a script that first quits all open applications without asking to save documents and then runs a “Watch Me” recorded action to select Shut Down from the Apple menu.
Do you have any favorite rules that you’ve set up for Apple Mail on Mac? Let us read about your examples in the Comments section below.




I need a way to express more complex mail rules than Mail.app seems to allow. Instead of just allowing “if any” rules apply (or) and “if all” rules apply (and), I want to be able to nest “or” and “and” rules.
For example:
if (subject contains “deleted” or subject contains “[commit]”) and from is “foo@bar.com” then move message to mailbox xyz
Is there a Mail.app plugin that allows this? Or a different mail client?
Rules are useful, but I miss being able to “Block” those annoying junk-mail senders. I believe this action used to send a message back to the sender, telling them that the email address was invalid. I would rather have them remove my address from their database than have me continually checking and deleting their spawn from my inbox. Anyone know if this is still possible within mail?
This is ridiculously complicated and wastes more time than deleting the junk mail. All it needs is a means of clicking on the message and a ‘Block Mail from this Address’ button!
MSN hotmail, before it was taken over by affirmative action and latchkey graduates, used to have a spam filter where you could set parameters and the mail would be deleted, not just moved to junk. Reduced my junk from about 20/day to maybe 1 or 2 per week. Of course that was a great functionality, so therefore it was eliminated. That is what I would like to see reinstated.
Where is my message that showed a few hours ago?
TO ADMINS:
Oops! It shows now after posting a new one. This issue has arisen also other times. I cannot see all comments until post a new one!!!
Thanks for the article. Bug how to execute a rule (or all) when there is not such a button at “Mail – Preferences – Rules” and when “Message – Apply Rules” does nothing?
I LOVE rules. It’s the only way I can keep order in my mboxes. I segregate incoming mail by type (Vendors, Political, Health, etc.), and separate important recurring email notifications from computers (such as the ProControl in my local water system) into their own mboxes so I can quickly gauge whether trouble is brewing.