![]() When you find yourself performing the same task over and over on your Mac, you may wish some developer somewhere would code up a nice little app to make your job a bit easier.
When you find yourself performing the same task over and over on your Mac, you may wish some developer somewhere would code up a nice little app to make your job a bit easier.
There’s no reason to wait for an app when you can make use of one or more of the many Mac automation tools that are already available. Your Mac comes equipped with AppleScript, Automator, and Terminal, all of which can be used to create your own custom tools to make repetitive tasks easier.
AppleScript and Terminal require a bit of coding to create an app or script, but Automator uses a graphical interface to allow you to create custom apps without having to learn a complex programming language. So, we’re going to start our look at how to automate tasks on the Mac with Automator.
By the way, if you’d like to explore how Terminal can be used to create scripts, the Rocket Yard has a two-part introduction to the Mac’s Terminal app that you can check out.
Using Automator
Automator has a simple drag-and-drop interface you can use to build simple to complex workflows that can automate those repetitive tasks that just take time away from other things. Workflows are made up of individual tasks that you drag into place in the workflow. You can then tweak each task in the workflow to meet your specific needs. Once it’s ready, the workflow can be used much like an app, service, or folder action.
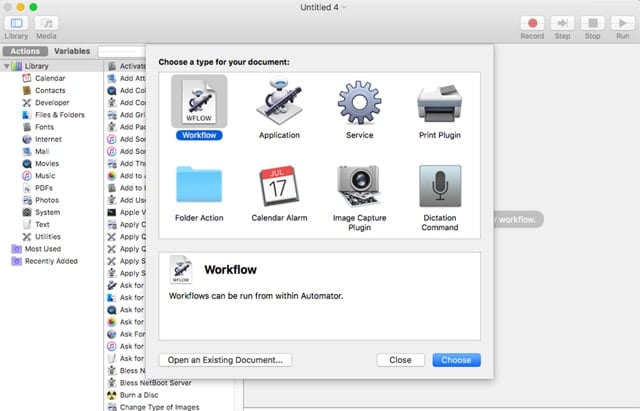
Automator Apps, Services, and Folder Actions
Automator supports creating the following types of workflows:
Workflows: These are a series of actions that you run from within Automator. Automator must be running for the workflow to work.
Applications: These are self-running workflows. They don’t need Automator to be active in order to work.
Services: Services allows you to build workflows that are tied to contextual menus that may appear within another app’s service menu.
Printer Plugin: Allows you to create workflows that appear in the Print dialog box.
Folder Actions: This is a workflow that you attach to a folder. When an item is added to the folder, it triggers the attached workflow to run.
Calendar Alarms: These workflows are triggered by events in the Calendar app.
Image Capture Plugin: These workflows are available from within the Image Capture app.
Dictation Commands: You can create workflows that are triggered by specific dictation commands.
We’re going to use Automator to create two different types of workflows. The first is a service that will allow you to select any word or phrase you come across and look up its meaning in Wikipedia. We’ll also show you how to modify this service, so you can use other sites to perform the lookup instead.
In our second example, we’ll create an application to batch resize images automatically. You could also use this workflow as a Folder Action, if that’s a better fit for your needs.
Automator Basics
Launch Automator, located at /Applications.
An Open dialog box will appear. Click the New Document button.
If you’ve used Automator before, and it opens to an existing workflow, select New from the File menu.
A sheet will open displaying the type of workflows you can create. Since the first workflow we’ll build is a service, select the Service item, and then click the Choose button.
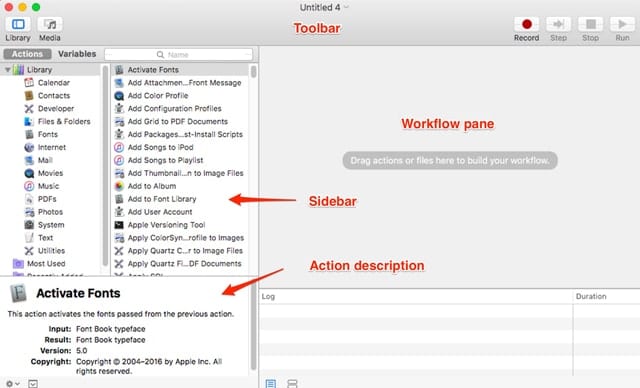
You’re now looking at the basic Automator interface. It consists of a toolbar on top, a sidebar that contains all of the Actions and Variables that you can use, a summary box just below the sidebar that briefly describes the item selected in the sidebar, and finally, the main workflow pane, where you’ll build your workflow by dragging items from the sidebar.
The sidebar can contain either Actions or Variables, depending on which item is selected in the toolbar just above the sidebar. Actions are a single step that Automator can perform, such as Open Finder Item, Search Spotlight, or Speak Text. Variables are holders of information such as Current Day, Today’s Date, Computer Name, or Operating System Version.
Lookup Service
If you haven’t already done so, launch Automator and select Services as the format for your new workflow.
Since you selected Services, AppleScript automatically prepended an action at the very beginning, which states that the service receives selected text in any application. This allows you to highlight any text in any application, and have the text sent to the next action in the workflow.
Make sure Actions is selected at the top of the sidebar.
Select Utilities in the first sidebar column. The first column is used as a filter for what appears in the second column. You can also select Library in the first column, and all possible actions will appear in the second column.
In the second column, locate the item named Run AppleScript.
Drag the Run AppleScript item to the workflow pane.
Although we said that you don’t need to write any code to create Automator workflows, we’re going to add a smidgen of code, just to show you how versatile Automator is.
In the Run AppleScript action that appears in the workflow pane, replace the lines labeled:
on run {input, parameters}
(* Your script goes here *)
return input
end run
with:
on run {input, parameters}
return “http:/www.wikipedia.org/wiki/” & (input as string)
end run
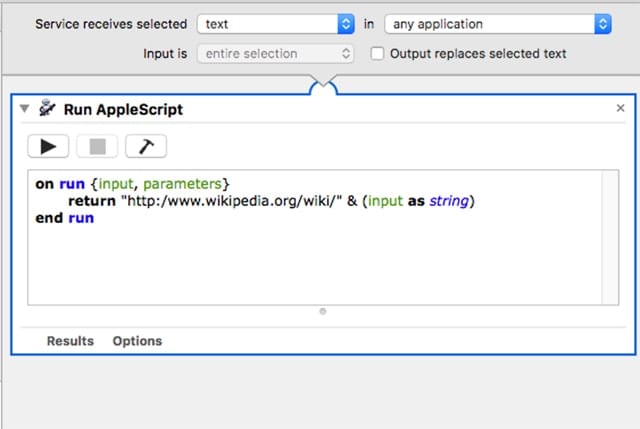
So far, we have a service that will grab the text you highlight in any application and send it off to Wikipedia to be looked up. The results of that lookup will be passed to the next action we attach.
In the sidebar, select Internet in the first column.
In the second column, locate the item labeled Website Popup.
Drag the Website Popup item to the Workflow pane; be sure to position the item just below the Run AppleScript item.
Automator will show the two actions as connected, with a chevron from the Run AppleScript action pointing to the Website Popup item.
The Website Popup item will display the results of the Wikipedia search in a scrollable popup window. You can set the size of the popup window, its position on your display, the user agent (the browser type that is used to query the Wikipedia site), and the Output.
For this example, set the options as follows; you can go back and experiment with them later:
- Site Size: Medium
- User Agent: Safari
- Output: Selected Text
- Position: Centered
All that’s left is to test the workflow. Unfortunately, Services takes input from outside of Automator, so we must add an action at the beginning to provide text to the service.
Select Text from the sidebar’s first column.
Locate Get Specific Text and drag the item in front of the Run AppleScript action in the workflow pane. When the green plus sign appears, you can drop the Get Specific Text.
In the Get Specific Text item, enter the text you would like to have looked up on Wikipedia. In this example, let’s look up Automator.
In the top right-hand corner of Automator’s toolbar, press the Run button.
The workflow you created will be run and a popup window should open with information about Automator from the Wikipedia website. Just below the popup window will be OK and Cancel buttons. Click the OK button when you’re done.
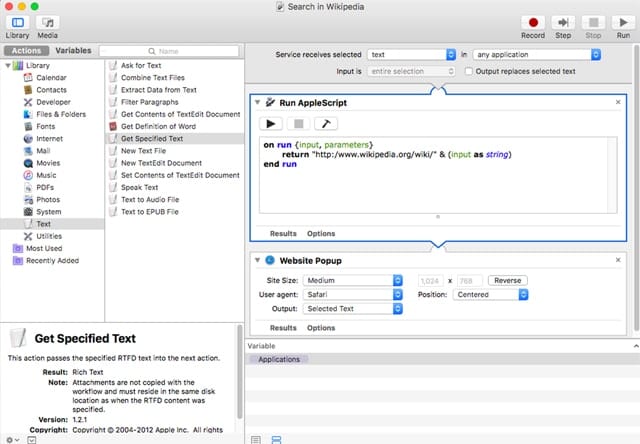
With the test complete, you can remove the Get Specific Text action from the workflow by clicking the close (X) button in the top right corner of the action.
The last step is to save the service so you can use it on your Mac.
Select File, Save, and then enter a name for the service. The name will appear as the menu name in any app’s Service menu. Keep the name short but descriptive. For our example, we suggest “Search in Wikipedia” with no quotes.
Other Lookup Services
By just changing the entry in the Run AppleScript action, you can change the site used to look up information. Here are three additional sites, along with the change to the Run AppleScript action needed.
Bing
on run {input, parameters}
return “https://www.bing.com/search?q=” & (input as string)
end run
DuckDuckGo
on run {input, parameters}
return “https://duckduckgo.com/?q=” & (input as string)
end run
Wolframalpha
on run {input, parameters}
return “https://www.wolframalpha.com/input/?i=” & (input as string)
end run
Resize Images
Our second example will be creating an application to resize images.
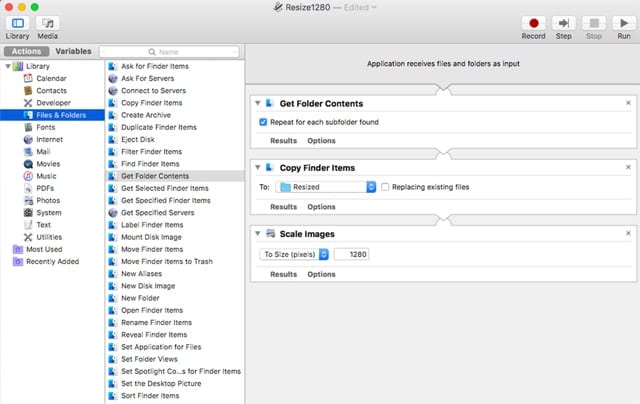
Launch Automator, select New from the File menu, and then select Application as the type of workflow to create. Click the Choose button.
In the sidebar, select Files & Folders in the first column, and drag Get Folder Contents from the second column to the workflow pane.
In the Get Folder Contents, place a checkmark in the “Repeat for each subfolder found” option.
In the sidebar, select Files & Folders, and then drag Copy Finder Items to the workflow pane.
In the Copy Finder Items action, use the dropdown menu to select Other, then either navigate to a folder you wish to use to store the images that will be resized, or click the New Folder button to create a new location to store the results of the workflow.
In the Sidebar, select Photos from the first column, and then from the second column, drag Scale Images to the workflow pane.
In the Scale Images action, use the dropdown menu to choose to either scale By Percentage or To Size (pixels). In the field, enter either the percentage to scale by, or the number of pixels wide the photo should be scaled to.
From the File Menu, select Save. Give the workflow a descriptive name. You may want to include the size or percentage the app will adjust an image to, such as Resize 1280, or Resize 70p. Be sure to choose a good location to save this workflow to. I put mine on the Desktop, where I can drag any image or folder of images onto the app to have them automatically resized.
You can create multiple versions of this workflow, each for different sizes to resize the images to.
Doing More With Automator
Automator can do a lot more than what we showed you here; it can build very complex workflow apps that can simplify your work processes. Take some time to go through the various Automator actions; remember, the description of each action appears below the sidebar.
You can also use Automator’s ability to record what you’re doing to build a workflow skeleton that you can tweak to meet your needs. Simply open Automator, select New from the File menu, then select Application as the type of workflow to create, and click the Choose button. Next, click the Record button in the top right corner, and then perform the task you wish to automate. Automator will try to create a duplicate of your workflow for you.
Recorded Automator tasks tend to need a lot of work to get them running without a hitch, but they’re a good starting point for creating your own workflows.



Automator workflows I’ve painstakingly created to actually be useful almost always break after a single os upgrade, if I’m lucky they break after two upgrades.
With one exception, there was never an identifiable (by me) change that would cause this to happen in Automator or the underlying OS. Like moving from 10.7 to 10.8. Were there really so many tweaks underneath that more than half my workflows broke?
I understand terminal/Unix scripts can stop working if a program is deleted, that’s clear and testable immediately. But Automator is apples builtin GUI program to make this happen quickly and easily so I wonder why they don’t care to alias deprecated hidden structures it uses. Too busy with iOS? It would also be nice if there were useful error codes in this situation. I’ve also had similar issues with Apple scripts and folder actions and the best you do is recreate them, or spend nearly the same amount of time debugging. Again, there’s no useful info on why this happens, what the changes are, and how to quickly fix them for all these supposedly helpful and time saving tools.
I have simply stopped making them because of this…
I use both Keyboard Maestro and Typinator actually for their specialty’s. But an integrated AND functional solution has greater potential for smoothness of execution IMO. It’s like OE vs Aftermarket. Too bad Apple killed konfabulator / Dashboard. At least they update grapher every decade and still have stickies.
I have tried a number of times to create Automator workflows. I did create one like yours which worked. But longer ones don’t seem to work and I think I am missing something that I don’t understand. There’s very little on the Internet for help. I am trying to copy a couple of workflows from a tutorial on Ray Wunderlich site and couldn’t get that to work. If you could get someone to write a really good tutorial on Automator that will be a blessing.
I’ve never been able to find or make an automator workflow that was useful for my Mac life. Automator seems to almost exclusively work with and between Apple-created software apps, so it has very limited usefulness in my world, where I use a lot of non-Apple applications. I would recommend Keyboard Maestro as the best automation tool for those interested in improving productivity.
Thanks for tu hints.