![]() This is the first in a series of articles that will explore the Mac’s built-in accessibility features that are designed to make using a Mac as easy as possible for everyone. Is the mouse cursor a bit too small? You can change the cursor size within the Accessibility preference pane. Is a standard keyboard difficult or nearly impossible to use? Once again, within the Accessibility set of features you can modify how a standard keyboard works, or create an onscreen keyboard you can control with head or eye tracking technology.
This is the first in a series of articles that will explore the Mac’s built-in accessibility features that are designed to make using a Mac as easy as possible for everyone. Is the mouse cursor a bit too small? You can change the cursor size within the Accessibility preference pane. Is a standard keyboard difficult or nearly impossible to use? Once again, within the Accessibility set of features you can modify how a standard keyboard works, or create an onscreen keyboard you can control with head or eye tracking technology.
The range of capabilities in the Accessibility preference pane is so large that one article wouldn’t do them justice. So, let’s get started with a quick overview and a look at some of the more general settings and capabilities.
Accessibility Overview
The Accessibility API became an official part of the Mac with the release of OS X 10.2 (Jaguar), though it was known then as Universal Access. The name change to Accessibility didn’t occur until the release of OS X 10.8 (Mountain Lion). While the initial release lacked many standard features that are taken for granted today, it did include tools for those with partial vision loss, though in its original offering it lacked an important tool for those with visual impairment: a full-screen reader.
With each release of OS X, and later, macOS, the accessibility features grew and were refined to bring equal access to the Mac to all users.
As we delve into the Accessibility options it’s important to point out that not every feature we mention is available in all versions of the Mac operating system. Apple moved the location of some features around within the Accessibility preference pane from time to time. Where possible, I’ll attempt to mention if a feature has been moved, and where it used to be located. I’ll also concentrate on the versions of the Accessibility preference pane starting at OS X Mountain Lion and going forward, with emphasis on the version included with macOS High Sierra. The earlier versions, known as Universal Access, have many of the same features, but the user interface is different enough to make including the older versions cumbersome at best. If I miss any changes, be sure to leave a comment below, letting us know.
The Accessibility options are currently organized into five categories:
General: This category was added with macOS Sierra. The general pane is primarily used to select which Accessibility options will be available in the Accessibility Options Shortcut panel.
Vision: This category was originally called Seeing, but it underwent a name change in OS X Yosemite. This group includes Accessibility options useful for anyone with vision-related impairments.
Media: The Media category was added in OS X Yosemite. It allows the use of subtitles and spoken descriptions in media that supports the feature.
Hearing: Basic audio controls involving alerts and converting all stereo sound to mono.
Interacting: This is the largest accessibility category and covers all the user interface elements used to interact with the Mac, including keyboard, mouse or trackpad, Siri, Dictation, and Switch Control.

Accessing the Accessibility General Category
All of the Accessibility options are accessed through the Accessibility preference pane. To bring up the pane, do the following:
Launch System Preferences by clicking on its Dock icon, or selecting System Preferences from the Apple menu.
Select the Accessibility preference pane.
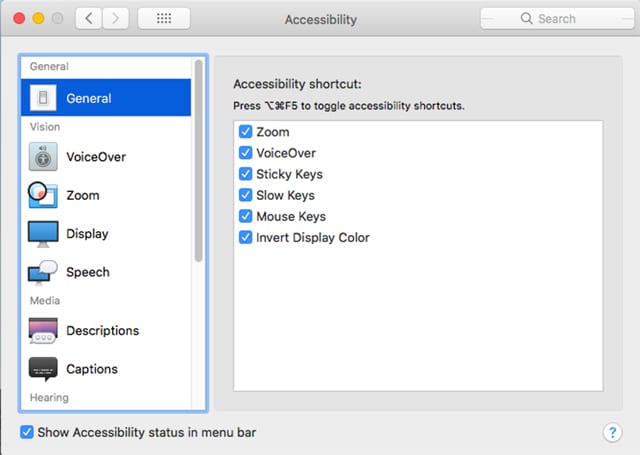
The Accessibility preference pane will open, displaying a sidebar on the left-hand side that contains a list of all of the Accessibility options, organized by category. On the right is the configuration pane, which allows you to control how each of the accessibility options is used.
In the sidebar, select the General item. The General category was added in macOS Sierra to support a new feature: the Accessibility Shortcut panel. You may need to scroll to find the item. If you’re using an earlier version of the OS, you can skip down to the Accessibility Status section, below.
In the configuration pane, you’ll see a list of accessibility services that will be shown in the Accessibility shortcut pane when it’s displayed. You can select which items you wish to have shown by placing a checkmark in the corresponding box.
Note: Placing a checkmark in the box doesn’t enable the feature; it only allows it to appear in the Accessibility Shortcut panel.
Using the Accessibility Shortcut Panel
To bring up the Accessibility Shortcut panel, press the following keys on your keyboard in unison:
Option, Command, F5
On keyboards whose function keys perform multiple duties, you may need to press a key labeled Fn in addition to the above keys in order for the keyboard shortcut to work. If there’s no Fn key, and the shortcut doesn’t work, look for a key labeled F lock. Press the F lock key once to enable the function keys, and then perform the keyboard shortcut shown above.
You can also triple-press a Mac’s Touch ID (power button), if so equipped.
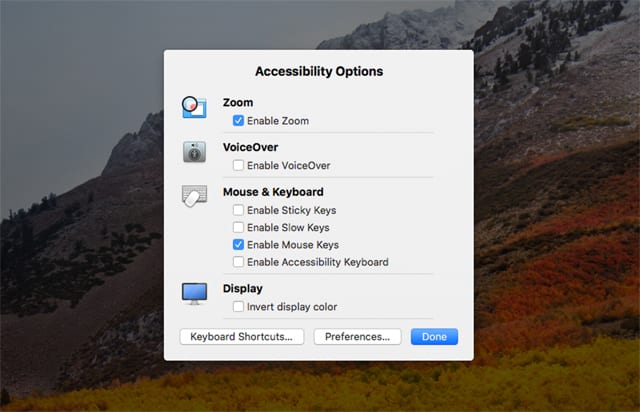
The Accessibility Shortcut panel will be displayed. Place a checkmark on any accessibility option you wish to enable.
When you have made your selections, click the Done button.

The Accessibility Shortcut panel provides a quick way to enable a function that you may need only occasionally, such as Mouse Keys, which enable the keyboard number pad to be used to control the mouse pointer.
You can also turn the items displayed in the Accessibility Shortcut panel on or off using the Accessibility preference pane and the appropriate category item.
Accessibility Shortcut panel tip: If only one option is selected in the General category, the Accessibility Shortcut panel will not be displayed. Using Option, Command, F5, or pressing the Touch ID bar (power button) three times will toggle the option on or off.
Accessibility Status
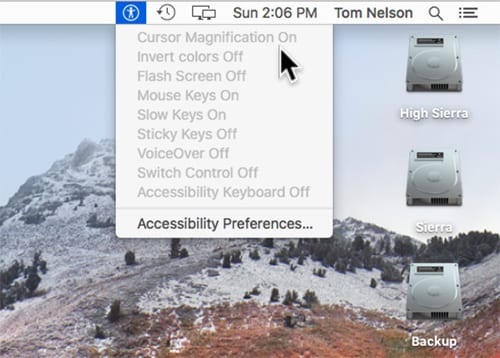
The last item we will examine in this first installment is Accessibility Status, the ability to know at a glance which Accessibility features are enabled or disabled.

Reopen the Accessibility preference pane, if you closed it.
At the bottom of the preference pane, place a checkmark in the Show Accessibility Status in Menu Bar item.
You can now see the status of various Accessibility options with just a click on the menu bar.
Coming Up Next
In the next installment of our guide to the Mac’s Accessibility features, we’ll look at the Vision category, and explore using VoiceOver, as well as other vision category options.


Thanks. This is helpful.
Thanks for these articles! I can now find my mouse as you showed me how to make it larger.