![]() The Mac’s Disk Utility app supports a number of capabilities that make managing the Mac’s storage system easier. But one set of features seems to get overlooked a bit: the creation and management of encrypted disk images.
The Mac’s Disk Utility app supports a number of capabilities that make managing the Mac’s storage system easier. But one set of features seems to get overlooked a bit: the creation and management of encrypted disk images.
Disk images have many benefits; they can be used to distribute apps and data to users, for creating master image files for various media types, such as CDs and DVDs, and for creating archives and backups, as well as quite a few additional creative uses.
Encrypted disk images allow you to protect the content of the images from prying eyes. Encrypted disk images can’t be mounted, viewed, or accessed unless you know the password associated with the image file.
In this Rocket Yard Guide, we’re going to look at how to create encrypted disk images. We’ll start with an overview of the basics of disk images and encryption, and then show you how to actually create various types of disk images.
Encryption Type
Disk images support two types of encryption: 128-bit AES (Advanced Encryption Standard) and 256-bit AES. The two levels of encryption refer to the size of the keys used in the encryption/decryption process. The 256-bit encryption is considered more secure than the 128-bit encryption, but the 256-bit encryption also takes longer to encrypt and decrypt. The 128-bit encryption will likely meet the needs of most people, while the 256-bit encryption is a better choice for data that needs a higher level of protection.
Mounting an Encrypted Disk Image
Before you can make use of a disk image, it needs to be mounted, so your Mac can work with the data within it. Mounting an encrypted disk image isn’t much different than mounting a normal disk image; simply double-click the disk image file, or right-click (control-click) the disk image file, and select Open from the popup menu.
Before the image is mounted, your Mac will display a window that asks you to provide the password to grant access to the information stored within. Enter the password, and click the OK button.
You can also automate the task of providing the password by selecting the option to “Remember password in my keychain.” When this option is selected, either during the encrypted image file creation (OS X Yosemite and earlier), or when you’re asked for the password when mounting the image (all versions of the Mac OS), the password will be stored within your keychain and used automatically the next time you mount the image file.
Unmounting an Encrypted Disk Image
Unmounting an encrypted disk image returns the image file to an encrypted state, preventing access to the data stored within. You can unmount the image by dragging the mounted image (not the image file) to the trash, or right-clicking on the mounted image and selecting Eject from the popup menu.
Image Formats
Disk Utility supports creating a number of disk image formats that can be used for various projects. Not all of the following formats are available in every version of Disk Utility, or with every method of creating a disk image.
Read only: Allows the content of the mounted image to be viewed, and any files it contains to be opened and read. Additions to the image or changes to any of the files are not allowed. The read only option is only available when creating an image from a folder or drive, or when converting from one image format to another.
Compressed: Similar to the read only option, but any free space within the image is first removed to reduce the size of the image file. The compressed option is only available when creating an image from a folder or drive, or when converting from one image format to another.
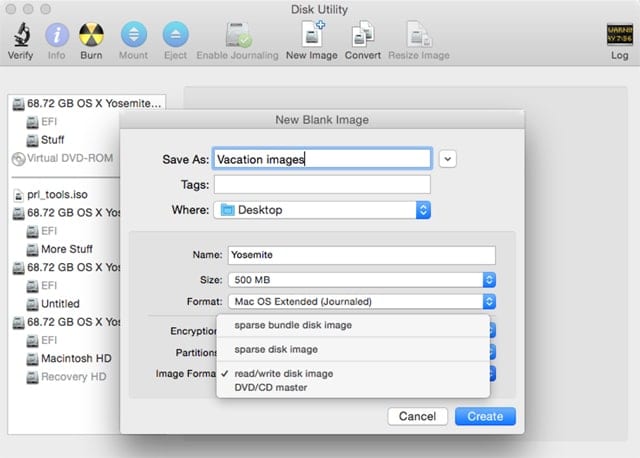
Sparse image: This type of image format allows the image size to grow and shrink, to accommodate the amount of data stored in the image. The maximum size the image can grow to is set during the image creation process. Sparse image files have the file extension: .sparseimage
Sparse Bundle disk image: This type of disk image is made up of multiple small files, usually 1 MB, 2 MB, 4 MB, or 8 MB in size. When data stored on this type of image is changed, only the file(s) that contains the changed data needs to be changed, created, or deleted. Just like the sparse image format, a sparse bundle disk image has a flexible size that grows or shrinks to accommodate the data within. The sparse bundle disk image is used extensively with Time Machine. Sparse bundle image files have the file extension: .sparsebundle
Read/Write disk image: This image format allows you to add files to the image after it is created. The size of the image file is predefined, and can’t be expanded or reduced once created. Read/Write image files have the file extension: .dmg
DVD/CD master: This image type is used for mastering CDs or DVDs. If you’re using OS X El Capitan or later, when this format is selected, the image size field will change to a dropdown menu with 177 MB (CD 8 cm) selected. You can use the dropdown size menu to select any of the standard DVD/CD sizes. If you’re using OS X Yosemite or earlier, you must manually change the size field to one of the standard DVD/CD sizes. DVD/CD images have the file extension: .cdr
Hybrid image (HFS+/ISO/UDF): This image format is used for creating a single image whose files can be used on multiple platforms.
Note: The two sparse image formats have a maximum size that you set during creation. This is the size the image file will appear to have when mounted on your desktop. The actual image file (the .sparsebundle or .sparseimage file) will only use the amount of space needed to hold the data within.
Create a Blank Encrypted Disk Image
Launch Disk Utility, located at /Applications/Utilities.
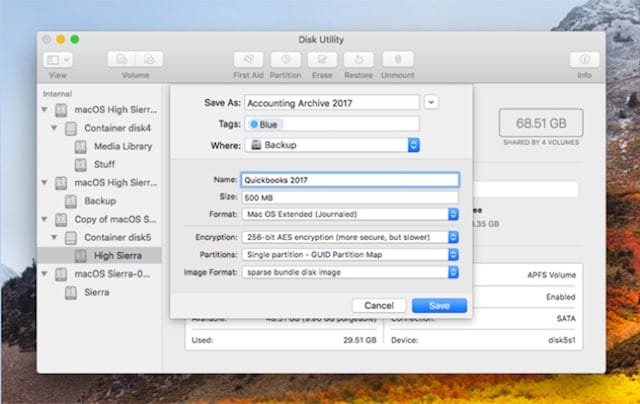
If you’re using OS X Yosemite or earlier, select File, New, Blank Disk Image. You can also select New Image from the Disk Utility toolbar. If you’re using OS X El Capitan or later, select File, New Image, Blank Image.
A New Blank Image window will open, with various fields and menus to allow you to customize the disk image you will create. Fill in the information needed:
Save As: Enter the file name for the image. Do not include any file extension; Disk Utility will add the correct extension during the creation.
Tags: Enter any Finder tags for the image file. This option is only available with OS X Mavericks or later.
Where: Use the dropdown menu to select a location for the file. You can also use the chevron next to the Save As: field to use a standard Save As dialog box to select a location. OS X El Capitan and later uses the standard Save As dialog box, though you can use the dropdown menu method by clicking the chevron icon.
Name: This is the name of the disk image when it is mounted.
Size: Use the dropdown menu to select a size for the image. The dropdown menu is prepopulated with sizes commonly used. You can also select the Custom option in the menu and enter any size you wish. OS X El Capitan and later uses a Size field that allows you to enter the size you wish to use in MB or GB.
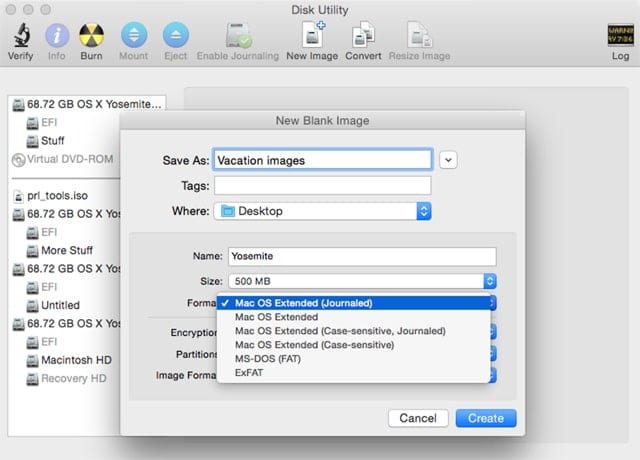
Format: Use the dropdown menu to select one of the standard drive formats to use for the disk image. If you plan to use this image with PCs, select either MS-DOS (FAT) or ExFAT. If you’re only going to use this encrypted image with a Mac, Mac OS Extended (Journaled) is a good choice. This format applies to the image file and not the mounted image. macOS High Sierra and later add the APFS format to the selection.
Encryption: Use the dropdown menu to select None, 128-bit AES, or 256-bit AES encryption. In OS X El Capitan and later, you’ll be asked to create and verify a password once you select an encryption type.
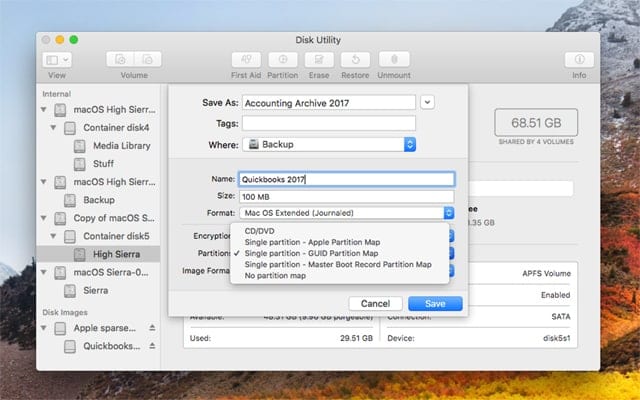
Partition Map: The dropdown menu allows you to select from:
- Hard Disk: Not available in OS X El Capitan and later.
- CD/DVD: Generic CD/DVD format used in OS X El Capitan and later.
- No partition map: Used with Macs running OS 9 and earlier.
- Single partition – Apple Partition Map: Used with PowerPC Macs.
- Single partition – Master Boot Record Partition Map: Used with PCs.
- Single partition GUID Partition Map: Used with Intel Macs.
- Single Partition CD/DVD: Used for CD/DVD images used on a Mac. Not available in OS X El Capitan and later.
- Single Partition CD/DVD with ISO data: Used for hybrid CD/DVDs. Not available in OS X El Capitan and later.
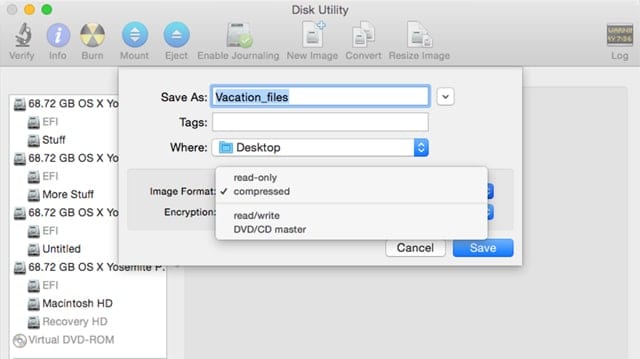
Image Format: Use the dropdown menu to select
- sparse bundle disk image
- sparse disk image
- read/write disk image
- DVD/CD master
Make your selections, then click the Create button (OS X Yosemite and earlier), or the Save button (OS X El Capitan or later).
In OS X Yosemite and earlier, the password entry window will be displayed:
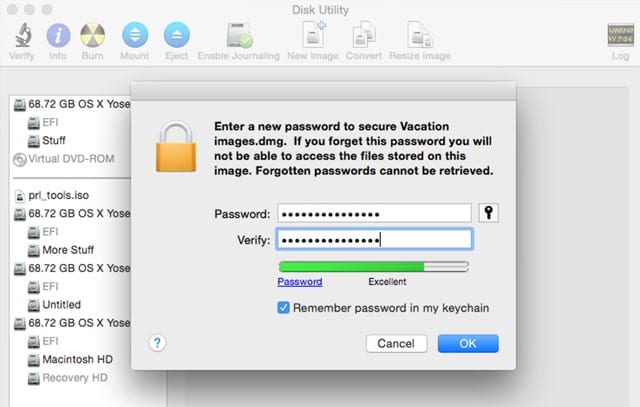
- Password: Enter a password to use for this image.
- Key icon next to Password field can be used to open the Password Assistant, which can be used to generate a password based on your choices.
- Verify: Re-enter the password.
- Password Strength: A bar graph displays how good the password is, based on length and types of characters used.
- Keychain can remember your password for the disk image. Place a checkmark in the box labeled Remember password in keychain.
- Once you’ve entered and verified a password, click the OK button.
Disk Utility will create the disk image and mount it on the desktop.
Create a New Image from a Folder
Disk Utility also allows you to create a new image that will contain the contents of a folder you select. This allows you to bypass the process of adding files to an image manually after the image is created. It also allows you to create read only images that can’t be changed (at least, not easily).
The process is nearly identical to the one used for creating a new blank image. The differences are outlined here:
- If you’re using OS X Yosemite or earlier, select File, New, Disk Image from Folder.
- If you’re using OS X El Capitan or later, select File, New Image, Image from Folder.
A window will open, allowing you to browse to and select a folder to use for the new image. Once you’ve selected a folder, click the Image button (OS X Yosemite and earlier), or the Choose button (OS X El Capitan or later).
The New Image from Folder window will open; it’s very similar to the one used for selecting options for creating a blank image. The difference is in the Image Formats you can use:
- Read-only
- Compressed
- Read/write
- DVD/CD master
- Hybrid image (HFS+/ISO/UDF)
Make your selection and click the Create button (OS X Yosemite and earlier), or the Save button (OS X El Capitan or later).
Convert Disk Image
You may find that once you’ve created and used a disk image for a while, the format or encryption options you selected need to be changed. Disk Utility can convert an existing disk image to the following formats:
- Read only
- Compressed
- Read/write
- DVD/CD master
Encryption can be changed to None, 128-bit AES, or 256-bit AES.
To convert a disk image, first make sure the image is unmounted, then launch Disk Utility and select Images, Convert.
In the Convert window that opens, browse to the location of the image file you wish to convert, select the image, and then click the Convert button.
The Convert dialog box is, in many aspects, just a mini version of the image creation window. Provide a name for the converted image file, a location to store the file, and then use the Image Format dropdown menus to select a format to change to, and the Encryption dropdown menu to select an encryption type to use. When you ‘re ready, click the Save button.
How do you use disk images? Let us know using the Comments section, below.




How secure is it when you edit a file on the mounted drive that is intended to be secure? Can a key logger or other malware see the clear text of that file?
There seems to be a window of time during which the malware can see what is in the editing application’s memory buffer or just see keystrokes.
This is a non-starter if you want to encrypt a crypto seed phrase.
I have a very large (100GB+) encrypted sparse bundle disk image. The disk image file itself (i.e. the “mydiskimage.sparsebundle” file) is included in my Time Machine backups but if I want to restore a single file/folder in the disk image using Time Machine, I need to restore the entire .sparsebundle file, taking a guess as to when the last good copy of the file was saved, then mount it and retrieve the file. Are there any other options for keeping “time machine like” backups of a disk image at the file/folder level?
Burning password-protected DVDs routinely is as easy as doing the same for usb flash drives but going full 256 probably will be an overnight task. Valuable feature of today’s OSX.
I want to create a password-protected folder on my new iMac (Mojave). I’ve tried creating the sparse disk image recommended on several websites, and even varying some parameters (image format, size, etc) I always get an error message saying I don’t have permission to do this.
Has anyone seen this problem and is there a fix?
Have tried using Disk Utility’s New Image from Folder? This will give you the options to include encryption for the folder.
You can find the option in Disk Utility under the File menu, New Image, Image from Folder.
Tom
Thx. Excellent
Any way to access a disk image from a PC? I share lots of disks between systems. It would be great to be able to access a disk image remotely.
How do you shrink a Sparse Disk Image?
How do you change the password of an encrypted sparse disk image?
Thanks.
Nice write up on a needed topic.
High Sierra 10.13.4 does have a nasty bug that can cause hidden data loss if one is copying a large number of folders and files onto a sparse image. I’ve only seen this when gigabytes are being copied during a Finder drag/drop operation. The files will APPEAR to copy, but the destination will get partial files rather than the entire files. The partial copying may not be apparent until one unmounts and remounts the image.
The underlying bug is that the image sometimes does not grow in size fast enough to accommodate a large file copy operation. Finder doesn’t notice and keeps on “working.” This happens well under the disc image approaching its maximum growable size. It’s simply not grown fast enough to keep up with a big Finder copy.
It may take several copy attempts before the image grows large enough to successfully receive an entire large copy attempt. Three copy attempts in a row seem sufficient (just keep telling Finder to replace all)
Fortunately, this bug does not seem to happen with smaller files or folders being dragged. It’s only with really big bunches of data (which of course is way worse time to have invisible data loss)
Apparently this bug affects sparse disk images with the new APFS file system only but not the old Mac HFS file system. So I don’t recommend using the new file system on Sparse Images until the big is fixed. The author of Carbon Copy Cloner won’t support sparse disk images as a result of the big until Apple fixes it. So I would keep an eye on his blog to see when it becomes fixed.