![]() You may not have heard of rsync; it’s a file transfer and synchronization program that’s often used to create elaborate and complex backup systems.
You may not have heard of rsync; it’s a file transfer and synchronization program that’s often used to create elaborate and complex backup systems.
Written for Unix operating systems, rsync is included with the Mac and can be accessed directly from Terminal, or used within a number of scripting languages.
The rsync program has a number of features that make it a good candidate for building local, as well as remote, backup, archiving, and synchronization systems. It can also be used for basic file copying, and for maintaining file synchronization between one or more folders, either locally or with a remote system (think cloud-based storage, as an example).
In this Rocket Yard Guide, we’re going to concentrate on using rsync locally. If you wish to use rsync with a remote system, you’ll need to ensure that both the local system and the remote system have rsync installed.
If you’re looking for a copy of rsync to install on a system other than a Mac, or you’re just interested in discovering more about this versatile app, you can check out the rsync website.
Before we get into details about using rsync on the Mac, a note about versions. The version of rsync that’s distributed with the Mac tends to lag behind the current version available on the rsync website. The Mac version has been at 2.6.9 for a number of years, while the current version is at 3.1.3 (as of January, 2018). You should have no problems using the older Mac version with remote platforms that have one of the newer versions installed, but going the other direction could have unexpected results. Always check version compatibility when using rsync with remote systems.
Using Rsync
The Terminal app is used to invoke rsync and its various commands. If you’re new to using the Terminal app, check out the Rocket Yard series Tech 101: Introduction to the Mac’s Terminal App.
Rsync uses a simple structure for issuing commands:
rsync -options theSourceDirectory theDestinationDirectory
While the number of options can get long, the format is always the same; the rsync command followed by any optional switches, then the source directory followed by the destination directory.

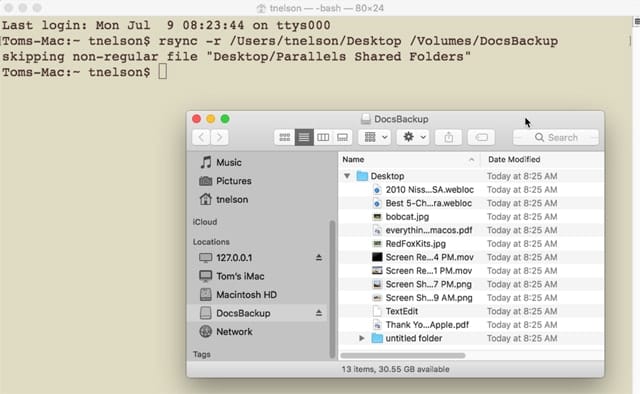
Let’s look at a basic rsync command that will copy a directory and all sub-directories it may contain. To tell rsync we want all the files and folders, including everything in subdirectories, we include the -r option. In the Terminal app, enter:
rsync -r /Users/tnelson/Desktop /Volumes/DocsBackup
(Replace tnelson with your user name, and DocsBackup with your desired target for the copy.)
In this example, my messy Desktop folderand its contents will be copied to a USB flash drivenamed DocsBackup. After the command is executed by hitting the return or enter key, the DocsBackup flash drive will have a new folder named Desktop, with all of my Desktop content.
If you want to copy only the contents of the Desktop, and not the parent folder named Desktop, you would add a forward slash after the directory named Desktop, like this:
rsync -r /Users/tnelson/Desktop/ /Volumes/DocsBackup
Terminal Tip:Terminal will figure out the directory pathnames for you. Enter the rsync command and any options at the Terminal prompt, followed by a space, then drag the source directory from a Finder window onto the Terminal window. The source directory pathname will be entered for you. Next, enter a space in Terminal to separate the source and destination directories, then drag the destination directory from a Finder window onto the Terminal window, and the destination pathname will be entered.

Time Stamps
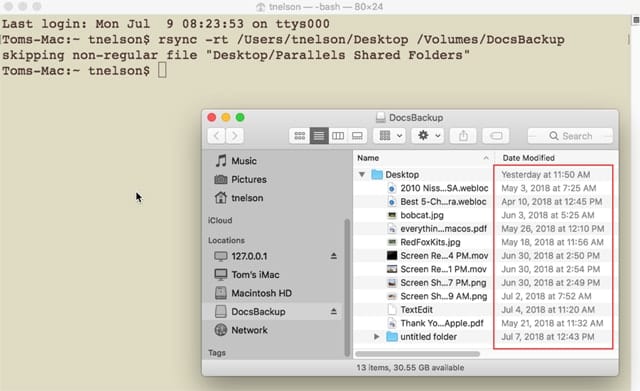
When you copy files and folders to the destination directory, rsync uses the current time and date as the time stamp for the copied files. You can see this by opening a Finder window on the destination, and setting the Finder’s View to List mode. The creation and modification dates for the files will be set to the current time.
This is the default behavior for the rsync program, and having the files reset to the current time can be advantageous in some uses. But if you want to retain the original creation and modification data, you can, through the use of the -t option:
rsync -r -t /Users/tnelson/Desktop /Volumes/DocsBackup
In the above example, we’ve used both the -r and -t options to recursively copy all subdirectories as well as preserve the original time stamps.

rsync Tip:When using multiple option switches, you don’t have to use the dash symbol before each one. Instead, use a single dash, and place the options together. In the above example, rsync -r -t would become rsync -rt
Archive
Another commonly used rsync option is -a. This switch puts rsync into archive mode, which preserves time stamps, performs a recursive copy, keeps all file and directory permissions, preserves owner and group information, and copies any symbolic links.
Archive mode gets a lot of use when you wish to make backups as opposed to just syncing files in a directory. It’s a lot easier to remember the -a option than combining seven or so rsync options together (-rlptgoD) to perform the same task.
If I wanted to back up my Documents directory to the DocsBackup flash drive, I would use the -a (archive) option, as seen in this example:
rsync -a /Users/tnelson/Documents /Volumes/DocsBackup
Synchronize
Since sync is in rsync’s name, it must be a pretty good synchronization tool. The rsync command uses a special algorithm to compare files in the destination and source directories, and only copy the differences to the destination. There are options that allow you to specify how to handle discrepancies between the source and destination:
Delete Files in the Destination
When syncing directories, it’s not uncommon to have files in the destination directory that aren’t present in the source. rsync will normally leave those files alone, but you can also instruct rsync to delete files in the destination directory that don’t appear in the source. This can help ensure that both directories are identical:
rsync -rt –delete /Users/tnelson/Desktop /Volumes/DocsBackup
This new option, –delete, is two dashes plus the word delete. Sometimes, the double dash will be displayed as an em dash, so if you see a long dash instead of two short dashes, be sure to enter two dashes for this option.
The –delete option will remove any file or directory on the destination directory that isn’t present on the source.
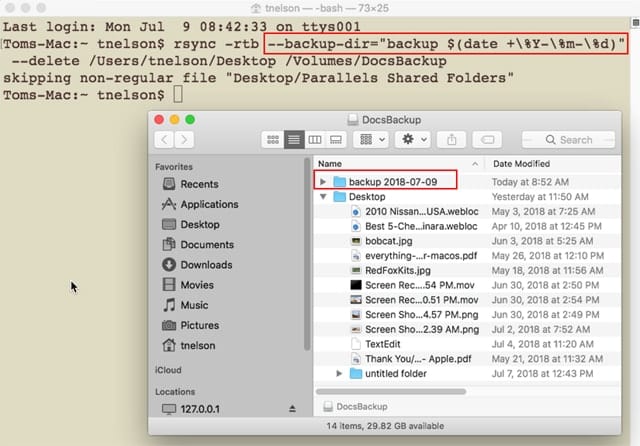
A safer way to handle files or folders on the destination that aren’t present on the source is to back them up before they’re removed. rsync can do this for you using the -b and –backup-dir switches:
rsync -rtb –backup-dir=”backup $(date +\%Y-\%m-\%d)” –delete /Users/tnelson/Desktop /Volumes/DocsBackup
In the above command, the -b option has been added to -r and -t, creating the -rtb option. We’ve also used the –backup-dir command to specify the name of the backup folder to use. In this example, the backup folder will be named backup, and have the date, in the form of year, month, day, appended to its name.

You don’t have to append the date to the backup folder name but it helps when the same rsync backup script is used over and over. All that’s actually required for the –backup-dir command is a direct path to be specified, such as:
rsync -rtb –backup-dir=backup –delete /Users/tnelson/Desktop /Volumes/DocsBackup
In the above example, the backup directory named backup is created at the root level of the destination path, so after this command is executed, there will be a new folder named backup at the root of the DocsBackup flash drive.
I also make sure to put the backup option ahead of the delete option to ensure rsync handles the options in the correct order. You don’t want files to be deleted before they’re backed up.
Exclude Files in the Source
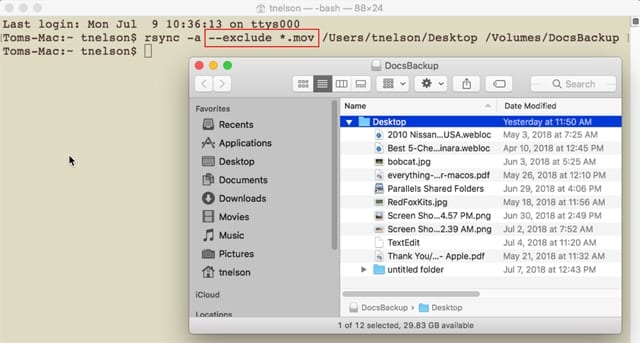
Sometimes there may be files or directories in the source that you don’t want to copy to the destination. You could manually move these files before an rsync copy, but an easier way is to use the exclude option:
rsync -a –exclude MyTestFolder /Users/tnelson/Desktop /Volumes/DocsBackup
In the above rsync command, the folder MyTestFolder, which is on the Desktop, will not be copied to the DocsBackup USB flash drive.

Exclude can use a file or folder name, but it also supports the use of regular expressions for pattern matching. Regular expressions and pattern matching would require their own article to do them justice; for now, I suggest opening another Terminal window (Shell, New Window) and entering the following at the Terminal prompt:
man re_syntax
Hit enter or return. This will display information about how to use regular expressions.
Commonly Used Rsync Options
To finish off our introduction to using rsync, let’s take a look at a few common options the command supports.
- -a – Enables archive mode, commonly used to back up a directory and retain all permissions, time stamps, symbolic links, etc.
- -b – Makes backups of any files in the destination directory that aren’t included in the source. Commonly used with –backup-dir and –delete switches.
- –backup-dir= – Allows you to define a name for the backup directory that will be used by the -b option.
- –delete – Removes files present in the destination directory that are absent from the source directory.
- -n – Dry run; no files are moved. Instead, rsync displays what the results would have been. Use -n with the -v option to gather additional information.
- -r – Recursive; forces rsync to transverse all subdirectories contained within the source directory and copy the subdirectories and their content to the destination directory.
- -t – Time stamps; preserves the existing time stamp on files and folders that are being copied.
- -m – Prunes empty directories. Directories that are empty aren’t copied.
- -z – Compress; uses compression during data transfer. Most often used when using rsync with a remote system.
- -v – Verbose; increases the level of information displayed by the rsync command. You can chain multiple v’s together to increase the information presented. Helpful for debugging, but not recommended for general use.
There are many additional rsync options and switches. To see the complete list, open a Terminal window and enter the following at the prompt:
man rsync
Press enter or return.
One of the best ways to understand how rsync works is to give the command a try with some dummy directories. Create a source directory with a few files and subdirectories in it, and try using rsync to copy them to a dummy (test) destination directory.
Be sure and try out the various options and switches and see how they affect the copy process. With a bit of tinkering, you can create customized backup solutions to meet your needs.


Hi, this is a great tutorial thanks! I was wondering if you know why, not matter which options i use, I get a tiny file included with each changed file that starts with ~$… So for example if I have hundreds of updated files I get hundreds of these 150 bytes files. My goal is that I have a main drive and I want to copy/mirror all changes onto the backup drive
But you have to be careful with the -a option on a Mac because it doesn’t copy extended attributes like your Finder tags. To make sure you get everything, you need to add the -E option.
Why don’t you write a new article–or amend this one–to discuss all the options that do not work with the macOS version of rsync.
So many… including -p (permissions are not preserved), –exclude-from, etc….
Forgive me if I’m wrong but is not rsync the engine used by carbon copy cloner? If so, to avoid irreversible disasters, is this not a better/safer route to achieving the desired result?
I used to use sync to keep a home backup. Once daily run by cron. In the office hourly backups on one machine, daily on another. I set it up to do remote login with public key encryption and login.
very good and useful.
Convinces me again how powerful MACOS is.
Will certainly look at the other subjects in this portal.
kind regards
edgar
40 yrs desktop and unix experience
Awesome that you’ve taken the time to detail this. For people looking for a ‘drag and drop’ GUI tool for rsync, consider Truck.app -> bonhardcomputing.com/truck/ I wrote it to make this sort of thing quick and easy. You can work on the local filesystem simply by specifying the server address as ‘localhost’ of course.
Tried to set server to “localhost”, but get response “Unable to connect to port 22 on 127.0.0.1 or ::1”
Seems like an inappropriate forum for support, I’d rather you email me, but all you need to do is start SSH sharing in System Preferences.
@bonhardcomp can you confirm Truck is compatible with latest rev of Big Sur? I have SIP Enabled, but have granted Accessibility and Full Disk Access to both Truck and Rsync (installed via Homebrew.)
I’ve enabled Remote Login and can access open up the app and file system for 127.0.0.1 but when I select a folder to copy it locks up.
That’s a really great summary thanks. While using something like Carbon Copy Cloner which gives you a less sudden death interface with the ability to set up automatic backups, it’s always useful to understand the full process underneath
Never use the built-in rsync on a Mac, because it doesn’t know anything about extended attributes that could be critical to your backup copies. The rsync client that gets installed by either macports or homebrew should support files with extended attributes just fine.
I think you should update your clarification for this article from Mac 101 to, well, maybe, Mac 105 or perhaps Mac 301. This is far from basic stuff. Once you have to start listing arguments in Terminal beyond yes or no, on or off, it is no longer elementary.
That said, you can do basic copies, like in your first example, using the Finder. If it’s something you need to do regularly, Carbon Copy Cloner is a great tool. Super Duper! is OK for basic stuff. Of course these apps cost money, but if you’re copying or backing up often enough the cost may be worth it. That said, you can also make basic disk archives, including with encryption and a password, with Disk Utility. It can also be used to restore a backup.
That’s not to say using Terminal is a bad idea, if you like that sort of thing. But it’s far easier to make a mistake in terminal than in the aforementioned apps.
As someone once said, “To err is human, but to really screw up requires a computer!”
I have run into problems with both rsync and CCC.
With rsync, you do have to read the man page and troubleshoot a bit. And El Captain’s advice is probably good. For those interested in learning a bit, using rsync is doable. Do plenty of test runs, check the permissions and other details of the output.
Try backing up an iTunes library and see if you can use it as your iTunes library.
The real problem with CCC is that so much of what it does is invisible to the user. Plus it’s not inexpensive.
And then comes time for the paid upgrade for a new version.