![]() For many of us, the Mac’s Mail app is the most often used app in our collection. It has so many features that for most of us, we only touch the surface of what it can do. In this Rocket Yard guide we’ll check out seven features that are often overlooked, most likely left in the default setting, or simply not used.
For many of us, the Mac’s Mail app is the most often used app in our collection. It has so many features that for most of us, we only touch the surface of what it can do. In this Rocket Yard guide we’ll check out seven features that are often overlooked, most likely left in the default setting, or simply not used.
If you’re a Mac Mail user, take a look at our Mail tips and give them a try.
1. Set How Often to Check Mail
Has Mail become a distraction? It either rarely or never updates, leaving you wondering if Mail is actually working, or it updates too often, flashing notifications that distract you from your work. In most cases, the problem is the update interval that Mail uses to check for new messages.
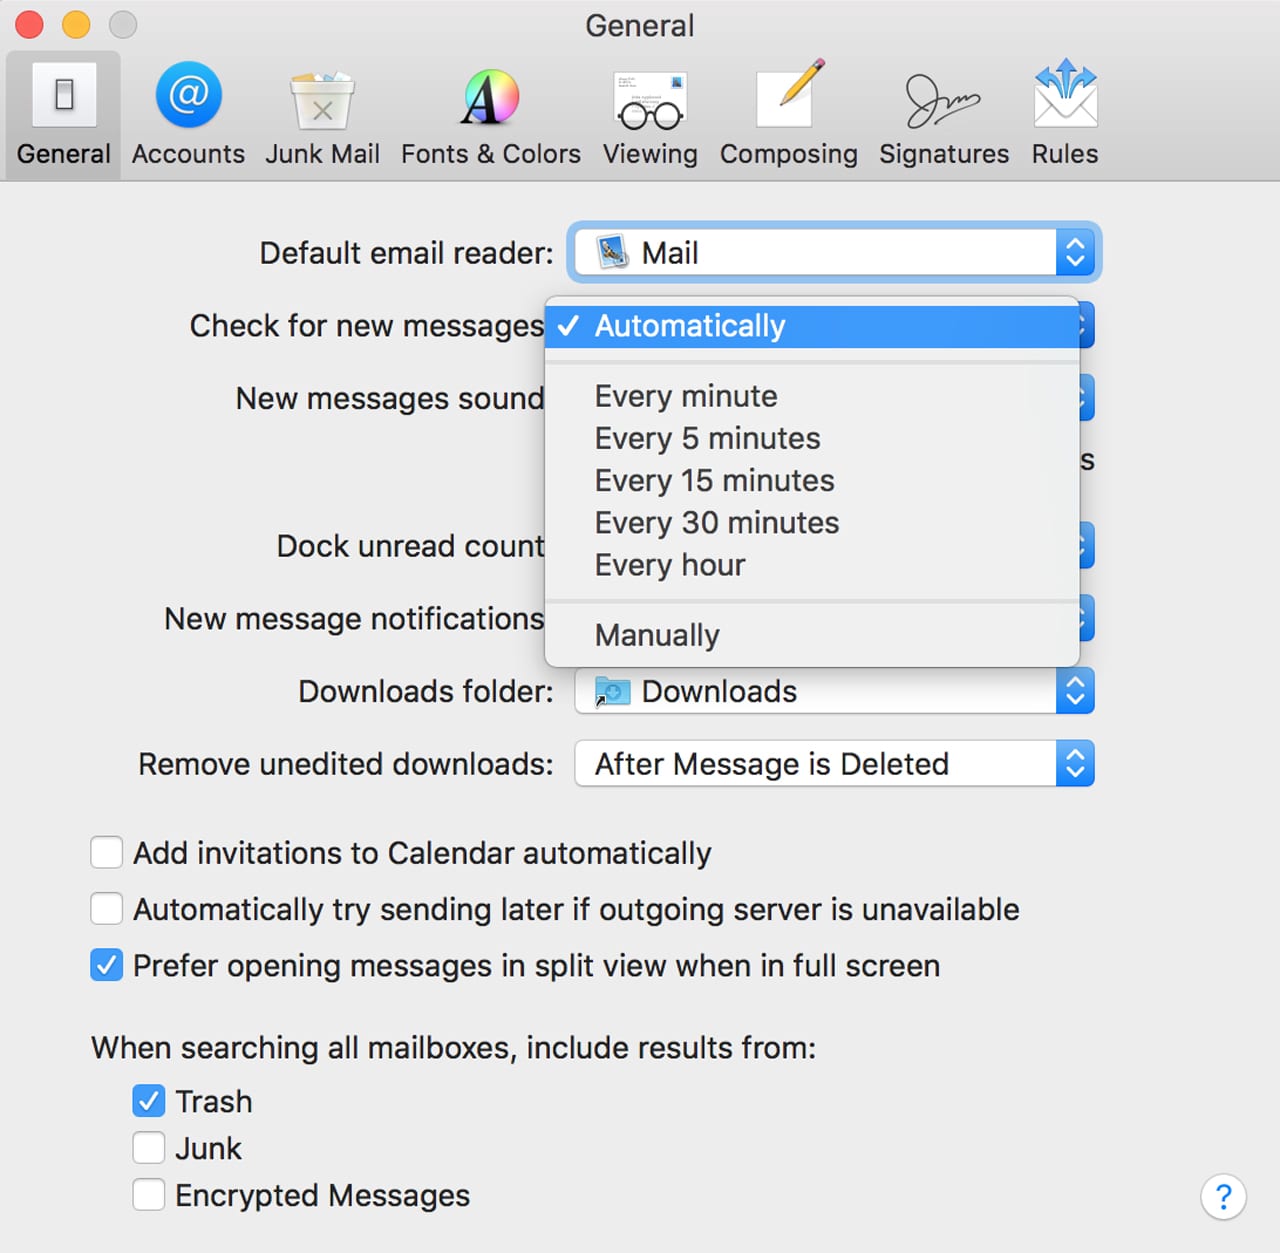
You have a few choices in setting the mail check interval, from Automatic to Manual; there are also quite a few preset times, from every minute to every hour and lots of times in-between. The following steps will let you set the interval to use for checking mail:
Launch Mail, and select the Preferences option from the Mail menu.
In the Preferences window that opens, click or tap the General button.
Look for the “Check for new messages:” item. You’ll find the following options in a dropdown menu:
- Automatically: (Default) According to Apple, Mail will vary the time frame for checking messages based on whether the Mac is plugged into a power source or using batteries. I’ve found that if someone is using an Exchange mail account or an IMAP account that supports the “Idle” command, Mail will deliver messages as soon as they become available on the server. Otherwise, new mail checking is performed at 5-minute intervals when your Mac is connected to an AC source.
- Every minute
- Every 5 minutes
- Every 15 minutes
- Every 30 minutes
- Every hour
- Manually: Checks for new messages when you click or tap the Get Mail button in the mail toolbar. Additionally, if you’re using IMAP or an Exchange-based mail account, it will check whenever you click or tap an IMAP or Exchange mailbox in the sidebar.
Select the check mail interval you wish to use from the dropdown menu.
You can close the Mail preferences window.
2. Switch to Classic Layout
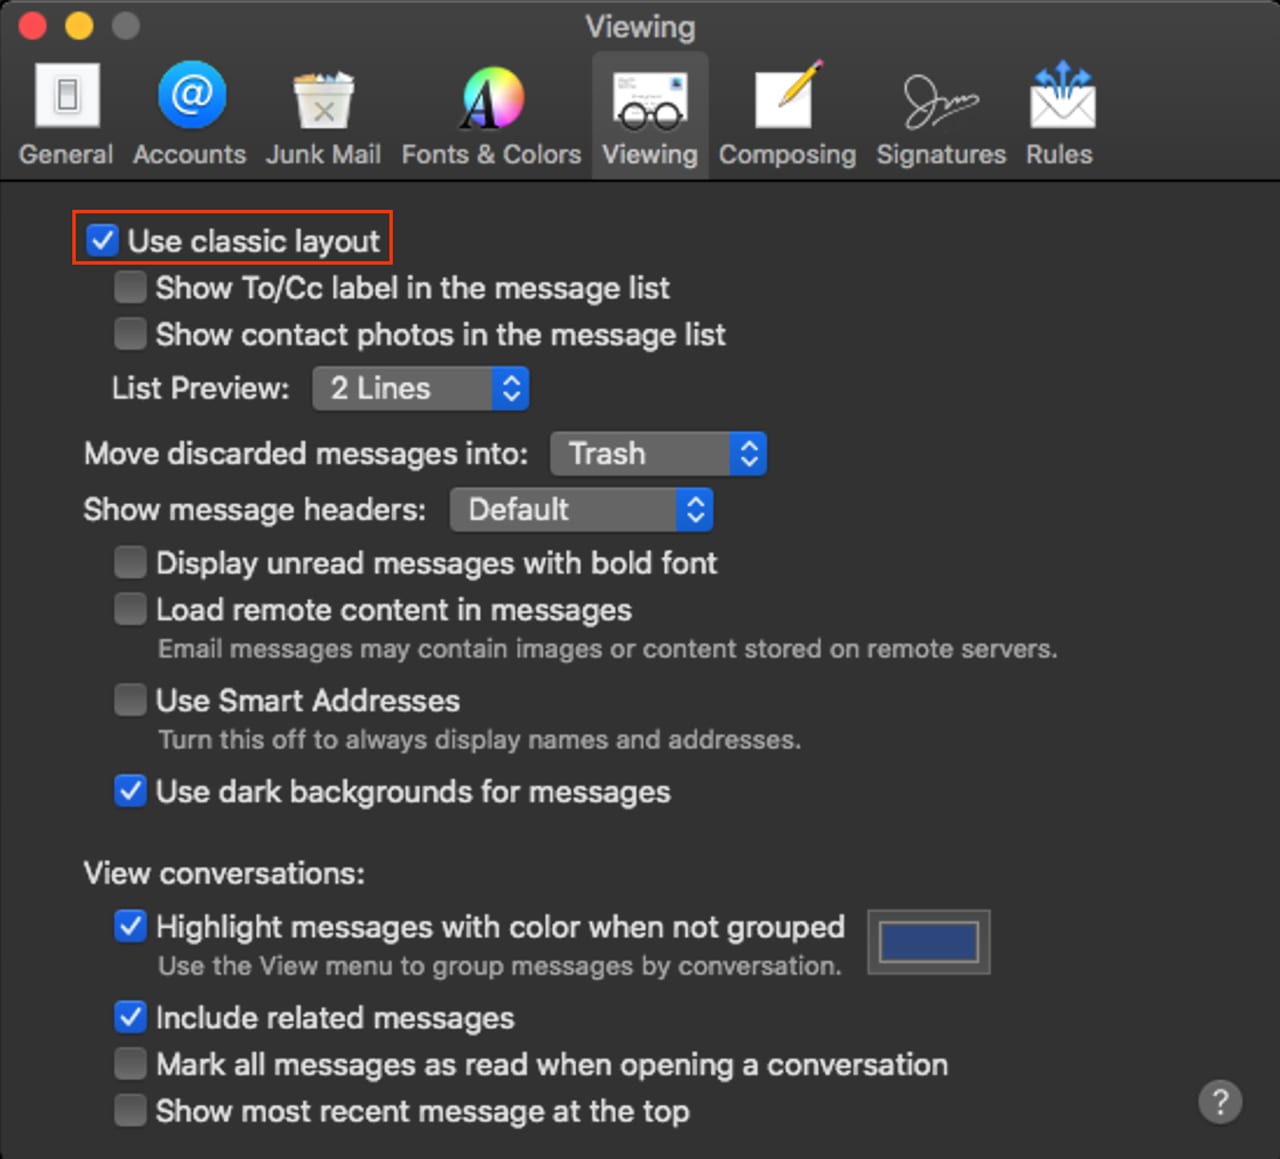
The default view for the Mail app is to show the mail messages next to the mail list. This can result in fewer messages in the list being displayed, and a smaller window to view the actual mail content. If you would rather see more messages at once, and have a larger message viewing area, you can revert to the older view method, now known as the classic layout.
Launch Mail, and then select Preferences from the Mail menu.
In the preferences window, select the Viewing button.
Place a checkmark in the “Use classic layout” box.
The Mail app’s view is updated immediately. You can toggle the Use classic layout option on and off to see which view option you like best. Don’t forget you can adjust the size of each column or pane by dragging the separator in any of the views.
Once you have the view set the way you like, you can close the preferences window.
3. Previous Recipients
Have you ever needed to send an email to an acquaintance, coworker, or distant relative, but couldn’t remember the email address? You probably tried looking in the Contacts app, but you couldn’t find them listed. What makes it more annoying is that you know you’ve either received an email from them or sent them one. But you can’t find a reference to them anywhere.
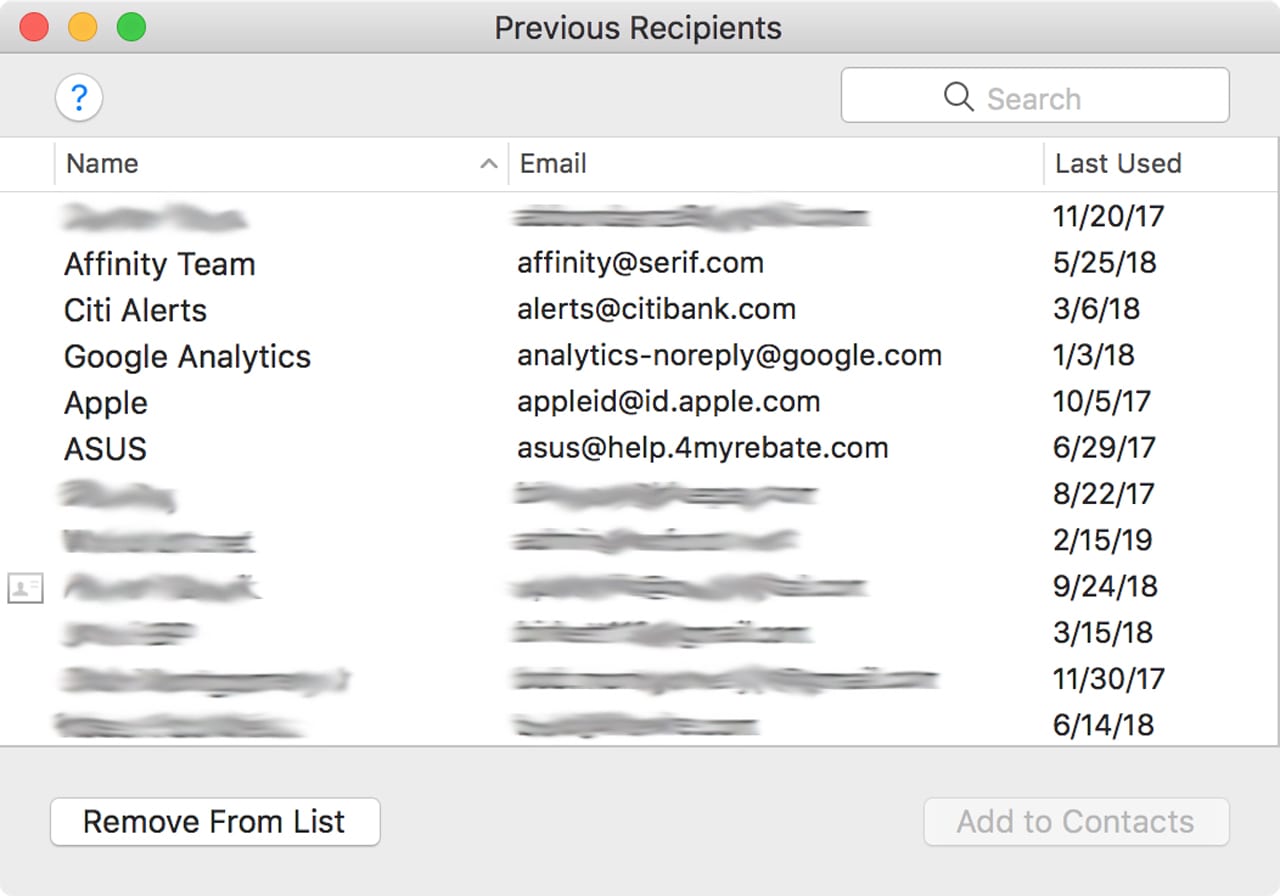
There’s still one place you can check: Mail’s Previous Recipients list. Whenever you receive or send an email, the email address of the individual is added to a list of previous recipients. To check the list, do the following:
Launch Mail, if it isn’t already open.
From the Window menu, select the Previous Recipients item.
The Previous Recipients window will open.
The list can be long; when I looked at mine, there were two years of recipients in the list. Thankfully, you can sort the list by name, email address, or date. Once you find the email address you need, you can select it and add it to your Contacts app.
Surprisingly, you can’t drag the email address to a new Mail message, or otherwise use it directly within the Mail app, without first adding it to the Contacts app. You can, of course, manually enter the email address, and now that you know the correct address it will likely autocomplete as you type the name in the email header.
4. Drag Attachments to Mail’s Dock Icon to Start a New Message
You probably know that dragging a file to an app’s icon in the Dock will usually open the file in the selected app. The same is true of the Mail app; this feature can be used to automatically open a new mail message with the selected file already attached to the message.
That’s a great time saver if you’re someone who routinely adds documents to your mail messages.
Go ahead and give it a try. The Mail app doesn’t even have to be the front most app; just drag a file and drop it on the Mail icon in the Dock. Mail will open a new document with the file already attached, ready for you to fill in any needed information before you send it off.
5. Load Remote Content
Email messages often contain images and other content that can drastically affect the time it takes to download a message or display it in Mail’s viewing pane. At the same time, those bits of images or other content embedded in an email can be used to inform mail marketers that you have read their message and that your email address is an active one.
If you would like to speed things up a bit, or just wish to have a bit better mail security, you can turn off the automatic loading of remote content.
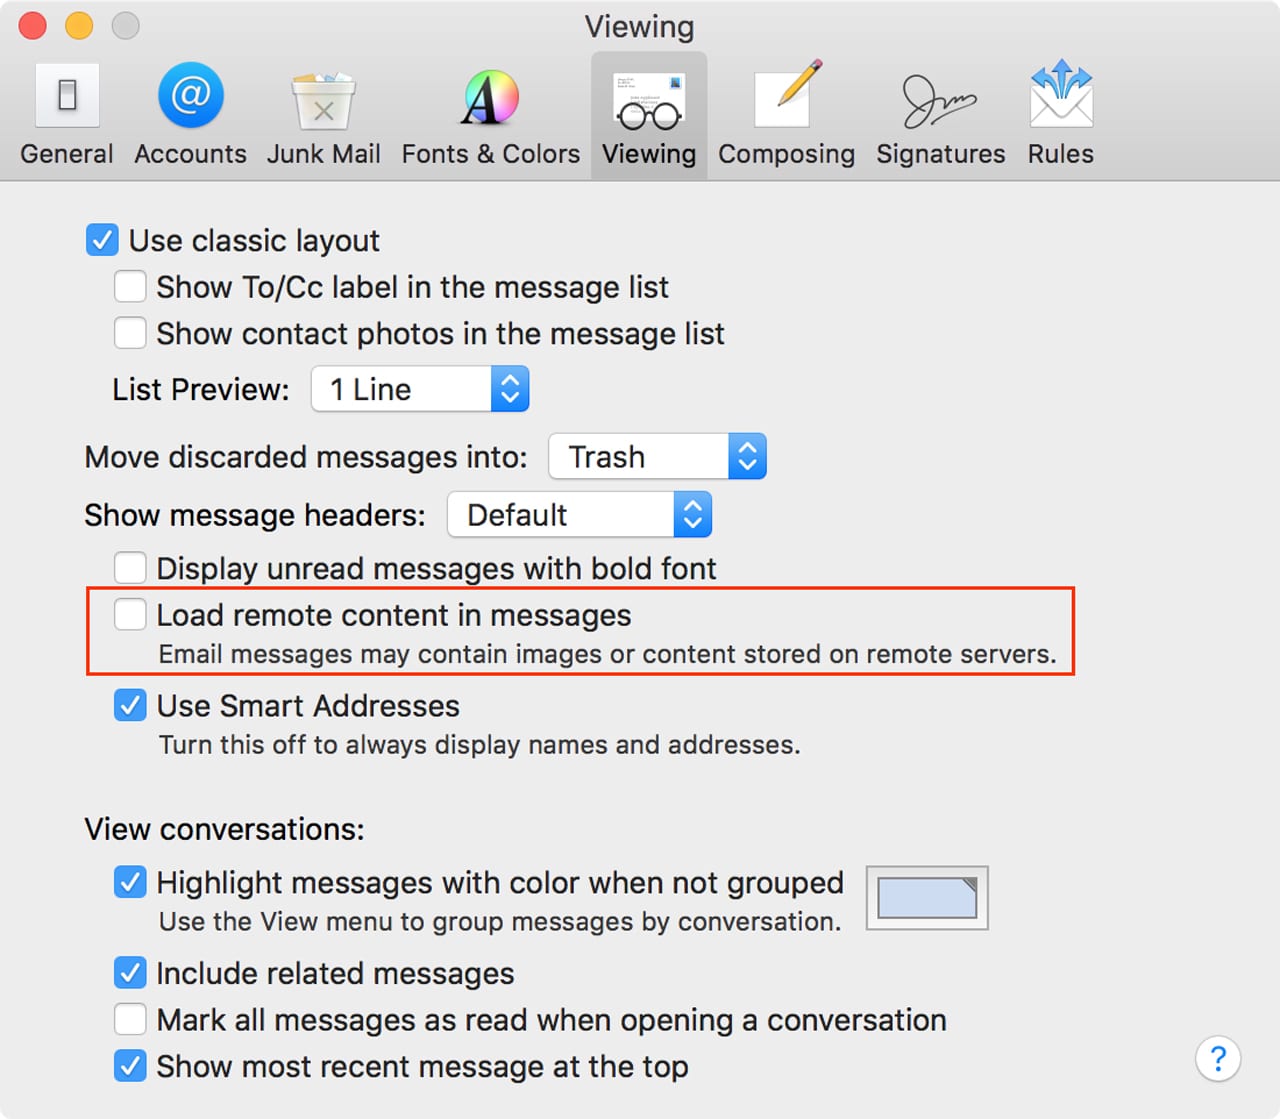
Once you turn off remote content, the messages you view will only contain text, and placeholders for the missing content. If you decide you want to view the missing content you’ll find a new Load Remote Content button at the top of the message. Clicking the button will fetch the missing items in the message and display them for you.
To control how remote content is displayed, use Mail’s preferences:
With Mail open, select Preferences from the Mail menu.
In the preferences window, click or tap the Viewing button.
Place or remove a checkmark from the “Load remote content in messages” box.
When you’re done, you can close the preferences window.
6. Quick Look Web Pages
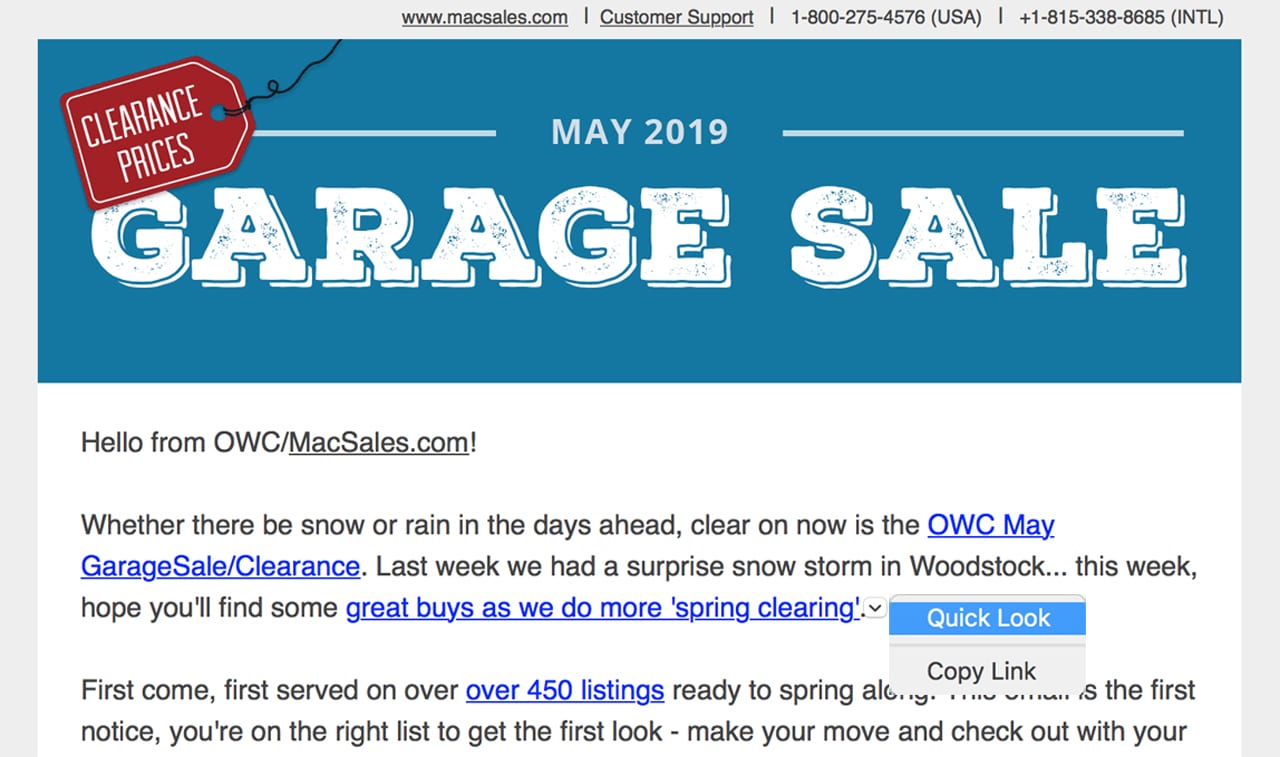
You may already know about the Mac OS Quick Look capabilities that allow you to see a file’s content just by placing the cursor over the file’s name and pressing the space bar. A similar technique can be used within the Mail app to preview the content of a web page link within a mail message.
The advantage of using Quick Look to view a web page is that it doesn’t launch the Safari web browser to view the web page, saving you the overhead needed to launch a complete app. It may also be a bit quicker to view the web page because you don’t need to wait on the full Safari app to load, only the WebKit rendering engine.
Even though you’re not using the full Safari browser to access the embedded link, you should still exercise caution when viewing links in a Mail message. You may find this Rocket Yard guide helpful: Tech Tip: Checking Questionable Links Without Clicking Them.
To quick look a link within a Mail message, do the following:
While viewing the mail message, place the cursor over link. A data detector disclosure triangle will appear at the end of the URL.
Click or tap the triangle. A Quick Look window will open to display the content of the linked web site. You can scroll about the Quick Look window to see the entire web page. You can also use the button at the top of the Quick Look window to open the web page in Safari.
To close the Quick Look window, just click or tap outside the window.
7. Priority Field
Have you ever needed to gain the attention of the recipient of an email? Aside from calling them and saying, “Hey, I sent you a very important email!” there doesn’t seem to be much you can do at first glance. Mail seems to lack any type of method to set a priority level on a message.
Actually, the ability to set priority levels is hidden, and perhaps for good reason. Aside from a few times when a message really was very important, I have found most “priority” messages are far from that, and the sender is just trying to get my attention for something I have no interest in.
But if you really feel setting a high priority is appropriate, here’s how to do it:
Open a new message.
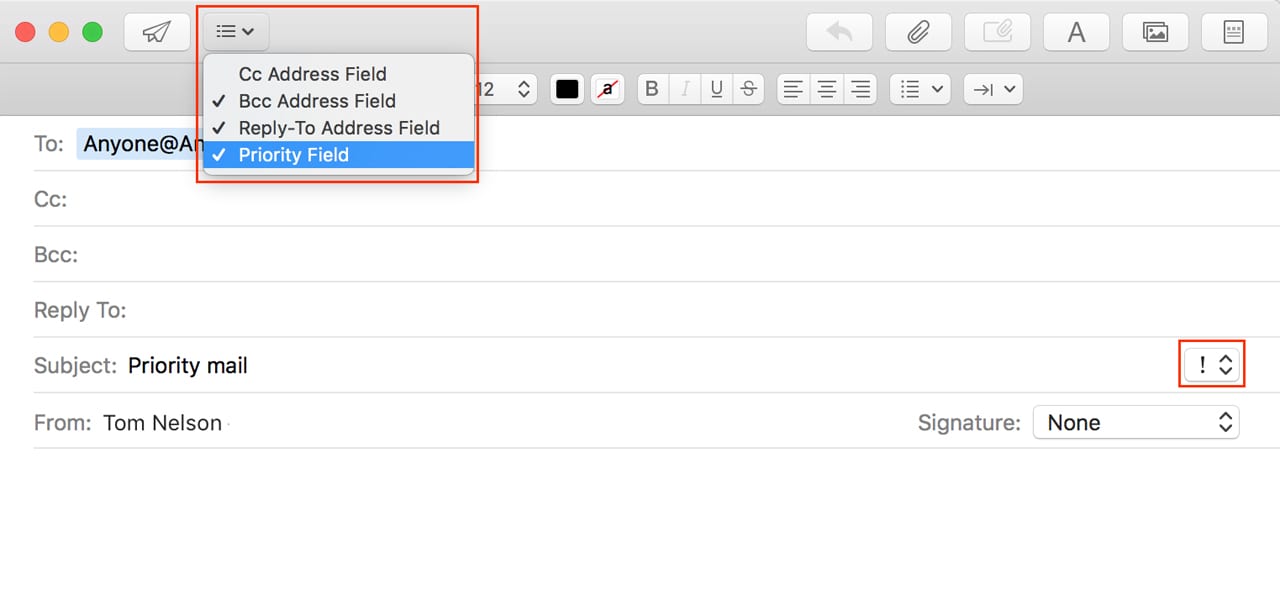
Click or tap the “Select visible header fields” button in either the toolbar or just to the left-hand side of the From: field. The actual location of the button is dependent on the version of Mail you’re using.
From the popup menu, select Priority field.
The Priority field will be added to the Mail message header at the end of the Subject line.
Use the Priority field to set the message priority to High Priority, Normal Priority, or Low Priority.
Tip within a tip: The “Select visible header fields” button also allows you to enable cc, bcc, and reply to fields.
More Mail Tips
We’ve only scratched the surface of mail-related tips. If you have any to share with all of our Rocket Yard readers, please leave a comment below.



Some useful tips, thanks. One I cannot find – ‘Classic layout’.
I cannot find it and as a user on Mac OS 11.4 I thought I had the latest Mail version…. what have I missed.
Got any tips on Connection Doctor? Can I perhaps remove some of the options that dont see to work?
Colin
Thanks helpfull
Why does iOS Mail have up & down arrows for next and previous messages and MacOS Mail still does not?
If a mailbox is selected (highlighted in the sidebar) you can use the up/down arrow keys on the keyboard to go to next/previous message.
This will work for any individual mailbox selected, or for the top level Inbox.
Tom
I would like to archive my e-mail to and external drive or NAS in a way that I can still access and search the e-mail mail boxes. What is the best way to do this?
So, when I am looking at my inbox an seeing the emails, there is a
banner that slides out from the right telling me the subject of each
of the message in turn. How do I disable that “feature”.
No indication of the version.
I wish I could use Mail, but since loading Mojave, Mail sends me to System Preferences for a new account, and when I do setup my account, it tells me it already is there. Then for crying out loud doesn’t it open.
I use Sparks by Readdle in its place with no problems.
“The advantage of using Quick Look to view a web page is that it doesn’t launch the Safari web browser to view the web page”
Actually, one of the biggest advantages of Quick Look is that it is often able to let you view the contents of a file that you don’t have the third-party app to open outright. Back before Pages could open MS Word documents, the only way for people without MS Word to read the doc and docx files they would get in their mail was to use QuickLook on them.
When in the “modern” (ha ha; Mail is anything but modern/updated) layout, is there a way to hide the message preview window? I know you can do this in the Classic layout (by closing the bottom preview pane).
I like the modern/newer layout b’c of the ability to show the Contacts photo associated with the email; makes finding emails quicker.
Ralph, you should be able to grab the divider between the message list and the preview pane and drag it all the way to the right. As soon as you get close to the edge, it will disappear. You can always grab the divider and drag it back left to reveal the preview pane again.
The only thing I can make disappear is the folders list. The messages list and the individual messages can only be made smaller.
Ha; never mind. After posting I caught what you meant — I kept trying to collapse with the outermost edge, not the edge between the messages list and the message preview. Thanks for the kick in the head.
Yeah, it can be tricky to grab just right!