![]() Smart folders and the Dock just seem to be made for each other. You can configure a smart folder to display just the files or folders that meet your specific criteria. Need a folder that just shows the image files you worked on this week? Or perhaps a folder that only shows new music you’ve added to your Mac? Add these smart folders to the Dock, and you’ll have a quick way to view and work with their files without having to browse through the Finder to find them.
Smart folders and the Dock just seem to be made for each other. You can configure a smart folder to display just the files or folders that meet your specific criteria. Need a folder that just shows the image files you worked on this week? Or perhaps a folder that only shows new music you’ve added to your Mac? Add these smart folders to the Dock, and you’ll have a quick way to view and work with their files without having to browse through the Finder to find them.
If you’ve been following Rocket Yard guides, you may remember that you can use the Terminal app to create Recent Items stacks for the Dock that can show recently used apps, documents, and servers. And while the premade recent items stack is helpful, it doesn’t allow you to use your own search criteria to create the items in the stack.
Smart folders give you all the power of the recent items stack, but with complete control over what the content of the smart folders will be.
Creating Smart Folders
Let’s start the process by exploring how smart folders are created. For an example, we will create a smart folder that displays image files you’ve worked with over the past week.
Start by having the Finder as the active app; you can do this by clicking on the desktop or opening a Finder window. Once the Finder is the front most app, follow these instructions:
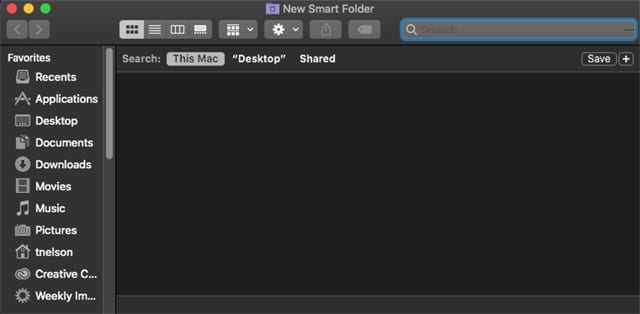
From the Finder menu, select File, New Smart Folder.
An empty smart folder window will open. In the window’s toolbar, make sure Search is set to This Mac.
At the far right of the window, click or tap the plus (+) sign. This will display filters you can use to build the smart folder’s search criteria.
Use the first dropdown menu to select “Date Last Opened,” and the second dropdown menu to select “this week.”
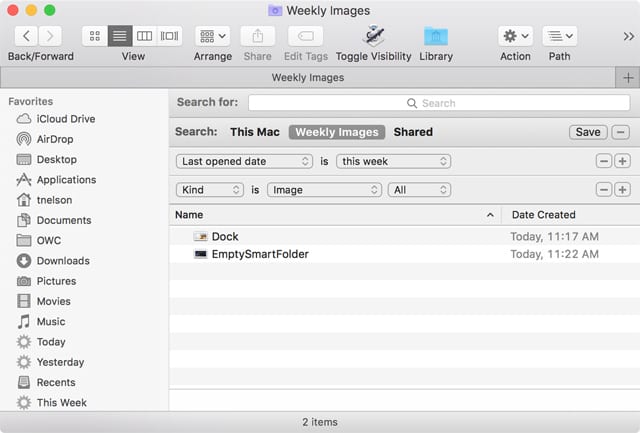
The smart folder will be populated with any files or folders that meet the above requirements of being opened in the last week.
To further refine the search, click or tap the plus (+) sign at the far right of the window.
A second search filter will open. Set the first dropdown menu to “Kind,” and the second dropdown menu to “Image.”
A third dropdown menu will appear that you can use to select the type of image (JPEG, TIFF, GIF, PNG); for this example, select the “All” option to display any of the image file types.
At this point, you’ve created a basic smart folder that will show any image file you’ve opened in the last week. And while this may be all you need, there are further refinements to the search filters you can make.
Hold down the option key. You’ll notice that the plus (+) sign has changed to display ellipses. Click or tap the ellipses to add additional restrictions to the current search criteria. You’ll see two filter sets appear.
The first allows you to select Any, All, or None, if the following conditions are true. The second criteria set allows you to set the conditions that are being tested. As an example, if you don’t wish to have any PNG image files included in the smart folder, you would set the menus as follows:
Set the first dropdown menu to None.
Set the second group of menus to Kind, Image, PNG.
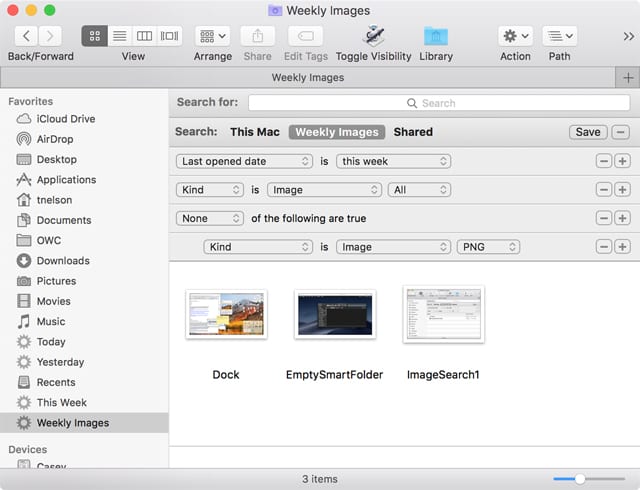
You’ve created a smart folder that will display all of the image files you have opened during the last week, except PNG files.
Saving Smart Folders
Smart folders are temporary, until you use the Save button. When you’re ready to save the smart folder for later use, click or tap the Save button.
In the pane that drops down, enter a descriptive name for the smart folder, such as Weekly Images.
Use the dropdown menu to pick a place to save the smart folder to.
Note: The default location for smart folders is in the Saved Searches folder in your Library folder: ~/Library/Saved Searches. This folder is normally part of the hidden Library folder content. If you want to be able to easily access this folder in the future, you could change the location to some place more accessible, such as your home folder. For our purpose of adding smart folders to the Dock, the default location will work fine.
You can have the smart folder included in the Finder sidebar by placing a tick mark in the Add to Sidebar box.
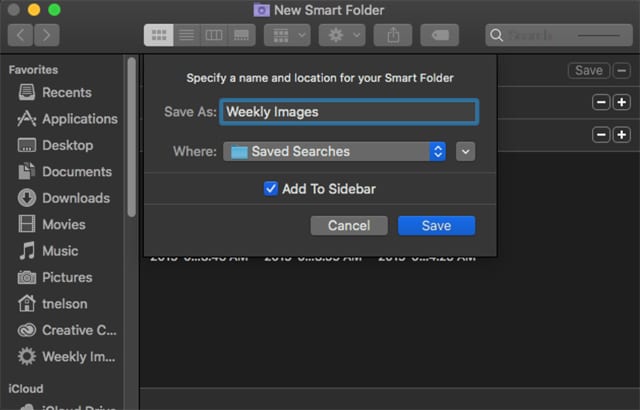
When you’ve made all the changes, click the Save button.
Smart Folder Search Criteria Tips
The smart folder’s search criteria aren’t limited to what’s displayed in the dropdown menus. In most cases, you’ll find an entry in the Other menu.
As an example, if you wanted to include a file’s Finder Tags attribute in a search, you would select “Other” in the first search dropdown menu.
This would cause a list of file attributes to be displayed. You could then scroll through the list until you found the attribute “Tags.” Highlight the Tags entry, then click or tap the OK button.
You can now include search criteria based on a tag’s color.
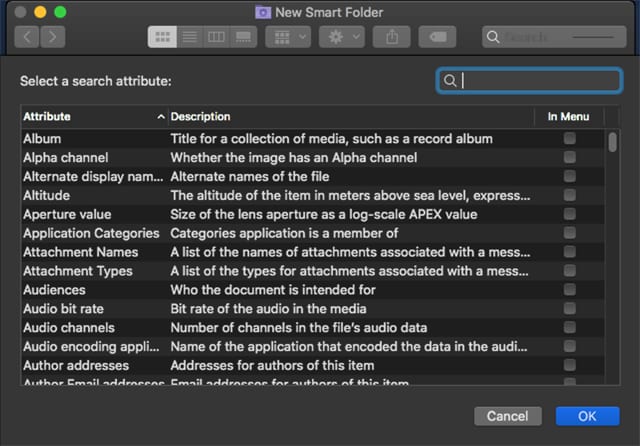
The list contains a wide selection of file attributes, everything from Album names used in iTunes or other media management systems, to Message ID number, to Year Recorded, and many things in between.
If you believe you’ll be using any of these other attributes regularly, you can add them to the Search Criteria menus by selecting “Other” from the dropdown menu, locating the attribute in the list, and placing a checkmark in the In Menu box.
Editing an Existing Smart Folder
From time to time, you may find that the smart folder you created needs to be updated with slightly different search criteria to meet your new needs; or perhaps the current search isn’t working as you expected.
To edit an existing smart folder, use the Finder to navigate to the smart folder, or select the smart folder in a Finder window’s sidebar.
If you used the default location to save the smart folder to, you can access it by selecting Go to Folder from the Finder’s Go menu, then entering ~/Library/Saved Searches.
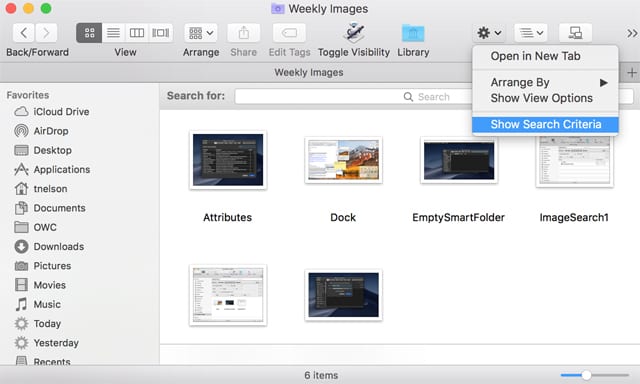
Once the smart folder is displayed in a Finder window, click or tap the Action button in the Finder toolbar and select the Show Search Criteria option.
The search filters for the smart folder will be displayed. You can make any changes you wish, including modifying existing search criteria or adding new search criteria.
When you’re done, click or tap the Save button.
Adding Smart Folders to the Dock
Smart folders can be added to the right-hand side of the Dock for quick access.
You can add a smart folder by dragging the smart folder from a Finder window, or from the Finder sidebar, to the far right area of the Dock.
When you drag the smart folder to the Dock, make sure you hover above the Dock long enough for any Dock icon to move out of the way. Otherwise, when you release the Smart Folder, it may be deposited within another Dock item.
Setting Docked Smart Folder Options
Smart folders in the Dock have a number of options for how they’re displayed, including whether they’re displayed as a folder or a stack, sorting order when viewed, and the method used to view their content.
You can find out more about using the Dock in the Rocket Yard guide: macOS 101: How to Take Full Advantage of the Dock.
One question that’s often asked is, “What’s the difference between displaying as a folder and displaying as a stack?” The answer, for the purpose of actually seeing the content of a docked folder, is that there’s no real difference, except for the icon used in the Dock.
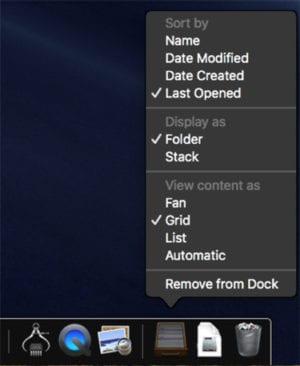
When you right-click a folder in the Dock, you’ll see the option to Display as Folder or Display as Stack. When you choose Display as Folder, the Dock icon will change to a file cabinet drawer and remain the same icon, no matter what items are within the smart folder. If you select Display as Stack, the icon in the Dock will change to a thumbnail of the most recent item contained within the smart folder.
You can use either display type; it doesn’t affect how the smart folder’s content will be displayed when you click on its Dock icon.
Removing Smart Folders from the Dock
Smart folders can be dragged from the Dock onto the desktop to remove them from the Dock, or you can right-click the smart folder’s Dock icon and select Remove from Dock from the popup menu.
When you remove an item from the Dock, including smart folders, you’re not deleting the item; you’re only removing a shortcut from the Dock that pointed to where the actual item is stored.
To permanently delete a smart folder, open a Finder window and navigate to where you saved the smart folder. You can then drag the smart folder to the Trash.
Sharing Smart Folders
When combined with the Dock, smart folders become a powerful workflow tool. If you’re using smart folders, let us know how you’re using them and, if you wish, share the search filters you’re using in the comment section below.





Very good. Very clear, well written. Thanks.
Is it possible to create a wildcard search? For instance, I’d like to search for any images that have content in the keyword field.
Great article. The problem is that smart folders become corrupt with time.
Apple should implement a search option like Sherlock with Mac OS 9. And allowing to search using Spotlight indexing and also without it, because sometimes index is corrupt and other times disks are not indexed.