macOS Catalina includes a number of new features, new ways to perform tasks, and of course a few hidden features and tricks, not all of which have been discovered yet.
Of course, that’s what we expect from a new version of the macOS. In this Rocket Yard guide, we’ll take a look at tips and tricks for using macOS Catalina.

If you haven’t upgraded yet, you may find these Rocket Yard guides helpful:
- How to Upgrade Install macOS Catalina
- How to Clean Install macOS Catalina
- How to Use Migration Assistant with macOS Catalina
General macOS Catalina Tips
We’ll start with some of the basics.
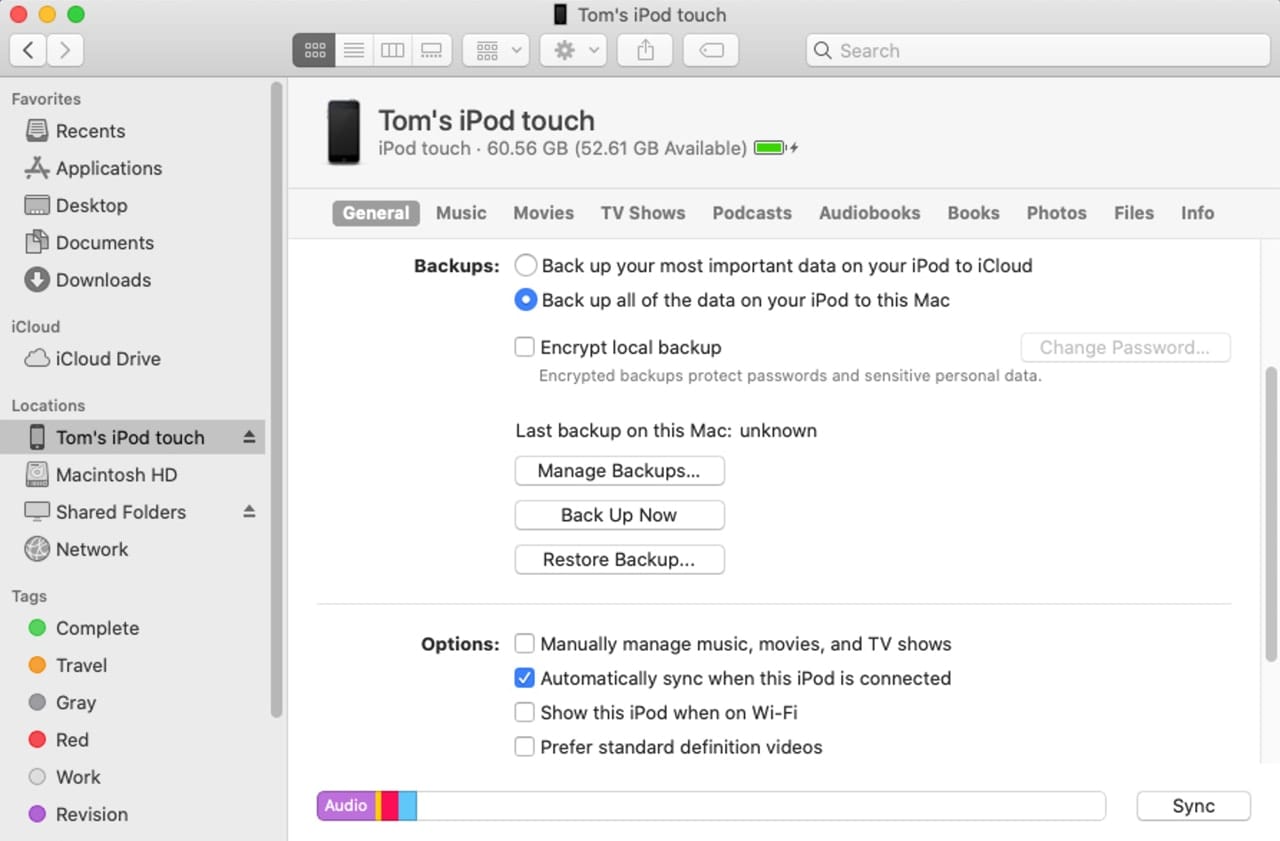
Finder Sync: Catalina split up iTunes into multiple individual apps that focus on specific media types. The new apps, Music, Podcast, and TV, handle their respective media types. But what happened to the file syncing capabilities of iTunes? They’ve been moved over to the Finder, which is a better fit for the task of syncing files between devices.
iOS devices you connect to your Mac now show up in the Finder’s sidebar, along with your drives, shared folders, and networked devices. Selecting an iOS device in the sidebar brings up a number of options, including backing up and restoring information on the device, managing how connections are made, and updating software on devices if needed.
You’ll also find the usual syncing options for Music, Movies, TV Shows, Podcasts, Audiobooks, Books, Photos, and Files. Each category has its own sync settings you can configure. Using the Finder for media and file syncing appears to be an improvement over the all-in-one iTunes method, and provides plenty of options to manage the process.
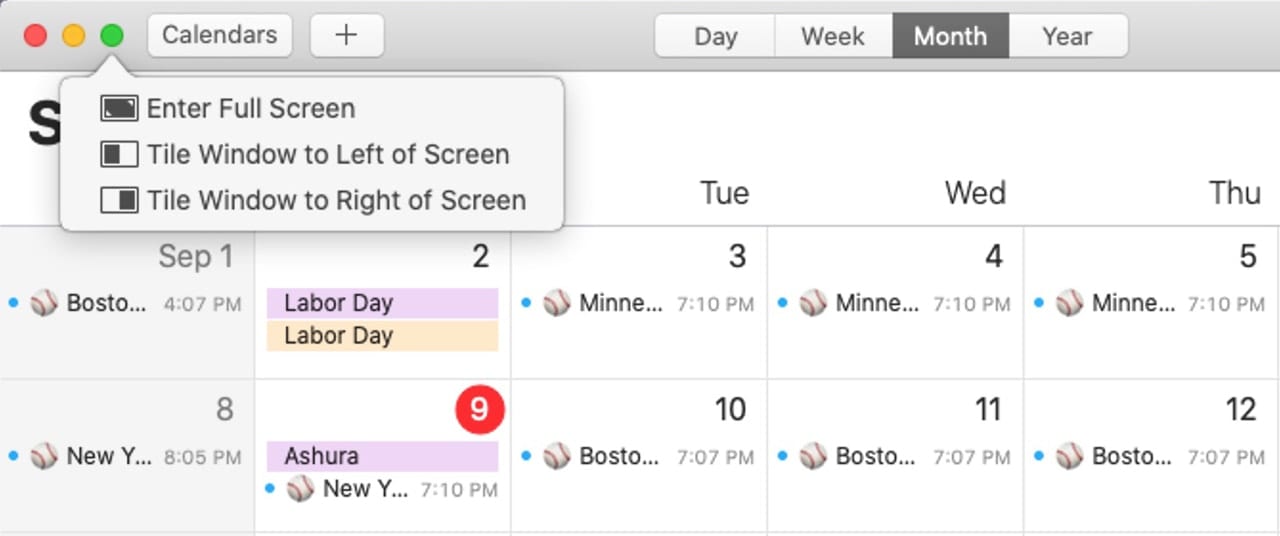
App Tiling: Most apps and their windows support a new window tiling feature in macOS Catalina. Tiling divides your screen in two, with a left-hand and a right-hand side. The currently active window takes up one of the two sides, while other windows are reduced to tiles. The tiles are similar to thumbnails, though a bit bigger, and displayed on the opposite side of the screen.
Selecting one of the tiled windows will expand the window to fit into one side of the screen.
To make use of tiles, open an app and hover your cursor over the green traffic light bubble. You’ll see a dropdown menu listing three options: Enter Full Screen, Tile Window to the Left of Screen, and Tile Window to Right of Screen. Make a selection from the menu to activate window tiling for the app.
To exit window tiling, press the Escape key.
Apple ID in System Preferences: macOS Catalina moves the management of your Apple ID to its own dedicated system preference. This may not seem like much of an improvement, but with Catalina, you can manage all of your Apple account information from one place. You can review and edit account information, change password and security settings, including enabling two-factor authentication, review or change payment methods and shipping information, manage media, and manage purchasing settings used with your account.
In addition, you can configure most of the iCloud settings as well as see all the devices associated with your Apple ID.
There may not be anything new in the Apple ID preference pane, but it’s handy having all the information in one place.
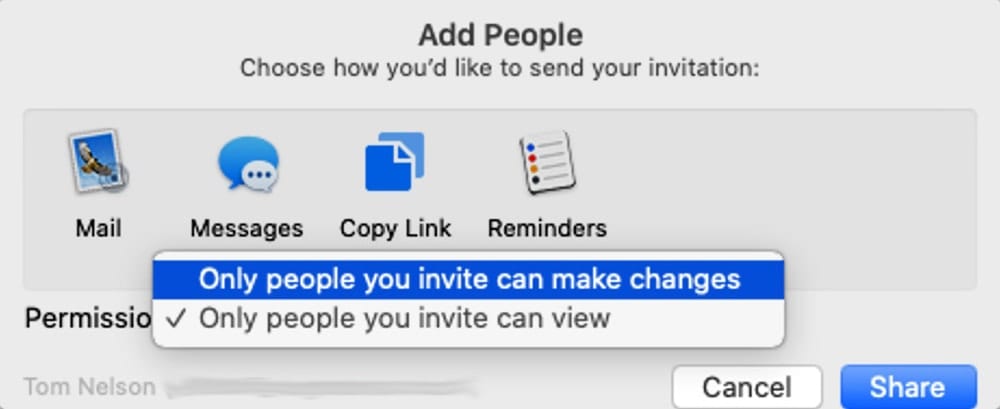
iCloud File Sharing: It took Apple a long time to implement this much wanted feature: the ability to share information in an iCloud drive with others. macOS Catalina lets you share iCloud folders and the information they contain. You control who’s invited to share your information as well as what permissions they have, such as viewing only or the ability to make changes.
You can find out more about iCloud Drive’s new shared folders in the Rocket Yard guide:
macOS Catalina Features: iCloud Drive Shared Folders
Removing iCloud Drive Files: With Catalina, you can delete an iCloud Drive file you have locally on your Mac while keeping the file available on your iCloud Drive. This can be helpful for reducing the amount of storage you’re using on your Mac.
Files you remove from your Mac are still shown in your iCloud drive, but with an iCloud icon next to their name. If you need the file, you can click or tap the iCloud icon and the file will be restored to your Mac.
To use this feature, open the iCloud Drive folder in a Finder window’s sidebar.
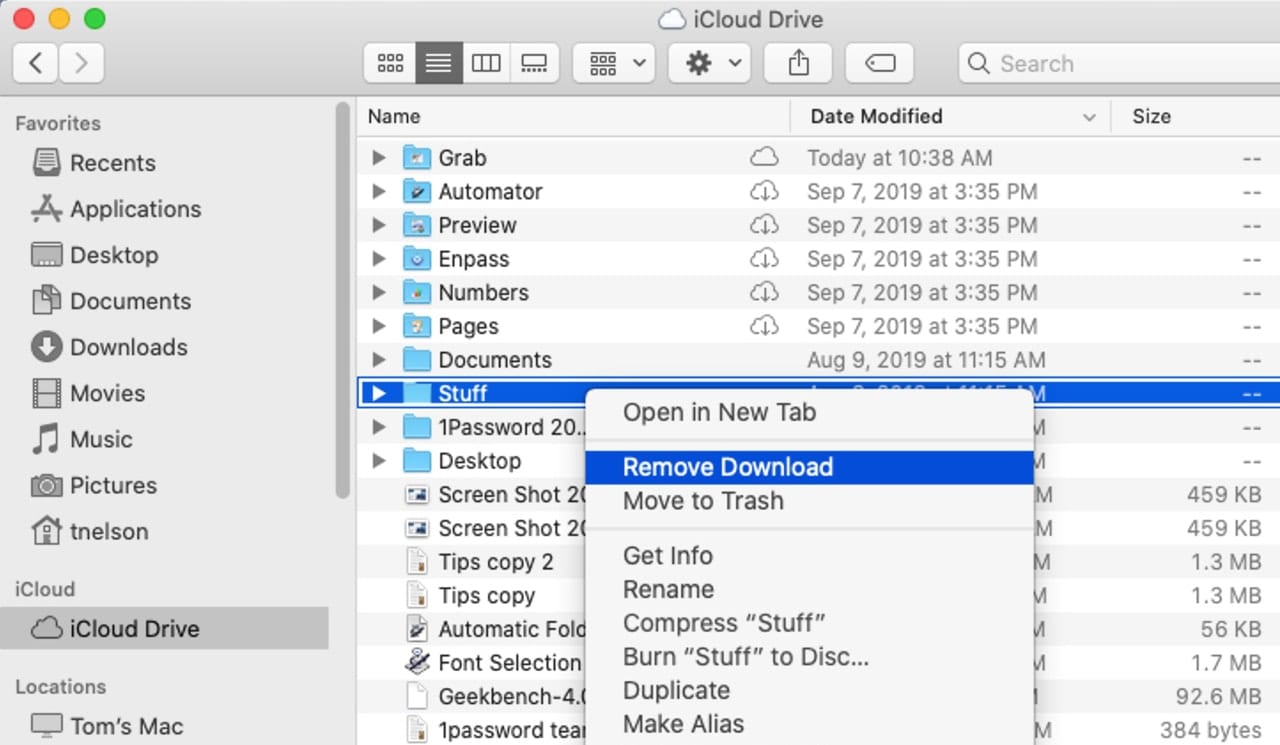
Right-click the file you wish to remove from your Mac and select Remove Download from the popup menu.
The file will be removed from your Mac and an iCloud icon will be placed next to the file’s name to indicate it’s still available in iCloud.
your iCloud Drive.
macOS Catalina Mail Tips
Here are a few tips for macOS Catalina’s Mail app.
Unsubscribe From an Email List: Email lists can be a good way to keep up to date on a favorite hobby, product, or other topic, but after a while, you may decide the list isn’t quite what you had in mind. It’s at this point you discover that getting off an email list can be a bit of a nuisance. Usually you have to send an unsubscribe email to a specific address, and sometimes figuring out the email address to use, or the format that the unsubscribe request must be in, can be a pain in the patootie.
Catalina’s Mail app makes the process of leaving an email list as simple as clicking or tapping a button. Next time you receive an email from the list server, simply open the email; you’ll find an Unsubscribe button in the message’s header. Click or tap the Unsubscribe button and the Mail app will remove you from the email list.
Mute an Email Thread: Have you ever been on the receiving end of a mass email that went out to everyone and their cousins? Perhaps you just received your company’s announcement of a holiday party, and everyone, and I mean everyone, is using the reply all option. The upshot is, every few minutes you’re receiving notifications of a new email message on a subject you no longer have any interest in.
The new Mute thread option will turn off notifications for any response to the thread, leaving you in peace. Muting does not delete or prevent the reply to the message from occurring; it just stops the pestering notifications from trying to grab your attention.
You can find the Mute option by selecting the offending email in the message list and right-clicking it. The popup menu will contain the Mute option.
Block Sender: You’ve probably already been blocking senders by creating new Mail rules that sends emails that match the rule you created to the trash. This can be effective, but it’s a bit time consuming. With macOS Catalina, Mail gets a new Block Sender option that does all the work for you, moving any message that matches up to the Block List to the trash for you. And you can enable blocking just by clicking the sender’s name and selecting the Block option from the popup menu.
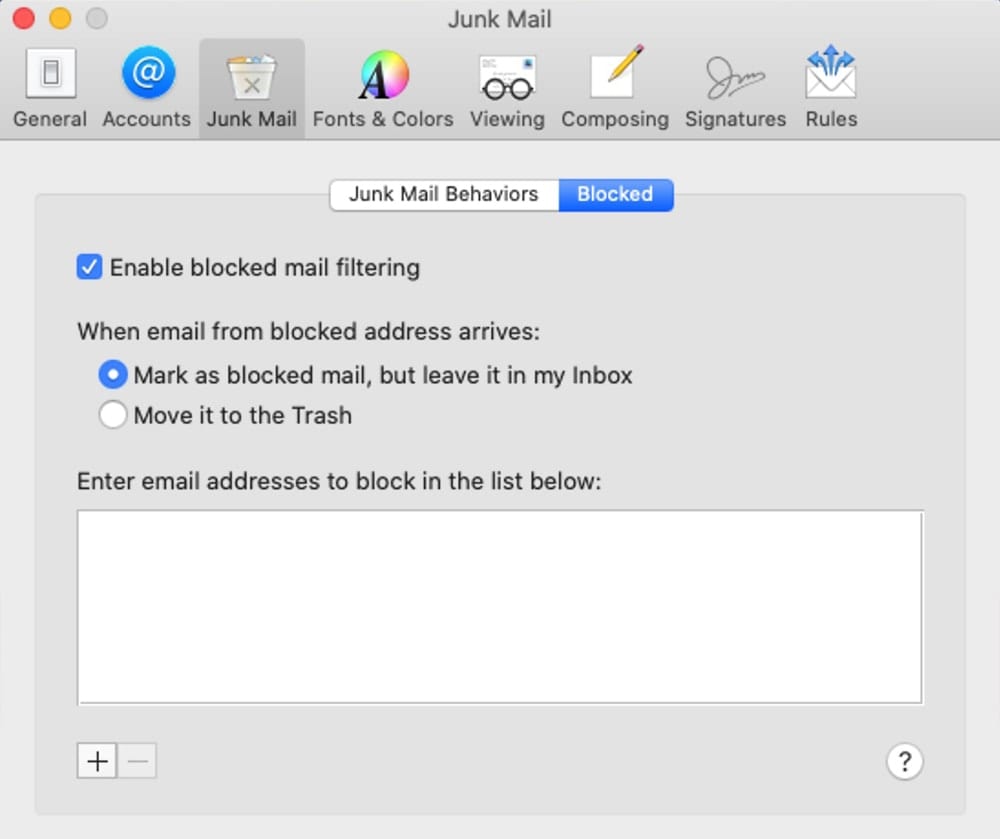
There are also a number of blocking options available from Mail’s preferences (look in the Junk Mail tab), including marking a message as blocked, but leaving it in your inbox, or moving blocked messages directly to the trash.
Safari Tips
The Safari browser has a few new or improved features. Here are two of them.
Safari Picture in Picture: Safari has had a picture-in-picture capability for some time but its implementation varied, depending on the site you were visiting. Most sites offer a small picture-in-picture icon from the embedded video player’s window. Others, such as YouTube, require you to double right-click to see the option to use picture-in-picture.
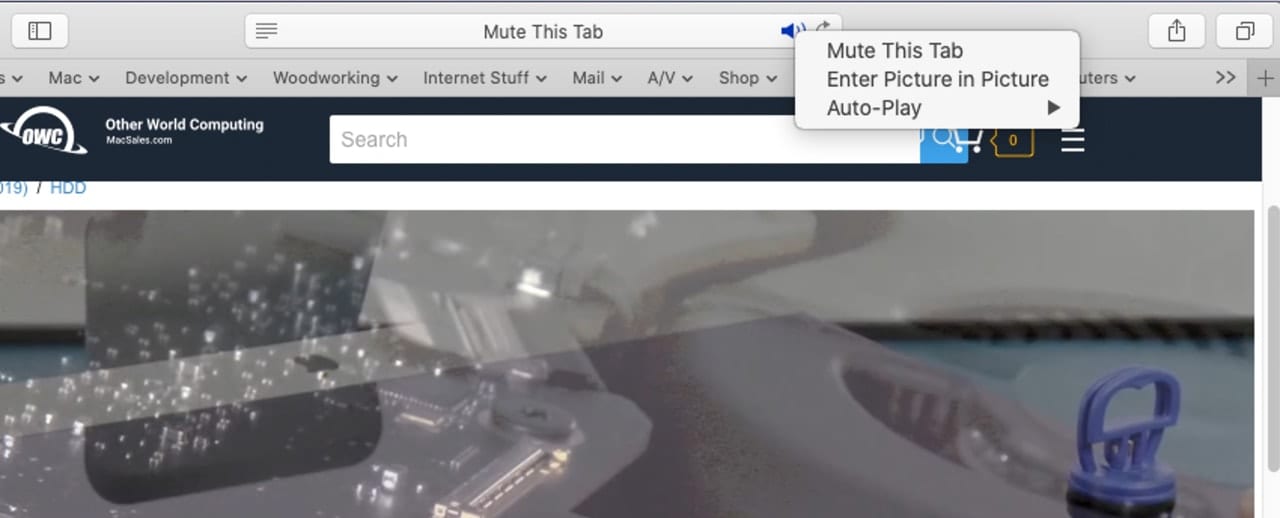
With macOS Catalina, Safari gains a simple way to enter picture-in-picture; just start the video playing, then right-click the speaker icon in Safari’s URL bar. A popup menu will include the option to Enter Picture-in-Picture.
Selecting the option will pop the video out into its own window, letting you watch the video while you continue browsing.
Weak Passwords: Safari will help prevent weak passwords from being created for use with websites you visit. When you create a password for a site you’re visiting, Safari will pop up a warning if the password is considered weak and easily cracked. Safari will offer to replace the weak password with one a bit stronger.
Safari can also save the passwords for you, to more easily allow you to create hard-to-break strong passwords. After all, who’s going to remember As5-f4C-h&n-bb7?
Additional Catalina App Tricks
Here are a couple more tips for you to try.
Take a Note: The Notes app in macOS Catalina has gained new sharing capabilities. You can set up a folder of notes and allow those you invite to collaborate with you on the notes. You can also control who has permission to view and change notes.
Invites to the shared folder of notes can be sent via Mail, Messages, or Reminders, or by links.
Document Signing: The Preview app has supported document signing for quite a while. With earlier versions of Preview, you wrote your signature on paper, then held the paper up to your Mac’s camera. Preview would take a picture of your signature and store it for later use on PDF documents, which was a somewhat cumbersome process.
With macOS Catalina, Preview can now use your iPhone or iPad to capture your signature by simply writing on the iOS device’s screen with your finger or an Apple Pencil (or any supported stylus). Of course, you can still use the camera or write on a touchpad, but the iPhone/iPad option will likely produce a better-looking signature.
What Features Do You Like in macOS Catalina?
As more of our readers make the transition to macOS Catalina, it would be interesting to find out which features of the new OS you really like, or for that matter, which ones you don’t. Let us know either way in the comments below.





Nearly every time I click, a menu pops up which keeps me from far too many actions without clicking again, sometimes three or four times till the menus stop popping up. How the hell can I stop these annoying popups?
App tiling existed before, but Catalina provides a new way of getting it set up, as you show above.
Note that if the app you want to tile is already in full screen mode, you need to invoke ‘Mission Control’ with keyboard dedicated key (or keyboard shortcut, trackpad gesture, or mouse button, depending on how the respective preferences are set up), then drag the second app into the workspace window for the first app (on right or left), just as you would have previously.