Did you upgrade to macOS Catalina and decide it’s not for you? Perhaps a favorite app isn’t Catalina compatible, or changes in some of the apps Apple provides are not to your taste. Maybe your Mac just seems to be performing poorly with Catalina, or you experienced issues installing macOS Catalina and would just like to get back to a Mac OS you know works on your Mac.
If you would like to downgrade from macOS Catalina to a previous version of the Mac operating system it can be done, but it isn’t always an easy or painless process. If you’re downgrading because of macOS Catalina installation problems, be sure to check the Catalina Install Issues section near the end of this article for any special steps you may need to take.
With those caveats in mind, let’s start the downgrade process.
What You Need in Order to Downgrade from macOS Catalina
There are a few different ways to perform the downgrade; here are two of them. You can:
- Reinstall a previous version of the Mac OS using the appropriate Mac OS Installer.
- Use Time Machine to restore from a date when your Mac was using a previous version of the o
perating system.
With any of the downgrade methods, you’re going to lose all the data currently on your Mac. The volumes that currently house your copy of macOS Catalina will have to be erased in order to convert the two special Catalina volumes (one read-only system volume and one read/write data volume) back to a format that is usable by the earlier versions of the Mac OS.
Back Up Your Current Data
Because of the need to erase your startup drive, the downgrade process should start with backing up all of your data. Time Machine is one option for a backup; just make sure Time Machine has been run shortly before you start the downgrade. The other option is to make a clone of the startup drive. If you go the clone route, make sure the cloning software you use is both APFS and macOS Catalina compatible; Carbon Copy Cloner and SuperDuper are two good possibilities.
If you need storage to house these backups, Other World Computing has a large selection of storage options available to choose from.
Don’t forget that besides having a backup of your data you should also have all your passwords, license keys, and network logins saved where you can easily access them during the installation of your replacement Mac OS.
Pick a Mac OS Installer
Unless you’re planning to use the Mac’s Internet Recovery options to reinstall the original version of the Mac OS that shipped with your Mac, or you’re planning on restoring from a Time Machine backup or a clone you made before you upgraded to macOS Catalina, you’re going to need a bootable version of the Mac OS you wish to install.
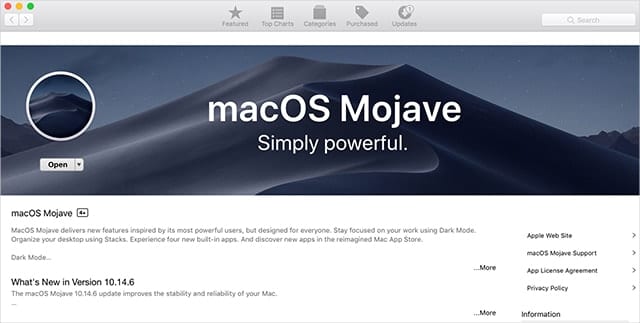
We can show you how to create the bootable installer, but first you’ll need to download the macOS installer from the Mac App Store. You can find the installers available at:
Download the installer of your choice. If the installer starts up automatically, be sure to quit the installer. Do not allow it to start the install process.
Note: You may see a warning about downloading an older version of the operating system. There should be an option available to continue the download.
T2-Equipped Macs
Creating and using the macOS bootable installer requires your Mac to be able to start up from an external drive. Macs equipped with the T2 security chip need to have a security setting altered to allow the use of bootable external devices.
If your Mac is equipped with a T2 chip, and most current Macs are, you’ll need to check the Rocket Yard guide:
How to Clean Install macOS Catalina
Follow the instructions in the T2-Equipped Macs section.

Create the Bootable Installer
You’ll need a USB flash drive with a minimum of 8 GB of storage space and preferably, but not a requirement, a USB 3.0 port.
With the installer downloaded and the USB flash drive in hand, follow the appropriate instructions linked below:
- How to Create a Bootable macOS Mojave Install Drive
- Create a Bootable macOS High Sierra Install Drive
- How to Make a macOS Sierra USB Install Drive
Once you have the bootable installer and a current backup, you’re ready to start the downgrade process.
Erase and Reformat the Startup Drive
Let’s start this section with an important notice:
Warning: This process will completely erase your Mac’s startup drive, destroying all of its content.
Early versions of the Mac OS did not make use of a read-only system volume and a read-write data volume. To ensure earlier versions of the OS can be installed, you need to erase and reformat the startup drive to remove the split volume architecture used in Catalina.
This can be done using the Mac’s Internet Recovery system. You may be tempted to use the normal Recovery volume that Catalina installs on your Mac. The problem is that the Recovery volume is part of the same APFS-formatted drive that houses the system volume and data volume you need to remove. Trying to erase and reformat the drive that also contains the Recovery volume can lead to some interesting error messages that are best to avoid.
Instead, use Internet Recovery, which runs from RAM memory, freeing you to use Disk Utility to completely erase the startup drive. Make sure you have on hand any network or Wi-Fi passwords you may need to make the network connection.
Restart your Mac while holding down the Option + Command + R keys. Continue to hold those keys down until you see a spinning world globe and the words Internet Recovery on the screen. This process takes a while, so be patient.
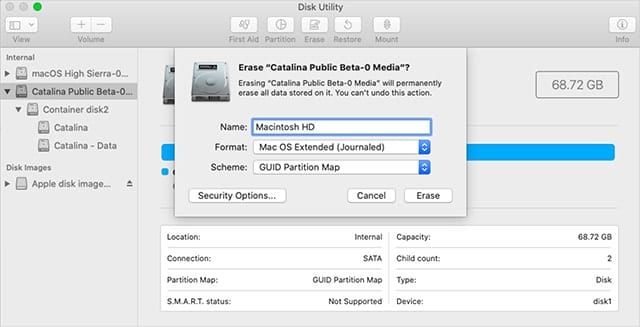
From the macOS Utilities window that opens, select Disk Utility, then click the Continue button.
In the Disk Utility window, select Show All Devices from the View menu, or use the View button on the toolbar.
In the Disk Utility sidebar, select the Mac’s startup drive (not the volume or the container, but the top-most item in the startup drive hierarchy).
Click or tap the Erase button.
In the sheet that drops down, give the drive a name, set the format to Mac OS Extended (Journaled), and the Scheme to GUID Partition Map.
Note: I’m suggesting Mac OS Extended (Journaled) because it can be used to install Mojave, High Sierra, and Sierra, though Mojave may convert the format to APFS during the installation process.
Click or tap the Erase button.
Once the erase is complete, you can quit Disk Utility.
Tip: If you don’t have a reliable Internet connection, you can use a bootable macOS High Sierra, Mojave, or Catalina installer. Boot from the installer then follow the steps above starting at: “From the macOS Utilities window that opens…”
Install Mac OS
With the startup drive erased, you’re ready to install the earlier version of the macOS.
Connect the bootable macOS installer you made earlier to your Mac.
If your Mac is still booted into recovery mode, quit recovery by selecting Quit macOS Utilities from the macOS Utilities menu.
Restart your Mac while holding down the option key.
Continue to hold the option key down until you see the Mac’s Boot Manager appear.
The Boot Manager will display a list of connected bootable devices. Use the arrow button to select the USB flash drive that contains the macOS installer. Hit the return key to boot from the installer.
Booting from the USB flash drive may take a while; eventually, the macOS Utilities window will be displayed. Select the option to Install macOS and then click the Continue button. The macOS installer will start up and walk you through the installation of the version of the Mac OS contained on the installer.
Use Time Machine to Downgrade
If you’ve been using Time Machine for your backups, it may be possible to restore from an earlier backup, when you were using an older operating system on your Mac.
The advantage to this method is that not only will you end up with an earlier version of the Mac OS, but you will also have all your data from that time restored as well. (You won’t have any data newer than that date.)
To Use Time Machine to restore from a previous backup point, you still need to erase and format the Catalina startup drive to remove the split system volume and the APFS formatting. Perform the steps outlined in Erase and Restore the Startup Drive, listed above.
When you get to where you quit Disk Utility, jump back to this point and continue from here.
The macOS Utility window should be open. If not, restart your Mac using the recovery partition, as outlined above.
Make sure your Time Machine backup drive is connected to your Mac.
In the macOS Utility window, select Restore From Time Machine Backup, and then click the Continue button.
The Restore from Time Machine Backup option will present some basic information; once you’ve read it, click the Continue button.
A list of restore sources will be displayed. Select your Time Machine drive and click Continue.
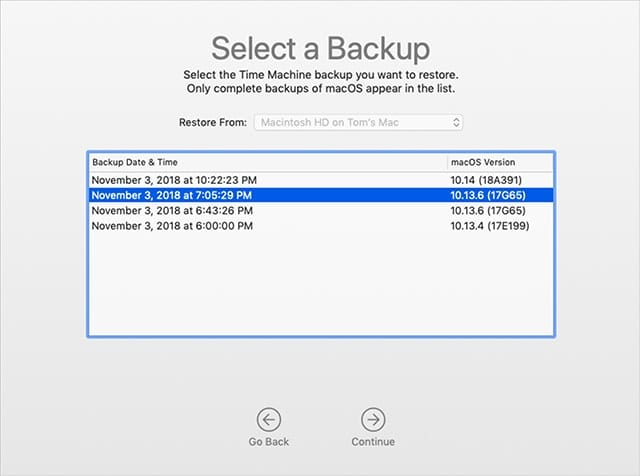
A list of restore points will be displayed, organized by date as well as the OS version that was in use. Select the restore point you wish to use, and then click Continue.
Time Machine will display a list of drives currently connected to your Mac. Select the drive you wish to use as the destination for the restore; this will normally be the startup drive you erased earlier. When you’re ready, click the Restore button.
The restore process will start. This can take a while; when it’s complete, your Mac will restart.
Catalina Install Issues
There have been a number of macOS Catalina install issues that may make it more difficult to downgrade to an earlier version of the Mac OS. We hope one or more of these tips will allow you to perform the downgrade and install an earlier version of the operating system.
Stuck at Setting Up: When your Mac is stuck at the Setting Up point, there’s some good news. The Catalina installation has actually finished, and if you could get past the Setting Up message, you could use your Mac.
The easiest way around this problem is to just shut down your Mac and restart it. Even if you have to force the power off, either by holding the power button in or unplugging your Mac via the power cord, your Mac should restart and either finish the setup process or, more likely, bring you to the login screen.
Even if you find yourself still stuck at Setting Up, you can force restart the Mac and then enter Recovery mode, as outlined above.
Can’t Download a Version of macOS or Create a Bootable Installer: You may not be able to download or create a bootable installer because your Mac is still not functional due to an install error with Catalina. You don’t have to use your Mac to download or create the bootable installer; it can be done on any Mac, such as the Mac of a friend, family member, or coworker.
Once you have the bootable installer, you can force restart your Mac and start the downgrade process as outlined above.
Can’t Log In: Make sure you’ve tried restarting, as well as the steps outlined in:
How to Fix macOS Catalina Installation Issues
specifically, the Activation Lock Prevents Access to Your Mac section.
In previous versions of the Mac OS, you could use Single User mode to remove a system file that would force the Mac to run the setup process again, giving you the opportunity to create a new administrator account. Unfortunately, the read-only system volume in Catalina prevents the removal of the file.
If you still can’t gain access, you should consider using the Recovery mode to erase the drive and either reinstall Catalina, or an earlier version of the Mac OS.
Damaged Startup Drive: If the Catalina installation resulted in the startup drive being damaged, you may not be able to make use of the Recovery mode to use Disk Utility to repair the drive.
If you can’t restart into Recovery mode, you can try using Internet Recovery, which doesn’t require a working recovery partition. You’ll find instructions above, in the Erase and Reformat the Startup Drive section.
Once the macOS Utilities window is present, select Disk Utility, and then try the First Aid option.
Video Not Working: There have been a few reports of monitors attached to Macs via an HDMI port not working with Catalina. One workaround is to use a Thunderbolt to HDMI cable so that you can connect the monitor to one of the Mac’s Thunderbolt ports. This should get the display working, and allow you to perform the downgrade or continue to use Catalina.
Now What?
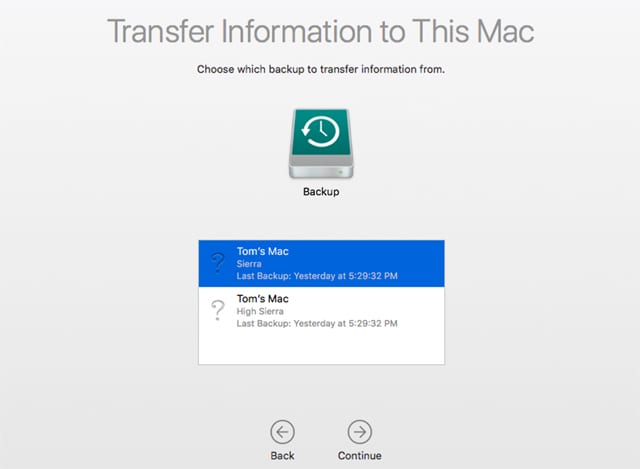
Now that you’ve reinstalled an earlier version of the Mac OS, the hard part begins: deciding which files you want to restore from a backup. You can use the Migration Assistant app to restore files from a clone, another Mac, or a Time Machine backup. Or, you can use Time Machine directly to restore selected files.



Older macOS versions require a single unified volume, so the read-only system and read-write data volumes created by Catalina must be removed prior to installation.Regard S2 Akuntansi
Downgrading from macOS Catalina requires erasing your current data, as the system and data volumes must be reformatted for compatibility with earlier macOS versions.Regard S2 Akuntansi
This tutorial is incomplete. It doesn’t say what should be done when there is no partition scheme available (which is mos of the case for the downgrade options mentioned), and also it doesn’t say how to proceed after macos from bootable installer is actioned. It is not as straight forward as it seems. The only thing I appreciate in this article is that the author kept the legacy of Steve Jobs by dragging the paths instead of typing them in the command line of Terminal unlike creatures from Apple Support suggests.
The best tutorial I have found and understandable for a non-techie.
This seems to forget a HUGELY important step: how do you tell the App Store that you’re no longer on Catalina (or Big Sur these days), and that you need the Mojave versions of apps instead of the App Store going “yeah so you were on a more modern OS so I won’t even let you download the mojave version anymore, sucks to be you”?
Very useful.
Lucky you. I haven’t even passed this step. I cannot start operating my mac after performing all the actions mentioned in this article. It kerps circling me into recovery boot.
As a neophyte trying to retrograde a newer Mac’s OS to Mojave today, using these and related instructions, I got pretty deep into the process–and the afternoon–before realizing a basic fact, from the Discmaker X FAQ: that no Mac can safely run an OS that pre-dates what it originally came with.
These instructions are pretty clearly laid out and I appreciate that they are available, but I for now would have benefited from some very basic warnings/education at the top.
Thanks for the suggestion – it would be good to mention this whenever we talk about downgrading.
I’m trying to downgrade to High Sierra. I created the bootable USB but when I try to install the OS through the recovery menu it says the disk is locked and won’t let me select the USB. What do I do? It’s just a Sandisk USB with no external lock.
I’m trying to downgrade to Mojave using shift+option+command+r (because my mac came with Mojave) and on internet recovery (when the globe is spinning), I pick my wifi and put in the password and then it stays there with my wifi picked with the globe spinning then after a while it gives me an error code (-2002F I think) or just plain freezes. Does anybody know how to fix this?
Hi, I recently upgraded from Mojave to Catalina and apparently the new System Preference panels did not load. All of the Catalina info sites show black and white (B&W) panels. One such B&W panel appeared during upgrade then disappeared. I need to install the 2019 version of TurboTax Premier and need to be able to set the privacy panel to “Anywhere”, but that button is not on the older Privacy panel. Mac is blocking the install, because the downloaded program has not been “Notarized” by Intuit. The program did install on my wife’s Mojave OS machine.
How do I get the new panels to show up?
Thanks.
I’m running High Sierra 10.13.6 on my Mac. I have a Install macOS Catalina application from Apple and I want to know what version it is before I install it. I use to be able to show package contents and go to Contents/version.plist to get the version but I’m not seeing that information in Catalina. I’ve tried opening it in Text Edit and Test Wrangler and all I see is a bunch of strange coding. Is there a way I can see what version of Catalina I have before installing it? Thanks!
Hi Jeff,
I checked on the issue you mentioned of not being able to view the version of the Catalina install.
I happen to also have a Mac running 10.13.6, so i downloaded Catalina to that Mac and checked the version information.
I opened the package content of the Install macOS Catalina app. Then opened the Content folder where I found two .plist files (Info.plist and version.plist) that contain the version information.
I was able to open both plist files with TextWrangler and read their content without any problems. In my case the version was 15.2.02.
The app TextEdit also worked for viewing the information.
You can also view the version information directly from the installer app by right-clicking the app and selecting Get Info. The version should be listed in the General section of the Get Info box.
Tom
Thanks Tom,
The thing throwing me off is that every place you indicated showed my installer version was 15.0.3. I was expecting 10.15.0.3 and was wondering if Apple had started a new OS installer naming convention like Adobe where the version numbers don’t match the names.
I’m a little confused. You have us create a bootable flash drive, but then have us boot off of internet recovery to reformat the drive. If you have a bootable Mojave install drive, why would you not use it?
Great instructions otherwise — used them to revert my older non-retina MacBook Air because (among other things) Catalina absolutely trashed the font rendering so it was horrible to look at. :/
Hi, i sucessfully downloaded Mojave, however the app store automatically tried to install it, came up with an error and quit taking with it the downloaded copy of mojave. Any tips on how to proceed?
Where can you download MacOS Mojave 10.14?
All I can find in 10.14.1 and up, and every other version tells me I need 10.14 downloaded.
Did you try downloading it from the App Store? 10.14.6 should be a full installer, not just an upgrade install.
Superduper is not yet 100% Catalina compatible