In part one of this two-part series on studio acoustics, we reviewed some basic concepts and acoustic problems often found in home studios and small rooms. Assuming you have read part one, you should now be familiar with concepts like flutter, comb filtering, room modes, and decay time. In this article, we’ll explain how to treat these issues and compare the effectiveness of common acoustic solutions.
Absorption vs. Diffusion
There are two important concepts you should understand as we begin to identify solutions to improve the acoustics of your home studio — absorption and diffusion.
What is acoustical absorption?
Acoustical treatments that utilize absorption are designed to remove or lessen sound energy. These types of treatments work by absorbing sound energy and reflecting back only a small percentage of the original sound. There are a plethora of materials available for this purpose, and they offer different levels of performance based on several factors. These include:
- Thickness and density of the material
- Absorption C
oefficient , measured at various frequencies - Size of the air gap between the material and the treated surface
In short, absorption is all about “trapping” sound energy so that it doesn’t bounce around your room and create sonic chaos. Additionally, it’s important to know that lower frequencies typically require thicker, denser materials to be absorbed, which can sometimes be challenging in very small spaces.
What is acoustical diffusion?
Diffusion is absorption’s partner in crime when acoustically treating a studio. While absorption is removing sound energy, diffusion works by scattering sound waves back into the room at random. Diffusion can help mitigate multiple problems in smaller rooms, reducing flutter and making your room’s decay and acoustic response more natural.
By combining these two types of solutions, you can transform the most boxy sounding of rooms into a highly functional, natural sounding environment that makes for a great home studio.
Start with the Corners
If you’ve ever searched online for acoustic treatments, you’ve likely come across inexpensive acoustic foam, usually sold in 1′ x 1′ squares. While these can be a good choice in certain scenarios, they are not the best solution when you first start treating your room. They are generally useless below 250 Hz — an area that can be particularly troublesome in smaller rooms, the kind often used in home studios.
The Biggest Bang for the Buck
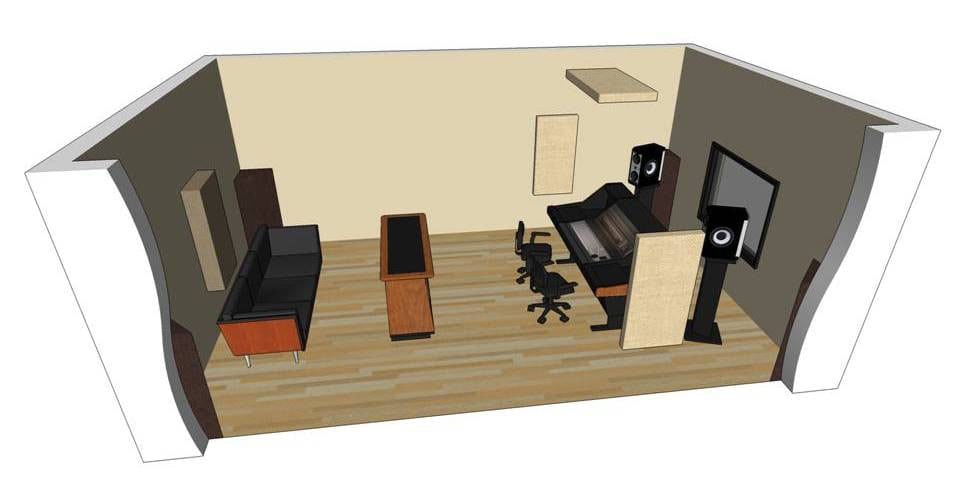
The most effective first step you can make in treating your home studio is to install bass traps in all four corners, floor to ceiling. Even if you can only treat two or three corners, this will significantly improve the low-frequency response of your room. Corners are where the biggest buildup of low-frequency energy occurs, especially in smaller rooms. Properly treated, I promise that you will be amazed at the difference bass trapping will make.
There are plenty of corner bass trap offerings out there, so here are a few I would recommend looking at:
- GIK Acoustics Tri-Trap
- ATS Acoustics Corner Bass Trap
- Space-saving option: Primacoustic Cumulus
- Budget foam option:
If your budget simply can’t support an investment in the solutions listed above, you can find acoustic foam corner bass traps for about 1/4 of the price. They won’t be as effective, especially below 250 Hz, but if you go this route, you’ll want foam traps that are at least 12″ x 12″ x 24″.
Hear the True Sound of Your Speakers
Now that we have treated the corners and improved the low-frequency response of your room, let’s talk about treating early reflections.
When audio comes out of your studio speakers, the sound waves bounce off walls, the ceiling, and the floor. It’s a bit of acoustic chaos. These bounces, or reflections, arrive at your ears milliseconds after the direct sound you hear from the speakers, mixing together and significantly altering certain frequencies. If you don’t treat the reflection points, you’ll likely be unable to accurately hear what your speakers are producing.
First, let’s review how to identify your room’s early reflection points and then some suggestions for how to treat them.
Locating Early Reflection Points
In order to identify the early reflection points in your studio, you’ll need two things: a friend and a small mirror.
These simple steps will make locating reflection points at your listening position a breeze:
- Sit in your listening position facing your speakers
- Have your friend hold the mirror flush against the left side wall and move it from front to back until you see the cone of your left speaker in the mirror.
- Mark that location on the wall. You’ve just identified the early reflection point for your left speaker.
- Repeat steps 2 and 3 for the right side.
- Now that you’ve identified early reflections on your side walls, it’s time to select a treatment.
This treatment can be something like a 2-inch thick 2′ x 4′ acoustic panel, or less expensive (and less effective) acoustic foam. Here are some popular options:
- GIK Acoustics 242 Acoustic Panels
- ATS Acoustic Panels
- Primacoustic Broadway Panels
- Auralex Studiofoam Absorption Panels
Next Steps, Budget Permitting
By treating your corners and early side reflection points, you have taken the first and most essential steps to improve your home studio’s acoustics. While these are important treatments, they are indeed the bare minimum.
If your budget can support further investment in acoustic treatments, I recommend treating the ceiling above your listening position (a.k.a. an acoustical cloud) and installing additional acoustic panels throughout your room to further control flutter and reduce decay times.
If you’re the type who would prefer to buy an entire kit of pre-selected pieces for acoustically treating your room, here are two complete room kits that I would recommend checking out. They provide a great starting point and include corner bass trapping, ceiling cloud panels, and early reflection treatment.
- GIK Acoustic Room Kit Package 3
- (3) 242 24″ x 48″ Acoustic Panels
- (4) Tri-Trap Corner Bass Traps
- (1) Monster Bass Trap Panel
- Primacoustic London 16 Room Kit
- (24) 12″ x 12″ Scatter Blocks
- (12) 12″ x 48″ Control Columns
- (6) 24″ x 48″ Broadband Panels
What happened to diffusion? You talked about diffusion!
I did indeed — it’s good to understand two of the most common technical terms used when talking about acoustic treatment. In many (but not all) home studio scenarios, I consider diffusion a nice-to-have, not a must-have. As mentioned earlier in the article, diffusion can help reduce acoustic artifacts like flutter and make your room’s decay sound more natural by scattering sound waves. Diffusers can also make a small room sound more lively, and that may or may not be part of your objective. In the end, I would only invest in diffusion treatment after accomplishing the basics of corner bass-trapping, early reflection treatment, and any necessary additional absorption treatments. Absorption will usually provide you with the best value for your money in most small, home studio rooms.
Home Studio Acoustic Treatment Summary & Conclusion
If, after reading this article, you’re feeling overwhelmed by the notion of investing in acoustic treatment for your home studio, here’s the short version:
- Treat as much of the corners as you can from floor to ceiling with corner bass traps. This will significantly help your room’s frequency response.
- Treat early reflection points to the left, right, and on the ceiling with 2′ x 4′ panels (or acoustic foam if budget is limited). This will reduce comb filtering effects and will help you hear the true sound of your speakers.
- Increase wall coverage, as your budget will allow, to incrementally improve the acoustic performance of your room and dramatically reduce flutter. You’ll be especially glad you did this if you have a one-room home studio and plan to record live instruments.
Acoustic treatment is an often unexpected, yet absolutely necessary expense. It can also be one of the most expensive aspects of putting together a proper home studio. It may not feel like the sexiest way to spend your limited resources, but choosing to invest in acoustic treatment will ensure that you are setting yourself up for sonic success. I spent years skimping on acoustic treatments in various spaces and home studios. After taking the leap and finally making acoustic treatment a priority, I can honestly say that I wish I had done so years ago.
Expensive? Yes. Worth it? Absolutely.


This is incredible info. Thanks for the time and effort in publishing it. OWC my vendor of choice
Thanks for reading Garth! I’m glad it’s helpful!