Printing from a Mac is as easy as pressing Command + P or selecting Print from an app’s File menu. But what if the default printing settings aren’t exactly what you need for a particular print job?
If you just started working from home (WFH), there will probably be times when you need more control over the printing process, to get the professional results you need for a work environment, or just to learn some cool new printing tricks.
Either way, this Rocket Yard guide will look at tips for productive printing.
Printing from the Mac: The Basics
The Mac uses a multi-part print system with three main areas you can interact with:
- Printers & Scanners:
This preference pane in System Preferences is where you manage printers and scanners connected to your Mac. You can add or remove printers, check supply levels, and pick which printer to use by default, as well as the default paper size the printer uses. - Print Queue:
Print jobs you send to a printer are processed by the print queue. The print queue manages print jobs, letting you pause or resume the print job, and delete or skip print jobs. The print queue also provides information about the current status of the printer, such as the printer is printing, paused, or has a problem. - Print Command:
The print command initiates a print job. In most cases, this will include opening the print dialog box, which allows you to specify options to be applied to the document. This can include which printer to use, how many copies to print, and the paper size to use, as well as a number of additional printing options.
Our tips will cover all three printing areas, starting with basic print commands.
Printing Tips
These tips should make the printing process more productive and, with any luck, allow you to explore new areas of the Mac OS.
Print Multiple Documents
If you have a number of documents to print, the usual course of action is to open each document in the appropriate app, hit the print command (either Command + P or File menu, Print), and let the app initiate the print process. A quicker way is to select all the documents to be printed in the Finder and then press Command + P or select Print from the Finder’s File menu. Your Mac will print all the documents to the default printer.
Tip: Use the Drag and Drop tip below to print multiple documents to a printer other than the default.
Drag and Drop printing
We all know about using drag-and-drop; if only we had a printer icon that we could drag documents onto for printing. With this tip, you can add a printer icon to your Dock just for drag-and-drop printing.
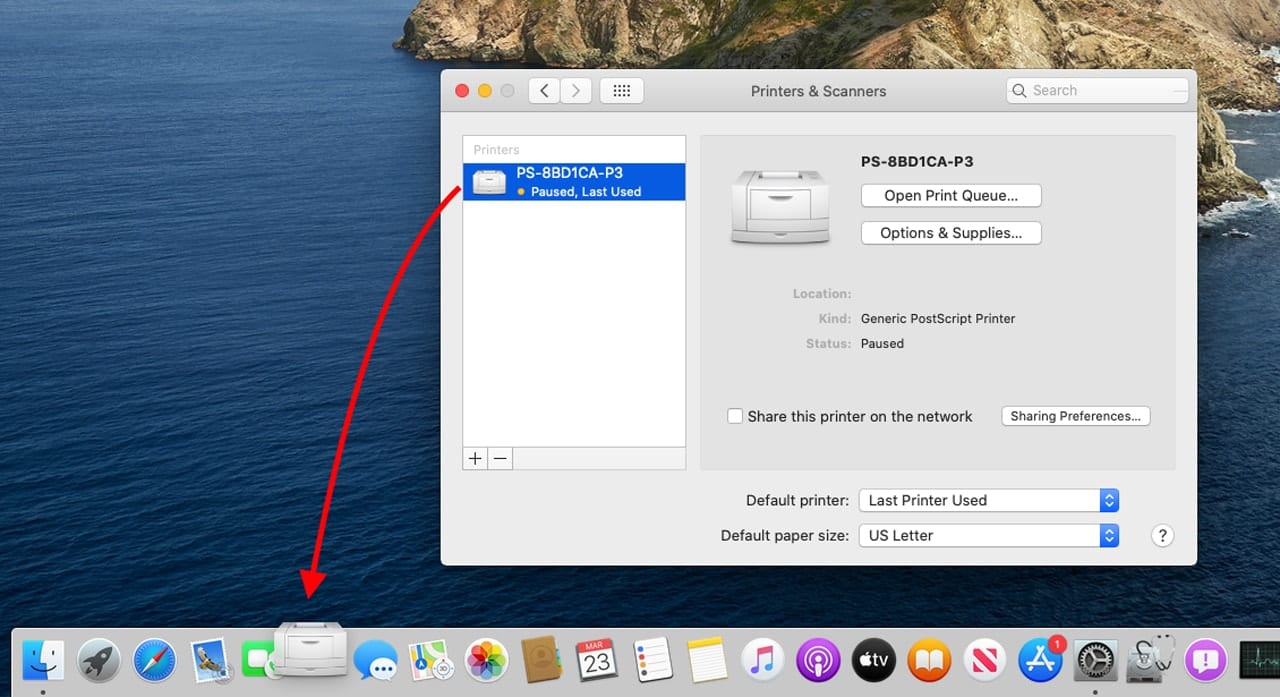
Open System Preferences and select the Printers & Scanners preference pane.
From the list of printers, drag a printer from the Printers & Scanners sidebar and drop it onto the Dock. A printer icon should appear in the Dock.
Next time you wish to print a document, just drag the file to the printer icon in the Dock.
Tip within a tip: You’re not limited to a single printer in the Dock; you can add as many printers as you need to the Dock.
Adjust Margins
You may find yourself wishing you had just a smidgen more room to print, perhaps just a quarter of an inch more space on the bottom of letter-size paper would let you print on a single page, or maybe you need borderless printing for some photos.
No matter what the reason, you can adjust the margins before you print.
Open a document in the app you will print from, then select File, Print.
In the Print dialog box, select the Show Details button. (If you only see a Hide Details button, you’re all set.)
Use the Printer dropdown menu to ensure the correct printer is selected.
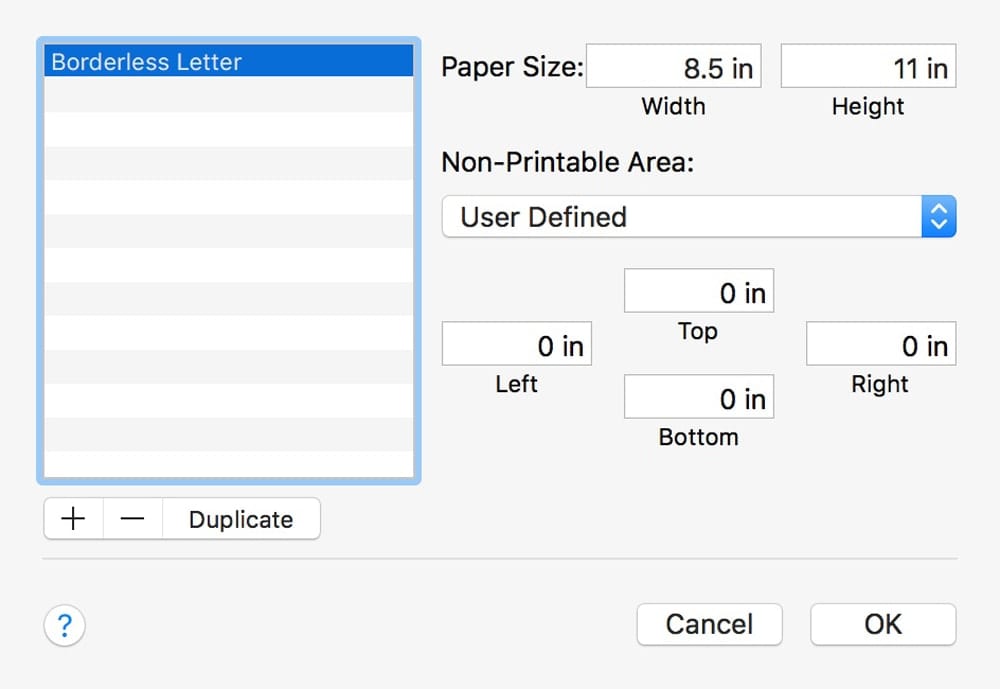
Use the Paper Size dropdown menu to select Manage Custom Sizes.
Note: If the Manage Custom Sizes item in the Paper Size menu is grayed out, it’s likely due to the lack of support for the feature in the selected printer.
Click the plus (+) button near the bottom of the sheet that opens. A new custom paper size will be added, with the name Untitled.
You can edit the new paper size name to something more descriptive by clicking twice on the Untitled name.
Make sure the paper size entry is correct for the paper you’re using. As an example, a U.S. Letter is 8.5 in. by 11 in.
Set the Non-Printable Area dropdown menu to User Defined.
Adjust the margins as needed for the document you’re printing, then click the OK button.
Note: Most printers will work with zero margins, handy for printing borderless photos, but if the printer doesn’t support a zero margin option, the resulting print will use the printer’s minimum margin settings regardless of what you entered.
Create or Edit Printer Presets
Printer presets are saved collections of printing preferences. They can be as simple as the number of copies and paper size to use, or as complex as which color matching utility to use, print quality, gamma, duplex printing, booklet printing, reverse page printing and quite a few other options.
You likely don’t want to manually configure the printing preferences for a complex printing session if you’re going to be using it often; that’s where presets come in handy. To create a printing preset, perform the following:
Open the app and document that you will be printing.
Select File, Print.
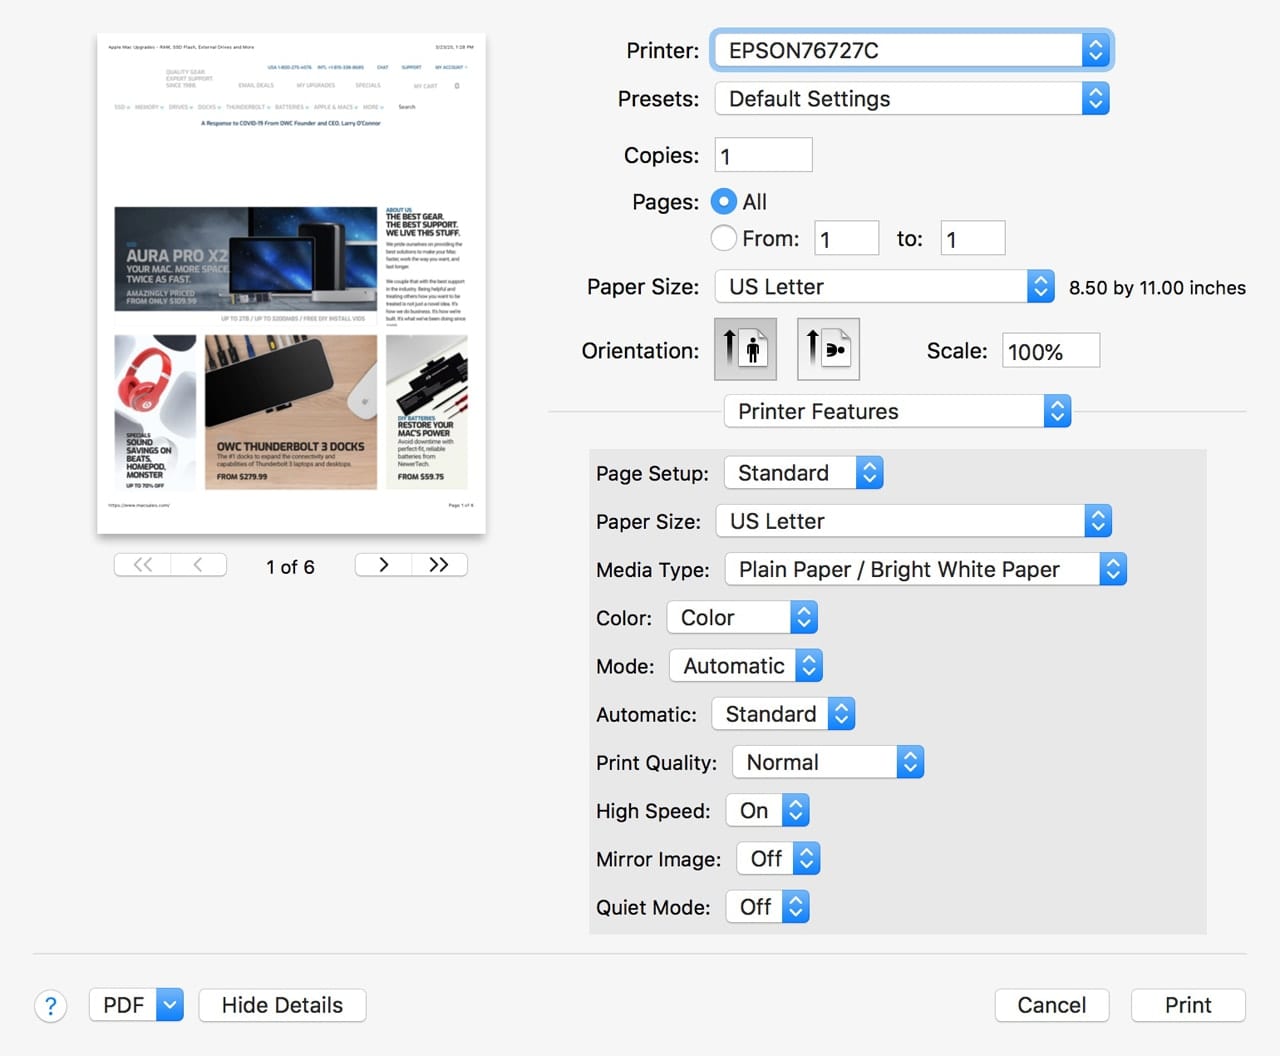
In the printing dialog box that opens, make sure Show Details is selected.
Use the Printer dropdown menu to select the printer you will be using.
Use the Presets dropdown menu to select a printing preset to start from. In most cases, you can just choose the Default Settings.
Enter values for the number of copies and pages to print.
Select a paper size to use, orientation, and scale.
From the Print Option dropdown menu, which may be populated with the name of the app you’re currently using, select each item in the dropdown menu, one at a time, and fill in the preference settings. You should see the following items in the list:
- Current app name
- Layout
- Color Matching
- Paper Handling
- Cover Page
- Printer Features
Once you have filled in all the preferences, perform a test print by clicking the Print button.
After examining the test print, make any adjustments you need. Once you’re satisfied with the preference settings, you can save them as a preset by using the Preset dropdown menu and selecting Save Current Settings as Preset…
A sheet will drop down, asking you to give the preset a name.
Select if the preset should be specific to the chosen printer or to all printers.
Note: Some preset preferences may be specific to a printer and can’t be used on other printers you may have. If you’re not sure, use the Only this printer option.
Review Presets
You can review preset settings by using the preset dropdown menu and selecting Show Presets. This will display all of the presets that have been created, including the Current preset, the Default Settings, and the Last Used Settings.
While reviewing presets, you can delete and duplicate presets, but you can’t edit them. To edit a preset, use the tip outlined above.
Troubleshooting Tip: If the Printer settings always return to the Default preset after each time you print a document, forcing you to select a different preset every time you print, you can prevent this from occurring by removing the checkmark from the Reset Presets Menu to Default Settings After Printing box.
Printer Queue
Each printer has its own print queue to manage all the print jobs submitted to it. You can exercise some control over the print queue, including pausing all print jobs, pausing specific print jobs, deleting a print job, printing test pages, or reordering print jobs.
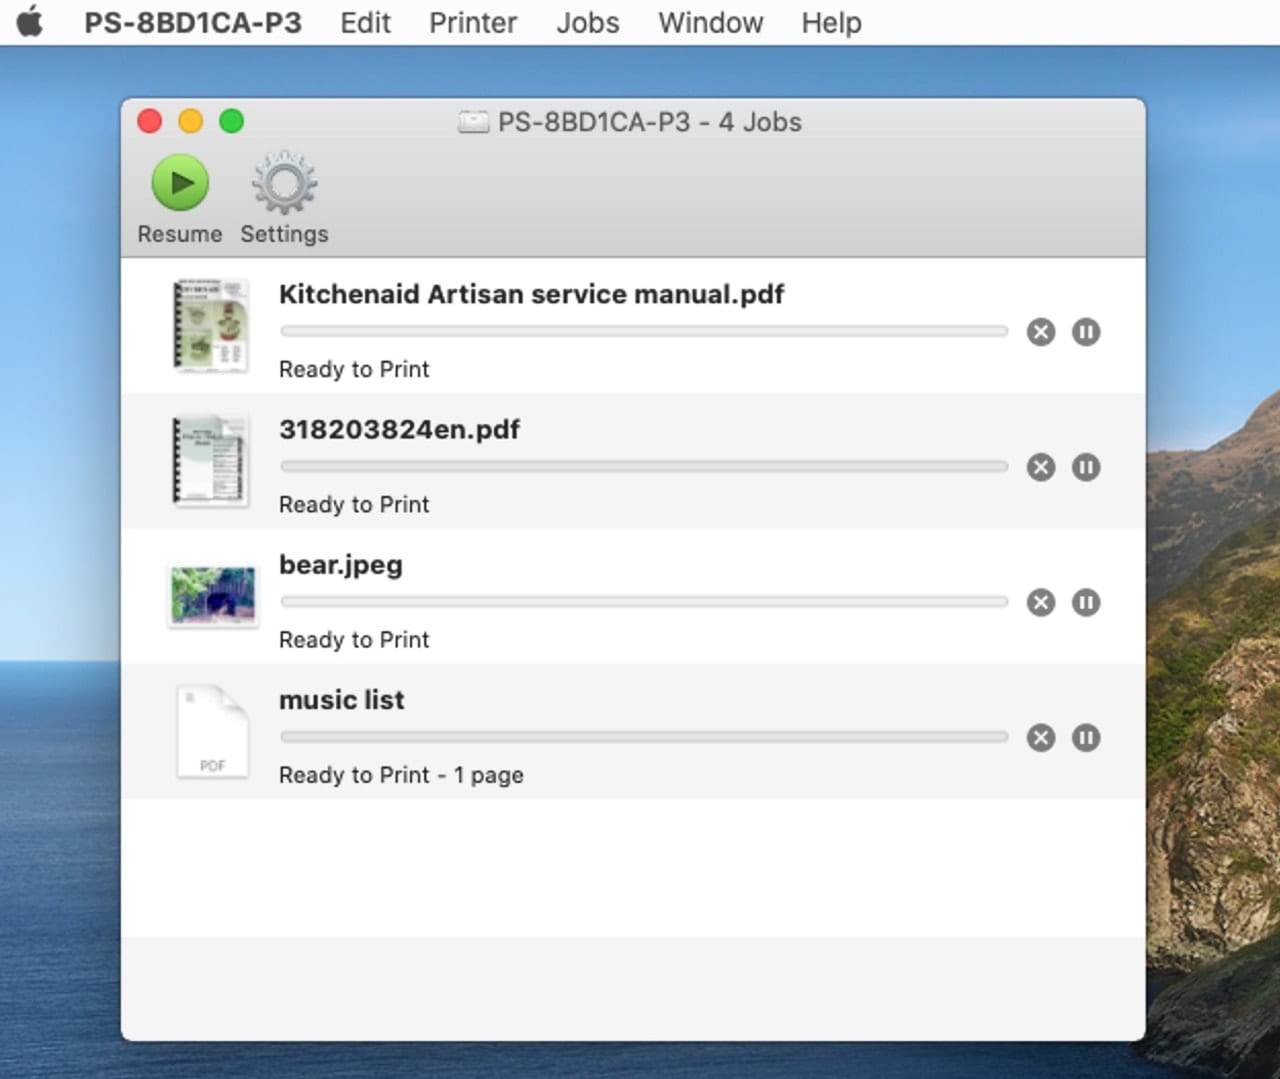
Accessing a Print Queue: From the Printers & Scanners preference pane, select a printer from the list, and then click the Open Print Queue button. You can also click on the printer icon in the Dock that will appear when a print job is in process, or because you added the printer to the Dock, as outlined in the tip above.
The printer queue will display each print job currently in the queue.
Stop the print queue: You can pause the print queue by clicking the Pause button in the print queue’s toolbar. To resume printing, click the Resume button in the toolbar.
Delete a print job: Click the X button at the far right of the print job, or select the print job from the list and choose Jobs, Delete Job from the menu.
Suspend a print job: You can keep a specific job from printing while allowing other print jobs to continue by selecting the job you wish to suspend from the printer queue list and selecting Jobs, Hold Job from the menu.
Remove stuck print jobs: The printer queue may become stuck occasionally. Usually, a single print job is gumming things up, and you’re having problems trying to delete the print job that is causing the issue. You can use the Terminal app to clear all print jobs, including the one that is stuck:
Open the Terminal app, located at /Applications/Utilities.
At the Terminal prompt, enter the following:
cancel -a
Hit Enter or Return, depending on your keyboard.
All printer queues on your Mac will be cleared of all jobs.
Printers & Scanners Preference Pane
Printers and scanners can be added to and deleted from your Mac using the Printers & Scanners preference pane.
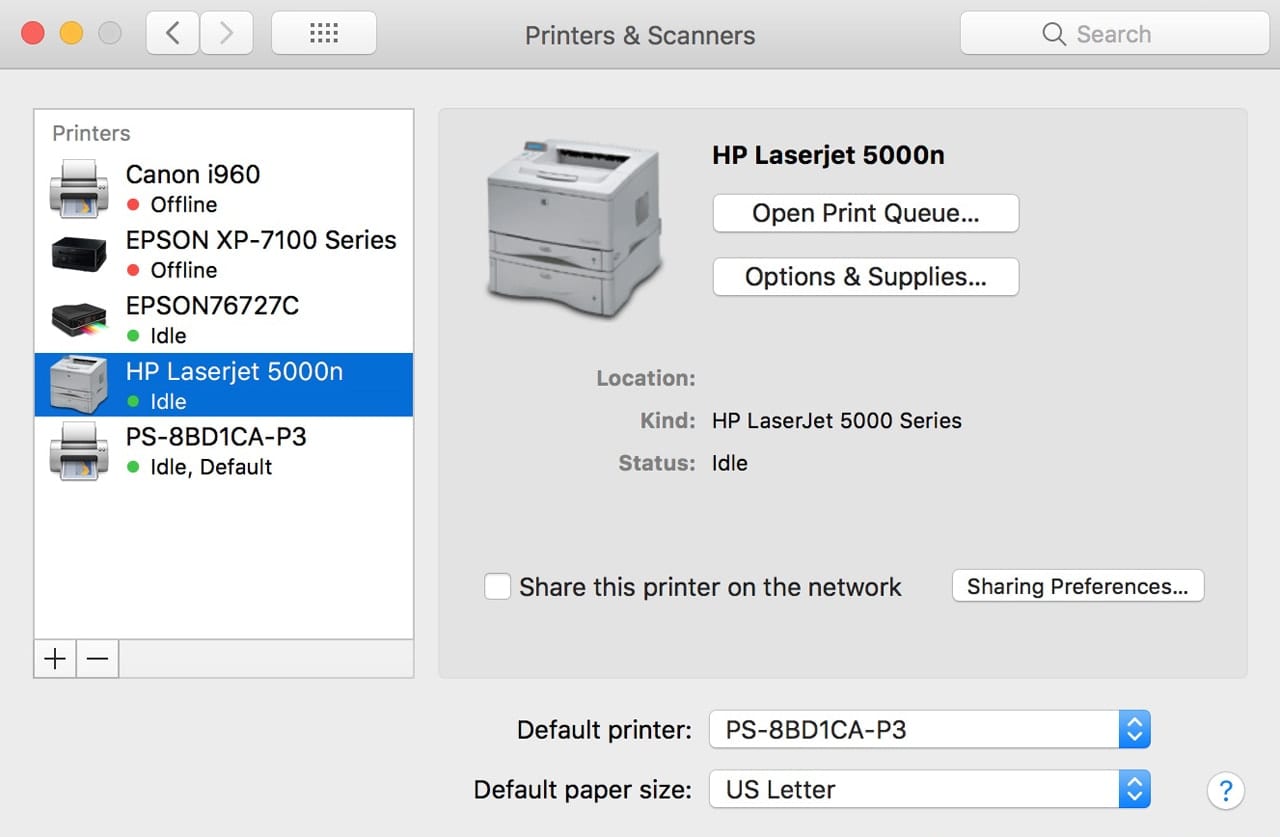
Open System Preferences and select the Printers & Scanners preference pane.
Add a Printer: In the sidebar, click the plus (+) button near the bottom, then follow the onscreen prompts. If your printer came with an installer app, it might be better to run the dedicated installer than to manually add the printer.
Delete a Printer: You can remove a printer by selecting it from the sidebar and then clicking the minus (-) button near the bottom of the sidebar. You’ll be asked if you really want to remove the selected printer; click the Delete Printer button.
Set Default Printer: If you have more than one printer attached to your Mac, you can specify which one to use as the default. Locate the Default Printer dropdown menu and select the printer you wish to use as the default from the list.
Set Default paper size: Use the dropdown menu to pick a default paper size to use.
Reset Printing System: If you ever run into an issue with a printer, printer driver, or printer queue that you just can’t fix and you would like to just start over, you can.
The macOS printing system can be reset to the condition it was in before any printers or scanners were connected to your Mac. This reset will remove all printers, printer drivers, printer queues, print jobs, scanners, and scanner drivers from your Mac, allowing you to start over with a clean slate.
To reset the printing systems do the following:
In the Printers & Scanners preference pane, right-click or control-click in the sidebar where the list of printers and scanners can be found.
Select “Reset Printing System” from the popup menu.
You will be asked if you really mean to reset the printing system: click the Reset button to proceed.
You can now reinstall any printer you need.
More Printing Tips
Do you have any printing tips or tricks? Share them with the rest of the Rocket Yard readers by adding comments below.
More Work From Home Essentials
- What You Need (And Need to Know) to Work From Home Successfully
- Use a Dock or Hub With Your Computer
- Choosing a UPS for Your Computer System
- FaceTime and Other Videoconference Apps
- Get More From Your Printer
- Helpful Apps and Utilities
- Photoshop Alternative – Affinity Photo
- InDesign Alternative – Affinity Publisher
- Illustrator Alternative – Affinity Designer
- Going Mobile While Staying Home




Thank you!
I thought I knew most of this stuff, but I learned there is ALWAYS more to learn.
Please keep up the good work and show us other things that might be helpful while working from home.
AirPrint was designed for easy printing from iOS mobile devices, but early OS-X and macOS AirPrint printer drivers rendered my Canon printers incapable of using many of the advanced features. Some features, like precise photo paper selection, and printable CD’s, were only initially available in NON-AirPrint drivers and printer software for OS-X and macOS. There are still differences, so when you install a printer, check to see if both AirPrint and NON-AirPrint drivers are available.
I can now do most print and scan tasks directly from my iPhone, but unlike Apps, there is no automatic notification when a manufacturer updates OS-X/macOS printer drivers and support software. Check the printer support site occasionally to be sure you have the latest drivers.