

We’re coming up on the first anniversary of the COVID-19 pandemic. While many of us have become very accustomed to using Zoom for everything from online work meetings to virtual exercise classes, we might not be using the tool to its full advantage. In this post, I’ll provide a selection of tips to help turn you into a Zoom master.
Zoom Virtual Backgrounds
Last April, OWC Jen showed you how to add a Zoom background. It’s fun and easy, and there are thousands of backgrounds that you can download. You can even use your own photos to add a personal touch. Sometimes the backgrounds don’t work just right, or perhaps you’re tired of static images. Here are some additional hints.
Video Backgrounds
You’ve probably noticed that Zoom includes some video backgrounds that are quite relaxing! Like the still backgrounds, they are added by clicking the up arrow next to Stop Video, then selecting Video Settings. Click Background & Filters on the left sidebar, and you have a choice of Virtual Backgrounds. The videos are signified by a small “video camera” icon such as the one seen in the left corner of the “Aurora Borealis” video I’m using in this screenshot:
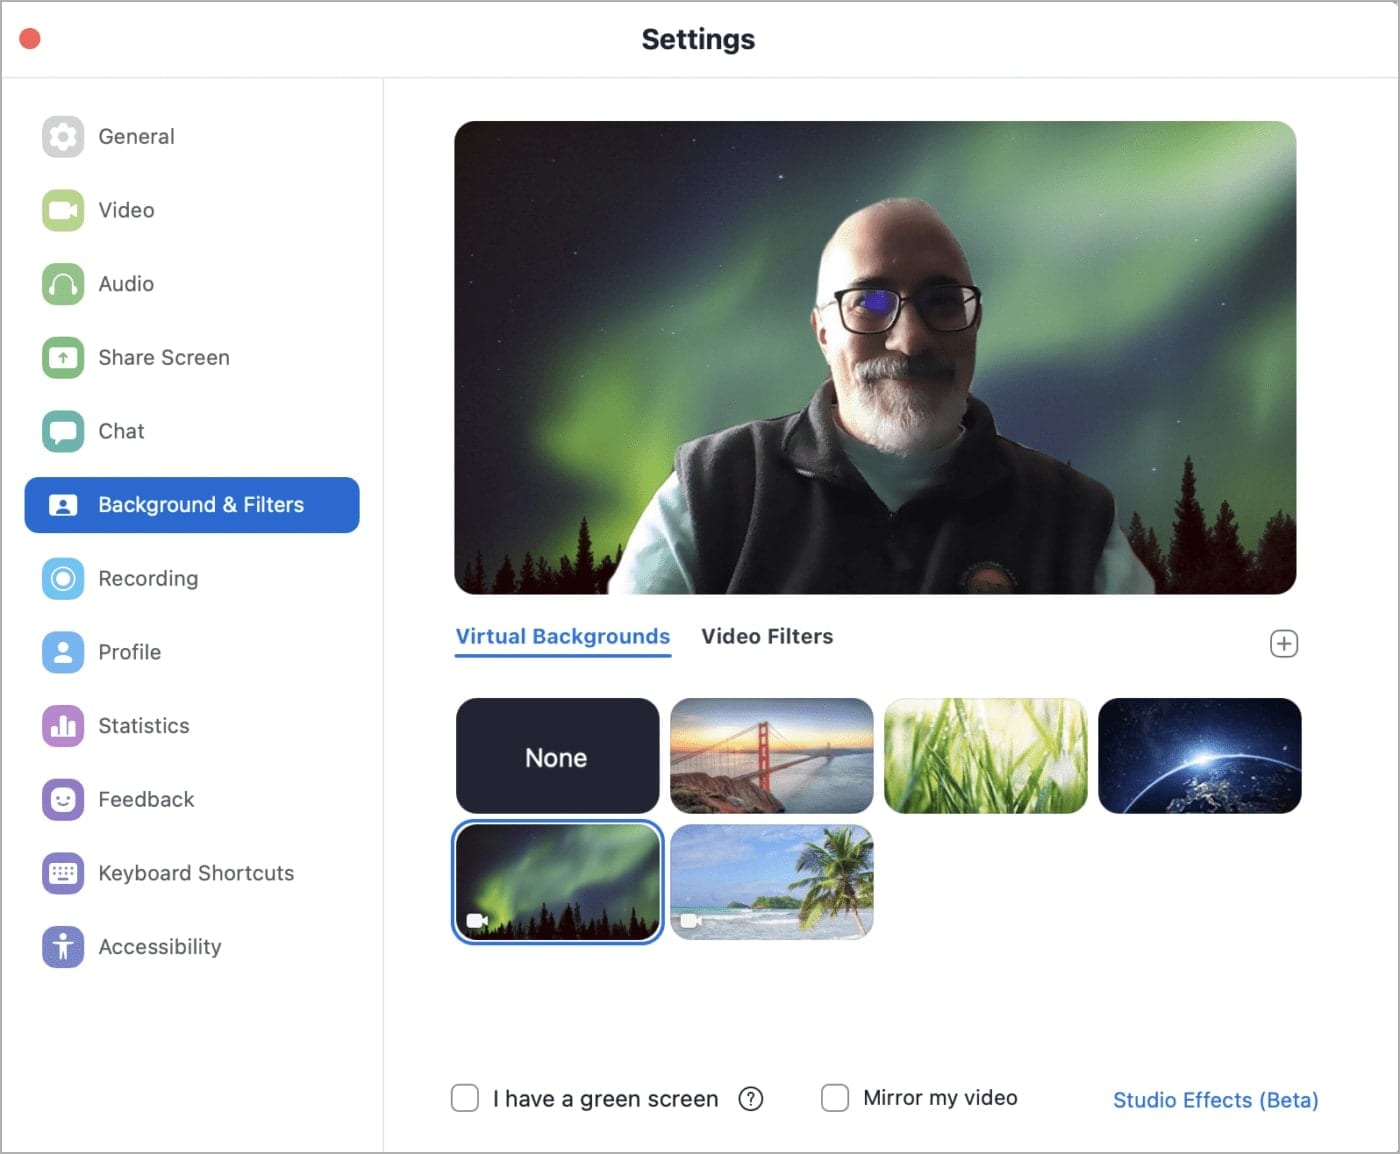
As OWC Jen points out in her article, you can add your own still images by clicking the plus sign ( + ) above the sample virtual backgrounds. That’s also where you can add your own video! Note that your video must be 1080p (1920 x 1080 pixels) or less resolution – 4K video doesn’t work. I enjoy using downscaled drone videos as a backdrop during my Zoom calls.
Filters
You may have seen the term “Filters” in previous paragraphs. These aren’t what you might think they are – when I think of filters, I think of those glass or plastic pieces that go over a camera lens and add tint, polarization, or special effects.
Zoom filters are actually those and a lot more! They include tints, but they’re also made up of holiday borders, virtual hats, ears and eyes that follow your head movements, a microwave oven, a big screen TV in a room, and so on.
These filters and Zoom virtual backgrounds are additive – they work together for extra fun effects.
Zoom Studio Effects (beta)
Studio Effects are a beta filter from Zoom. If you’ve ever wanted a mustache and beard but aren’t as fortunate as I am in the facial hair department, studio effects can make your day. There are also eyebrow and lip color changes; this can be useful if you usually wear makeup but forgot to “touch up” before your call.
Studio Effects are applied by clicking the “Studio Effects (Beta)” link at the bottom of the Background & Filters settings page. Just don’t apply bright green lips and red eyebrows (see image at right), then forget to turn off the effects prior to an important Zoom meeting with a client…
Green Screens

When using Zoom backgrounds, you may have noticed that they sometimes don’t work that well and will “smear” into your body when there is movement. That can be resolved with the use of a green screen. Green screens are usually a bright green color—hence the name—and what they do is allow Zoom to pick a common background color onto which to project a virtual background.
Green screens don’t have to be green. A white or gray wall behind you can serve as a solid-color background as well. To enable green screen for a better virtual background experience, check the “I have a green screen” box on the bottom of the background & filters page.
Zoom attempts to detect the color of your backdrop. If it’s unsuccessful and the backdrop looks off, there’s a manual color picker that helps to even things out.
One important thing to remember when using a green screen – don’t use a color for your backdrop that matches your clothing or eyes. Doing so places the virtual background on your clothes, so you appear to be transparent…
Zoom Video Settings
Enough of the fun with virtual backgrounds and filters! There are several settings you’ll want to use in professional meetings. In the Zoom settings, click Video in the left sidebar to bring controls that can improve your video feed.
Touch up my appearance is a setting that smooths out skin tones and can actually make you look better. It’s adjustable, so if you had a particularly rough night before your important Zoom meeting, you could touch up a bit more… My office is usually quite dark, so I like to check the “Adjust for low light” box as well. That lightens skin tones to make it appear as if a soft light is being pointed at your face.
Use a Different Camera with Zoom
Most of the time I use the FaceTime HD camera that’s built into my Mac. On occasion, if I want to use a different camera angle, I’ll use a second camera. Lots of cameras can be used – webcams, DSLR and mirrorless cameras, and even your iPhone.
I like to use the Camo app (free) from Reincubate to turn my iPhone 12 Pro Max into a really high-quality video camera for Zoom calls. The quality of the video is much better than what the standard FaceTime HD camera produces. There’s both an iOS/iPadOS app and a Mac “control center” called Camo Studio:
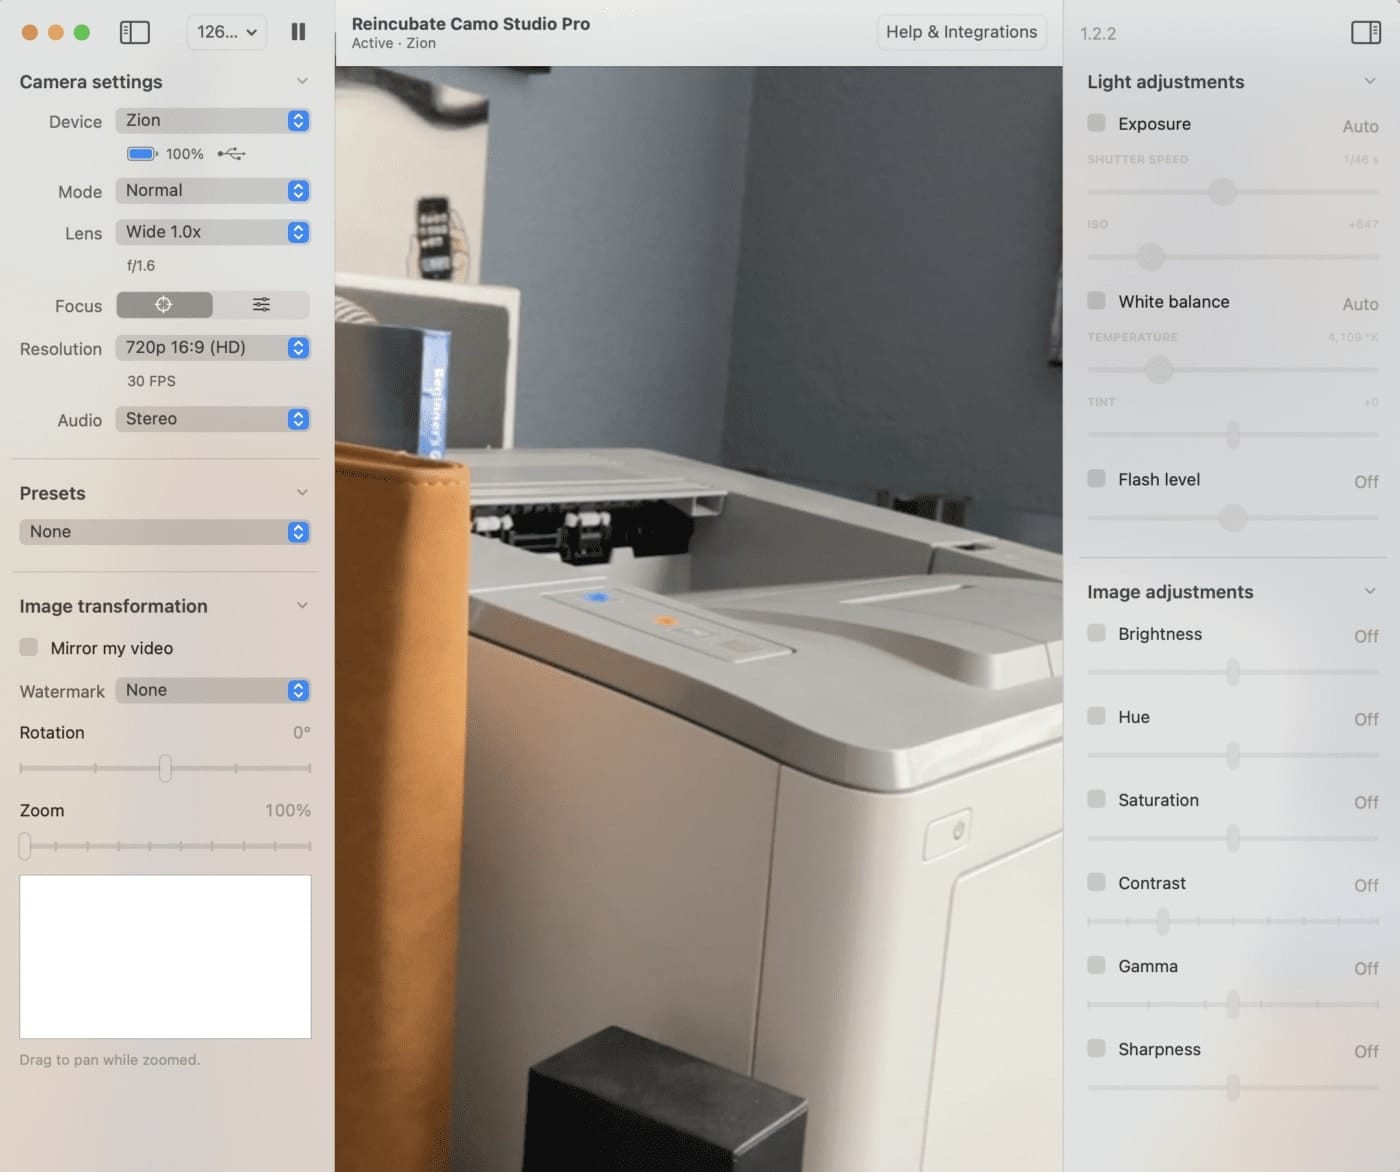
Once I have my iPhone connected to my MacBook, I fire up the Camo app, set the iPhone in a convenient location, and then select Reincubate Camo as the camera on the Video settings page.
Zoom Audio Settings
Before you start any Zoom conference, it’s a good idea to test your sound. When joining or starting a Zoom meeting, a dialog appears with a “Test Speaker and Microphone” button (outlined in red in the screenshot below).
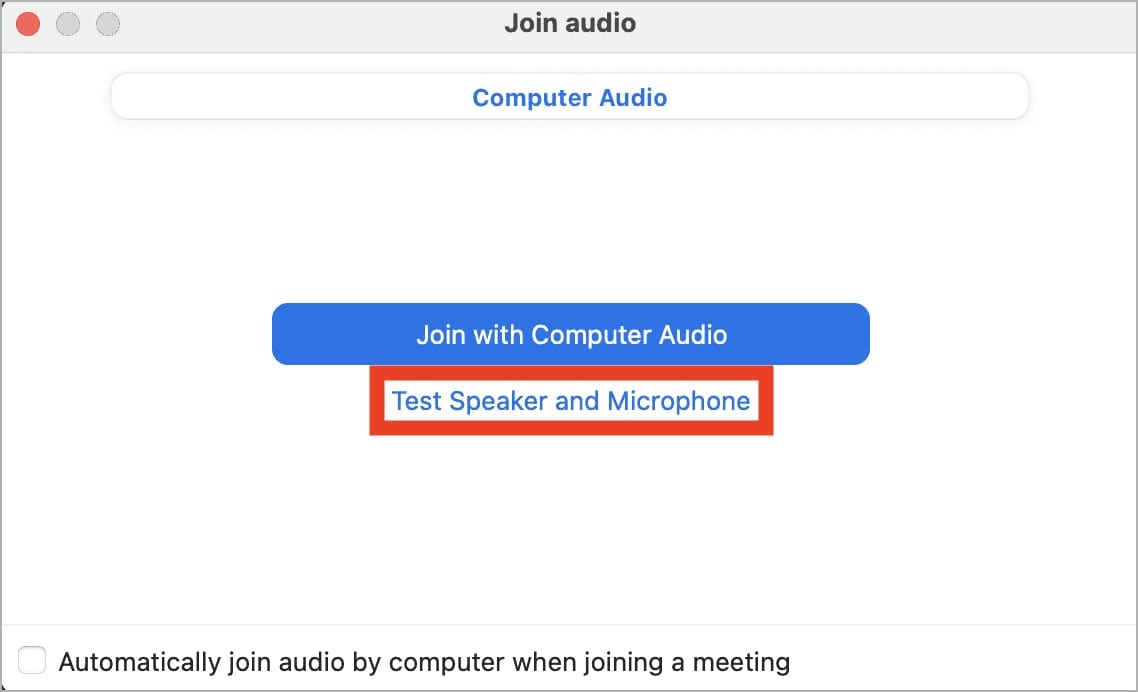
Click that button, and a tone is played to ensure that your speaker or headphones are working properly. Click Yes if you hear the tone. Next, you’re asked to speak and then respond “Yes” if you hear your voice played back. This tests your microphone setup.
It only takes a few seconds to perform these tests, and it can prevent a lot of embarrassment during your call.
Echo Cancellation
Zoom has an excellent echo cancellation function built in. Sometimes another person has their volume turned up and anything you say is echoed back to you, which is an indication that the automatic setting isn’t working properly. Click the up arrow next to the “Mute” button at the bottom left of the Zoom window and select Audio Settings from the menu.
At the bottom of the Audio Settings window is a button for “Advanced” (highlighted in red below). Click it and you can select “Aggressive” for echo cancellation, which should help those echo issues. Asking the other people on the call to turn down their speaker volume or to wear headphones also helps resolve echos.
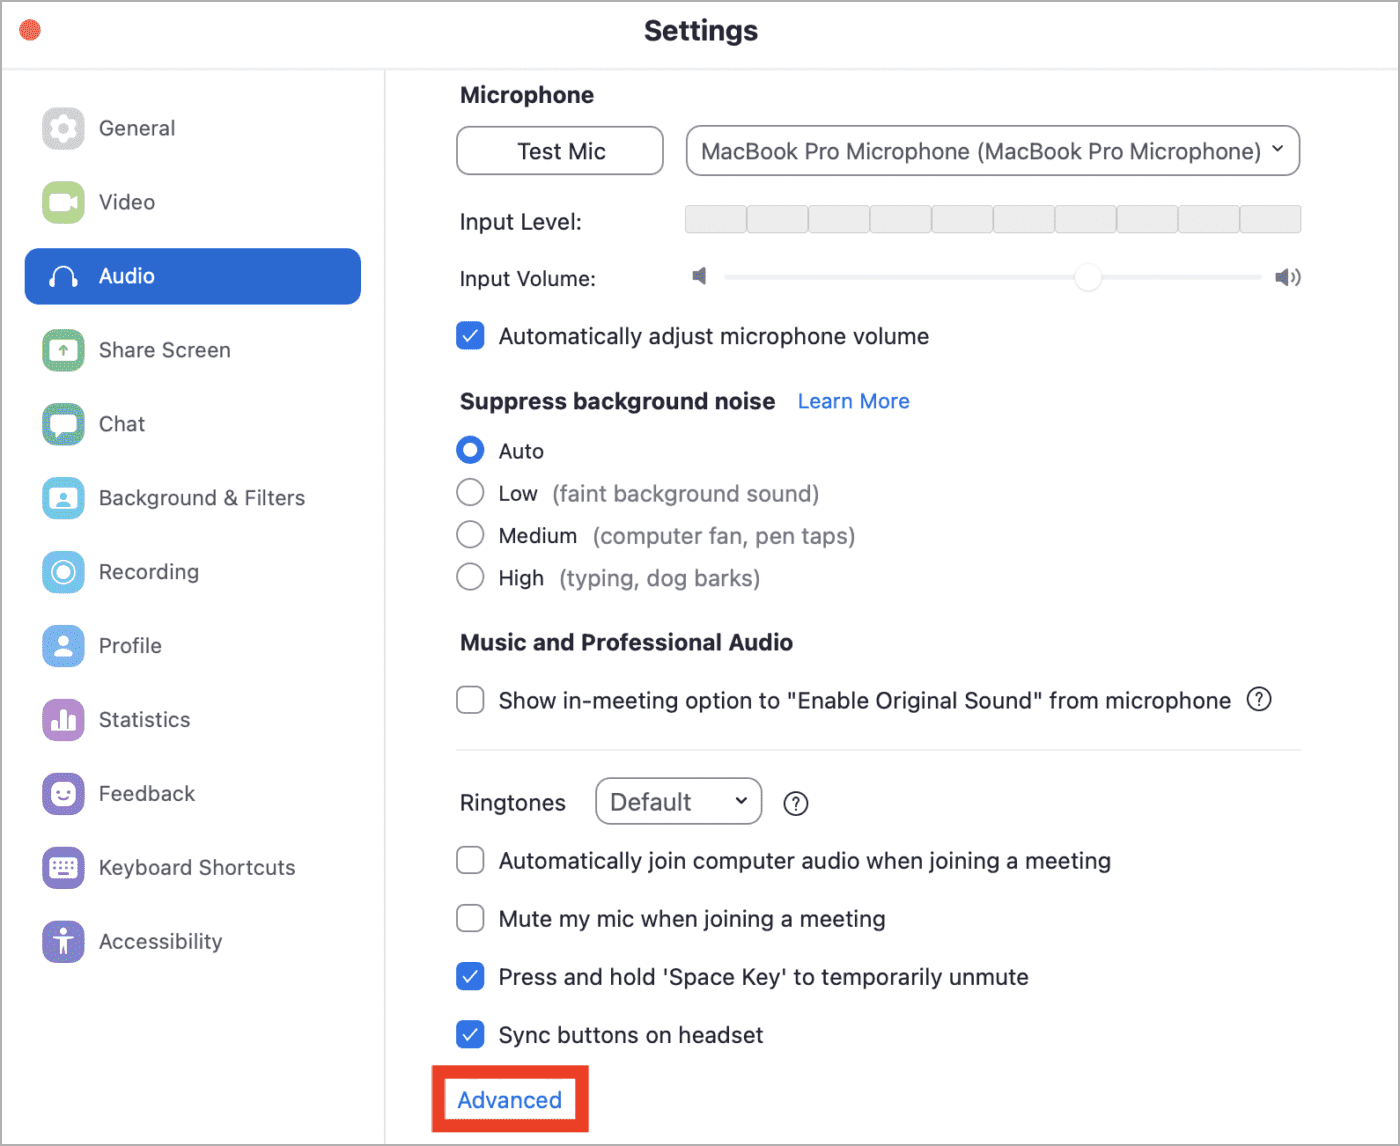
Suppress Background Noise
One other setting you see in the Audio Settings (above) is “Suppress Background Noise.” The auto setting is chosen by default and usually works quite well, but if you’re in a loud environment, you may want to switch those settings. Zoom provides descriptions of what sounds are suppressed at the different suppression levels.
Music and Professional Audio
Meetings are one thing; music livestreams or professional presentations are another. Zoom does a lot of things with your audio feed that you do not want if you’re using professional microphones, bringing in sound from a soundboard, and playing music. It suppresses noise, provides high pass filtering to get rid of audio hiss, and automatically controls gain.
For professional audio, check the “Show in-meeting option to ‘Enable Original Sound’ from microphone” box seen in the Audio Settings screenshot above. Additional options appear, including “High fidelity music mode”, “Echo cancellation”, and “Stereo audio”.
Spacebar to Mute
In meetings with a lot of attendees, it’s useful to mute everyone (this is an option for the Zoom meeting leader) using Meeting > Mute All from the Zoom menu.
Ask all attendees to use the Zoom audio settings and check the “Press and hold ‘Space Key’ to temporarily unmute” box. This requires each attendee to press and hold the space bar in order to be unmuted and heard by the other participants. It’s a great way to keep background noises from multiple attendees from being disruptive.
Share Screen
Zoom’s “Share Screen” feature is incredibly useful when you wish to show the other participants a document you’re working on or broadcast a presentation on your Mac. It’s turned on from the Share Screen button at the bottom of the Zoom screen.
Clicking that button displays a control screen with a number of options. You can select a Mac desktop (multiple desktops will appear if you have multiple monitors attached to your Mac), and by clicking the Advanced tab, select just a portion of the screen.
Remember using Camo earlier as a second Zoom camera? There’s a “Content from 2nd Camera” button on the Advanced tab to bring in that camera feed as a shared screen. Zoom is also beta testing using slides from a presentation as a virtual background. This is very powerful for instructors, as they are visible while showing slide content.
Whiteboard
Another useful Share Screen tool for instructors is the Whiteboard. Select Whiteboard from the Basic Share Screen tab and a virtual whiteboard appears:
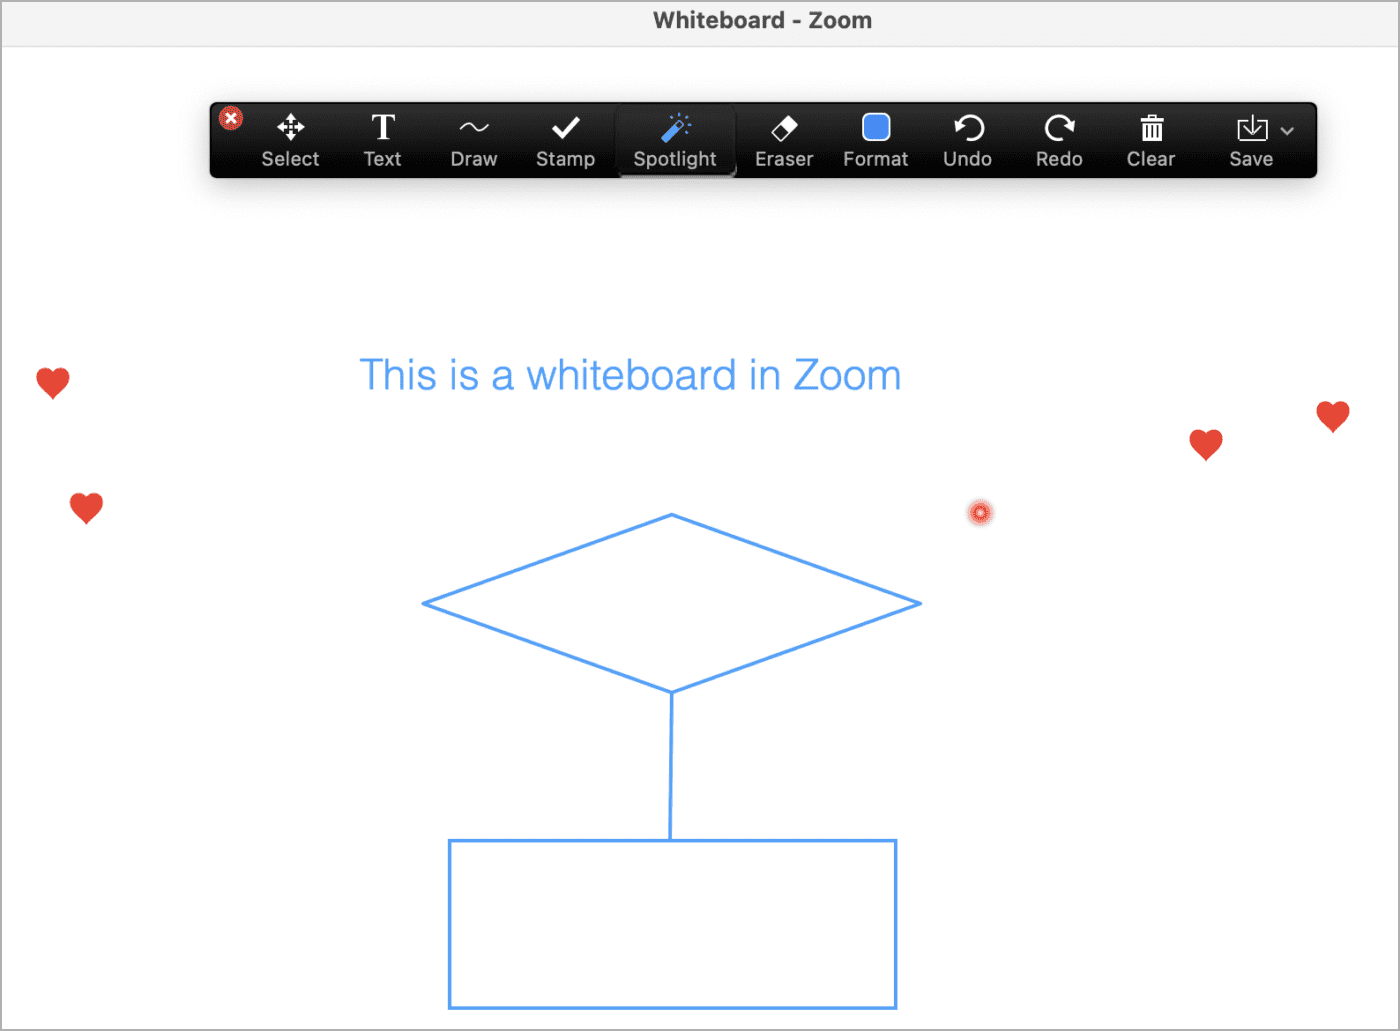
As you can see, it has tools for text, drawing shapes or freeform scrawls, and even a virtual laser pointer (AKA Spotlight).
Other Zoom Share Options
Two more Basic share options let you share the screen of any iPhone or iPad via AirPlay or a cable connection. Any app that is open on your Mac appears for selection in the Basic share tab.
To open a particular file stored in the cloud, click the Files tab. You’ll find buttons for most major cloud services, including Dropbox, Microsoft OneDrive, Google Drive, Box, and Microsoft SharePoint. To share a file that you have stored in iCloud, just open that document in the Finder, then use the Basic pane to share it on your screen.
What if you actually want to send a file to people in your Zoom conference, not just show it on the screen? I’ll show you how in the next section.
Chat
So you’re in a Zoom meeting and need to comment quietly to someone else. Click the Chat button at the bottom of the Mac Zoom screen and a sidebar appears on the right side of the video stream. At the bottom is a place where you can type in a message and send it to specific people in the meeting, everyone, or just the host.
To send a file stored on a cloud service, simply click that File button visible in the screenshot above. It displays the same cloud service options that are available from the Share Screen Files tab.
Sending Files from a Mac
Sending files from your Mac (or another device) during a Zoom meeting has to be set up by the person running the meeting as a Zoom administrator. That person needs to log into the Zoom web front end, then navigate to Account Settings under Admin. Scroll through the long list of settings until you see this:
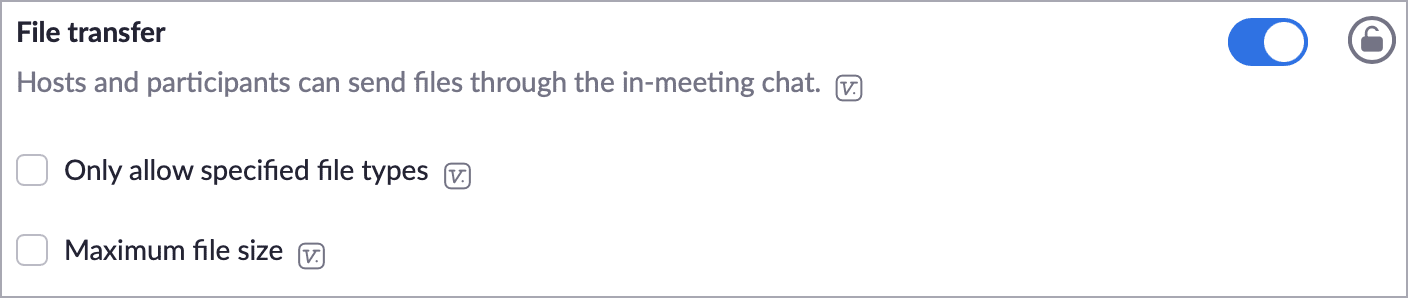
Click the button to the right of “File transfer,” and all hosts and participants are then allowed to send files through the chat. As an admin, it’s also possible to limit files to a specific type (like .pdf or .xslx only) and size.
Non-Verbal Feedback
Want to give Zoom meeting participants a way to tell you to speed up, slow down, or answer a simple yes/no question without disrupting the meeting? Another admin setting enables Non-Verbal Feedback. This must be set up before a meeting is started by the administrator, and it adds those feedback choices to the “Reactions” button on the Zoom window.
Reactions
Reactions are a productive way for participants to provide feedback during a Zoom meeting without interrupting. Clicking the Reactions button at the bottom of the Zoom screen brings up some common reaction “emoji” as well as the Non-Verbal Feedback choices described earlier.
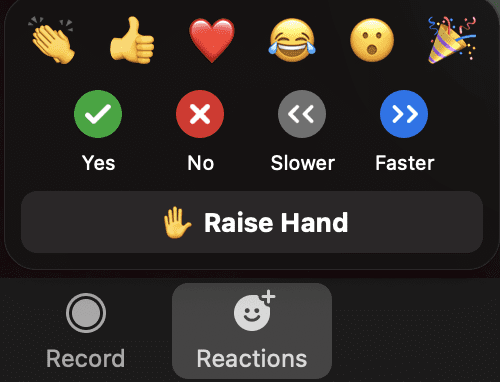
These reactions appear onscreen during the conference. Having participants “Raise Hand” is perfect if you have everyone muted and someone wants to ask a question. The leader simply unmutes that participant, so they are able to ask the question and receive an answer.
Although this is quite a long article, it only scratches the surface of the many features of Zoom. One way to get more experience with the tool is to set up conferences with one or more people just to try things out and see what’s available. You’ll all gain valuable knowledge in how to effectively use Zoom!
Have any other favorite Zoom tips you’d like to pass along to readers of The Rocket Yard? Please leave them in the Comments below.


Useful article. – I have an iPad Pro 12-inch (2020) and cannot find a way to activate the front wide-angle lens while in Zoom. It only allows me to use the fixed standard hi-rez front lens, so far. Any suggestions?
Good stuff. A few tweaks [from someone who anticipated the pandemic shutdown and learned zoom in a hurry last February] :
Spacebar doesn’t always work on my Macs. It seems to be deactivated by some host actions. What seems to work for me is to click unmute, then mute. This makes the spacebar work.
The Reactions window only has the middle row [yes, no, etc.. ] when the meeting is hosted by a premium account [enterprise] it isn’t there in the host is on an entry level paid account.
Thanks. There is also the option to save a Zoom presentation using PowerPoint with laser pointer and audio for lecturing. It is amazing how it compresses it without losing quality. Other applications fail during presentation and generate much larger movies.
Lots of bad ideas in this. Use a plain background and light yourself properly.