

Apple allows you to access the startup volume on one Mac as a drive that appears on another that’s directly connected. This can help if you’re experiencing some hardware or software issues and are trying to figure out what’s wrong. (On Intel Macs that’s known as “Target Disk Mode,” and you can read this OWC article. )
However, this process—known as “Share Disk” or “Mac Disk Sharing”—is a bit different on the new M1 Macs due to new security precautions.
Mac disk sharing on an M1
You can access the startup volume on one M1/Apple Silicon Mac as a drive that appears on another that’s directly connected. For example, the graphic below shows the icons for my Macintosh’s hard drive (Macintosh HD) and an external drive (the X5-500).
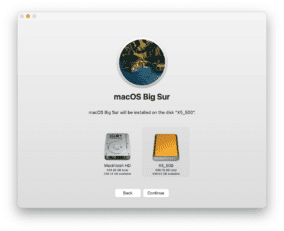
To share on an M1 Mac with Share Disk, connect two Macs via a USB or Thunderbolt cable. However, for the best results, use a Thunderbolt 3 SSD that has been freshly formatted with APFS and set up with a new installation of macOS 11.1 Big Sur. (See Howard Oakley’s writeup for details, from which I got the accompanying graphic.)
- Choose > Shut Down.
- Once your Mac is turned off, hold down the power button until you see “Loading Startup Options.”
- Click Options then click Continue.
- Choose an account on the Mac you’re sharing and enter its password, then click Continue.
- Choose Utilities > Share Disk.
- Select the disk to share (an M1 Mac lets you share any internal or attached hard drive or SSD).
- Click Start Sharing.
On the Mac from which you want to access the volume, choose Go > Network, select the Mac in the list that appears, click Connect As in the upper-right corner, select Guest, and click Connect.
When you’re finished with the mounted Mac volume, eject it, then click Stop Sharing on the sharing Mac.
Choose > Restart to resume using macOS on that Mac.
[Feature image by Muhammed Abiodun on Unsplash]


Thanks for a great article! Unfortunately, this doesn’t work for me. What if I follow the steps outlines and don’t see the disk in Network section? I’ve tried two M1 (12.2.3 OS) with a USB type-C cable, I’ve tried connecting Intel and M1 over the Thunderbolt wire as well (Target Disk mode). I don’t understand what I am doing wrong :(
Also, did you make any research as to how forensically sound this method is (assuming that disk arbitration is on, of course)? Thanks!
This is insane. The whole point of TDM was that the old computer was mounted like an external hard drive. To not be able to use macOS on the new computer in this mode–WTF!!! How am I supposed to open an app, navigate to the old computer’s file browser, and pull the files that I need? This is completely backward!!!
If you have to use Network then it means it’s only sharing files/folders, not the entire disk. This means you cannot modify/add/remove partitions like you can with Target Disk Mode (FireWire, Thunderbolt, or USB) on an Intel Mac?
In the first two bullet steps, which Mac are you talking about?
And Howard Oakley’s article is about booting off an external disk, not sharing another Mac’s disk