

This tip is all about screenshots on macOS. Whether you do screenshots often or irregularly, there are some gems in here!
Different types of screenshots
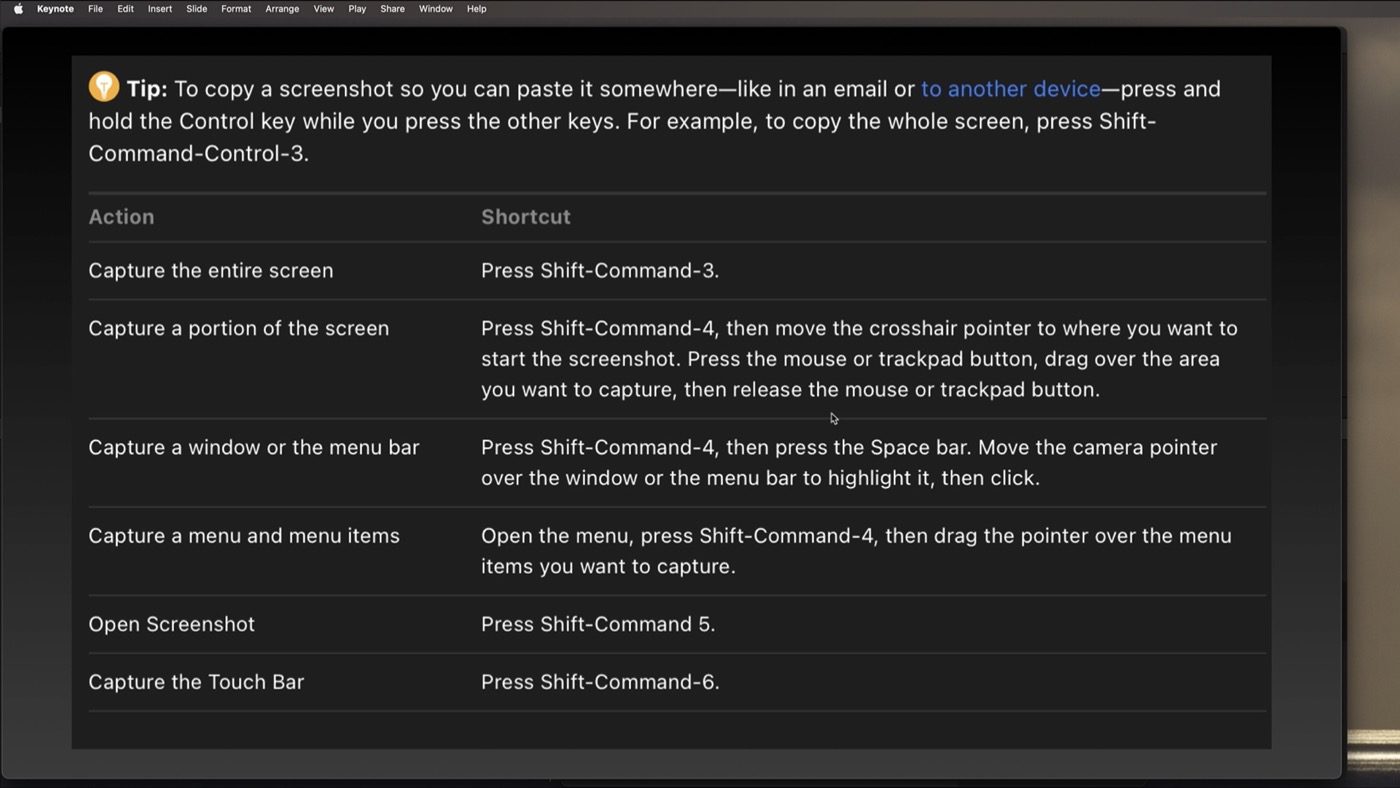
Here are some of the common ways to take a screenshot on a Mac.
- Want a screenshot of the entire screen? Command + Shift + 3.
- Want to make a selection? Command + Shift + 4
You’ll notice a temporary thumbnail that will display in the corner of the screen. If you double-click the thumbnail, it’ll open an image editor (not the Preview App) where you can make some quick changes/annotations.
All of that is really useful.
My favorite screenshot command by far is Command + Shift + 5. Seriously, I use this every day for something.
When you press it, you get an overlay palette on the bottom of your screen that allows you to do all of the above methods and more.
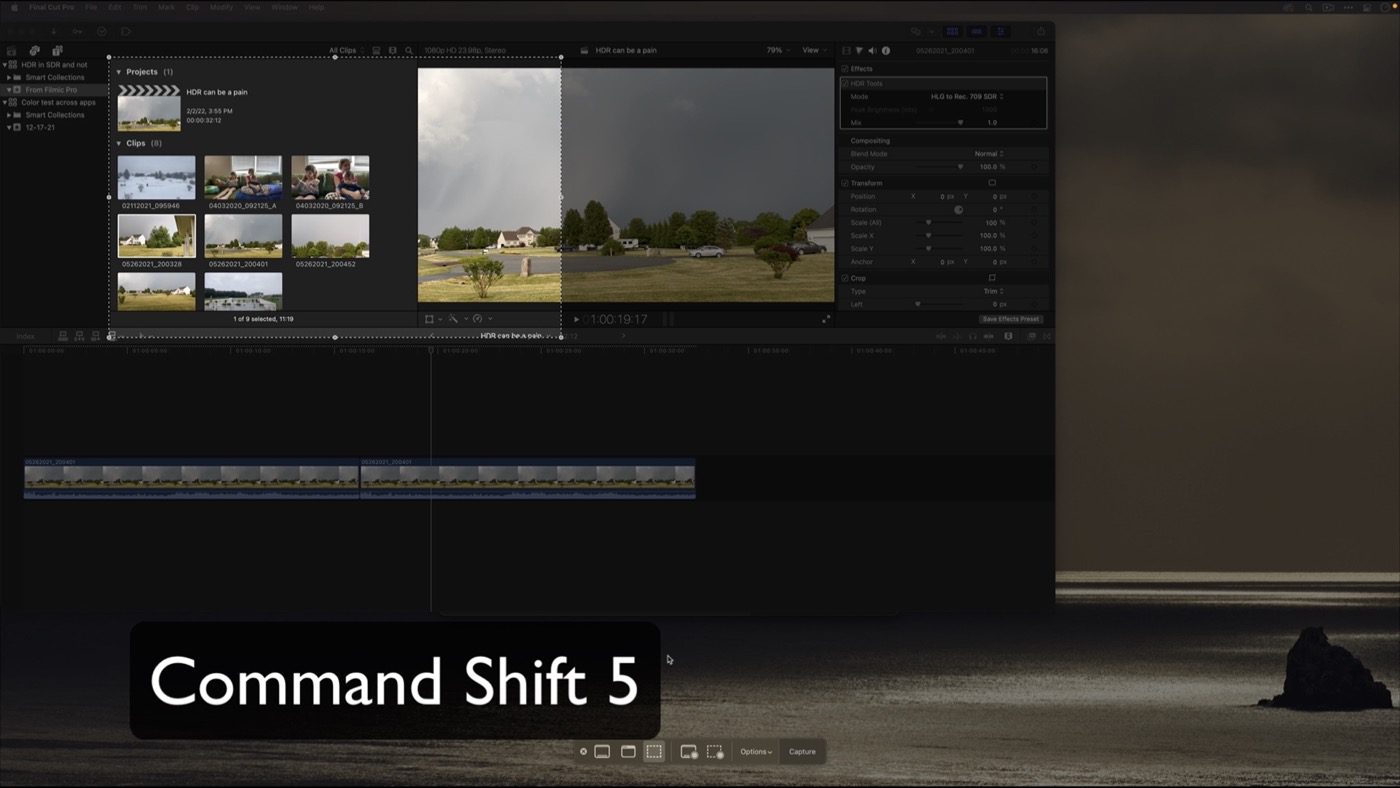
It has buttons for:
- Capturing the entire screen
- Capturing just a specific window (chosen with your mouse)
- Capturing a selection where you can draw/resize
That palette? This is where things get interesting. After those three? There are two choices for screen recordings for the whole screen or a selection.
Keep your eyes on the button on the far right. If the button on the right is Capture, it’s a screenshot. If it says Record, it’s a screen recording. And the Enter key will perform it (faster than a mouse click!)
The Options menu
The real hidden tip is the Options menu. It has three sections. The top is where the screenshot will go, the middle is for a timer, and the bottom section is for preferences.
It’s the top section that’s my favorite. It lets me choose where I want the screenshot. These are the options:
- Desktop: Not great, unless it means you can find it quickly; this causes clutter
- Documents: Now at least the clutter is hidden.
- Choose Location: This is my choice. I have a folder called “_Screenshots” on my desktop. Whenever I take a screenshot, it gets saved there, sortable by date. I have them going back for over a year. A quick library.
Everything else in that list is about supercharging your workflow.
The first is Clipboard. When it’s chosen, your screenshot goes immediately into the clipboard, allowing you to paste it into your application of choice. It’s great when I’m writing copy. I use this all the time with PowerPoint and Keynote.
Sometimes I send a bunch of screenshots in Messages or Mail. Now, every screenshot ends up automatically in that app. No copy/pasting is needed!
Annotating screenshots
Often, I need to add some information/annotation to the screenshot. Instead of creating the screenshot and opening it in Preview, I can choose Preview from the Options palette. Now it’s one step, not two, The screenshot automatically opens the Preview App for me.
Try Command-Shift-5 today and work smarter with your screenshots! And as always, let me know if you found these tips helpful!


great tips, I was not aware of Command-Shift-5. Very useful.
so how do you record sound with the screen recording?
I couldn’t find the thumbnail mentioned in the following: You’ll notice a temporary thumbnail that will display in the corner of the screen. If you double-click the thumbnail, it’ll open an image editor (not the Preview App) where you can make some quick changes/annotations.
I used “Command + Shift + 4” to get my screen shot.
Thank you, Warren
Warren, Ah! You want Command-Shift-5
You should see the thumbnail with Com+Shift+4 also, but be aware that it only appears momentarily in the lower right corner of the screen. After a brief appearance the thumbnail disappears, but the screenshot you took should be in your default location (usually your “Downloads” folder).
Hi,
Good tips!
However, my favourite is Cmd+Shift+2, which launches the wonderful ScreenFloat.
All the shots are automatically stored in a pull-down library in the top menu bar. You make a shot by dragging the mouse diagonally for an exact selection. You open a floating screenshot by double-clicking it in the drop down catalogue and another double click copies it for pasting in e.g. an email. You can also open it directly in Photoshop or whatever.
I use ScreenShot many times every day and I just love it.
Kind regards,
Joachim Smith
While Snag it, Lightshot, Evernote, Snappy, Lightshot, and Screenfloat are all great purchasable tools, this tip was 100% things built-in natively to OSX. Maybe there’s a tip in the future about evaluating third party screenshot utilities!
Thanks for the info about screenshots on Mac OS. The CMD-Shift-5 method for making a screen recording looks a lot like the controls for screen recording using the Quicktime app, and my only complaint with it is that after starting a screen recording, the only way to stop it is via a button that appears in the Finder Menu Bar. Unfortunately, the button gets slapped onto the left side of the Menu Bar and is almost always not visible because it’s covered with the current app’s menu controls. I’ve found a clumsy work-around with a plugin called “Accessmenubarapps.” It works sometimes to uncover the button to stop recording, but sometimes it just doesn’t work. It would be great if either Mac OS or the Quicktime app would allow for the stop recording button to appear on the right side of the Menu Bar so it wouldn’t be covered up by the current app. Do you know of another method to stop the recording?
I do, but it’s the least obvious item in the world. Command Shift 5 brings back the screenshot interface, but the record button is now a stop button.
It would never have occurred to me to simply repeat the keyboard command! OMG, thank you!
Yeah, FWIW, me too. Glad to help!
Awesome tip! I always uses Shif-command-4 and then had to open it up in Preview and email it. You tip shows me how to do the same process with a lot less steps. Thanks!!