

When you use Premiere Pro on a daily basis, you start to think about ways to speed up your workflow. That’s where keyboard shortcuts come in handy! And while most of us know the basics, like Cmd/Ctrl+K for making a cut on your targeted tracks, or pressing J, K, L for playing backward, forwards, and stopping, there are a ton of shortcut keys that are not assigned to your keyboard by default.
Let’s take a look at a few of my favorite shortcut keys and how I use them.
Close Gap
The command Close Gap in the keyboard shortcut menu is not assigned to your keyboard when you first launch Premiere Pro, so you’ll need to assign it manually. But once you do, it’s an effective way to quickly tackle assembly edits or pull selects.
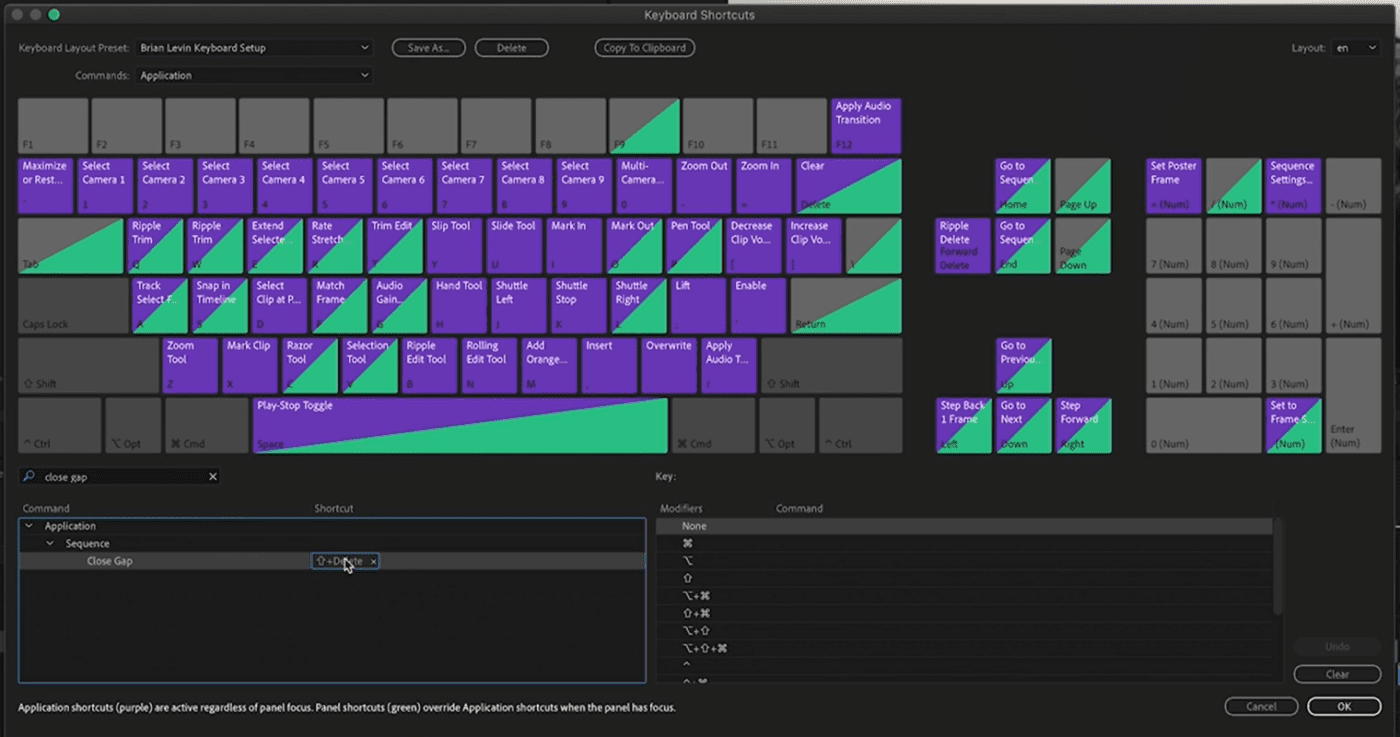
When you press the Close Gap shortcut key with nothing selected in your timeline, Premiere Pro will automatically find all of the gaps between clips and close them up. You can also isolate the command to just a specific group of clips by selecting those clips first, then pressing the shortcut.
I’ll use this command often when I am pulling selects, say from a string of b-roll, and I want to group similar items together.
Match Frame and Reveal in Project
Match Frame is one of the most powerful tools you can use. If you aren’t familiar with it, by default, you put your playhead over a clip in your timeline and press F on the keyboard. This will load that clip into your Source Monitor, where you can find a new In and Out Point and cut the clip back into your timeline. This is just one of many uses of Match Frame, but what I find myself needing to do often is to get from a clip in my timeline to the bin.
You can do that by right-clicking on a clip in either your timeline, or from the Source Monitor, and choosing Reveal in Project. You can set up that command with a shortcut key. Even though the command appears in both the timeline and in the Source Monitor, you can assign it the same exact shortcut key.
For me, I’ve chosen Cmd/Ctrl+F, as I generally want to Match Frame my clip into the source monitor, then reveal other relevant clips in the bin with it at the same time.
Multicam Enable and Flatten
If you like to work with nests in your timeline, then this handy shortcut trick is for you. A Multicam sequence is basically just a nested sequence with some specific audio settings if you happen to use Multicam audio at all. If you think about multicams in that way, then you can use their tricks to help you with your edit, even if you don’t plan on doing any Multicam editing.
Here’s a way this might work. Let’s say you’ve cut together a string of b-roll you really like, and want to nest it all together to prevent accidentally separating the clips, or just for organization purposes in your timeline. However, down the road, you’d like to get those clips out of the nest. You could open the nest, copy the clips, and return to your timeline. Then you would change your track targeting to make sure you are pasting the clips on the correct track, and finally, put the playhead where you want to paste and then perform the paste operation.
But that’s a lot of clicking, and we don’t have time for all that! Instead, try this. Right-click on the nest, go to the Multicam menu and choose Enable. Now go back to the nest, right-click, go to the Multicam menu and choose Flatten. Voila! The clips pop in, replacing the nest in place.

You can set Multicam > Enable as a shortcut key (I use the apostrophe key), and then you can set Multicam > Flatten as another shortcut key (for me, this is SHIFT+apostrophe). With these keyboard shortcuts set, I simply select my nested clips, press apostrophe once, then Shift+apostrophe and Premiere Pro does the rest.
Load in Source Monitor and Open Sequence in Timeline
Tired of all that pesky double-clicking in the bins? Replace double-clicking or clicking and dragging from the bin to the Source Monitor with a single shortcut key.
This works on everything–video clips, audio clips, and images. But where this really shines is in loading an entire sequence into the Source Monitor.
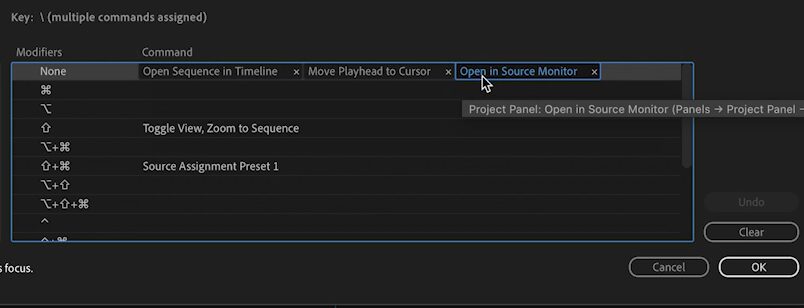
You might not realize this is possible, but once you load a sequence into your Source Monitor, you can then go so far as to open that sequence in a timeline of its own. And the cool thing is that the shortcut key you set up to Load in Source Monitor can also be the exact same key you use to Open Sequence in Timeline. This means you can get from the bin to the timeline with as little as two keystrokes.
For those editors who like to use the pancake style of stacked editing, this is great because you can stack the timelines on top of each other, and while you scroll through the timeline that you loaded into your Source Monitor, you’ll see what you are scrubbing in the Source window, and you’ll continue to see your main editing timeline in the Program window.
Reset source patching
By now you can probably tell that I’m a big proponent of three-point editing, whether that is from the bin or cutting from timeline to timeline. And all good three-point editing needs thoughtful track targeting in order to be successful.
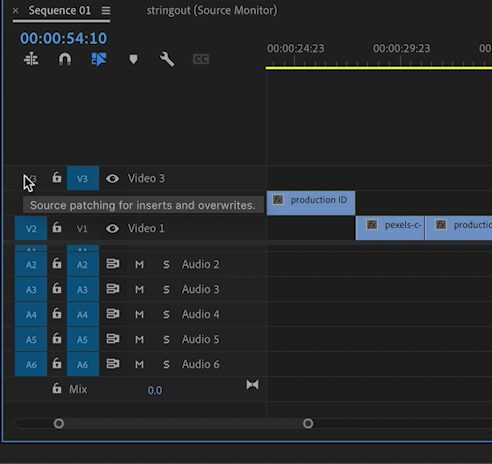
Unfortunately, Premiere Pro struggles a bit when it comes to track targeting. Just like timeline and bin view presets, you can set up track targeting presets and assign shortcut keys to them. However, for me, the simplest shortcut key to use when doing a lot of track targeting and three-point editing is simply Default Source Assignment.
When pressing this shortcut key, your V1 and A1 track targets will return to their respective V1 and A1 tracks, and sort upwards from there. If you have gotten lost in changing track targets for a complicated edit patch, this shortcut will get you back to basics so you can easily cut in more footage quickly to your timeline.
Move Playhead to Cursor
Ever since discovering this shortcut, I’m unsure how I ever edited without it. It does exactly what you think it does. By setting up this shortcut key on your keyboard, pressing that keystroke will move the playhead to wherever you have parked your mouse cursor. No more needing to go up to the top of the timeline and drag the playhead in the time bar to your destination. You simply position the mouse where you want the cursor to go and press this shortcut key.
This command is so useful and so powerful that I find myself pressing it in other apps and hoping for the same result, like when I’m using Adobe After Effects, or writing this article in a document.
These are just a few of my favorite keyboard shortcuts to use for quick and speedy workflows throughout my day. I hope this inspires you not only to set up the shortcuts I’ve shown you here but to find your own that makes you a faster and more efficient editor. And of course, don’t forget to leave a comment below, letting me (and other Rocket Yard readers!) know about your favorite keyboard shortcuts and how you use them.


What key do you like to set for the “Move Playhead to Cursor” shortcut?
For me this is the forward slash key next to the right bracket. I’m left handed so my right hand is always hovering around JKL and I use the bracket keys to change audio volume, so my finger is naturally always in that spot. I use this shortcut 10000 time a day probably.
Thanks for taking the time to write and share these techniques. As a decade-plus Avid Media composer editor who has been working in Adobe Premiere for the past several years, I find the tips in this article to be seriously promising, and I can’t wait to try them out. I’ll be sure to check out your website, too.
Thanks so much! Glad this was useful for you. As someone who started on FCP, moved to Premiere and later into my career began to use Avid, I discovered that I became an infinitely faster editor in Premiere when I adopted some of the Avid way of doing things, and that’s why I always try to demonstrate ways to manipulate Premiere to have a slightly more Avid way of working, without losing all of the things I really like about Premiere (and incidentally really dislike about Avid).