In this day and age, we’ve learned to predict our success based on how productive or unproductive our days go. While our definitions of success may vary, we all want to make the most of the hours we have on hand. Luckily, for Mac and iPhone Pro owners, there are a few tweaks that can take your productivity game to the next level.
Don’t worry. We’ve played around plenty to figure out these hacks before we pass them on to you. Whether new to the Apple ecosystem or well-acquainted, we hope there’s something everyone can benefit from, from the list of tips below:
1. Prioritize what’s important with Focus Mode
Whether you acknowledge it or not, almost everyone’s been a victim of mindless scrolling at one point or another. You’re well into your flow of working, and you pick up your phone and think “well, let me reward myself with just 5 minutes of Instagram”, and boom half an hour goes by and you’re still scrolling reels. Not only does it get difficult to resume your focus on work, but your break doesn’t feel refreshing as it should’ve felt.
So, what’s the solution? Remove your access to these applications altogether during your work hours with Focus Mode.
On your iPhone, go to Settings > Focus Mode
On your Mac, go to Apple Menu > System Settings, and then find Focus mode in the sidebar.
Tip: In all devices, the mode is represented by a violet square icon with a crescent moon on top.
Once you find Focus Mode, you can find or create a custom “work” profile where all distracting apps will be hidden for a set period. You can customize your iPhone home screen, who is allowed to call you during that time, what app notifications are allowed to pop up and so much more. You can schedule this “work” mode at a certain time, for example, 9 to 5.
Additionally, you can also set up “Smart Activation”, which will trigger the mode to turn on:
- when you open a particular application (e.g. Books)
- when your phone is in a certain location (you enter your workplace)
- or when you choose certain days for it to function (e.g all days except weekends)

This isn’t just a great way to maximize your work hours but get the most out of all areas of your life. For instance, you can customize a “sleep mode” that’ll dull your screen brightness, silence your calls and limit your access to certain stressful apps, a couple of hours before your bedtime.
All in all, with the help of customized focus modes, your apple devices can help you conquer many aspects of your life.
2. Convert images to another format right from the Finder
When working with a team, you’ll find yourself sending and receiving many files over. Most times, these are drafts-in-progress that require the collaboration of several individuals. And it’s a real bummer when a certain file won’t go through due to limitations of size or format.
Your team has deadlines to meet, working under pressure, and here you are downloading third-party apps to get a certain draft of your work visible to your colleague. Frustrating right? We get it. But did you know, you can convert most images right from your finder?
Ctrl + Click on the image you’d like to convert, select Quick Action, and then Convert Image.
A dialogue box will pop up where you can choose from a variety of formats (JPEG, PNG, HEIF) and the size of the finished conversion (small, medium, large, or original). You can check the box to retain the original metadata (if you’d like to) and hit Convert.
A newly converted image will be saved in the same location as the original image, without altering the original image either.
3. Save Text for later with Text Clippings
A lesser-known feature that’s been around since Mac OS 9, is the Text Clipping feature. This feature allows you to save the text you come across and utilize it in another application or document later. All you have to do is select the text you’re keen on saving for later and drag it onto your desktop or finder window. macOS then saves the text as an independent file that ends with .text clipping.
This isn’t just a great tool to quickly save any important bits of information. You can also save any unique quotes and literary pieces you’d like to keep coming back to later.
4. Replicate photo edits in the Photos app
This one will come in handy for graphic designers, content creators, or anyone who utilizes basic editing from their desktops. If you’ve ever used photo-editing apps such as Adobe Lightroom, you’re aware of the “preset” functions that they have. The preset feature allows one to save the edits done on a particular image such as tweaks in saturation, vibrance, white balance, etc., and then use it on another image. This way, you save time editing all the different pictures that require the same edits. Did you know that a similar feature is available on your Mac Photos app? Here’s how to access it:
When you’re done making your edits to a particular image in photos, click on the menu bar > Image and then Copy edits.
Then, open the image where you’d like to apply the same edits.
Then again, select Image, and then Paste Edits.
You can repeat this for as many pictures as you’d like.
5. Automate repeated tasks with Shortcuts App

Do you find yourself doing certain things on the regular? Maybe it’s the Pomodoro technique that you use to focus (25 mins work + 5 minutes break). It could also be something like texting your significant other that you’re on your way home so they can tell you if anything needs to be picked up from the grocery store.
Whatever it may be, there’s probably a Siri Shortcut for it. If there isn’t, you can create one. Just search for the Shortcuts app on your phone, and learn about all the different shortcuts, that are mostly triggered by voice commands. All you have to do is select the particular shortcut which you’d like to activate, and whenever you use the voice command for it, the action will take place.
If you want to jump into the awesome Shortcuts app, be sure to check out our full guide to getting started right here.
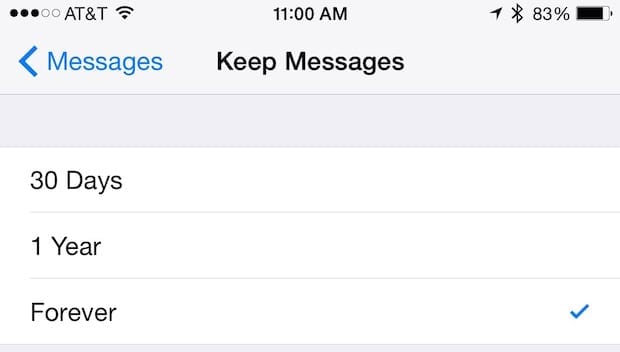
6. Work or Fall Asleep to iPhone’s white noise
If you’re somebody who finds it hard to work or fall asleep to silence, you appreciate white noise when you get some. Did you know, that your iPhone has an assortment of white noise that you can easily tap into? Here’s how:
Open up your iPhone’s Settings > Accessibility > Audio/Visual
Now, look for Background Sounds, and turn them ON.
Once you have toggled the Background Sounds ON, look for Sounds on the same page. Here you will find a variety of white noises such as streams, rain, and ocean. Enjoy!
7. Why type it, when you can just speak it
Leverage iPhone’s dictation tools when you can. This is especially useful for people who are convinced that they think, way faster than they type. Sure, there will be a few mistakes here or there. But, brainstorming everything important on paper, and sitting down to edit the document later is still probably the faster option than typing it up alone.
All you have to do is open a writing app such as Microsoft Word and then look for the microphone icon on your keyboard. Just touch down on that, and start dictating away. You’ll have to learn a few of the iPhone’s commands but it’s not rocket science. We have some of the most used ones here for you:
| Command | The Action the device will perform |
| New Line | Start from a fresh line |
| Space bar | Insert space |
| No Space | No Space between the two words |
| New Paragraph | Starts a new paragraph |
| Cap | Capitalize the next word you’re about to speak |
| Caps ON + Caps OFF | Capitalize the next text |
| All Caps | Makes entire next word upper case |
| All Caps ON + All Caps OFF | Makes next text section upper case until commanded All Caps OFF |
| No Caps | Makes next word in lowercase |
| No Caps ON + No Caps OFF | Makes upcoming text section in lowercase unless commanded No Caps OFF |
| Period/ Full Stop | Placed a full stop next to the last word spoken |
| Ellipsis / Dot Dot Dot | Places … |
There are a lot more dictation commands on the iPhone, these are just the most used ones. If you tend to use more special characters in your documents, feel free to look them up.
8. Organize your notifications so you never miss an important one
This trick may seem troublesome to set up at first, but is a game-changer for people who constantly miss out on important emails and notifications.
For instance, whenever you hear an alert sound and check your phone – it’s a food delivery app reminding you it’s lunchtime, insisting you order some take-out. You know it’s lunchtime, your stomach tells you that. So, suppose you want to keep such nuisance notifications off, and important notifications on. In this case, here’s how you can do it:
Open up Settings and find Notifications, and the set relevant permissions for each one.
You’d want to enable badges, banners, and sounds for applications whose notifications you truly care about.
And you’d want to disable badges, banners, and sounds, for applications that aren’t all that important to you.
And for applications that fall right in between, you can enable badges or banners and disable everything else. This can be done for application notifications that aren’t important enough for them to have a ring and disrupt you but are still worth glancing at, right when you open your phone.
9. Schedule when you can see your notifications
Suppose you’re somebody who has a hard time prioritizing what notifications are important and which ones you can skip. In which case, we get it. So, this hack is an alternative to the previous one.
Instead of filtering which notifications are important, you can schedule a Notification Summary and watch them all together at a time you set in the day. How many times have you caught yourself saying something like “oh, I need to pay for my car registration which will expire in 2 days” after looking at a notification? But in the end, you just forget to do it. But if you schedule your Notification Summary, you’re going in to watch your notifications with a mindset to take action. You might as well sit down with a notebook and pen. Here’s how you can schedule a Notification Summary:
Go to Settings> Notifications> Scheduled Summary
Under Applications, you can select which applications you’d like to include in your summary.
You can also add or remove a schedule, under the Schedule section.
10. Create Text Replacements for things you type often
You’ve probably heard about text replacements for your iPhone, but did you know you can also use the Text replacement feature on your mac? There are quite a few things that we notice ourselves typing again and again. This includes our address or that paragraph of text that helps you sign off an email. Here’s how you can set a shortcut of words (e.g tmwyr) that once typed will convert to a larger string of words (text me when you reach):
For your, Mac
Go to Apple Menu > System Preferences > Keyboard >Text
Here you will notice that a couple of text replacement examples are shown, and you can add your own ones using the + button underneath them.
For your iPhone
On your phone, find and hold the Smiley button or the globe icon.
Then, find Keyboard Settings > Text Replacement > + button at the top right.
Type the longer phrase in the Phrase Field and the shortcut for it in the Shortcut Field
That’s it! That’s how you add text replacement on your iPhone and Mac. Whichever device you add the text replacement to, the other device will automatically be synced to the same text replacements. That’s the beauty of being a part of the Apple ecosystem!
Let’s get to work!
Getting a hold of your devices is crucial to maxing out your productivity. If phone is beeping unnecessarily throughout the day, and your social media usage is untamed, your device could be hurting your productivity and focus more than it is helping. This is why it’s so crucial to leverage and optimize our devices so they work for us, instead of us unconsciously being controlled by them.