 1-800-275-4576
OWC Archive Pro Ethernet
Support Manual
Introduction
1.1 System Requirements
Operating System & Hardware
- Works with any 10GBase-T RJ45 SFP+ | 10GBase-LR SFP+ | 10GBase-SR SFP+ | SFP+ DAC equipped:
- Mac: macOS 13.x or later
- PC: Windows 10 or later | Windows Server 2016 or later
- Linux: current Ubuntu version recommended
Supported Storage Media:
- OWC Archive Pro Ethernet LTO-7 devices:
- LTO-7 Cartridges (Read / Write)
- LTO-6 Cartridges (Read / Write)
- LTO-5 Cartridges (Read)
- OWC Archive Pro Ethernet LTO-8 devices:
- LTO-8 Cartridges (Read / Write)
- LTO-M7 Cartridges (Read / Write)
- LTO-7 Cartridges (Read / Write)
- OWC Archive Pro Ethernet LTO-9 devices:
- LTO-9 Cartridges (Read / Write)
- LTO-8 Cartridges (Read / Write)
1.2 Package Contents
- OWC Archive Pro Ethernet (version based on purchase)
- IEC C13 Grounded Power Cable
- LTO Cleaning Cartridge
- LTO Data Cartridge (version based on purchase)
- Available options include LTO-7, LTO-8, & LTO-9
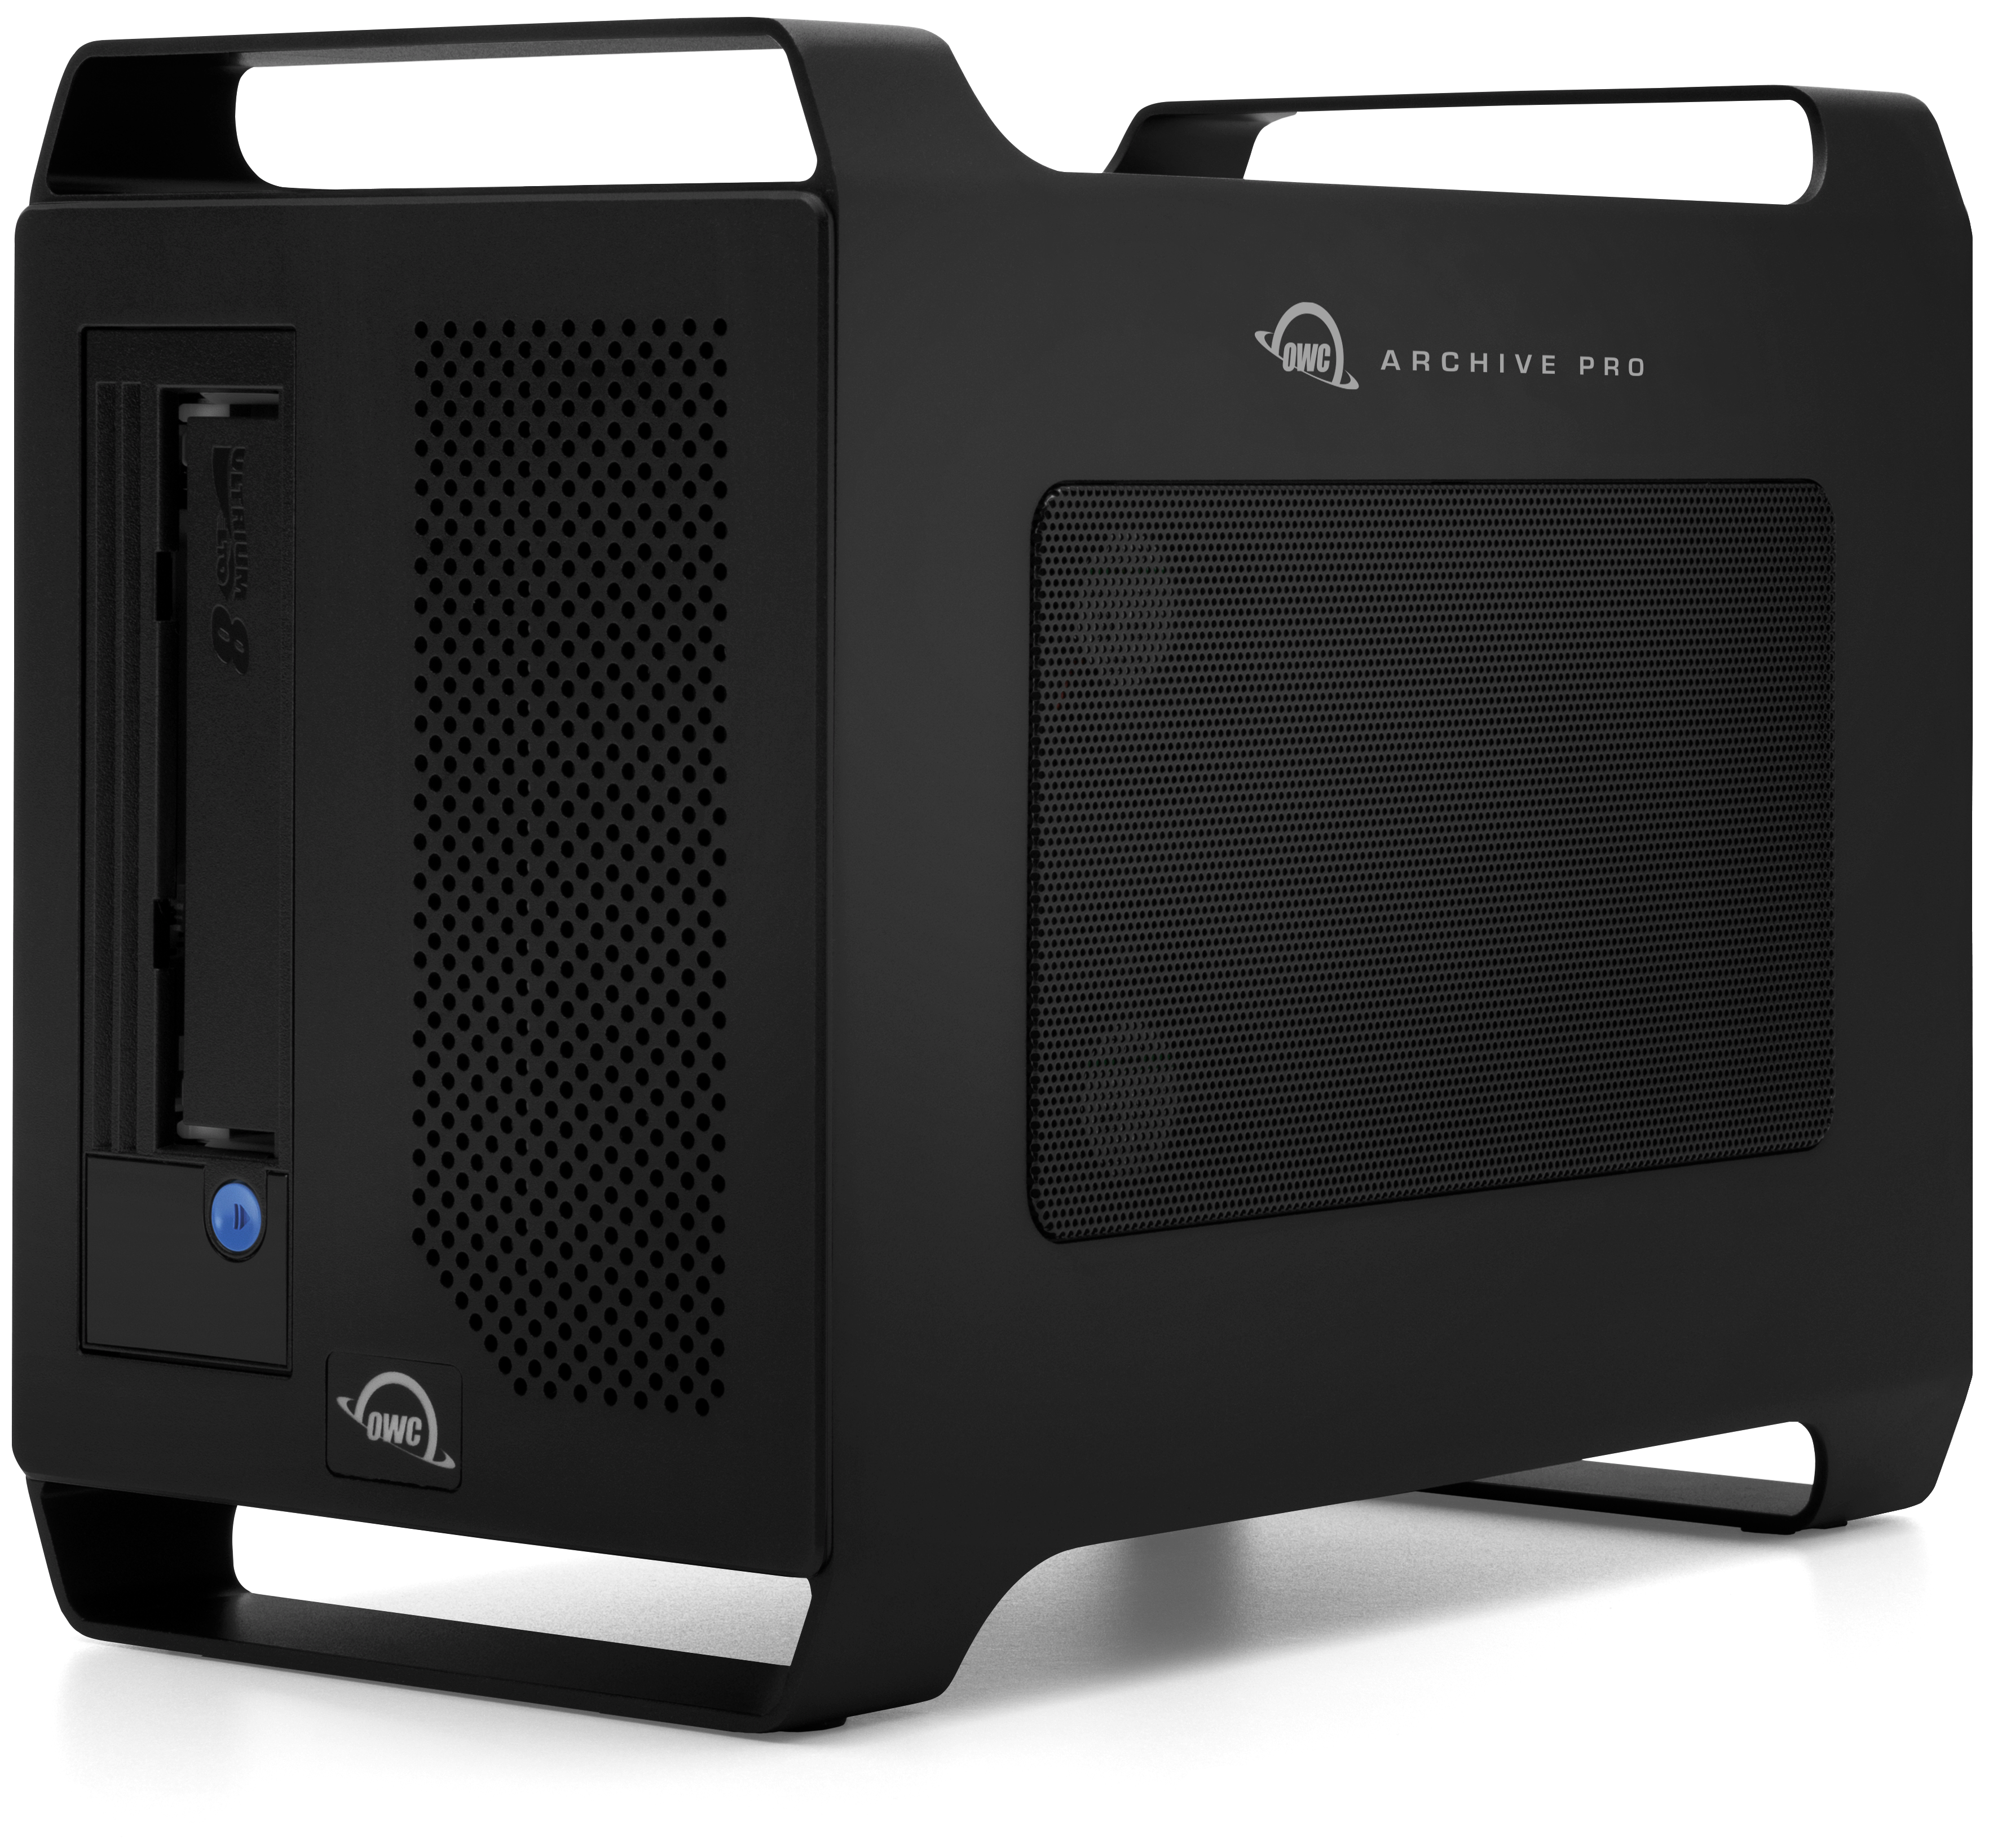
1.3 Front View
- LTO Tape Cartridge Slot – Carefully insert LTO tape cartridge. Ensure the arrow on the cartridge is facing the OWC logo on the front.
- Device Status Panel – See panel details below:

Device Status Panel Details
1. Unload Cartridge button – used to rewind and then eject cartridges, as well as to put the device into Maintenance mode, force a memory dump, or reset the drive.
2. Ready light (green) – used in conjunction with the other status lights, display and SCD dot to provide drive status information.
3. Encryption light (white) – used in conjunction with the other status lights, SCD, and SCD dot to provide drive status information.
4. Fault light (amber) – used in conjunction with the other status lights, SCD, and SCD dot to provide drive status information.
5. Single Character Display (SCD) – used in conjunction with the status lights and SCD dot to provide drive status information
- Front Panel Fault Codes:
- 0 = No fault
- 1 = Temperature fault
- 2 = Power fault
- 3-5 = Firmware or hardware fault
- 6-7 - Drive or media fault
- 8 = Interface fault
- A = Degraded operation
- C = Drive requires cleaning
- e = Encryption error
- J = Incompatible media or media format
- P = Write operation protected
6. SCD dot – used in conjunction with the status lights, and SCD to provide drive status information.
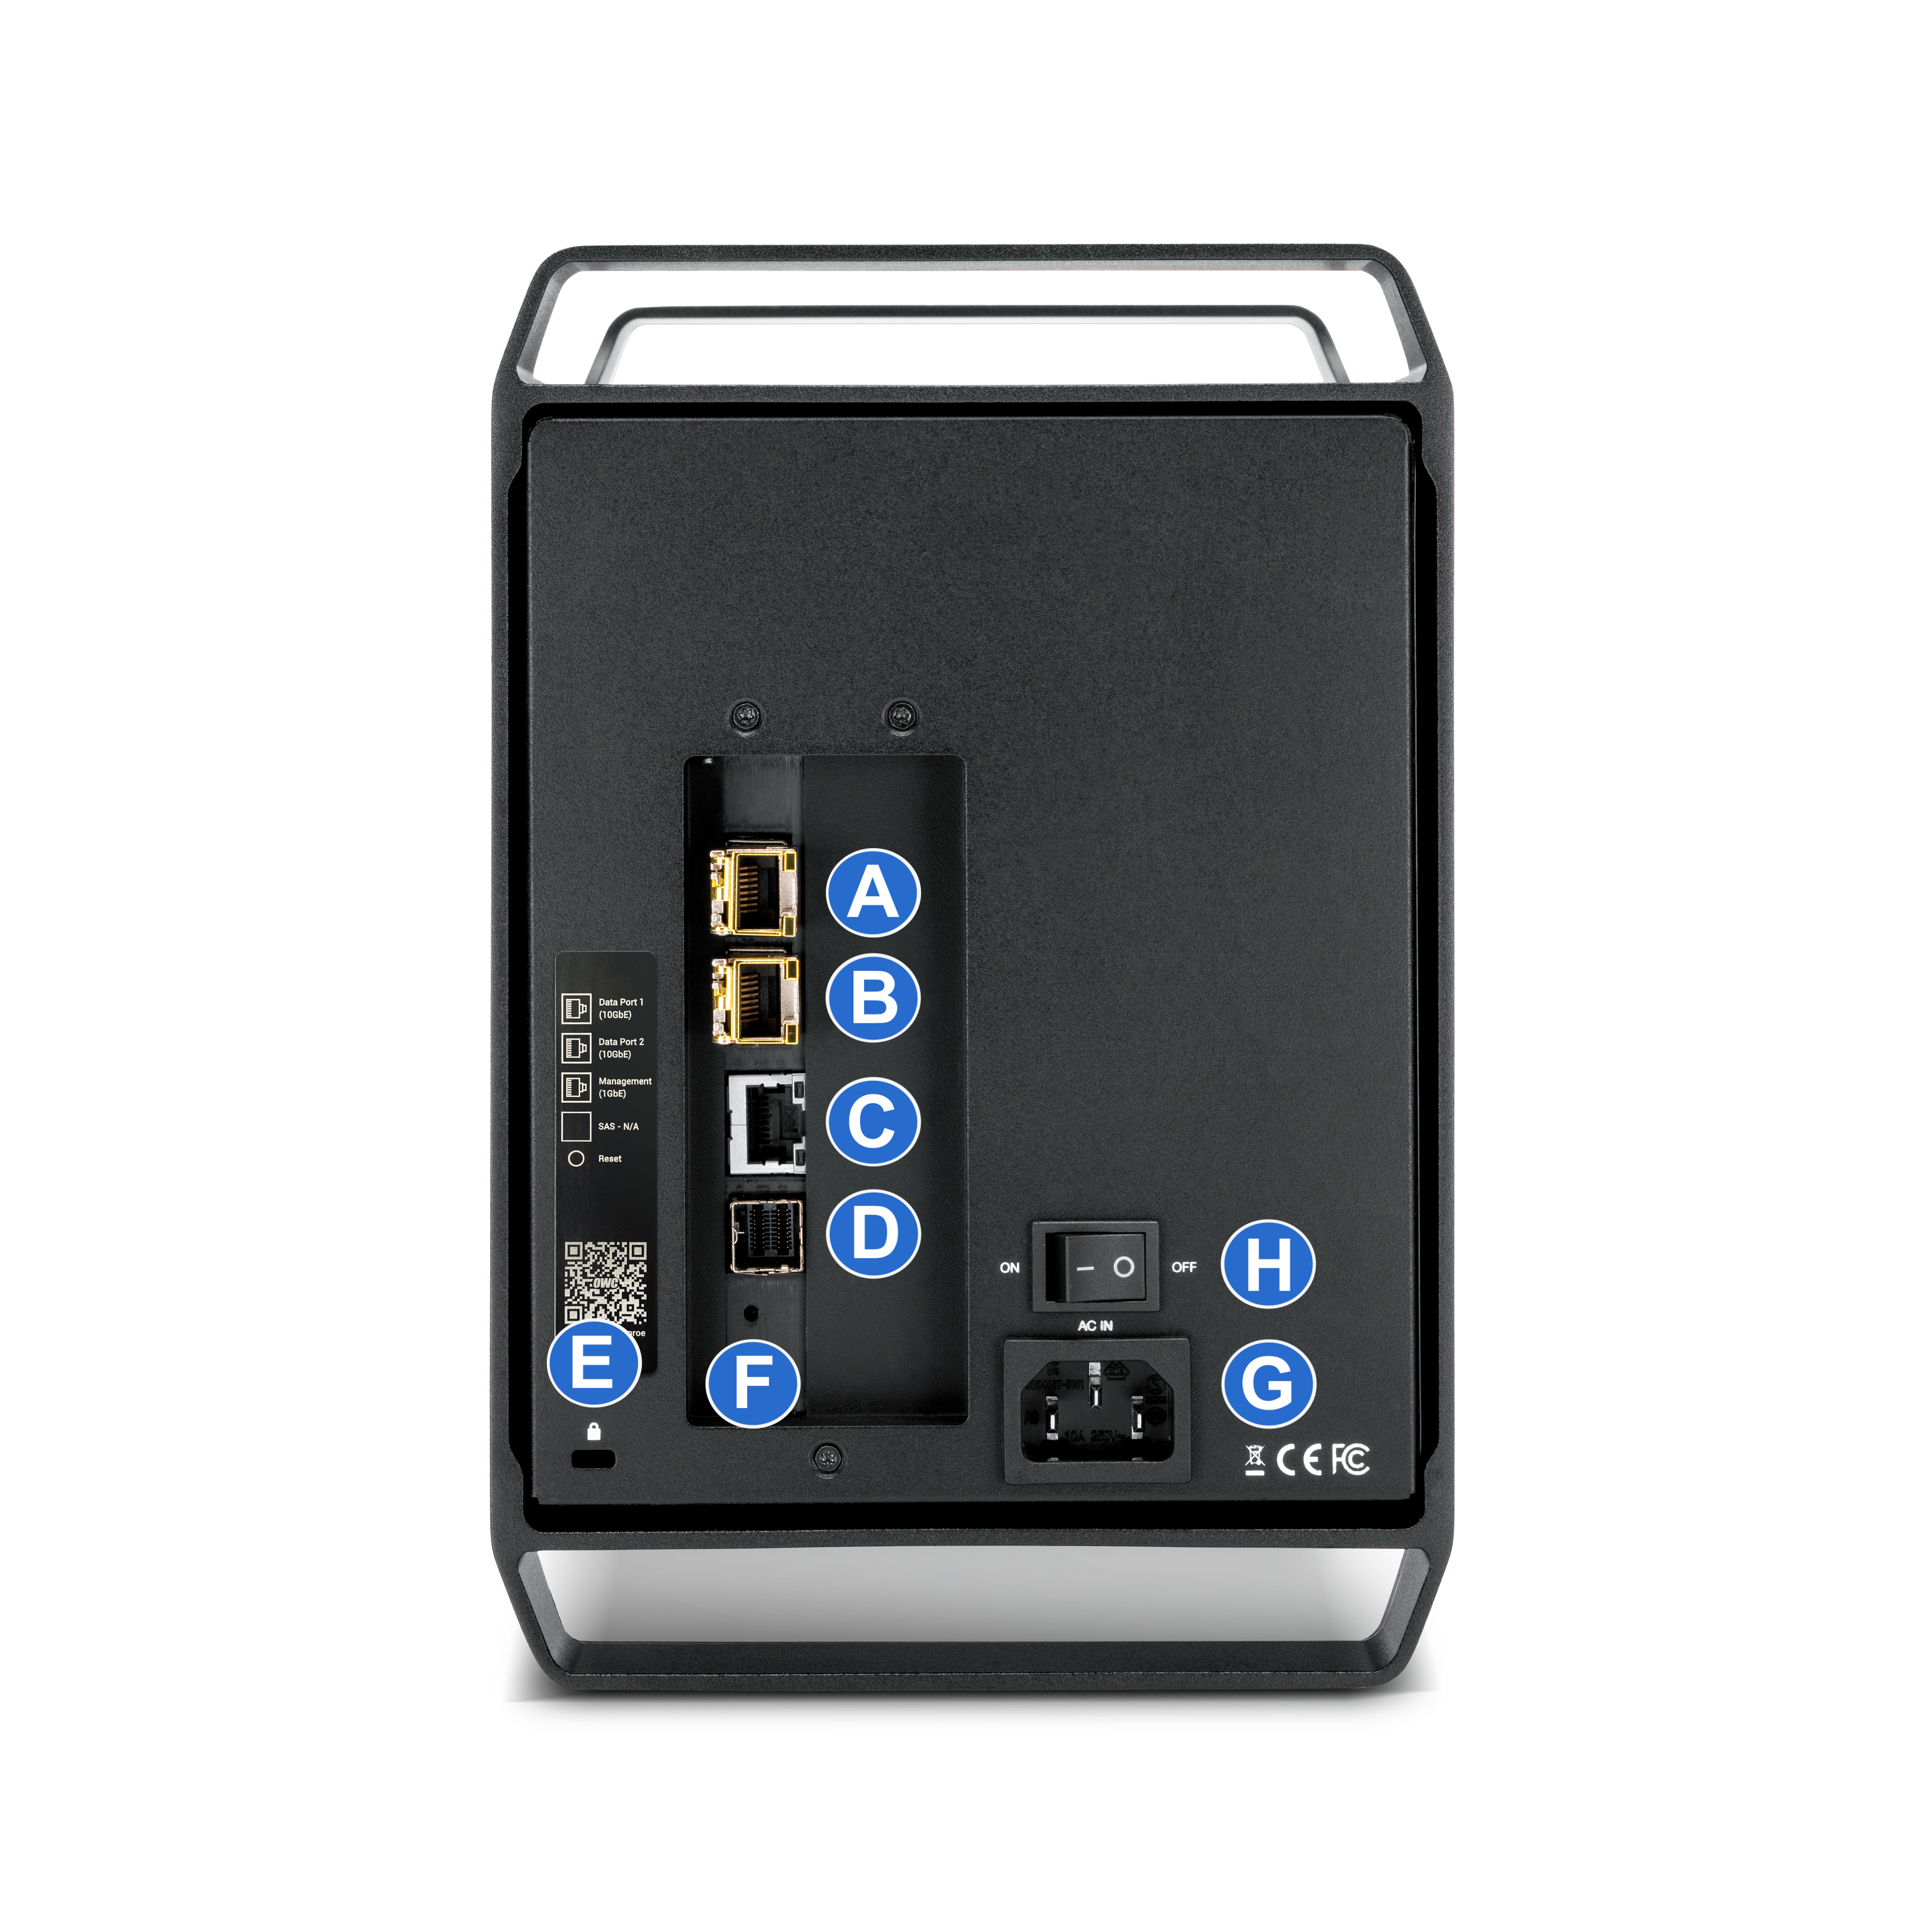
1.4 Rear View
A. (1) 10GbE SFP+ (Data Port 1) for iSCSI host connections - a 10GBase-T SFP+ to RJ45 optic module is factory installed supporting connection with a Cat6a ethernet cable.
- Additional optic modules/cables supported: 10GBase-LR SFP+ | 10GBase-SR SFP+ | SFP+ DAC
- Factory Default IP Address: 10.0.0.1
- Factory Default Subnet Mask: 255.0.0.0
- Factory Default MTU: Jumbo 9000
B. (1) 10GbE SFP+ (Data Port 2) for iSCSI host connections - a 10GBase-T SFP+ to RJ45 optic module is factory installed supporting connection with a Cat6a ethernet cable.
- Additional optic modules/cables supported: 10GBase-LR SFP+ | 10GBase-SR SFP+ | SFP+ DAC
- Factory Default IP Address: 172.16.0.1
- Factory Default Subnet Mask: 255.240.0.0
- Factory Default MTU: Jumbo 9000
C. (1) 1GbE RJ45 Management Port - Connect to a system with a Cat6 ethernet cable.
- Factory Default IP Address: 192.168.0.1
- Factory Default Subnet Mask: 255.255.0.0
- Factory Default MTU: 1500
D. (1) SAS port - Not used.
E. (1) Security slot – Connect a security tether.
F. (1) Reset Button - Reset the device's IP addresses and passwords to factory default settings.
- Press and hold the reset button for 5 seconds. The device will reboot and can take 5 minutes fully start up.
G. (1) IEC C13 AC IN Power Port – Connect the included power cable. Auto-sensing will automatically determine the AC source voltage level
H. (1) Power switch – Toggle to power the device on | off.
- Device does not draw residual power when toggle off
Getting Started
2.1 Initial Setup Notice
Initial setup of the OWC Archive Pro Ethernet requires a one time completion of the following guides. Connecting the OWC Archive Pro Ethernet after initial setup is simple and accomplished with a few steps.
Mac and Windows users who have completed the initial setup can skip to the next section "Section 2.2" Device Power and Connection.
2.2 Device Power and Connection
1. Plug the power cable into the OWC Archive Pro Ethernet power port located in the rear. Connect the other end into a power outlet. Toggle the power switch to ON. The device fans we begin spinning.
- NOTE: Using an uninterruptible power supply (UPS) is recommended to help protect from data loss due to electrical anomalies.
2. Connect a qualified Cat-6 or greater ethernet cable to either 10GbE RJ45 SFP+ Data Port port or 1GbE RJ45 Management Port located on the rear of the OWC Archive Pro Ethernet. Connect the other end of the ethernet cable into a system's onboard network port, ethernet adapter, or network switch.
- The factory installed 10GBase-T SFP+ to RJ45 optic module can be removed and replaced with 10GBase-LR SFP+ | 10GBase-SR SFP+ optic modules (not included). Please visit Section 3.2 "iSCSI Host Connection Optic Module Removal" for instructions.
Mac Reconnecting the Device
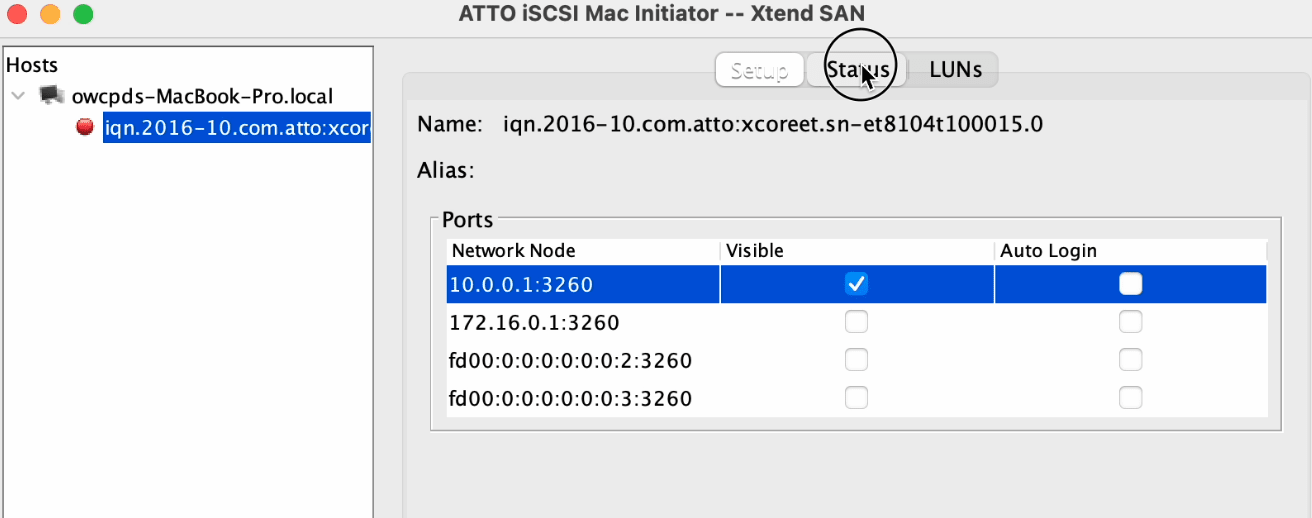
1. Launch the "ATTO Xtend SAN™ iSCSI Initiator for macOS (v.7)" application.
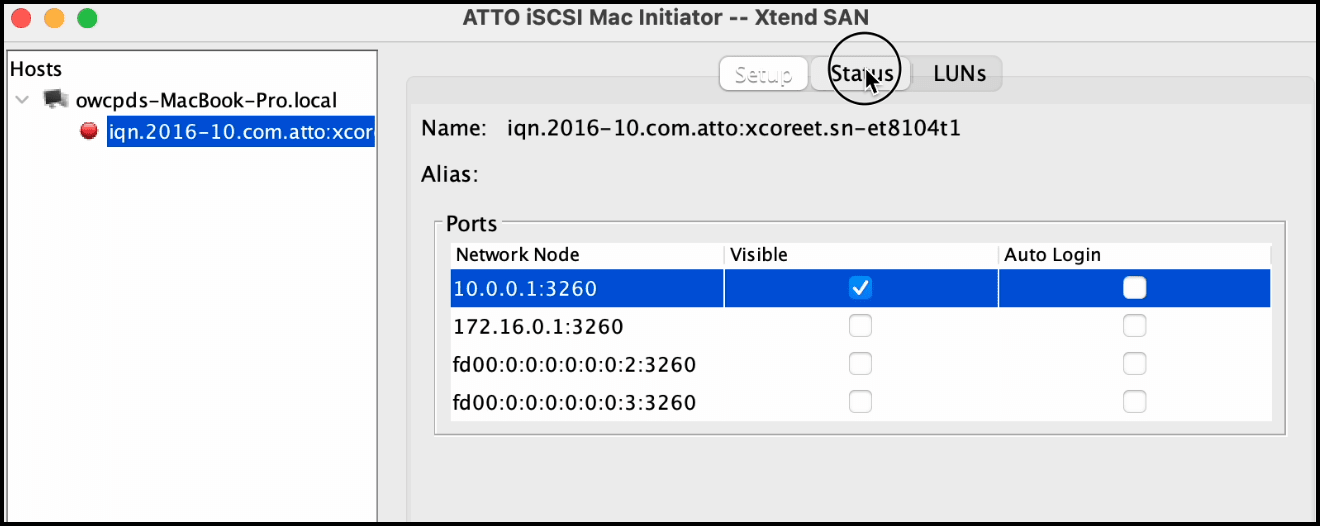
2. Select the OWC Archive Pro Ethernet target located under Hosts in the left pane.
- NOTE: Enabling "Auto Login" will remove the need to reconnect the OWC Archive Pro Ethernet through the ATTO iSCSI Initiator. Check the "Auto Login" box after selecting the OWC Archive Pro Ethernet under Hosts.
3. Select "Status."
4. Select the OWC Archive Pro Ethernet network node and select "Login."
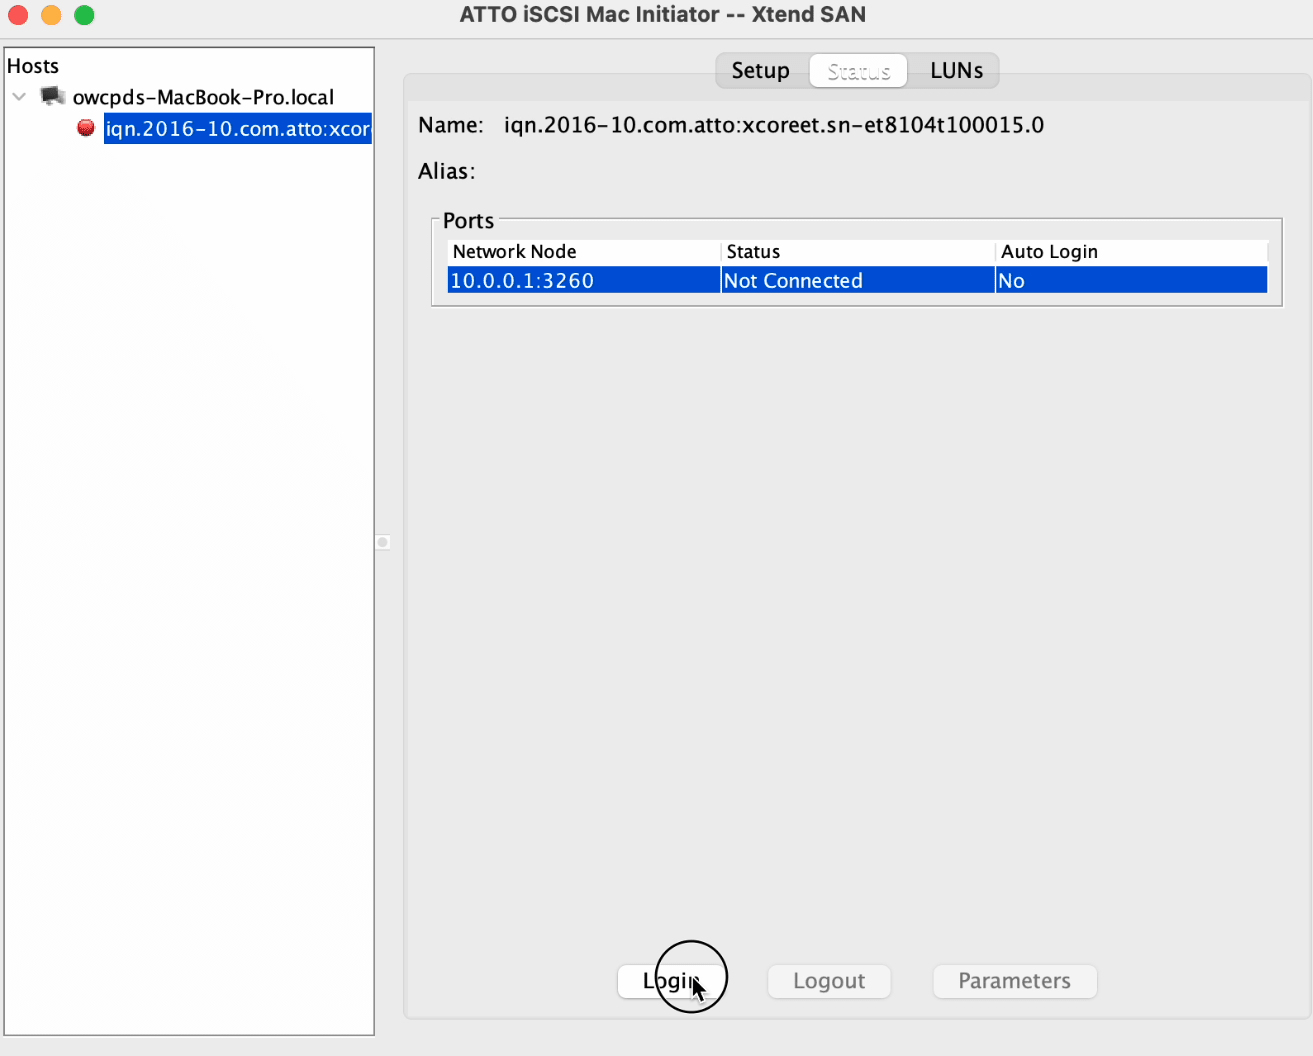
5. The OWC Archive Pro Ethernet is now connected to the Mac.
Windows Reconnecting the Device
1. Search in the Windows Search Box “iSCSI Initiator” and select "Open."

2. Select the OWC Archive Pro Ethernet and select "Connect."

3. The OWC Archive Pro Ethernet is now connected to the Windows PC.
Device Management
3.1 Disconnecting the Device
Mac Disconnecting the Device
1. Launch the "ATTO Xtend SAN™ iSCSI Initiator for macOS (v.7)" application.
2. Select the OWC Archive Pro Ethernet target located under Hosts in the left pane and select "Status."
3. Select the OWC Archive Pro Ethernet network node and select "Logout."
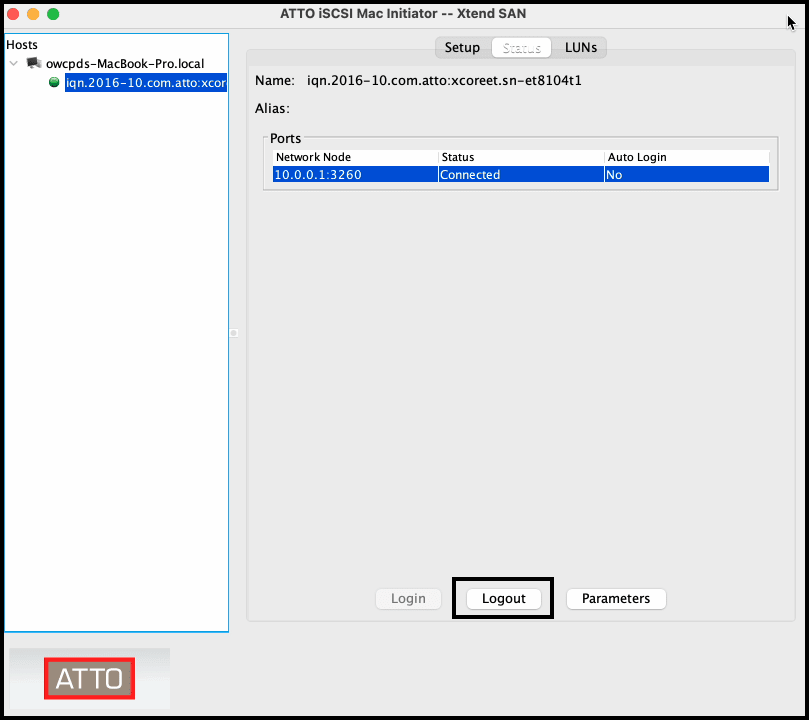
4. The OWC Archive Pro Ethernet is no longer connected to the Mac.
Windows Disconnecting the Device
1. Search in the Windows Search Box “iSCSI Initiator” and select "Open."
- The OWC Archive Pro Ethernet can also be disconnected by restarting or powering off the Mac.
2. Select the OWC Archive Pro Ethernet and select "Disconnect."
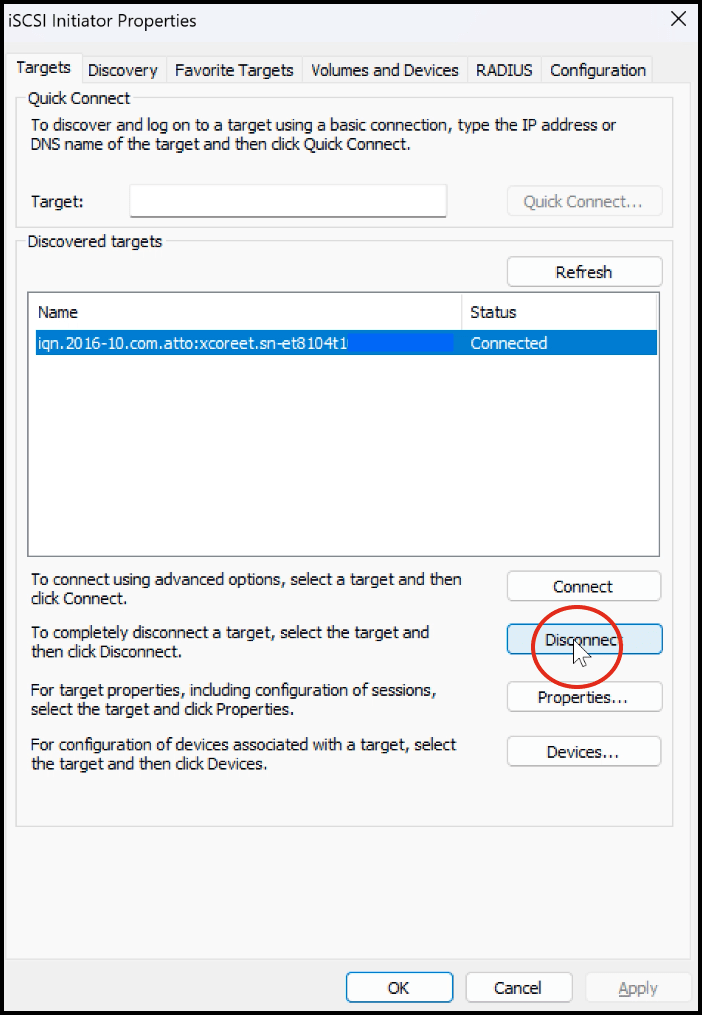
3. The OWC Archive Pro Ethernet is no longer connected to the Windows PC.
3.2 iSCSI Host Connection Optic Module Removal
1. Carefully lift the gold leaver outwards. The factory installed 10GbE SFP+ optic module will slowly slide out as the leaver is lifted.
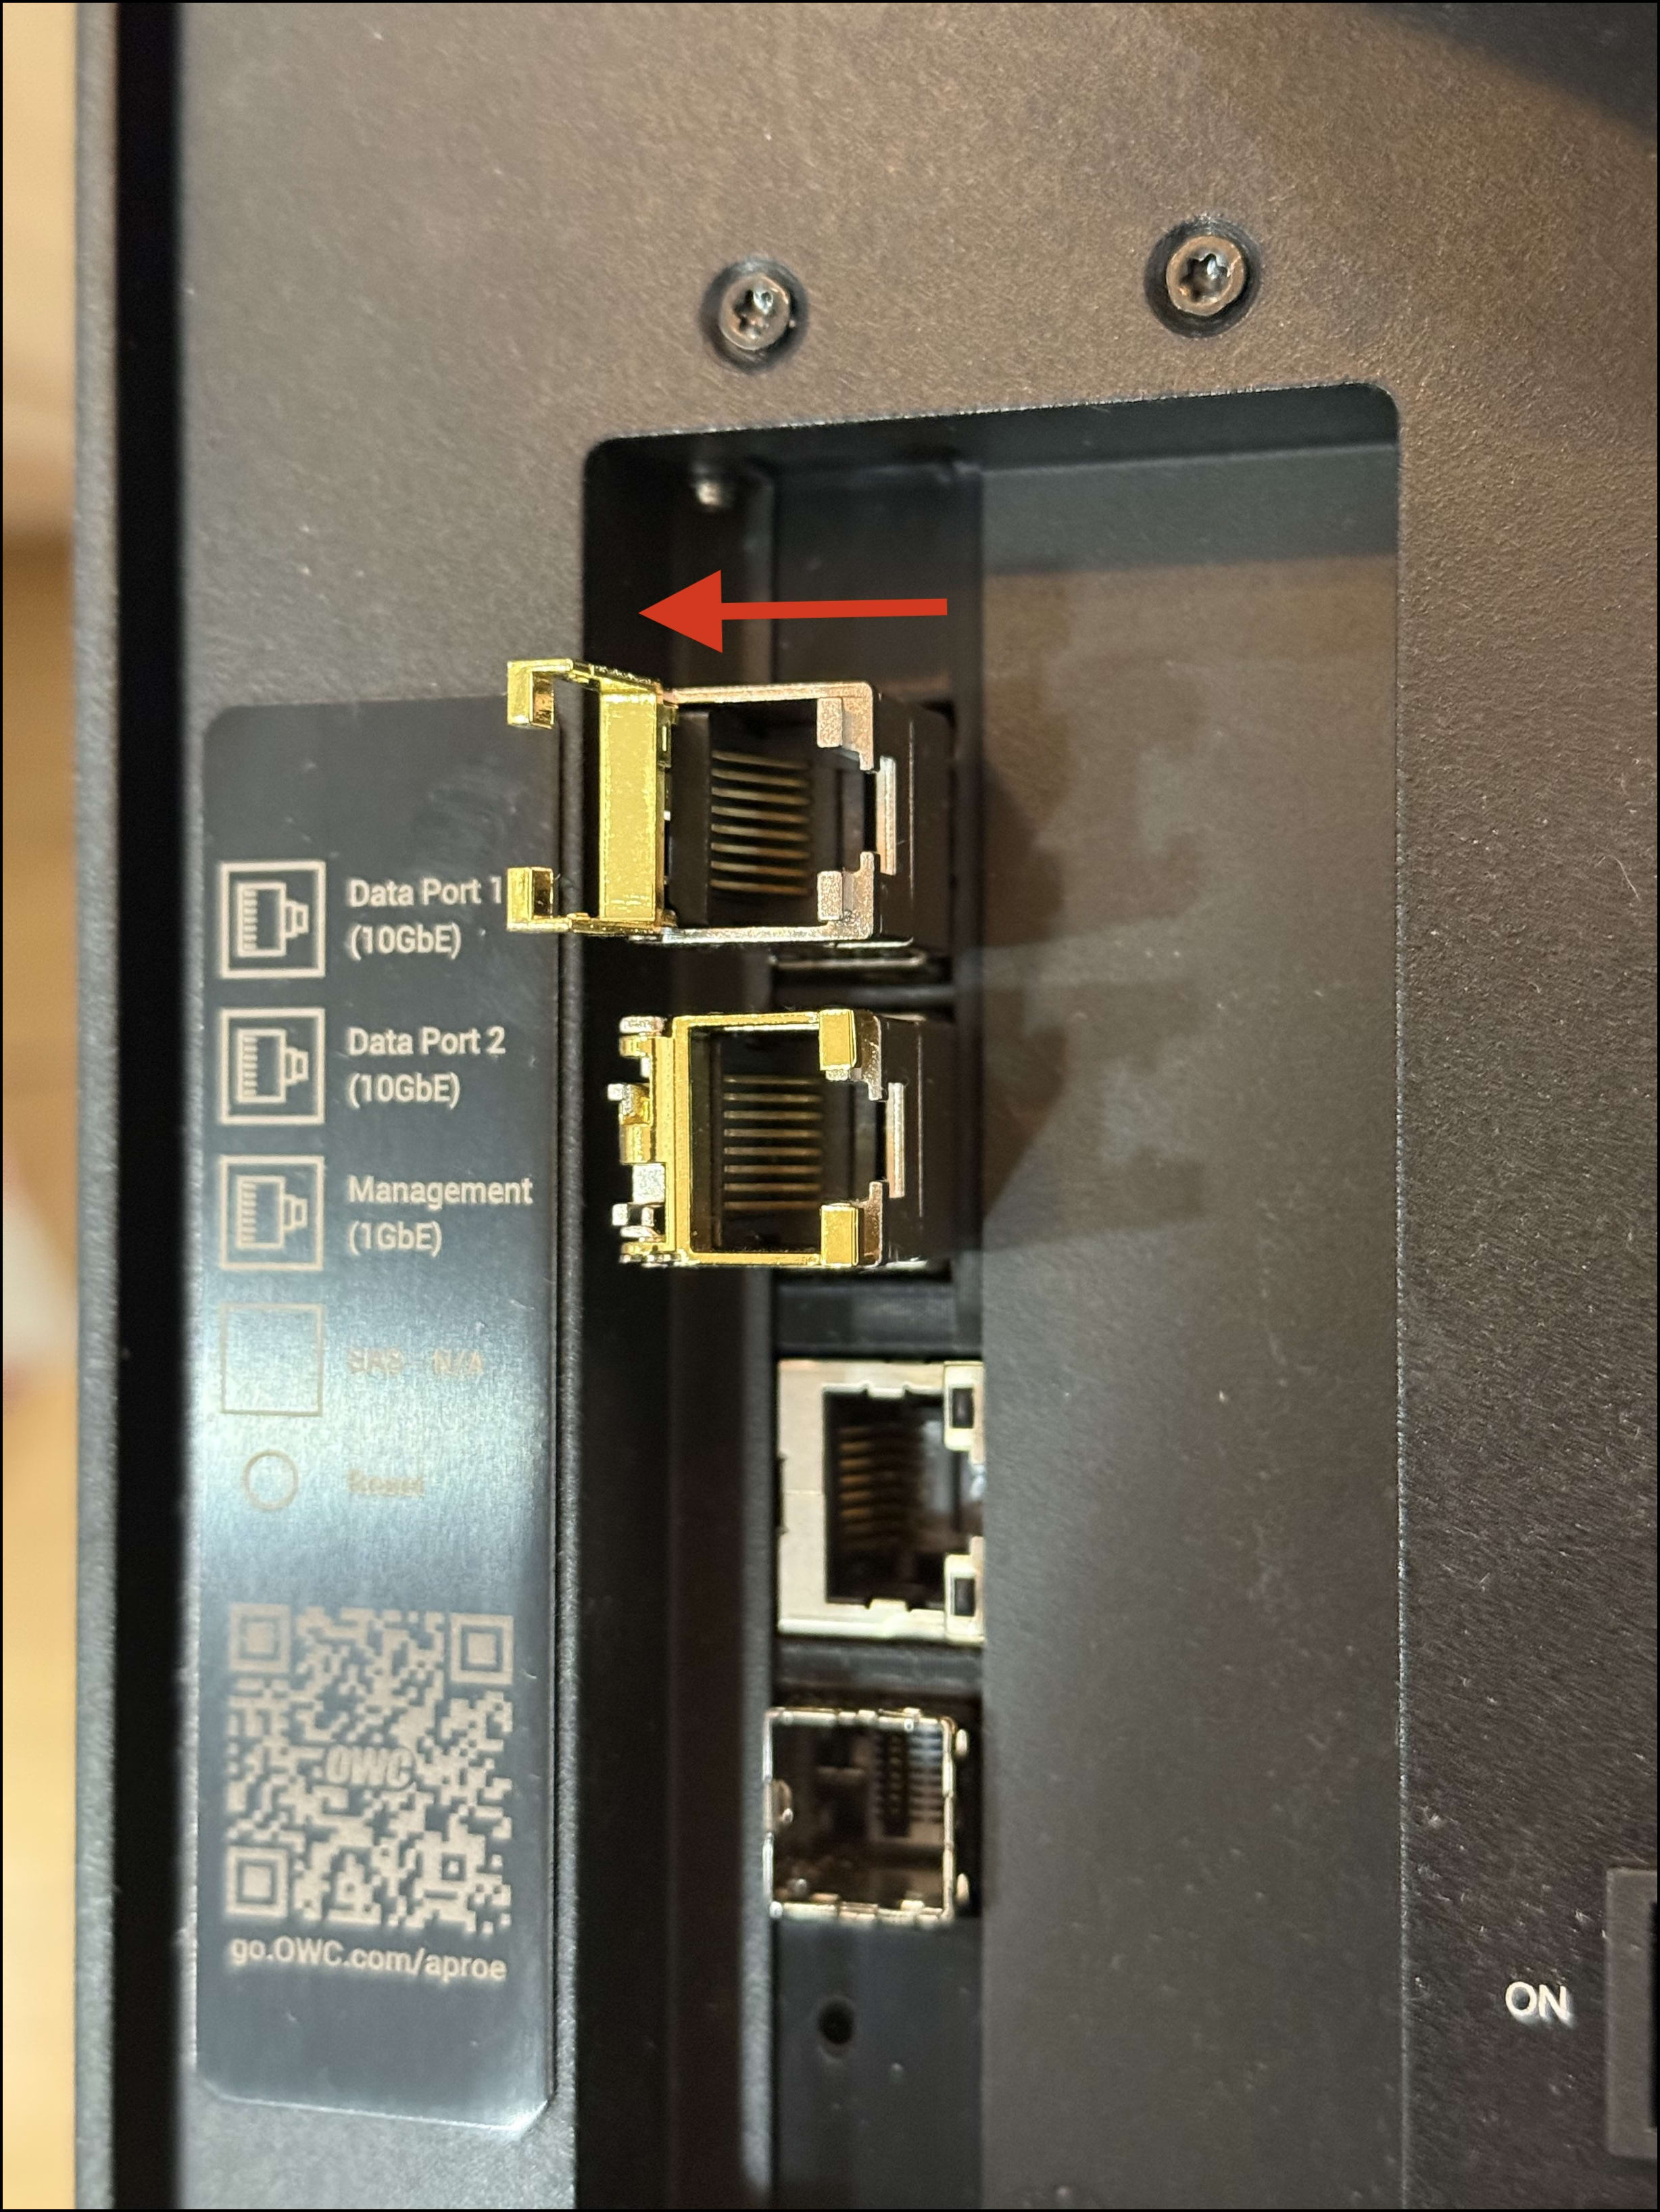
2. Slide the optic module out of the OWC Archive Pro Ethernet.
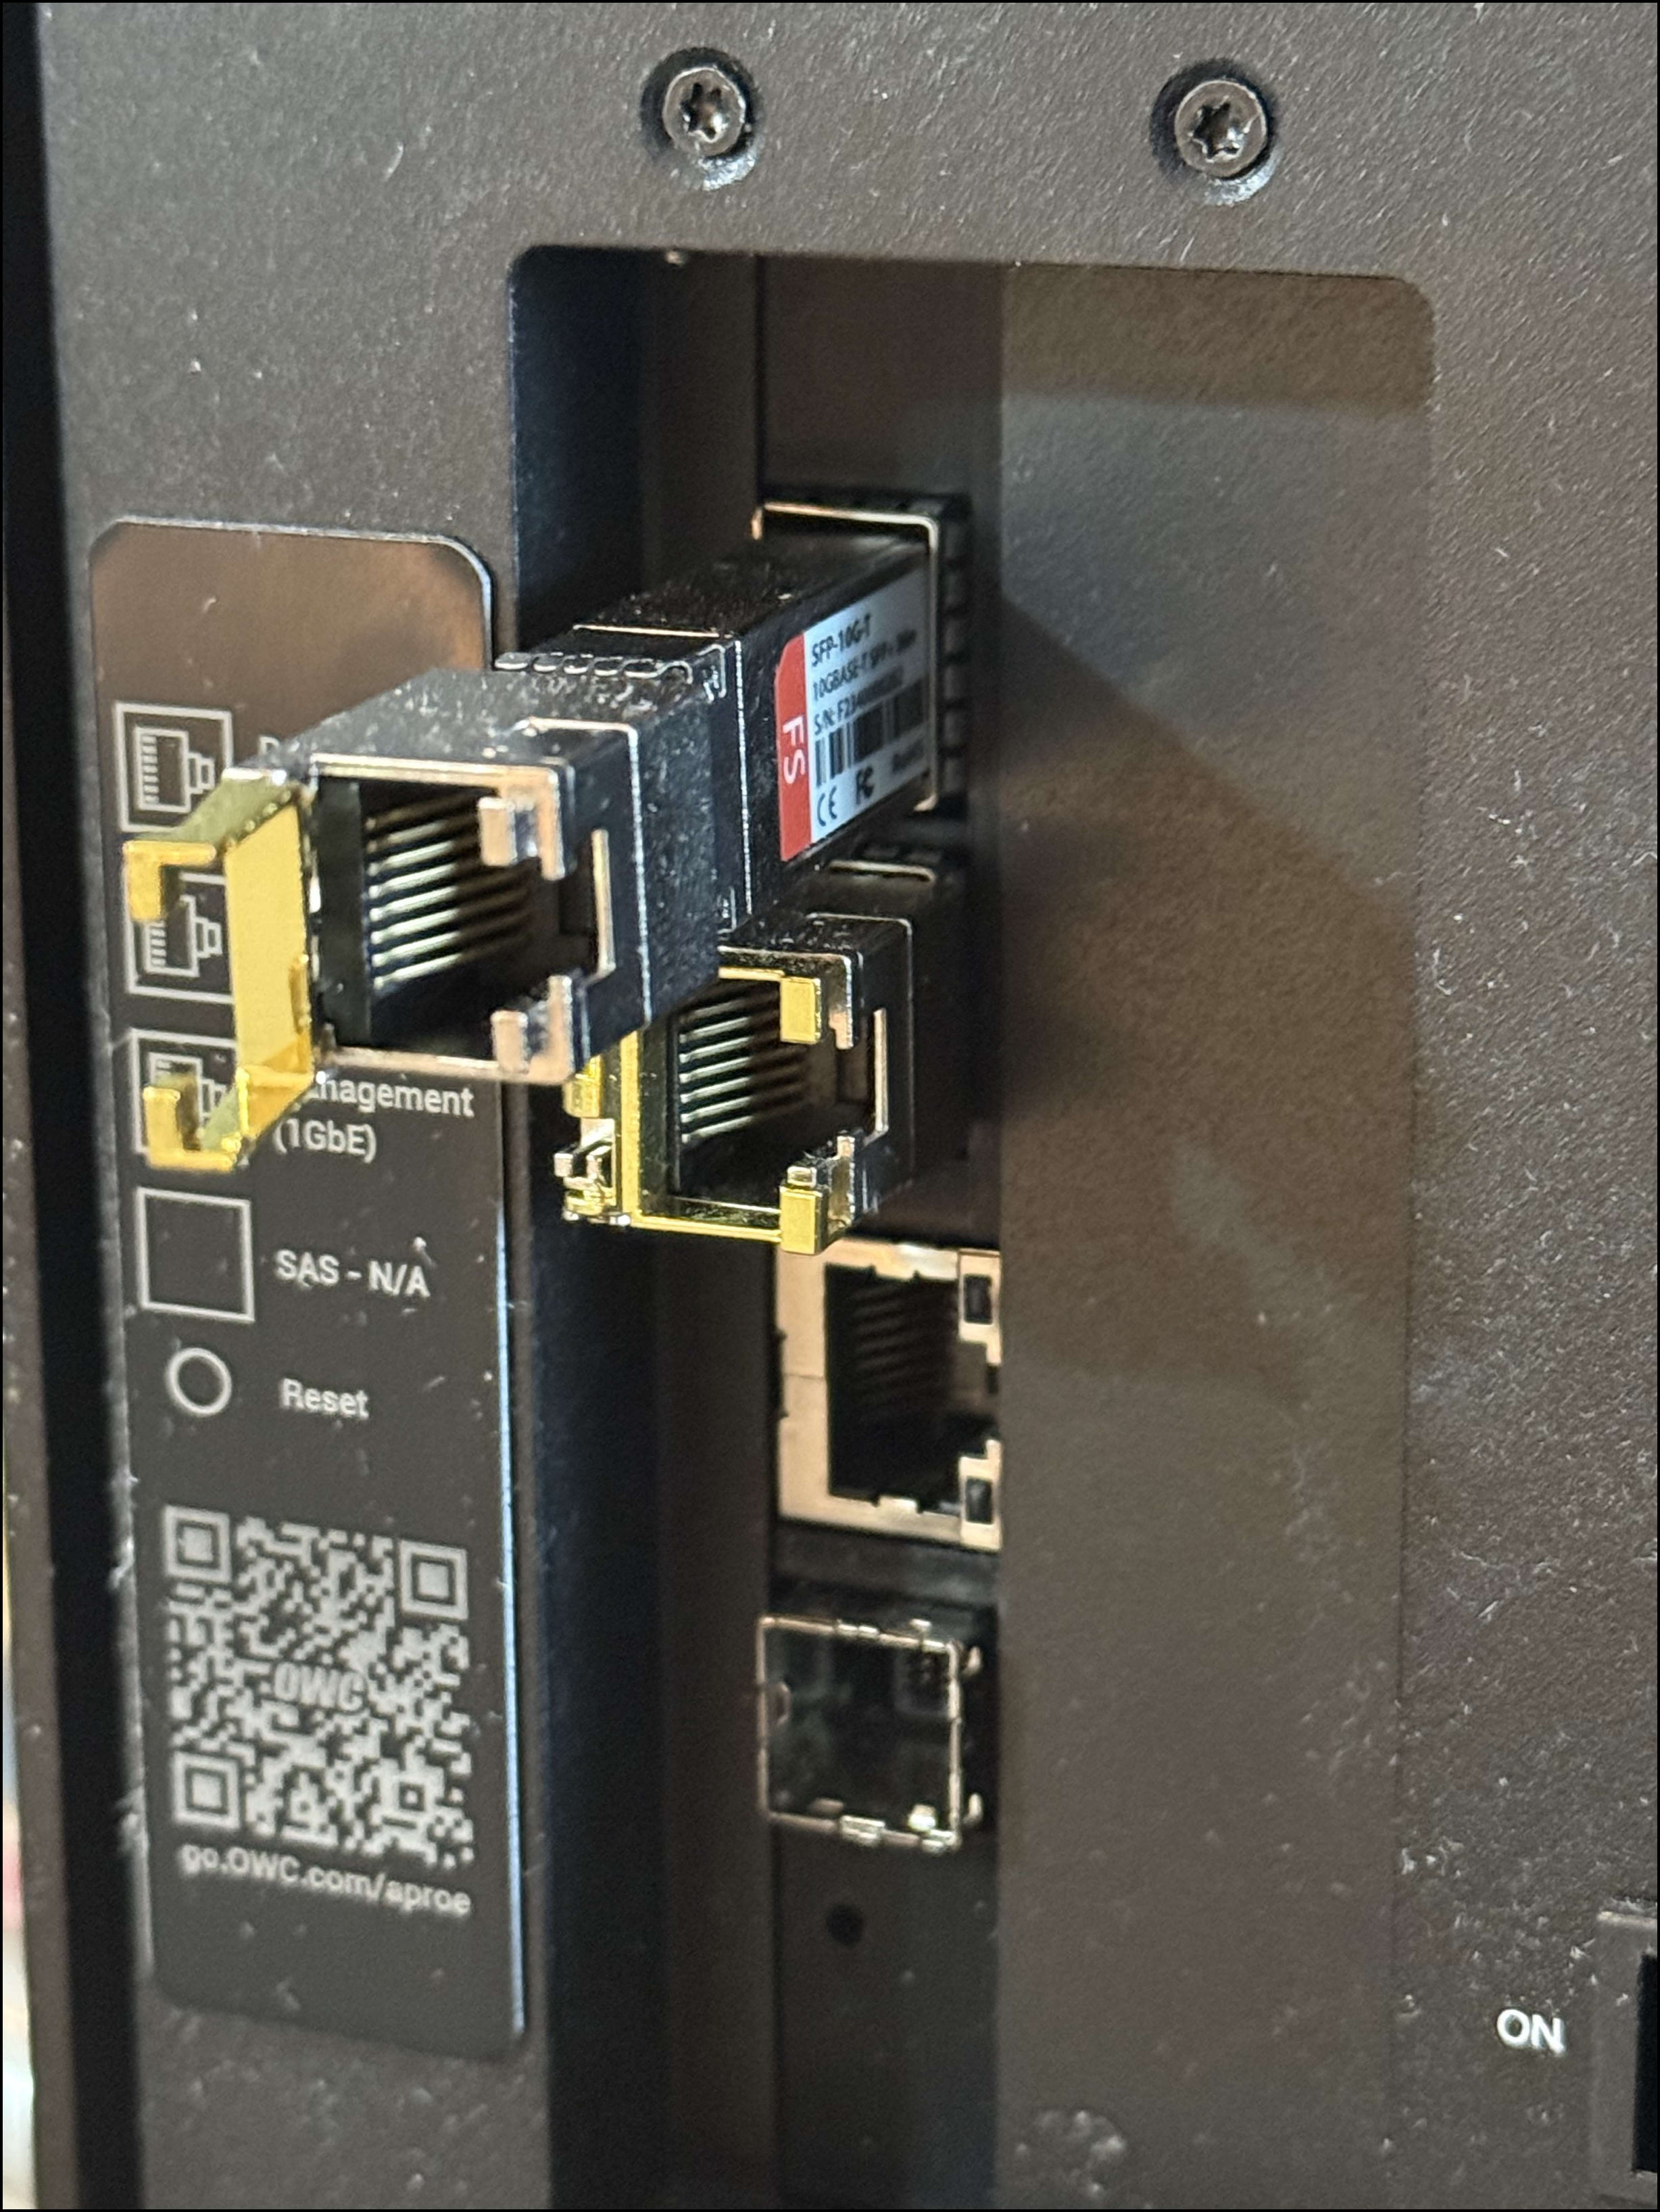
3. Carefully install a desired 10GBase-LR SFP+ | 10GBase-SR SFP+ | SFP+ DAC optic module/cable (not included).
- The original 10GbE SFP+ optic module can be reinstalled by carefully sliding it into the OWC Archive Pro Ethernet. Press the lever downwards to secure the connection.
3.3 ATTO Web Interface Manager
The ATTO Web Manager can be used to modify the OWC Archive Pro Ethernet IP address, maximum transmission unit (MTU), or setup a DHCP connection. Users who do not need to make these changes can move onto the next section.
1. Open a web browser of your choice and type in the address bar the IP address based on the data or management port currently being used to connect the OWC Archive Pro Ethernet. Press "Enter."
- A non-secure or non-private connection prompt may appear (Safari/Chrome). Click "show details" and click "visit the website". This prompt relates to local SSL certificates and is not a security concern.
10GbE RJ45 SFP+ Data Port 1 Connection:
- Factory Default IP address: 10.0.0.1
10GbE RJ45 SFP+ Data Port 2 Connection:
- Factory Default IP address: 172.16.0.1
1GbE RJ45 Management Port Connection:
- Factory Default IP address: 192.168.0.1
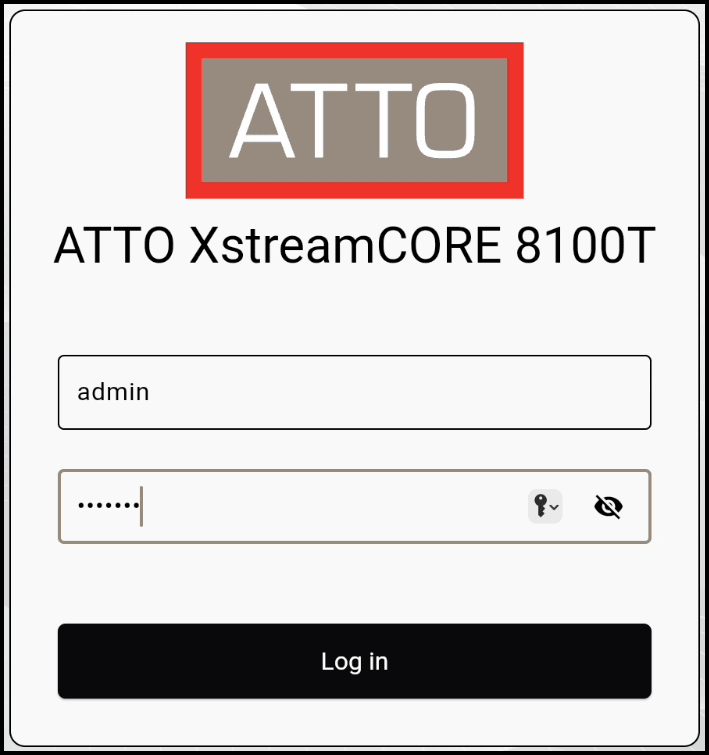
2. A login screen for ATTO XstreamCORE 8100T should appear. Enter the following login credentials:
- Username: admin
- Password: (located on bottom of device)
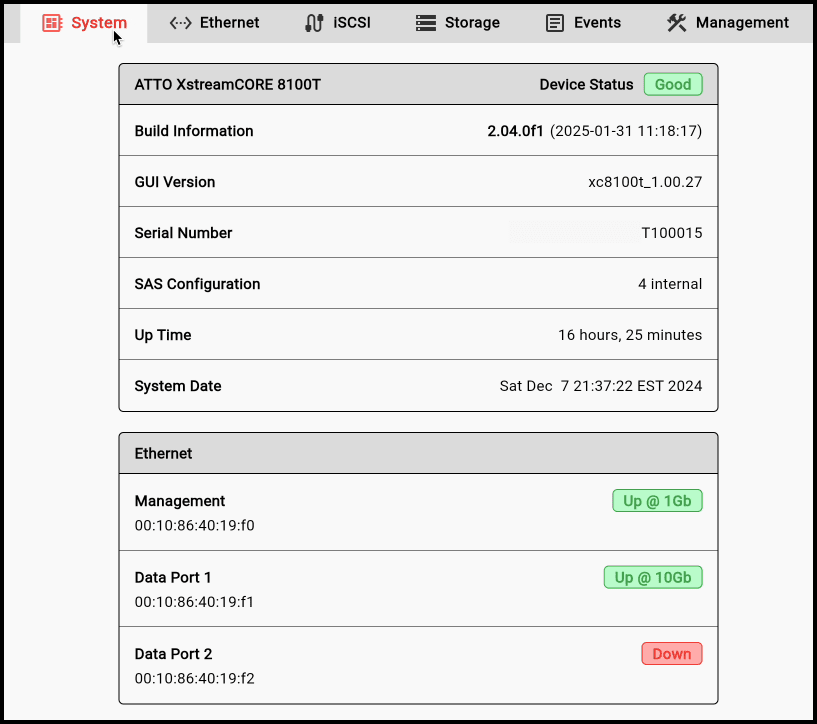
3. The ATTO XstreamCORE 8100T dashboard will appear. By default the System section will be highlighted display device information. Several options are available to help manage the OWC 10G Archive Pro.
- System: Obtain device, ethernet, and temperature details
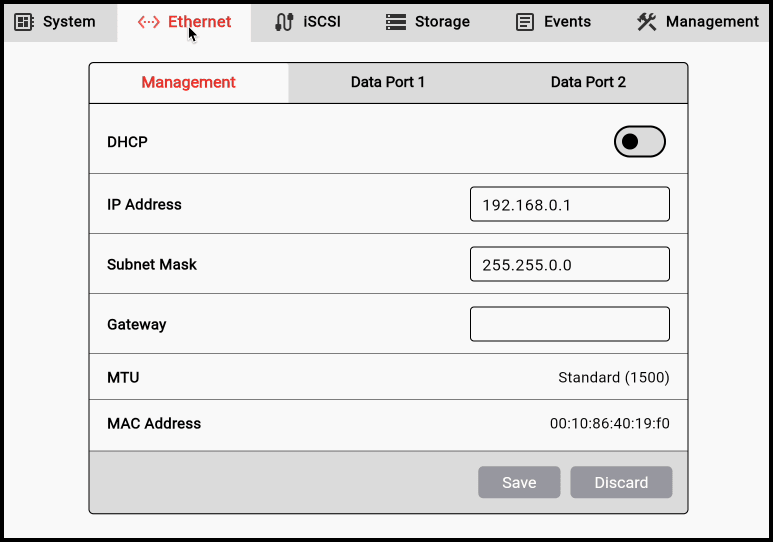
- Ethernet: Manage network settings include device IP address and Jumbo Frames
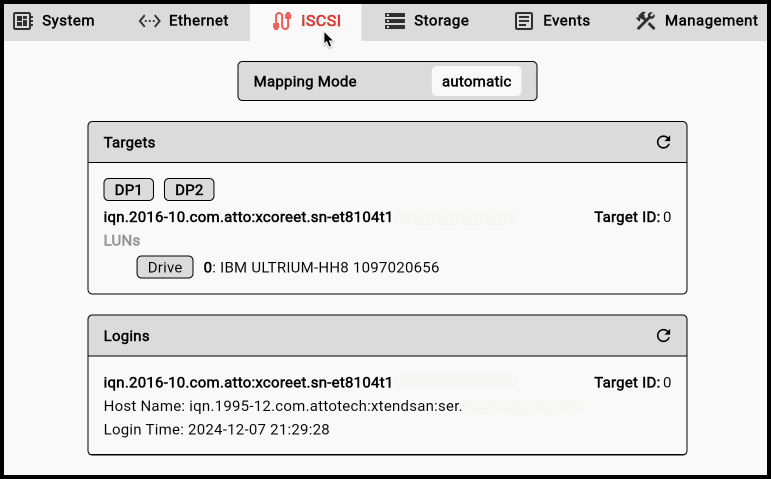
- iSCSI: Obtain ISCSI details
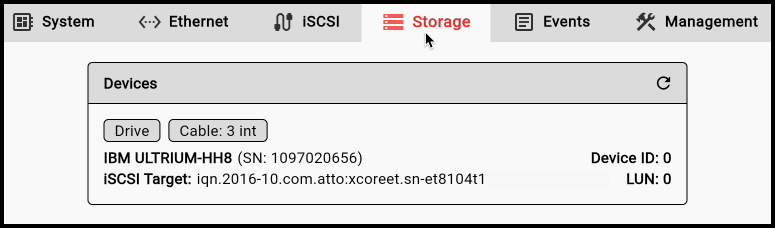
- Storage: Obtain LTO cartridge details
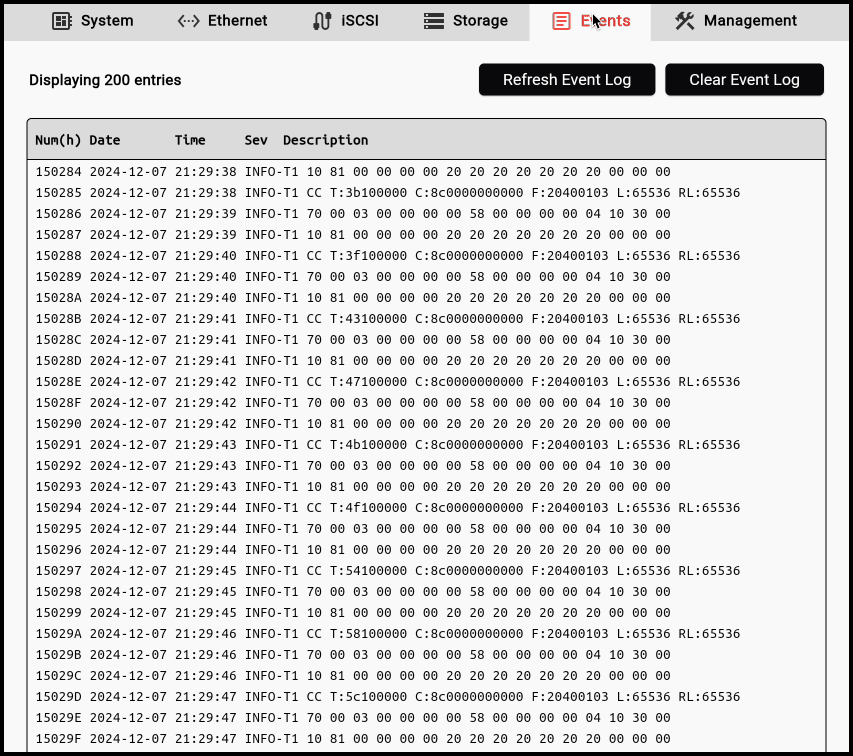
- Events: Obtain Event Log details
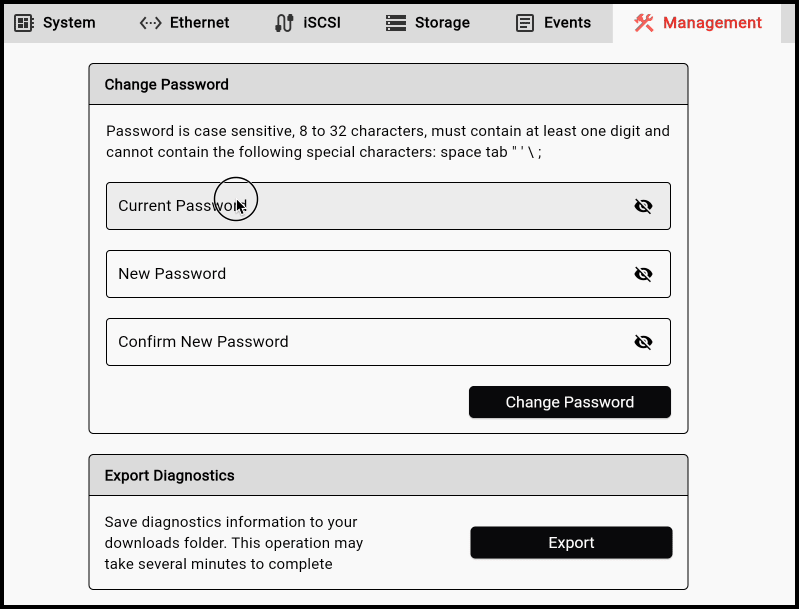
- Management: Change Password, Export Diagnostics, and Update Firmware
System
Ethernet
iSCSI
Storage
Events
Management
Support Resources
4.1 General Notes & Recommendations
General Notes and Recommendation
- IMPORTANT: LTO volumes will not automatically appear in the Finder. A LTO Interface software such as Hedge Canister is needed to acquire required drivers (IBM ICU, Macfuse, and IBM LTFS). Hedge Canister is included with the OWC Archive Pro Ethernet.
- Hedge Canister support manual provides additional resources for using the LTO Interface software.
- Hedge Canister version 25.2 is required for macOS 26 "Tahoe".
- Hedge Canister support manual provides additional resources for using the LTO Interface software.
- The OWC Archive Pro Ethernet can take up to 5 minutes for initial start up.
- Please do not cover, unmount, or disconnect the fans of the OWC Archive Pro. Proper cooling is important to maintain the operating standard of the OWC Archive Pro Ethernet.
- While cleaning your tape drive is important, it should only be done when the tape drive requests it with the 'C' fault code. Doing so on a regular basis will cost you in cleaning tapes and reduce the operational life of the drive.
Write and Data Protection
- Please do not power off the OWC 10G Archive Pro Ethernet or disconnect the Cat-6 ethernet cable from the host during use. Doing so could make an LTFS volume very difficult if not impossible to mount and recover data from.
- The mechanical process of ejecting the tape can take up to 60 seconds.
- On the underside of LTO tapes there is a red switch which displays a lock symbol when in the on position. When in the on position the tape is considered read-only and new data cannot be written to the tape. If you try to write to a tape with this feature enabled, the drive will display a 'P' fault code. This also prevents accidental formatting.
- Once you’ve filled or written everything to a given LTO cartridge, it is a good idea after you rewind and eject the media, to flip the physical write protection switch on the cartridge to prevent any damage or changes to the media when using it to restore files.
- IMPORTANT: Do not hold down the Unload Cartridge button for more than 5 seconds unless directed to by an OWC Technical Support representative. This may cause an LTO drive to perform a factory reset.
Performance
- Whenever possible use a source drive that is as fast or faster than the LTO drive to feed it data; this will help avoid the potential for pauses or restarts when writing data, that can happen when (for example) a slow drive enclosure is used as a source. Note that modern LTO drives typically operate between 250-400 MB/s.
Additional Resources
- IBM Product Support TOC: More information available at IBM’s Support platform
- Status Light / SCD codes: More information available at IBM’s Support platform
- Using the Cleaning Cartridge: More information available at IBM’s Support platform
- ATTO XstreamCORE 8100T User Manual
4.2 Troubleshooting
- If you’re having trouble connecting your OWC Archive Pro Ethernet to the computer, first check that the power cable is connected to the back of the device and a working power source, and that the device will power on (does not need to be connected to the host — please switch the device on and check the Power LED on the front of the device to verify).
- If the power is working but you’re still having trouble, verify that the Cat-6a ethernet cable is fully seated in the device and host ports. If that does not result in the device being recognized, you may want to try a different Cat-6a ethernet cable and/or connecting to a different system.
- A mixture of devices configured for jumbo frames and standard frames on the same network can cause performance issues. The OWC Archive Pro Ethernet can have Jumbo Frames disabled If a device on the same network doesn't support Jumbo Frames. Please view the Maximum Transmission Unit (MTU) section in either the Mac or Windows initial setup support article for instructions.
- Windows LTFS is end-of-life and no longer supported by IBM. The final available version is 2.4.5. Windows LTFS will no longer receive any updates including bug fixes. There is a known issue within Windows which affects LTFS capabilities on writing data. More information is available in our support article "Archive Pro: Windows LTFS End-of-Life | LTO Tape Issue".
- If you’re still having trouble making a basic connection between the host and device, please contact our customer support team for assistance.
4.3 About Data Backup
To ensure that your files are protected and to prevent data loss, we strongly suggest that you keep two copies of your data. Any data loss or corruption while using the OWC Archive Pro Ethernet is the sole responsibility of the user, and under no circumstances may OWC, its parents, partners, affiliates, officers, employees, or agents be held liable for loss of the use of data including compensation of any kind or recovery of the data.
4.4 Contacting Support
4.5 About This Manual
The images and descriptions may vary slightly between this manual and the unit shipped. Functions and features may change depending on the firmware version. The latest product details and warranty information can be found on the product web page. OWC’s Limited Warranty is not transferable and
General Use Precautions
- To avoid damage, do not expose the device to temperatures outside the following ranges:
- Environmental (Operating)
- Temperature (ºF): 41º — 95º
- Temperature (ºC): 5º — 35º
- Environmental (Non-Operating)
- Temperature (ºF): -4º — 140º
- Temperature (ºC): -20º — 60º
- Environmental (Operating)
- Always unplug the device from the electrical outlet if there is a risk of lightning or if it will be unused for an extended period-of-time. Otherwise, there is an increased risk of electrical shock, short-circuiting, or fire.
- Protect your device from excessive exposure to dust during use or storage. Dust can build up inside the device, increasing the risk of electrical shock, short-circuiting, or fire.
- Do not block the exhaust fans on the device. These help to keep the device cool during operation. Blocking the ventilation openings may increase the risk of electrical shock, short-circuiting, or fire.
Safety Precautions
- Use proper anti-static precautions when handling this device. Failure to do so can increase the risk of electrical shock or short-circuiting.
- Never expose your device to rain, or use it near water, or in damp wet conditions. Never place objects containing liquids on the device, as they may spill everywhere and into the openings. This will increase the risk of electrical shock, short-circuiting, fire, or personal injury.
- To avoid any risk of electrical shock, short-circuiting, fire, or dangerous emissions, never insert any metallic object into the device.
- Please cease use of the device and contact OWC Support if it appears to be malfunctioning.
Terms & Condition of Sale
Warranty
The OWC 1Archive Pro Ethernet has a 3 Year OWC Limited Warranty. For up-to-date product and warranty information, please visit the product web page.
Changes
The material in this document is for information purposes only and subject to change without notice. While reasonable efforts have been made in the preparation of this document to assure its accuracy, OWC, its parent, partners, affiliates, officers, employees, and agents assume no liability resulting from errors or omissions in this document, or from the use of the information contained herein. OWC reserves the right to make changes or revisions in the product design or the product manual without reservation and without obligation to notify any person of such revisions and changes.
FCC Statement
Warning! Modifications not authorized by the manufacturer may void the user’s authority to operate this device. NOTE: This equipment has been tested and found to comply with the limits for a Class B digital device, pursuant to Part 15 of the FCC Rules. These limits are designed to provide reasonable protection against harmful interference in a residential installation. This equipment generates, uses and can radiate radio frequency energy and, if not installed and used in accordance with the instructions, may cause harmful interference to radio communications. However, there is no guarantee that interference will not occur in a particular installation. If this equipment does cause harmful interference with radio or television reception, which can be determined by turning the equipment off and on, the user is encouraged to try to correct the interference by one or more of the following measures:
- Reorient or relocate the receiving antenna.
- Increase the separation between the equipment and receiver.
- Connect the equipment to an outlet on a circuit different from that to which the receiver is connected.
Copyrights And Trademarks
©2025 Other World Computing, Inc. All rights reserved. OWC and the OWC logo are trademarks of New Concepts Development Corporation, registered in the U.S. and/or other countries. OWC Mercury & OWC Archive are trademarks of New Concepts Development Corporation. Mac and macOS are trademarks of Apple Inc., registered in the U.S. and other countries. Thunderbolt and the Thunderbolt logo are trademarks of Intel Corporation in the U.S. and/or other countries. Other marks may be the trademark or registered trademark property of their owners.
No part of this publication may be reproduced, stored in a retrieval system, or transmitted in any form or by any means, electronic, mechanical, photocopying, recording or otherwise, without the prior written consent of OWC.
Free Support Chat
Our free award-winning support team is ready to answer all of your questions. Technical support is available Monday - Friday: 9AM - 6PM. Customer Support & Sales is available Monday - Friday: 9AM - 6PM. Support is unavailable on U.S. Federal holidays. Talk to a human today.