OWC Accelsior 8M2
Support Manual
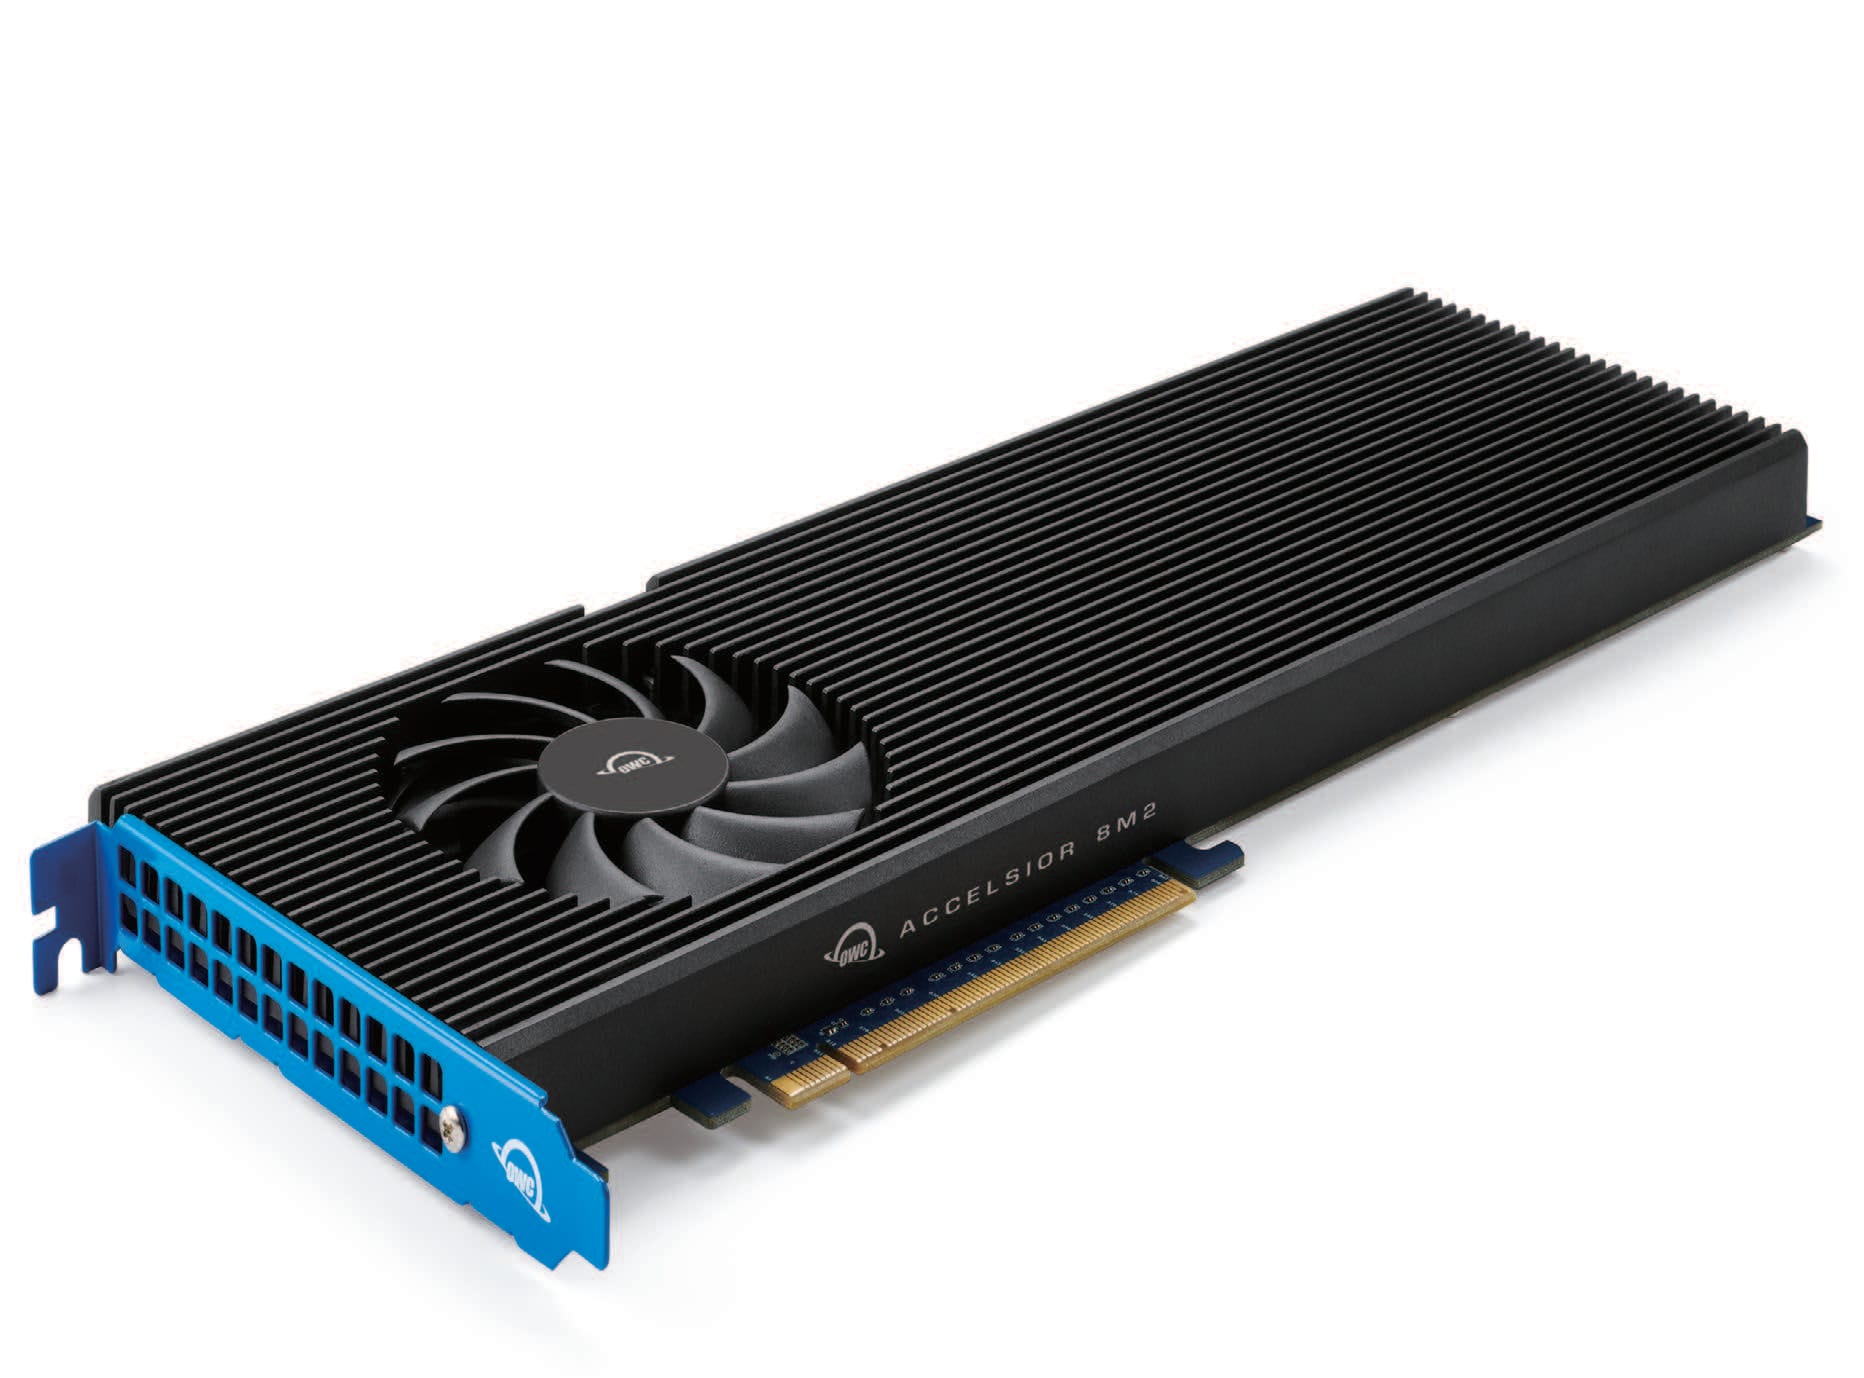
Introduction
1.1 System Requirements
Operating System:
- Mac: macOS 10.13.6 or later
- PC: Windows 10 or later
Hardware:
- Any Mac or PC compatible with Node Titan or third party PCIe chassis that support full height, full length cards, any Mac Pro 2019 | Mac Pro 2023, or a PC that supports the following:
- Form factor: full height, full length
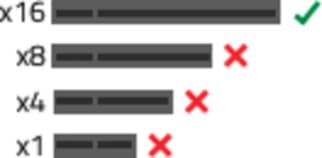
- Physical: x16
- Lanes: x16 strongly recommended
- PCIe 3.0 or later strongly recommended
- NOTE: A 6-pin auxiliary power connector is required when using the OWC Accelsior 8M2 with PCIe 4.0 drives in a PCIe 4.0 slot.
- NOTE: Proper system cooling should be considered when installing the OWC Accelsior 8M2 into a PC. This can be achieved through the addition of front or side PC case fans or by leaving unused PCIe slots between installed devices.
Drivers:
- No driver is required for the OWC Accelsior 8M2, however some M.2 drives may require one. Please review the drive manufacturer’s requirements before installing.
Supported Drives:
- Any NVMe PCIe M.2 SSD with an M-key connector
- 2280 form factor required
- Drives with their own heat shield are not supported
1.2 Package Contents
- (1) OWC Accelsior 8M2
- (1) Torx T8 driver
- (1) Phillips 1 Driver
- (1) 3 Years of SoftRAID Premium Access (License located on back of device)
1.3 Side View
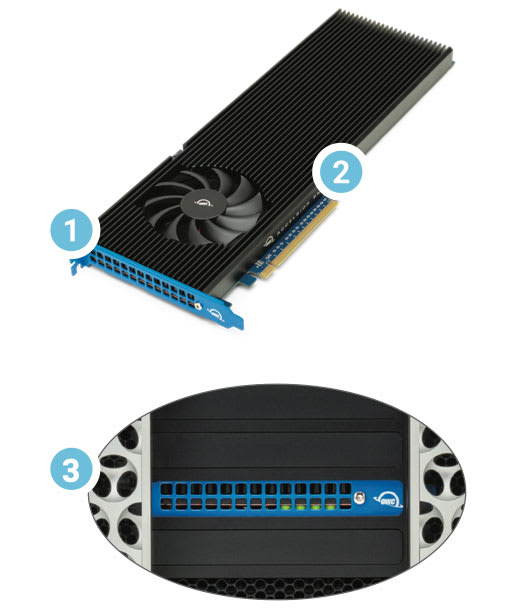
- PCIe Bracket – screws into the system chassis to reinforce card stability
- PCIe Connector – align this part of the device with a compatible PCIe slot on the host computer or enclosure
- LED Indicator - Power On = Solid Green / Drive Activity = Flashing Green
Getting Started
2.1 Device Setup
- This section describes the process of setting up the OWC Accelsior 8M2 if purchased with pre-installed drives. The OWC Accelsior 8M2 is available assembled with (8) NVMe M.2 SSDs configured as an OWC SoftRAID RAID 0.
1. Disconnect all power and powered devices from your host or PCIe enclosure. Open the host or enclosure so the compatible PCIe slot(s) are visible and accessible.
NOTE: The OWC Accelsior 8M2 will only physically fit into a 16x PCIe slot. Consult your host or enclosure manual to determine the PCIe slot location and physical size.
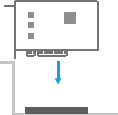
2. Align the PCIe connector of the OWC Accelsior 8M2 SSD with the compatible slot on your host as highlighted. Carefully seat the drive into the slot. If there is resistance, do not force the drive into the slot. Remove the drive, re-align the connector, and try again.
3. Once the drive is fully seated affix the included screw to the bracket.

NOTE: The OWC Accelsior 8M2 SSD may require additional power through a 6-pin power cable. Connect a 6 pin power cable from the computers power supply. More information is available from our OWC Accelsior 8M2 Instructional Video.

4. The OWC Accelsior 8M2 is configured as an OWC SoftRAID RAID 0. Downloading and installing the latest version of SoftRAID is recommended to experience the best performance.
- NOTE: OWC Accelsior 8M2 devices come bundled with "3 Years of SoftRAID Premium Access". Please visit OWC SoftRAID Product Details for more information regarding SoftRAID and the bundled Premium Access.
- NOTE: The OWC SoftRAID license is located on the back of the OWC Accelsior 8M2.
Mac OWC SoftRAID Setup
- Download OWC SoftRAID for Mac.
- Please review and follow the steps outlined in OWC SoftRAID Installation for Mac.
Windows OWC SoftRAID Setup
- If you are using the OWC Accelsior 8M2 with the Windows operating system, the pre-installed drives need to be reconfigured before they can be used. The following options will allow the Mac formatted OWC Accelsior 8M2 to work as a Windows formatted device.
- Download OWC SoftRAID for Windows
- Please review and follow the steps outlined in OWC SoftRAID Installation for Windows.
- Please consult the support article "Mac to Windows – SoftRAID Volume Conversation" for instructions to convert the Mac formatted OWC SoftRAID RAID 0 to a Windows formatted device through OWC SoftRAID.
- The Mac formatted OWC SoftRAID RAID 0 OWC Accelsior 8M2 can be used in Windows through the purchase and installation of OWC MacDrive11 Pro. OWC MacDrive11 Pro allows access to software RAID Mac-formatted drives in Windows without performing a conversion process. Please visit OWC MacDrive Product Details or OWC MacDrive Support for more information.
- Download OWC SoftRAID for Windows
2.2 Assembly Steps
- This section describes the process of installing drives into the OWC Accelsior 8M2 if purchased as a bare card. For maximum performance install eight identical SSDs, then configure them as a RAID 0 using SoftRAID. Visual steps are provided in the Accelsior 8M2 Instructional Video
- NOTE: OWC Accelsior 8M2 devices purchased as a bare enclosure come bundled with "3 Years of SoftRAID Premium Access". Please visit the OWC SoftRAID Product Details for more information regarding SoftRAID and the bundled Premium Access.
- NOTE: Before installing the assembled OWC Accelsior 8M2 in a host, write down the SoftRAID license located on the back of the OWC Accelsior 8M2. The license is required for installing and operating SoftRAID.
- The OWC Accelsior 8M2 has a Broadcom PEX88048 PCIe switch.
- This switch offers 16x upstream lanes allocated to the PCIe connector.
- This switch offers 32x downstream lanes providing 4x lanes to each of the (8) SSDs.
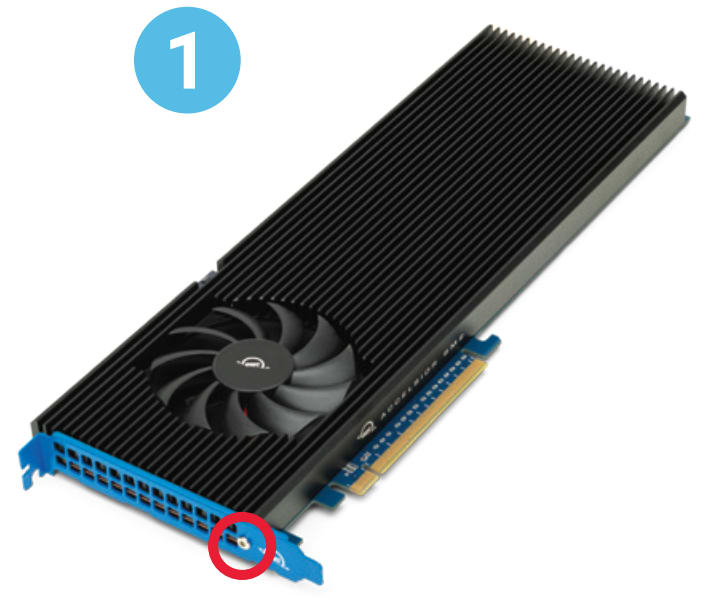
1. Remove the device from its packaging and set it on a flat work surface with the bracket facing you. Remove the highlighted screw using a Torx T8 driver
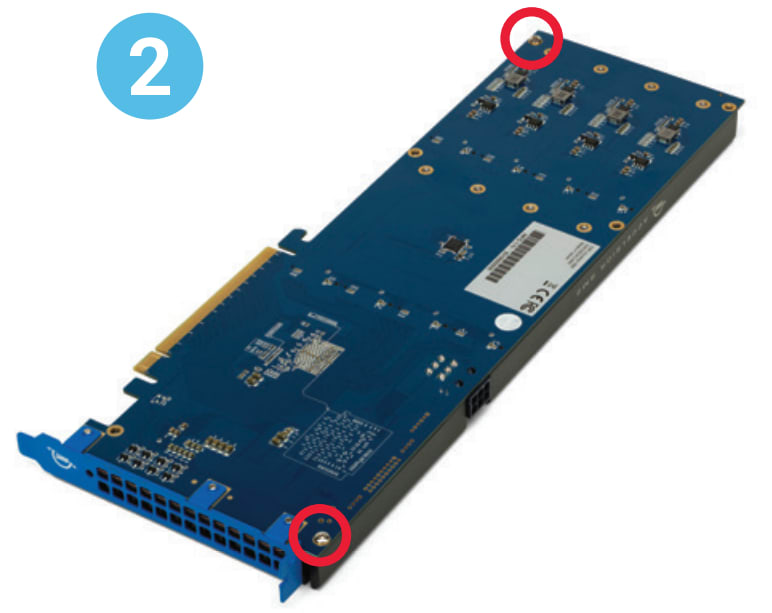
2. Carefully flip the device over and remove the two highlighted T8 screws to loosen the connection with the heat sink.
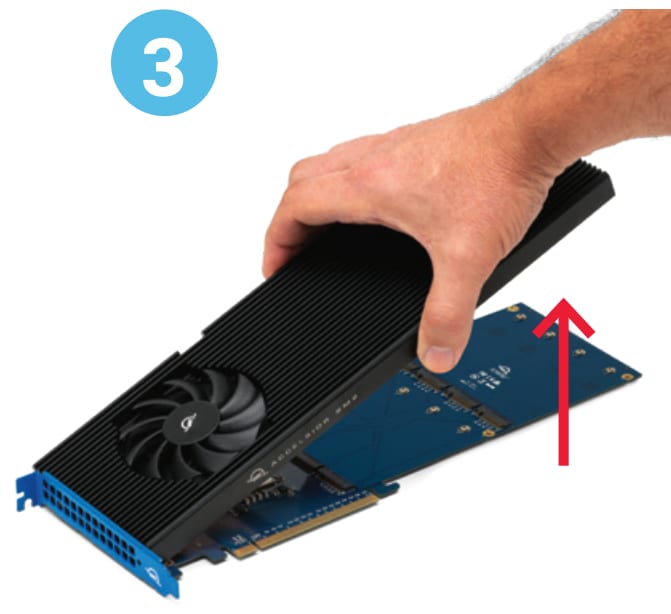
3. Carefully separate the PCIe card from the black heat sink. If you initially get more resistance than expected, don’t apply extra force to separate them. Instead you can try to carefully separate the pieces by opening them like a book.
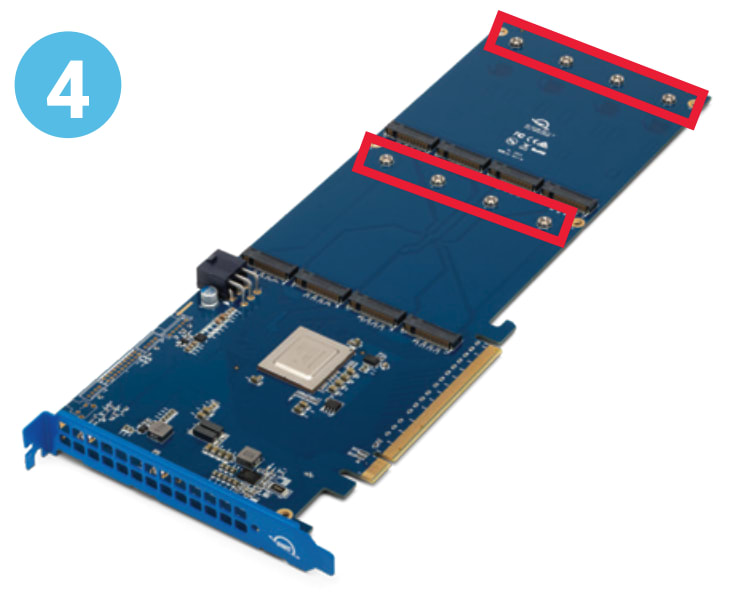
4. Flip the card over so it is resting on the work surface with the M.2 connectors facing up. Remove the eight highlighted screws with a Phillips 1 driver.
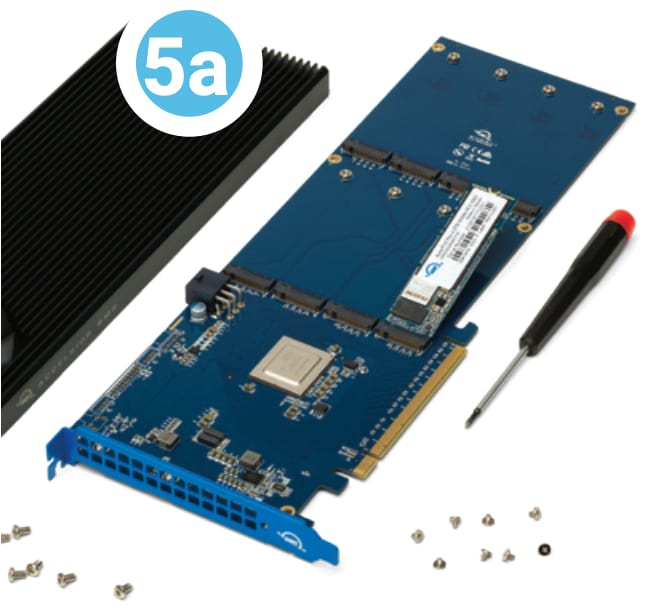
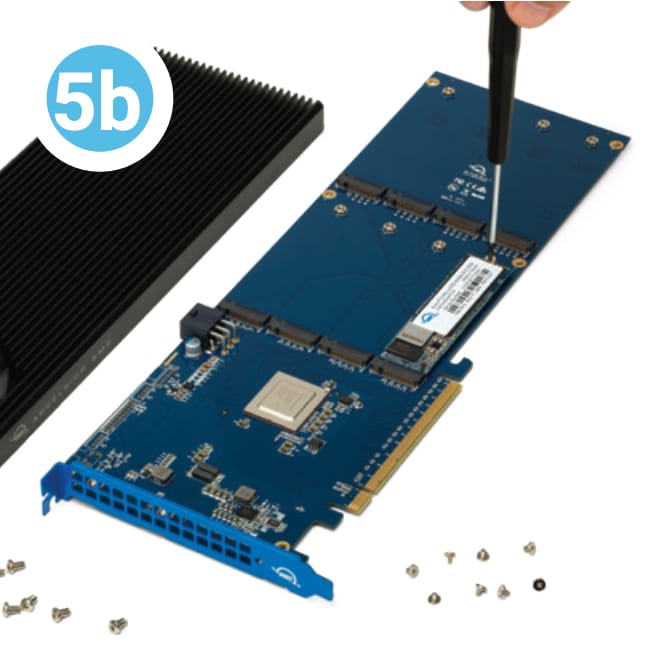
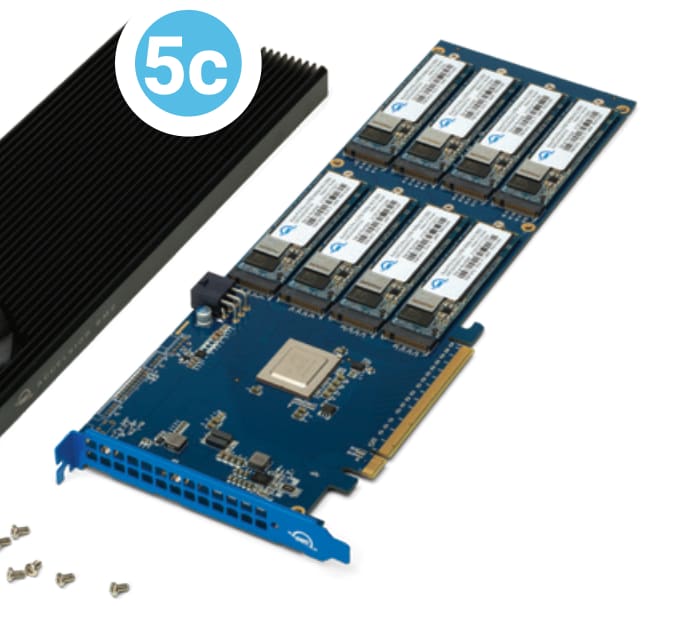
5. Carefully align the first M.2 drive at a slight angle into its connection (5a) and slide it forward until it snaps into place. Only a modest amount of force is required; do not force the drive if it does not snap into place. Re-align it and try again. Once the drive is seated use one of the screws from Step 4 to secure the drive (5b); you may need to hold the drive down initially until you thread the screw onto the post. Repeat this process for each M.2 drive you intend to install. (5c)
NOTE: When installing M.2 SSDs in the OWC Accelsior 8M2, you may encounter some misalignment between the mounting point on the SSD and the mounting post on the OWC Accelsior 8M2. You can still secure the SSD to the OWC Accelsior 8M2, however the mounting screw may sit slightly higher than the others after installation. This will not affect performance or stability of the SSD. If desired, you can also reduce the height mismatch by pushing the drive toward the drive connector while installing the mounting screw.
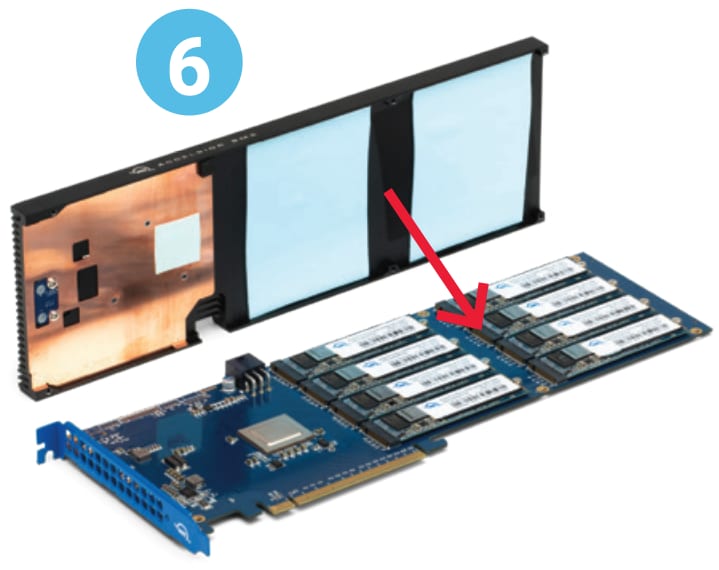
6. Set the PCIe card in front of you oriented as shown. Rotate the heat sink so that the drives align with the thermal pads. Next, carefully set the heat sink down on the PCIe card so that the six screw holes on the heat sink are over the corresponding holes on the PCIe card. You may need to press the heat sink down with light pressure to ensure the unit is flush.
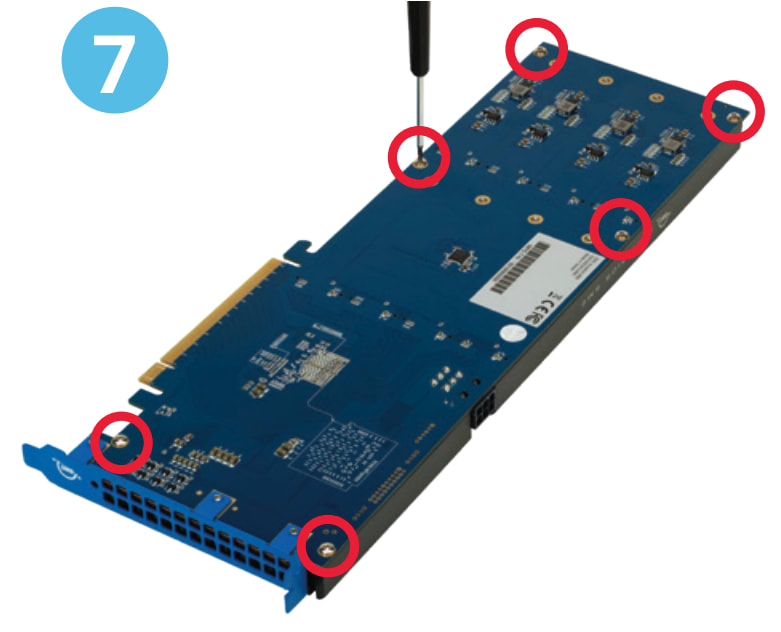
7. Re-affix the two T8 screws that you removed in Step 2, and affix the other four included T8 screws. If one or more of the screws does not fasten or does so at a slight angle, don’t apply extra force; the two components may not be fully aligned. Remove the screw(s) then re-check the applicable screw hole(s) on the PCBA PCIe card to make sure you can see through to the corresponding holes on the heat sink then try again.
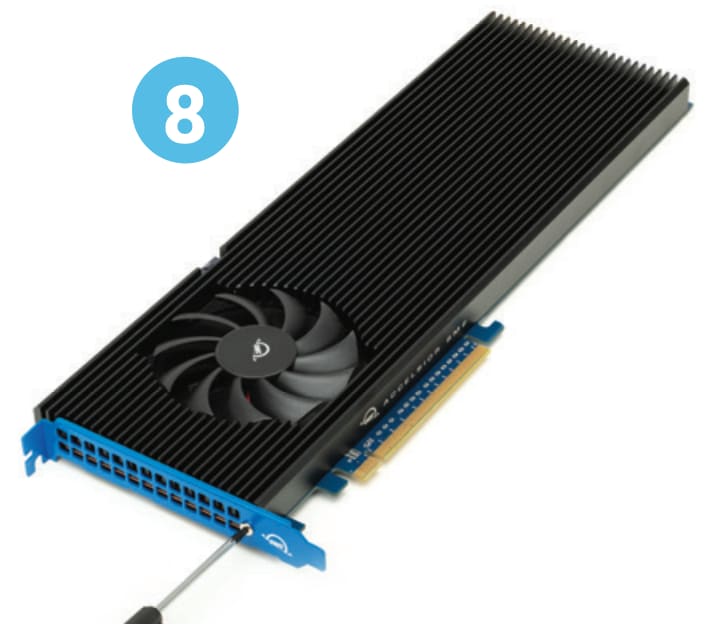
8. Turn the card over with the PCIe bracket facing you and re-affix the T8 screw that was removed in Step 1.
9. Align the PCIe connector of the OWC Accelsior 8M2 SSD with the compatible slot on your host as highlighted. Carefully seat the drive into the slot. If there is resistance, do not force the drive into the slot. Remove the drive, re-align the connector, and try again.
NOTE: The OWC Accelsior 8M2 will only physically fit into a 16x PCIe slot. Consult your host or enclosure manual to determine the PCIe slot location and physical size.


10. Once the drive is fully seated affix the included screw to the bracket.

NOTE: The OWC Accelsior 8M2 SSD may require additional power through a 6-pin power cable. Connect a 6 pin power cable from the computers power supply. More information is available from our OWC Accelsior 8M2 Instructional Video.

11. The installed drives are ready to be formatted. Move onto Section 2.3 “RAID Configuration Options” for instructions on how to format and configure the OWC Accelsior 8M2.
2.3 RAID Configuration Options
OWC SoftRAID RAID Configuration
- Downloading and installing the latest version of OWC SoftRAID is recommended to experience the best performance from the OWC Accelsior 8M2.
- NOTE: OWC Accelsior 8M2 devices come bundled with "3 Years of SoftRAID Premium Access". Please visit OWC SoftRAID Product Details for more information regarding SoftRAID and the bundled Premium Access.
- SoftRAID will assist with formatting the installed drives and setting up a RAID volume.
- NOTE: The OWC SoftRAID license is located on the back of the OWC Accelsior 8M2.
Mac OWC SoftRAID Setup
- Download OWC SoftRAID for Mac.
- Please review and follow the steps outlined in OWC SoftRAID Installation for Mac.
- Please review and follow the instructions outlined in Creating a macOS OWC SoftRAID Volume.
Windows OWC SoftRAID Setup
- Download OWC SoftRAID for Windows
- Please review and follow the steps outlined in OWC SoftRAID Installation for Windows.
- Please review and follow the instructions outlined in Creating a Windows OWC SoftRAID Volume.
Mac RAID Configurator
- Open the “Disk Utility” application on your Mac.
- Choose “File” and select “RAID Assistant”.
- Select a set type:
- Striped (RAID 0) set: A striped RAID set can speed up access to your data. You can’t create a RAID set on your startup disk; you must first start up your computer from another disk.
- Mirrored (RAID 1) set: Protect your data against hardware failure with a mirrored RAID set. When you create a mirrored RAID set, your data is written to multiple disks so the information is stored redundantly. You can’t create a RAID set on your startup disk; you must first start up your computer from another disk.
- Concatenated (JBOD) set: Increase storage space with a concatenated disk set. If you need one large disk, but you have several smaller disks, you can create a concatenated disk set to use as one large disk.
- Select the checkboxes of the disks you want to include in the set.
- For each disk, click the pop-up menu in the Role column and choose “RAID slice” or “Spare” to designate the disk as a standard member or spare in the set, then click Next.
- Enter a name for the RAID set in the RAID Name field.
- Click the Format pop-up menu, then choose a volume format that you want for all the disks in the set. (See File system formats available in Disk Utility.)
- Click the “Chunk size” pop-up menu, then choose a disk chunk size that you want used for all the disks.
- When you create a striped set, chunks of data from the same file are distributed across the drives. Ideally, you want data distributed across drives evenly and at an optimum size so that it can be efficiently accessed. If you want high data throughput from your set, choose a smaller chunk size so that data is spread across the drives and one drive can be accessing data while another is seeking the next chunk. With mirrored disk sets, choose a chunk size that matches the data you’re accessing. For example, when working with video files, your Mac is accessing large chunks of data, whereas when using a database of many small records, your disks may be accessing smaller chunks of information.
- If you are creating a mirrored RAID set, select the “Automatically rebuild” checkbox to allow the set to be automatically rebuilt when member disks are reconnected
- Click "Create" and then click "Done".
Device Management
3.1 OWC Disk Performance
Windows users connecting the OWC Accelsior 8M2 through an external PCIe enclosure may need to change the default Disk Removal Policy.
- As of Windows 10 v. 1809 the default Disk Removal Policy is ‘Quick removal’ instead of ‘Better performance’.
- NOTE: OWC storage solutions that are experiencing slow read/write speeds should consider checking and changing the Windows disk removal policy. Changing from "Quick removal" to "Better performance" can increase disk performance. OWC offers the application OWC Disk Performance to help change the Disk Removal Policy. Changing from "Quick removal" to "Better performance" can also be changed through OWC SoftRAID or manually through the operating system.
- Please review the support article Storage Solutions: OWC Disk Performance for additional details.
3.2 Manually Unmounting Volumes
To ensure no data is lost during normal use, always eject or unmount the corresponding volume(s) from the operating system before powering off and disconnecting the device. Unmounting options are provided below.
macOS
- Drag the icon for the device you wish to unmount to the trash can; OR
- Right-click the device icon on the desktop, then click “Eject”; OR
- Highlight the device on your Desktop and press Command-E.
Windows
- Windows 10 build 1809 (October 2018) or later:
- Eject the drive by clicking the ‘Show hidden items’ menu in the Taskbar, then clicking ‘Safely Remove Hardware and Eject Media’, and last select the ‘Eject’ option for this volume.
- Windows 10 build 1803 and earlier:
- Go to the System Tray (located in the lower right corner of your screen). Click on the “Eject” icon (a small green arrow over a hardware image).
- A message will appear, detailing the devices that the “Eject” icon controls, i.e., “Safely remove...” Click on this prompt.
- You will then see a message that says, “Safe to Remove Hardware.” It is now safe to disconnect the device from the computer.
3.3 Usage Notes
- SoftRAID works with macOS 10.14 or later and Windows 10 or later. M1 Macs require macOS 11.3 or later. SoftRAID is licensed per computer.
- The OWC Accelsior 8M2 has a Broadcom PEX88048 PCIe switch.
- This switch offers 16x upstream lanes allocated to the PCIe connector.
- This switch offers 32x downstream lanes providing 4x lanes to each of the (8) SSDs.
- The OWC Accelsior 8M2, when used with Windows, doesn’t have a driver that displays the device name. Windows lists the device as a Mass Storage Controller due to the absent driver. Performance of the OWC Accelsior 8M2 in Windows is NOT affected by this device error.
- Before installing this product in a host device, write down the SoftRAID license that is listed on the back of the OWC Accelsior 8M2 before installation into a host. The SoftRAID license is required for installation and operation of SoftRAID.
- NVMe SSDs with a heatsink will not fit and are not supported.
- Data transfer rates will vary based on SSDs used, CPU speed, RAID setting, and PCIe version.
Support Resources
4.1 Troubleshooting
- Many problems can be traced back to an improperly seated M.2 drive (0GB models only) or PCIe card, or host compatibility issues (e.g. installing the card in a slower PCIe 2.0 slot or a PCIe 3.x slot with too few data lanes to support the desired performance, or installed in a computer running an older version of Windows or macOS). Make sure that the M.2 drives (0GB) only and/or the PCIe card is seated properly, and that the computer is configured to meet the system requirements. If everything is installed normally and you’re still having trouble, please contact OWC Support.
4.2 About Data Backup
To ensure that your files are protected and to prevent data loss, we strongly suggest that you keep two copies of your data: one copy on your OWC Accelsior 8M2 and a second copy on another storage medium, such as an optical backup, or on an external storage unit. Any data loss or corruption while using the enclosure is the sole responsibility of the user, and under no circumstances may OWC, its parent, partners, affiliates, officers, employees, or agents be held liable for loss of the use of data including compensation of any kind or recovery of the data.
4.3 Online Resources
Support Articles:
- OWC SoftRAID Knowledgebase
- OWC SoftRAID Premium Access Details
- Mac to Windows – SoftRAID Volume Conversation Support Article
- OWC MacDrive Support Page
- OWC Disk Performance Support Article
Support Guide Pages:
Support Manuals:
Downloads:
Product Pages:
4.4 Contacting Support
4.5 About This Manual
The images and descriptions may vary slightly between this manual and the unit shipped. Functions and features may change depending on the firmware version. The latest product details and warranty information can be found on the product web page. OWC’s Limited Warranty is not transferable and subject to limitations.
General Use Precautions
- Read this user guide carefully and follow all recommended usage steps and precautions.
- To avoid damage, do not expose the device to temperatures outside the following ranges:
- Environmental (Operating)
- Temperature (ºF): 41º — 95º
- Temperature (ºC): 5º — 35º
- Environmental (Non-Operating)
- Temperature (ºF): -4º — 140º
- Temperature (ºC): -20º — 60º
- Environmental (Operating)
- Always unplug the device from the electrical outlet if there is a risk of lightning or if it will be unused for an extended period of time. Otherwise, there is an increased risk of electrical shock, short-circuiting or fire.
- Do not use the device near other electrical appliances such as televisions, radios or speakers. Doing so may cause interference which will adversely affect the operation of the other products.
- Do not place the device near sources of magnetic interference, such as computer displays, televisions or speakers. Magnetic interference can affect the operation and stability of hard drives.
- Do not place objects on top of the device.
- Protect your device from excessive exposure to dust during use or storage. Dust can build up inside the device, increasing the risk of damage or malfunction.
- Do not block any ventilation openings on the device. These help to keep the device cool during operation. Blocking the ventilation openings may cause damage to the device and cause an increased risk of short circuiting or fire.
Safety Precautions
- Read this user guide carefully and follow the recommended steps for assembly.
- Use proper anti-static precautions while installing drives into this enclosure. Failure to do so can cause damage to your drive mechanisms and/or the enclosure.
- Do not attempt to disassemble or modify the device. To avoid any risk of electrical shock, fire, short-circuiting or dangerous emissions, never insert any metallic object into the device. If it appears to be malfunctioning, please contact technical support.
- Never expose your device to rain, or use it near water or in damp or wet conditions. Never place objects containing liquids on the drive, as they may spill into its openings. Doing so increases the risk of electrical shock, short-circuiting, fire or personal injury.
Caution!
User proper anti-static precautions
- Discharge static electricity before beginning
- Work on a static free surface
Terms & Conditions of Sale
Warranty
The Accelsior 8M2 has a 5 Year OWC Limited Warranty if it was bundled with drives. Accelsior 8M2 enclosures that do not ship with drives have a 3 Year OWC Limited Warranty. For up-to-date product and warranty information, please visit OWC Accelsior 8M2 Product Details.
Changes
The material in this document is for information purposes only and subject to change without notice. While reasonable efforts have been made in the preparation of this document to assure its accuracy, OWC, its parent, partners, affiliates, officers, employees, and agents assume no liability resulting from errors or omissions in this document, or from the use of the information contained herein. OWC reserves the right to make changes or revisions in the product design or the product manual without reservation and without obligation to notify any person of such revisions and changes.
FCC Statement
Warning! Modifications not authorized by the manufacturer may void the user’s authority to operate this device.
NOTE: This equipment has been tested and found to comply with the limits for a Class B digital device, pursuant to Part 15 of the FCC Rules. These limits are designed to provide reasonable protection against harmful interference in a residential installation. This equipment generates, uses and can radiate radio frequency energy and, if not installed and used in accordance with the instructions, may cause harmful interference to radio communications. However, there is no guarantee that interference will not occur in a particular installation. If this equipment does cause harmful interference with radio or television reception, which can be determined by turning the equipment off and on, the user is encouraged to try to correct the interference by one or more of the following measures:
- Reorient or relocate the receiving antenna.
- Increase the separation between the equipment and receiver.
- Connect the equipment to an outlet on a circuit different from that to which the receiver is connected.
Copyrights And Trademarks
No part of this publication may be reproduced, stored in a retrieval system, or transmitted in any form or by any means, electronic, mechanical, photocopying, recording or otherwise, without the prior written consent of OWC.
© 2023 Other World Computing, Inc. All rights reserved. Accelsior, OWC, and the OWC logo are trademarks of New Concepts Development Corporation, registered in the U.S. and/or other countries. Mac and macOS are trademarks of Apple Inc., registered in the U.S. and other countries. Thunderbolt and the Thunderbolt logo are trademarks of Intel Corporation in the U.S. and/or other countries. Other marks may be the trademark or registered trademark property of their owners.
Free Support Chat
Our free award-winning support team is ready to answer all of your questions. Technical support is available Monday - Friday: 9AM - 6PM. Customer Support & Sales is available Monday - Friday: 9AM - 6PM. Support is unavailable on U.S. Federal holidays. Talk to a human today.


 1-800-275-4576