 1-800-275-4576
OWC Guardian
Support Manual
Introduction
1.1 System Requirements
Operating System & Hardware
- Works with any USB 3.2 Gen 2 (Type-C) and later or Thunderbolt 3 and later equipped:
- Mac: macOS 10.13 or later
- PC: Windows 10 or later
- iPad Pro: iPadOS 13 or later
- Linux: latest version of Ubuntu recommended
1.2 Package Contents
- (1) OWC Guardian
- (1) 0.3M (12") USB-C Cable
- (1) Getting Started QR Insert Card
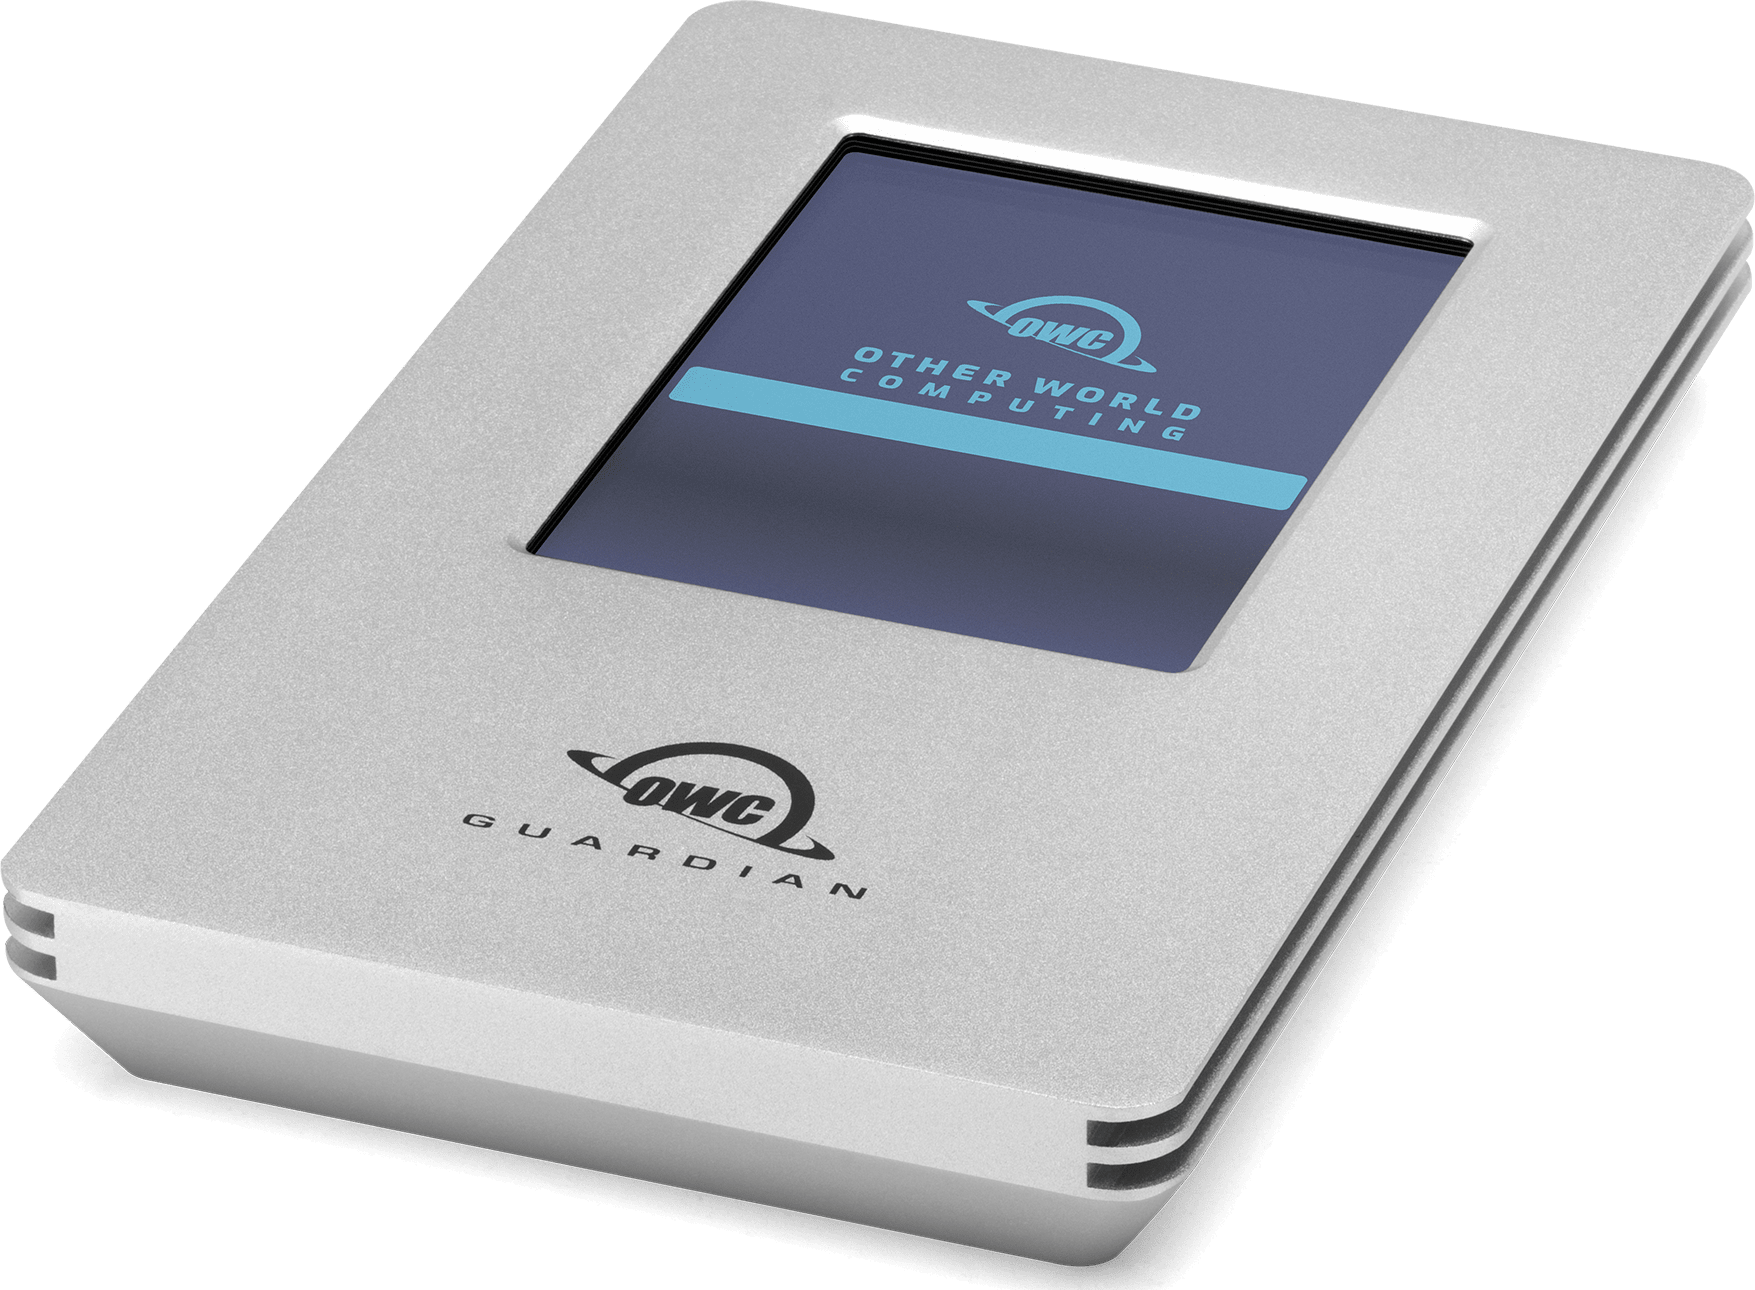
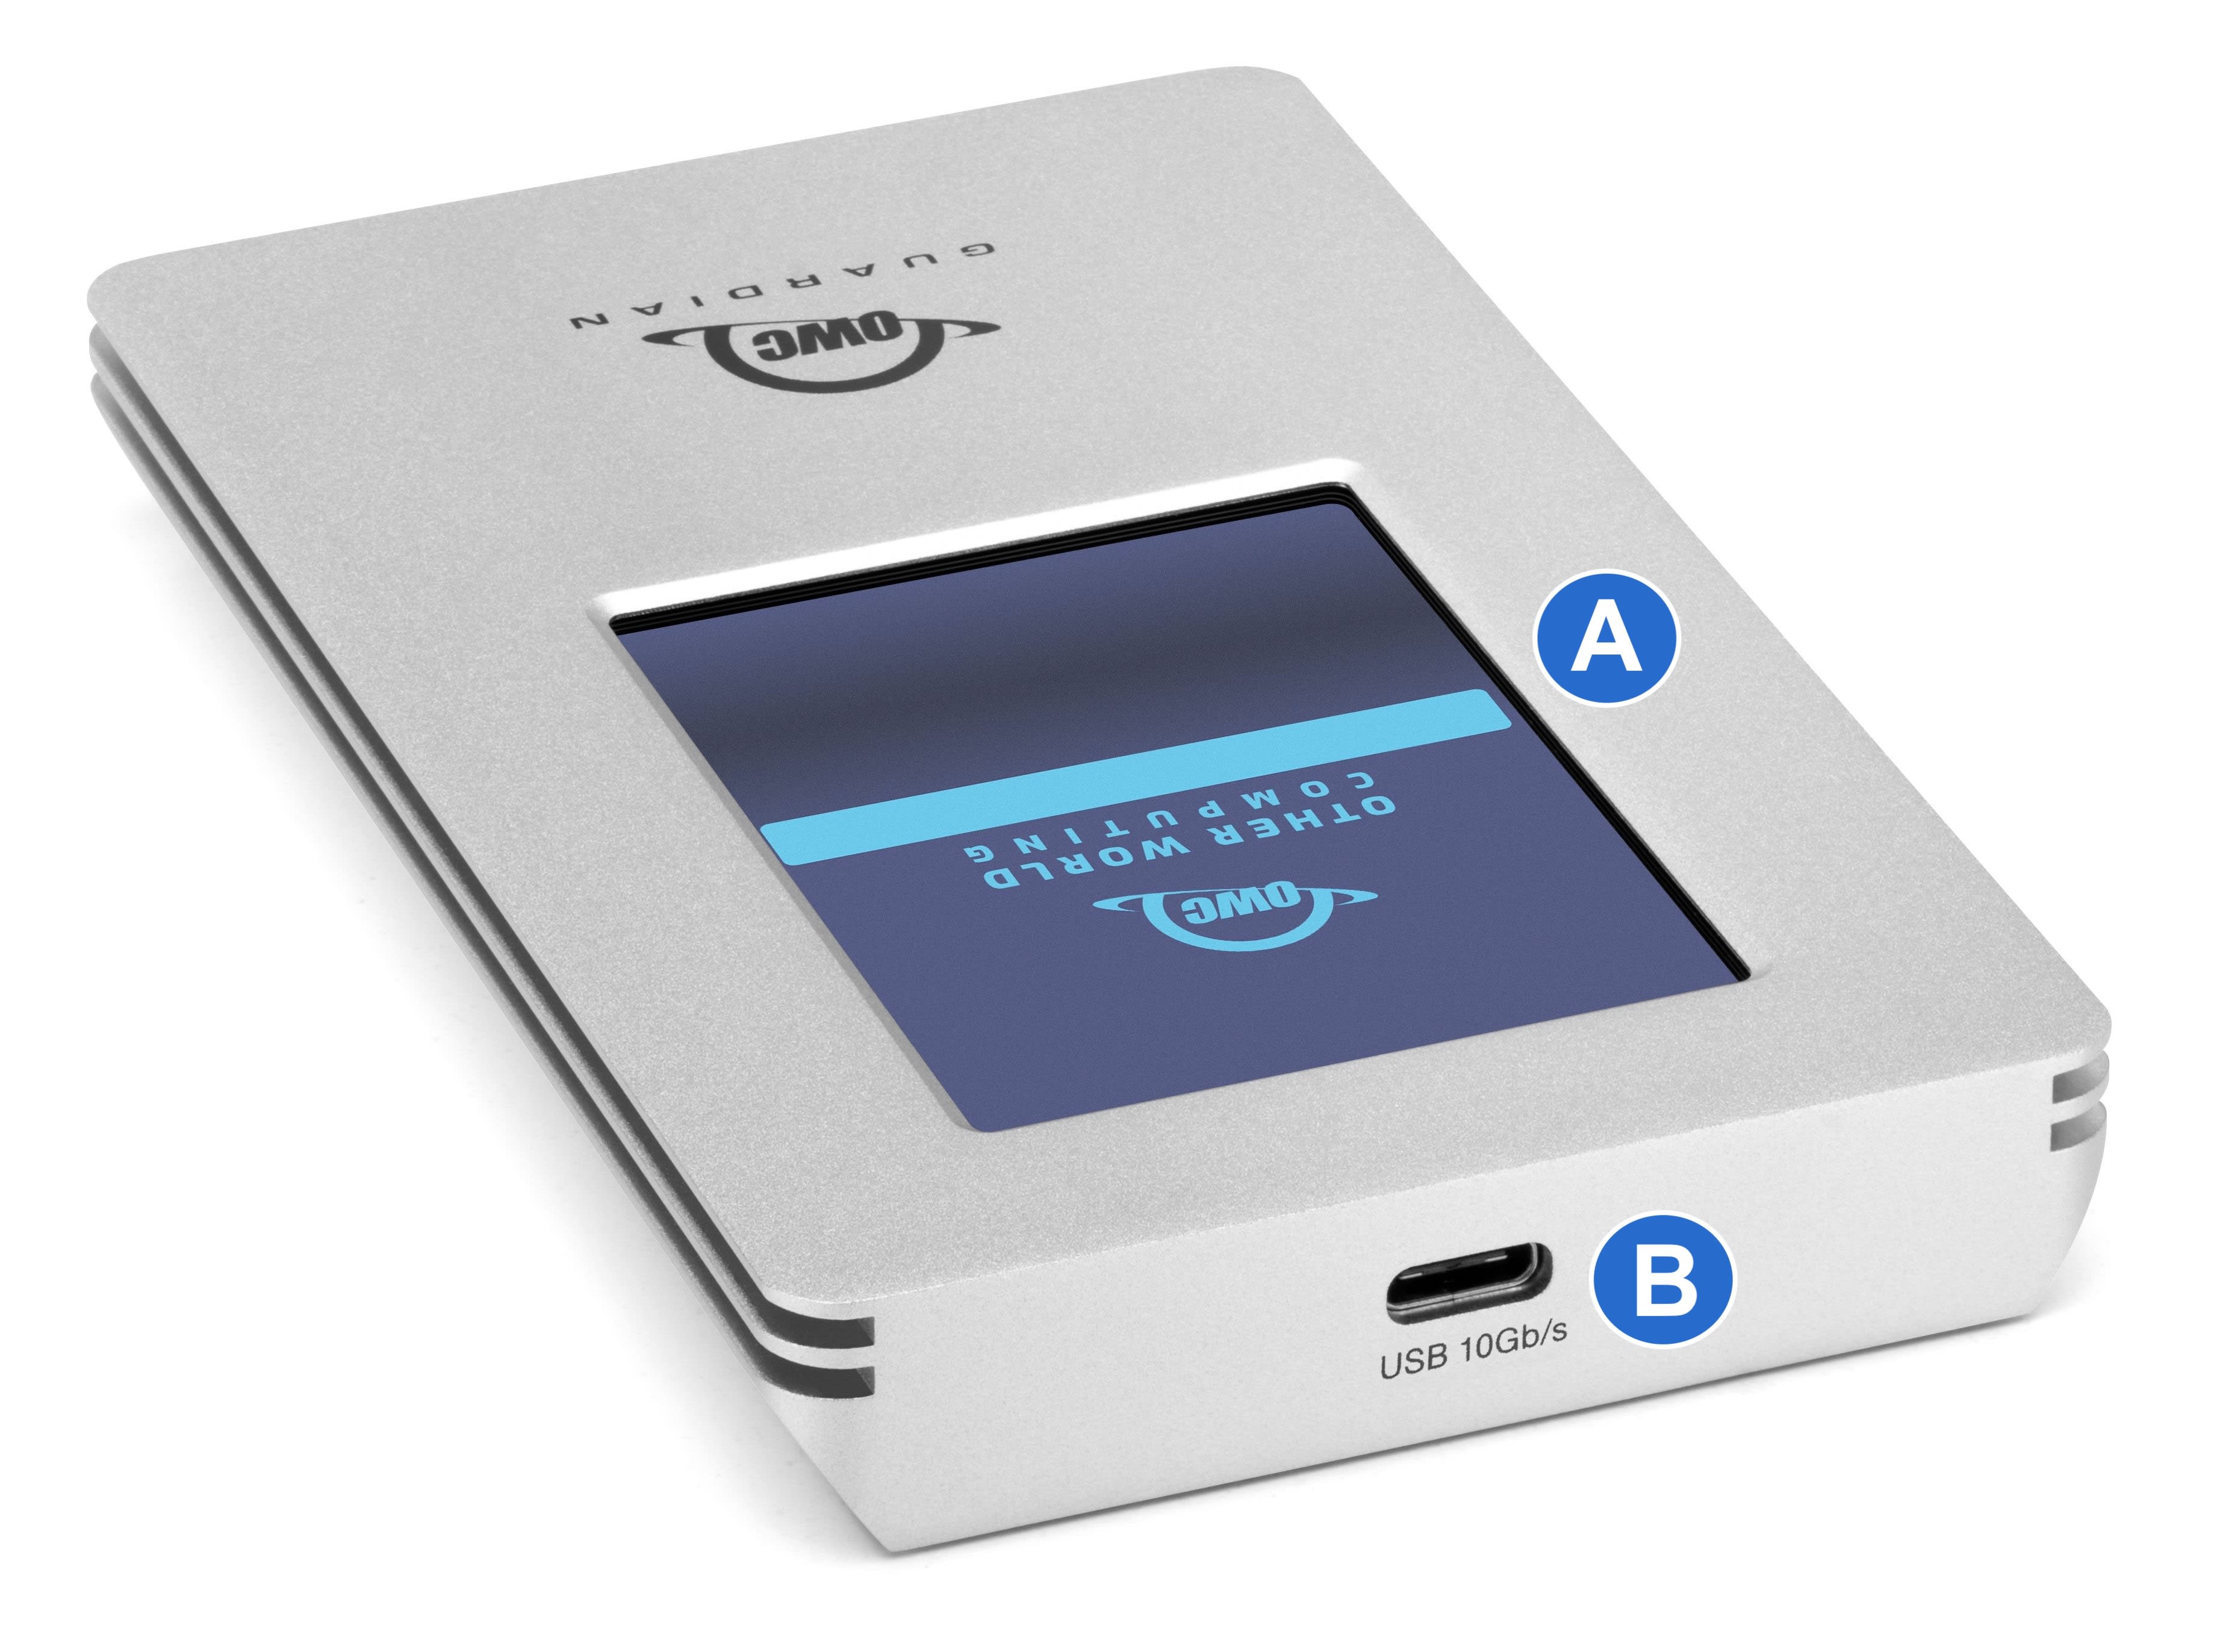
1.3 Overview
A. Interactive Display Screen - Touch screen display that allows interaction with the device.
B. USB-C 10Gb/s Host Port - Attach the included data cable and connect to a compatible system.
Getting Started
2.1 Device Setup
- This section describes the process of setting up the OWC Guardian.
- Initial setup of the OWC Guardian requires creating an Admin encryption password.
1. Connect the included 0.3M (12") USB-C cable to the USB-C port on the back of the OWC Guardian. Connect the other end of the cable into a compatible system.
- The OWC Guardian comes formatted as APFS for Mac systems and will mount when connected.
- NOTE: Windows, ChromeOS, and Android users will need to reformat the Mac formatted OWC device over that operating system to begin use. Please consult the support article "OWC Drive Setup Over Non-Apple Platforms" for instructions regarding reformatting the OWC Guardian to work with Windows, ChromeOS, or Android operating systems.
- OWC recommends using a 100W USB-C cable if the included cable isn't used.
2. Safely unmount the volume from the operating system before creating an Admin encryption password for the OWC Guardian. The volume will improperly unmount when the Admin encryption password is created.
- Mac: volume unmounting options:
- Drag the icon for the device you wish to unmount to the trash can; OR
- Right-click the device icon on the desktop, then click “Eject”; OR
- Highlight the device on your Desktop and press Command-E.
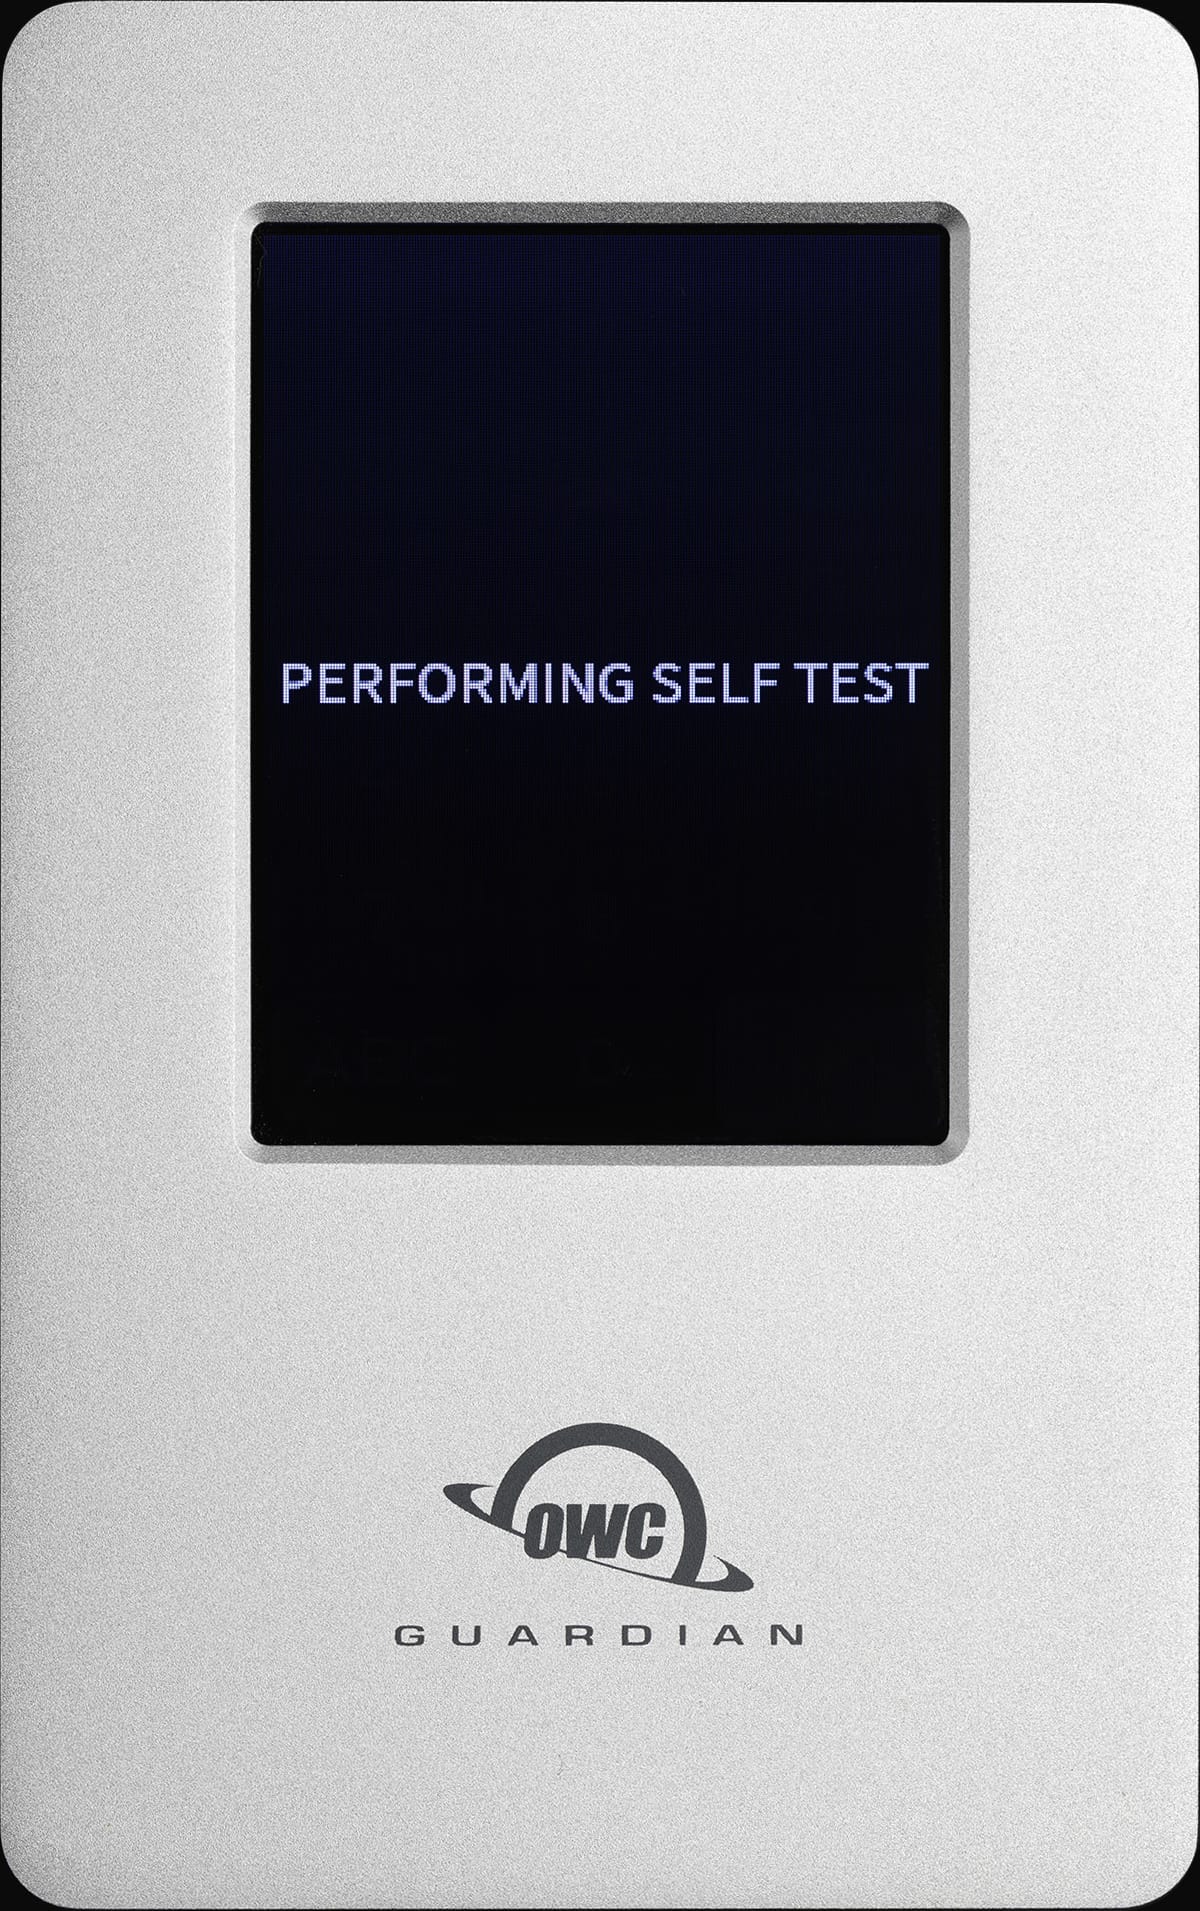
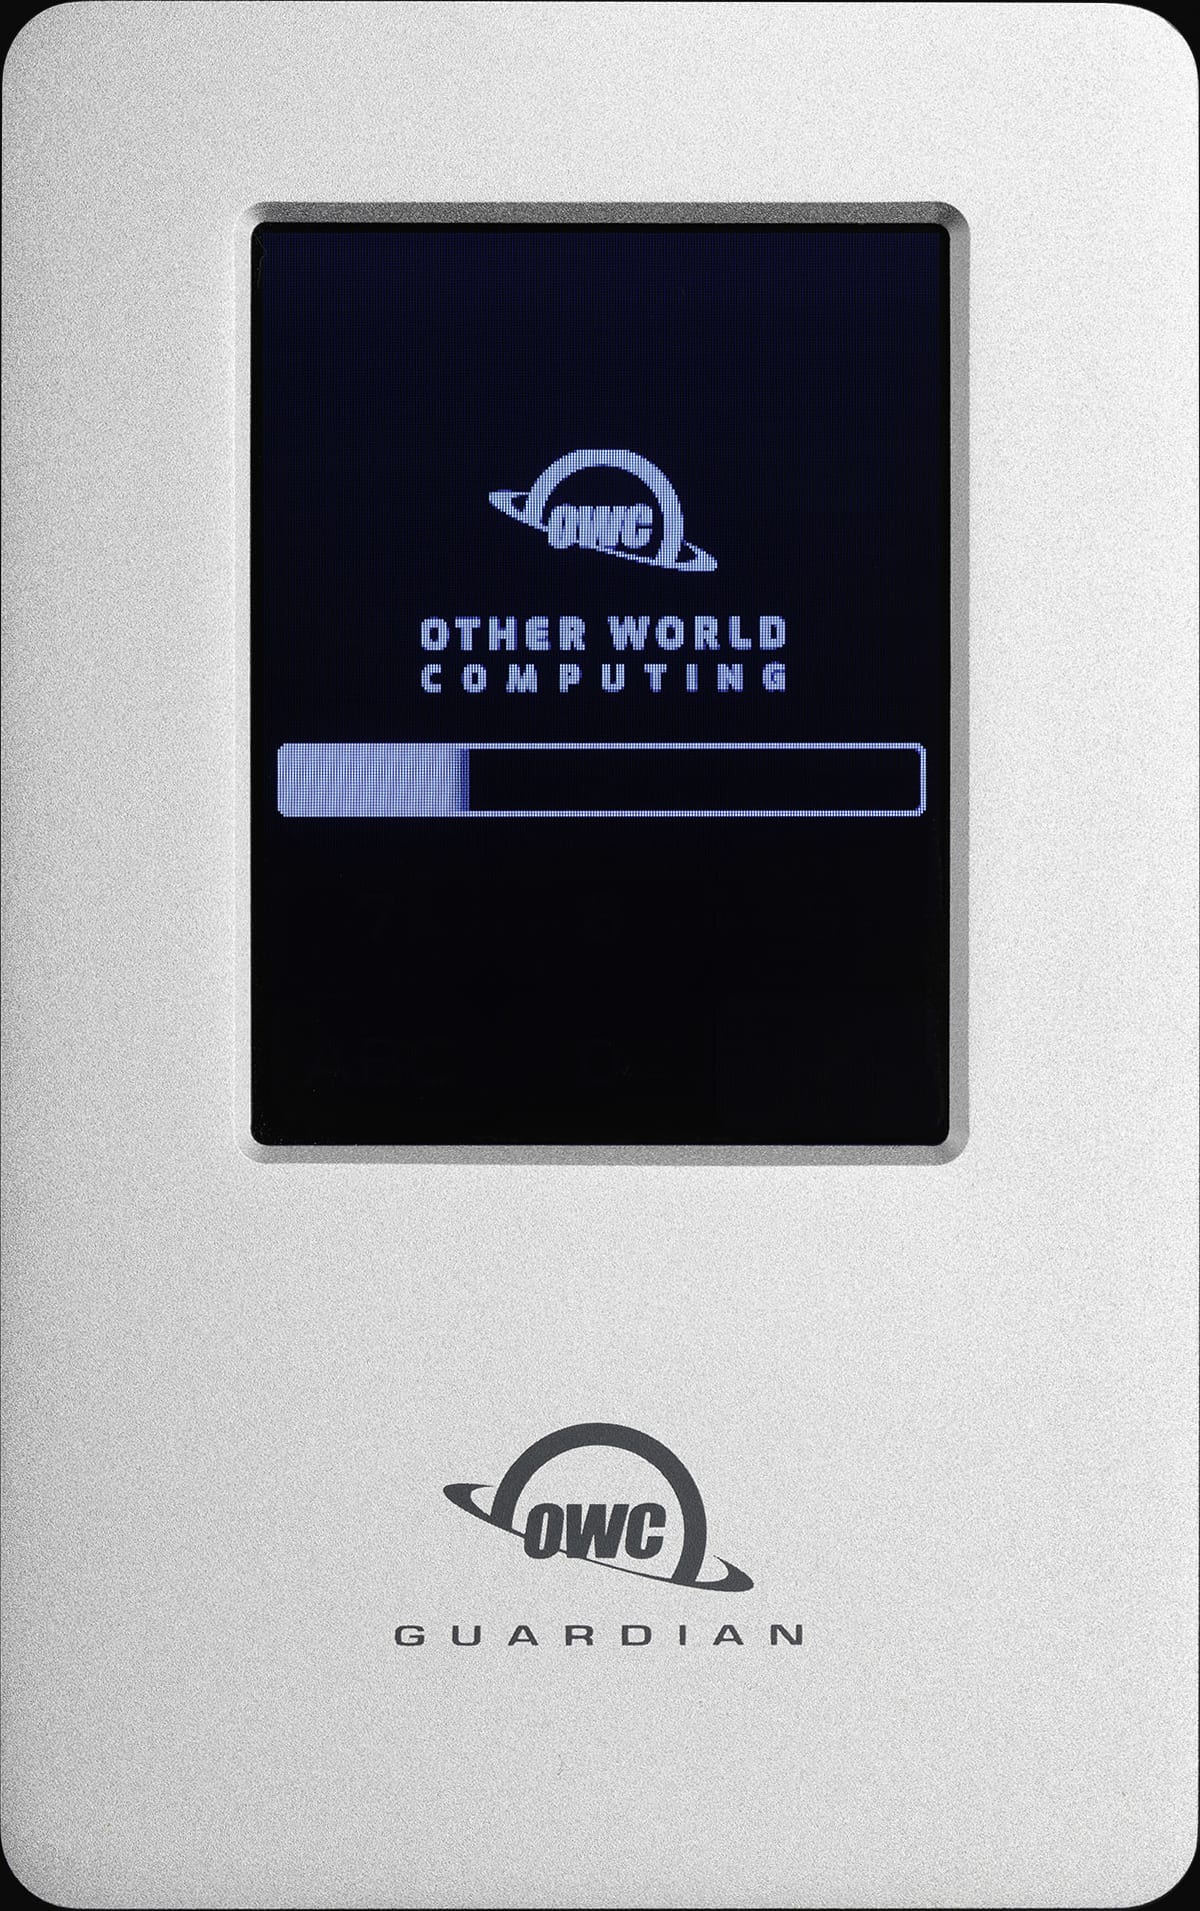
3. The OWC Guardian will power on and the screen will display a brief “Performing Self Test” message, followed by an OWC branded status loading bar screen.
4. A Welcome screen will appear after loading is complete. Create a new secure Admin password to encrypt the device by selecting the check mark box under “Create Your Password”.
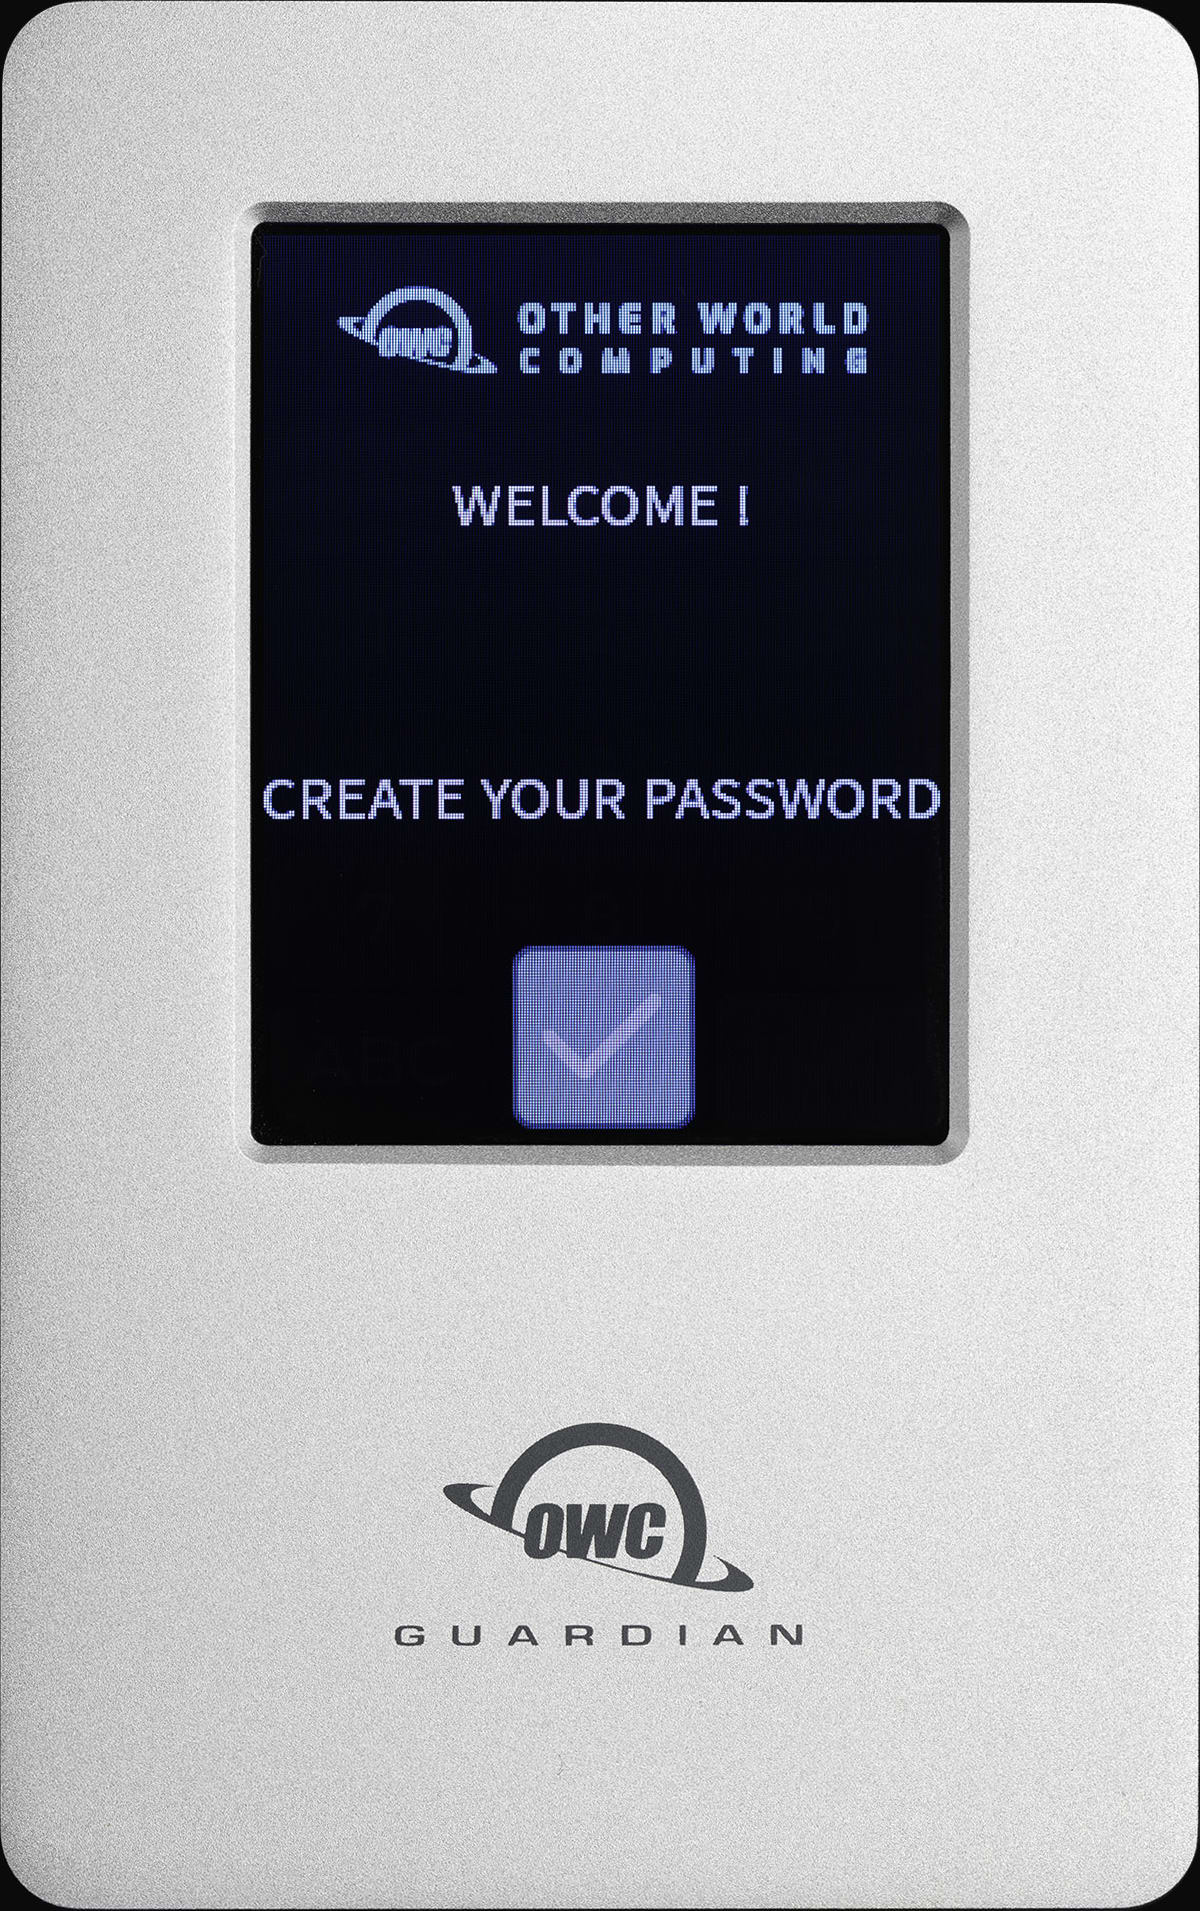
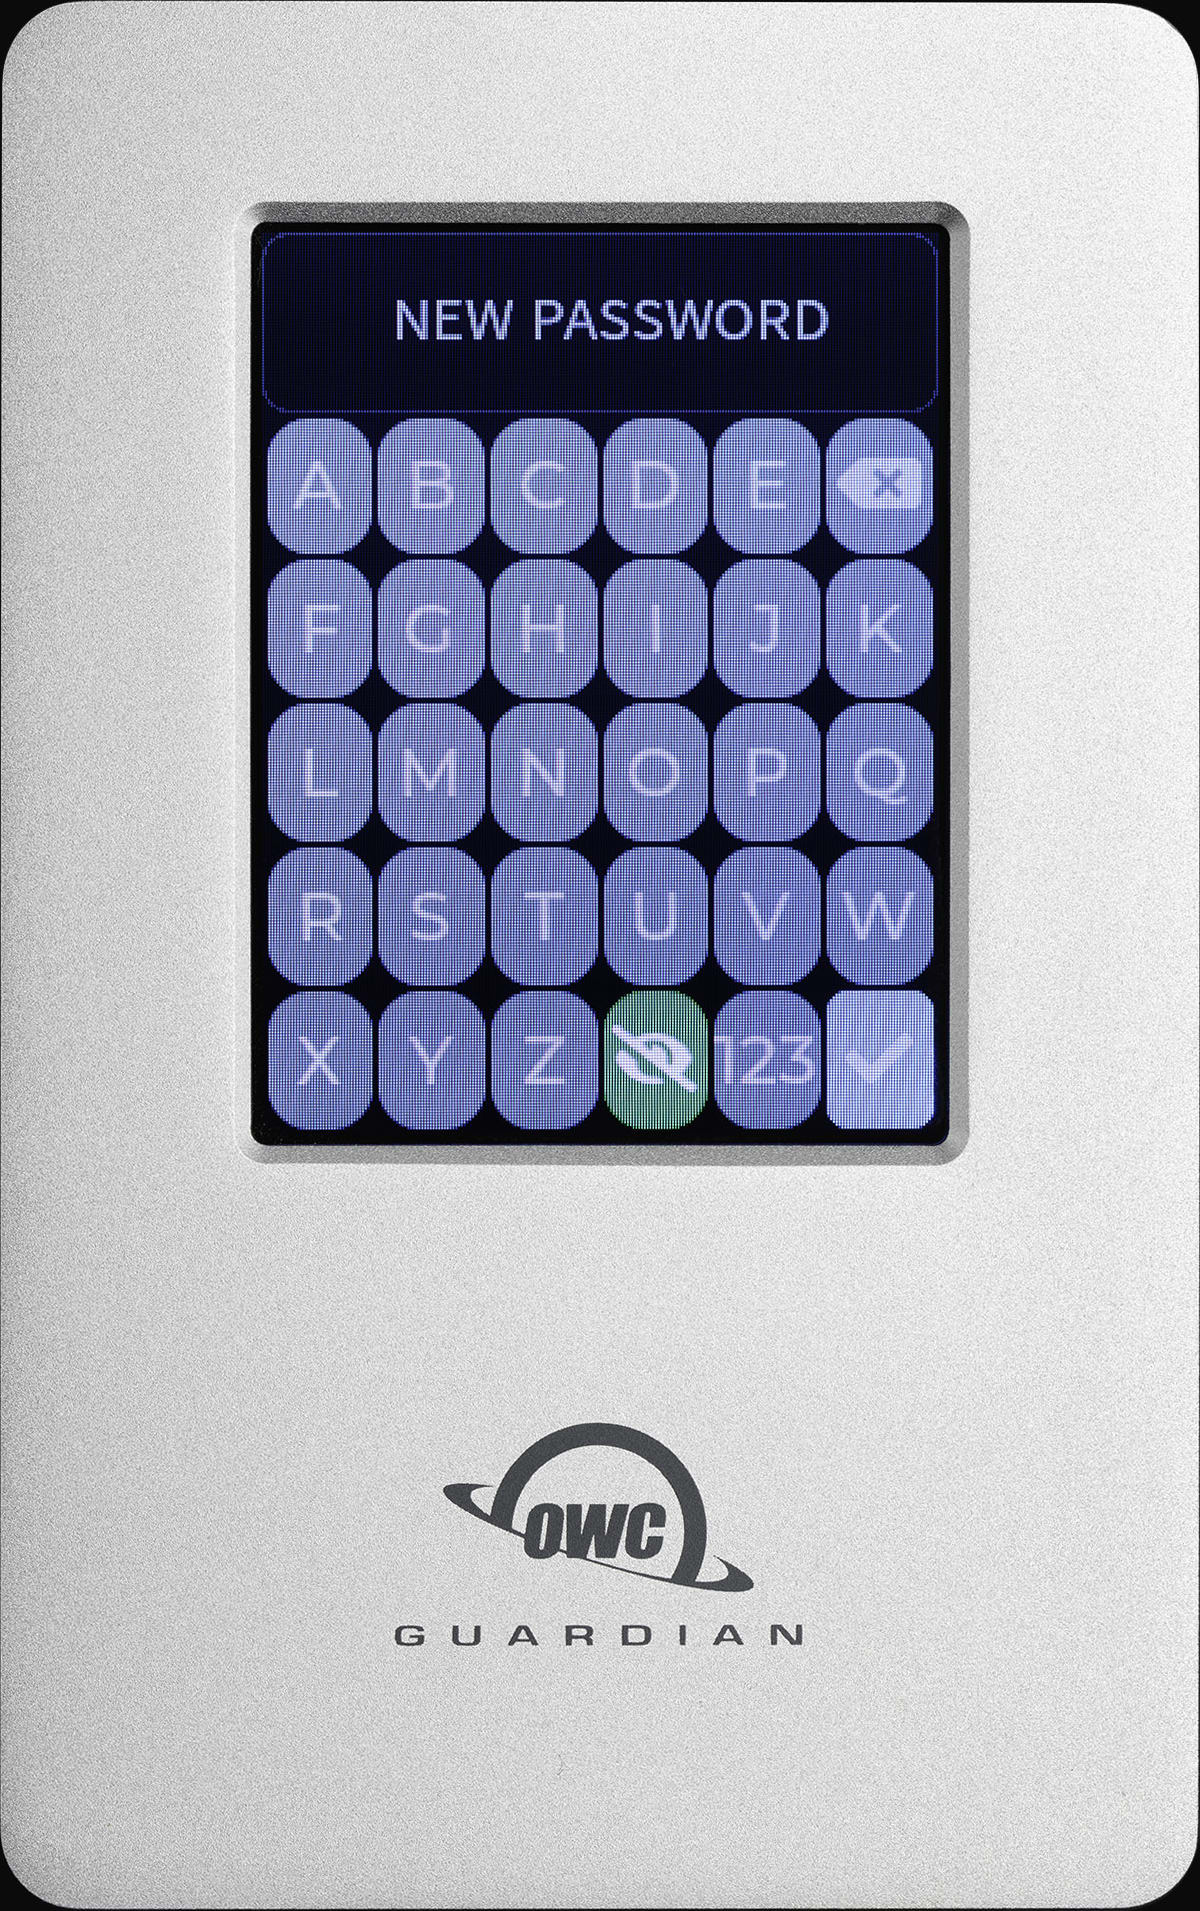
5. A New Password screen will appear. Use the keypad to create a new secure Admin password. Select the check mark box when complete.
- NOTE: Password must be between 6-30 characters. Entering a smaller password will trigger a "Password does not match" prompt.
6. A Confirm Password screen will appear. Use the keypad to enter the new secure password again. Select the check mark box to confirm the password.
- NOTE: There is no option to recover or reset the device's encryption password if forgotten. OWC strongly recommends securely storing the password.
- Users will be provided options to reset the OWC Guardian and make it accessible again if the password has been forgotten or lost. However, the volume data will not be recoverable. Please contact OWC support if this occurs.

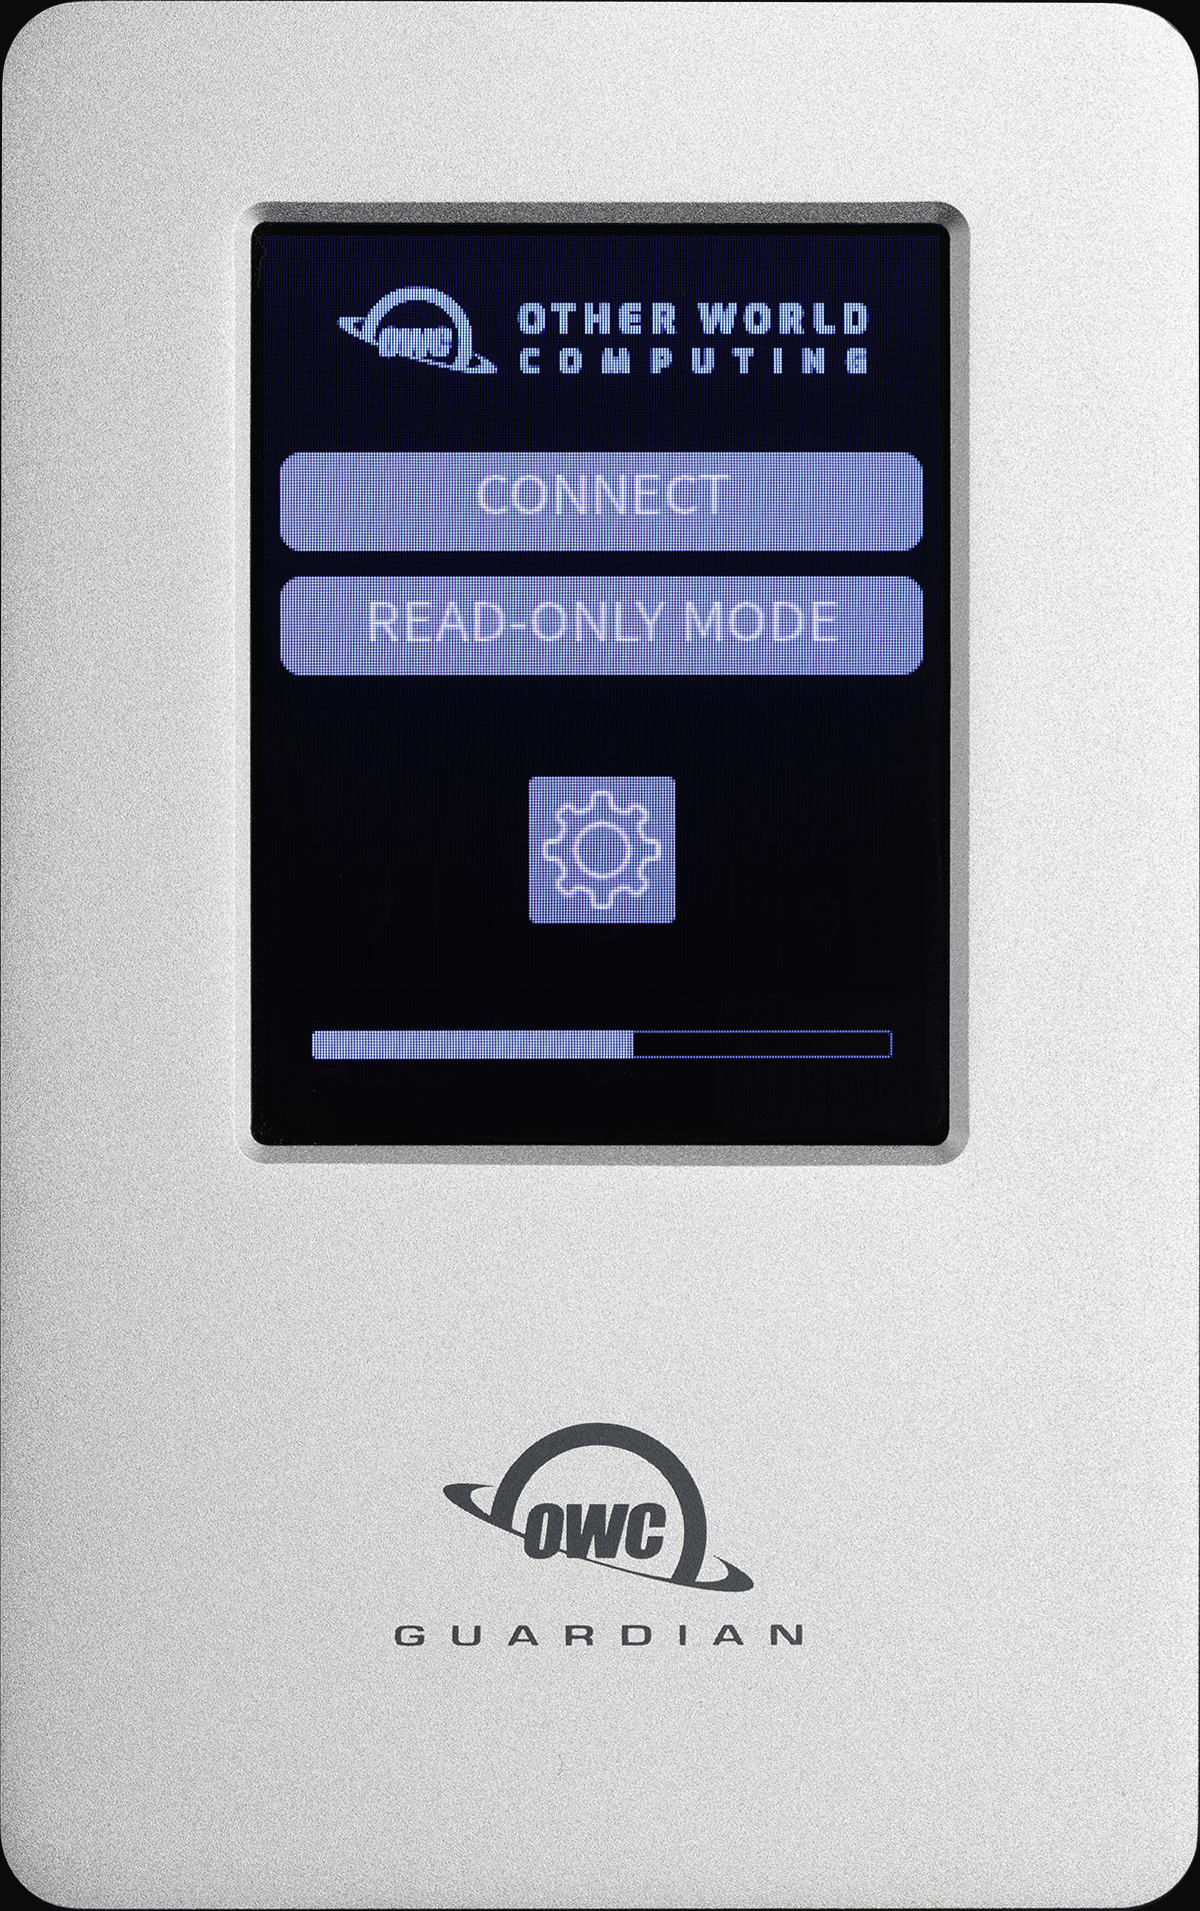
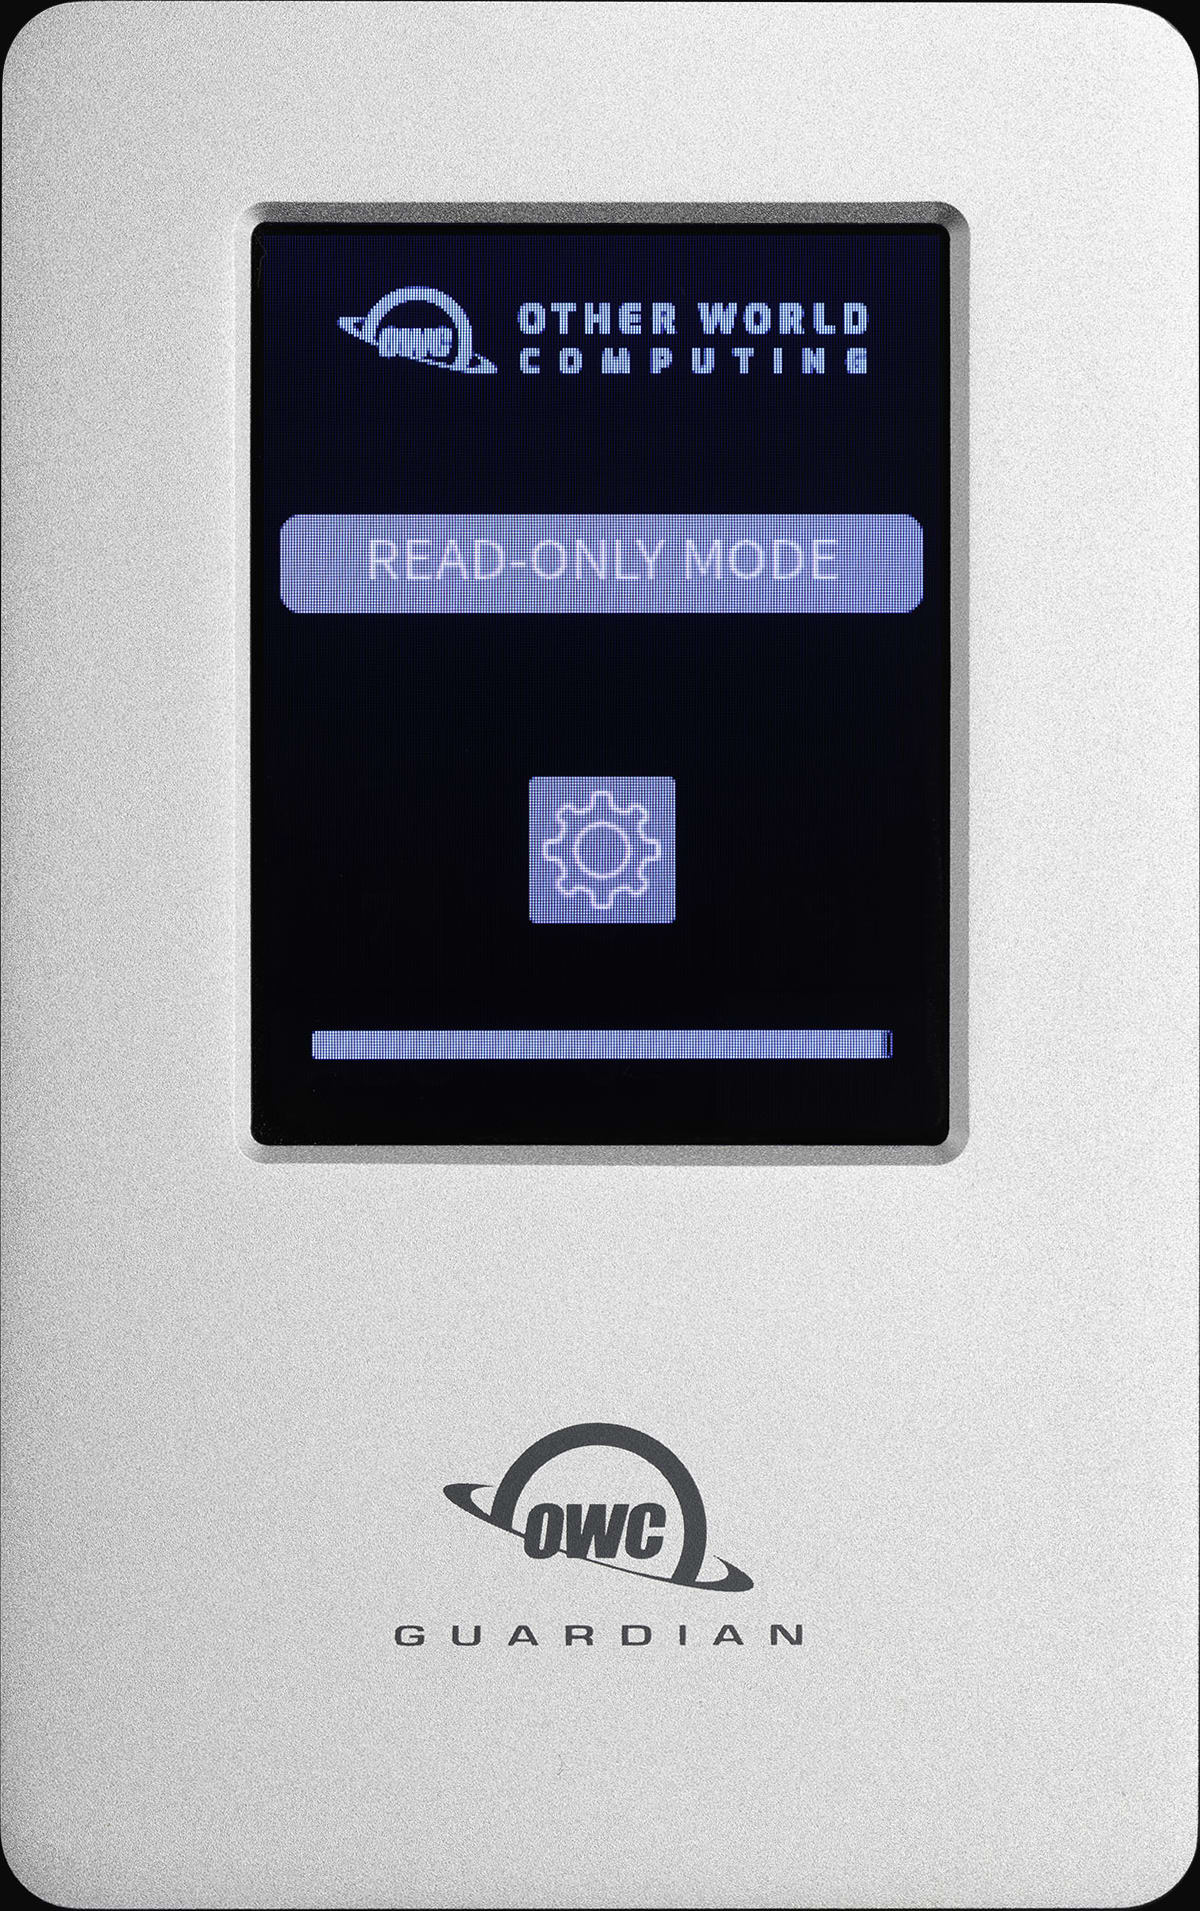
7. A Connecting screen will appear with a loading status bar while the device is connecting.
- “Connect” will immediately complete the connection process (only available for Admin Users).
- “Read-Only Mode” will disable write mode and not allow written files to the OWC Guardian.
- Locking and Unlocking, Rebooting, or disconnecting the device will disable “Read-Only Mode”.
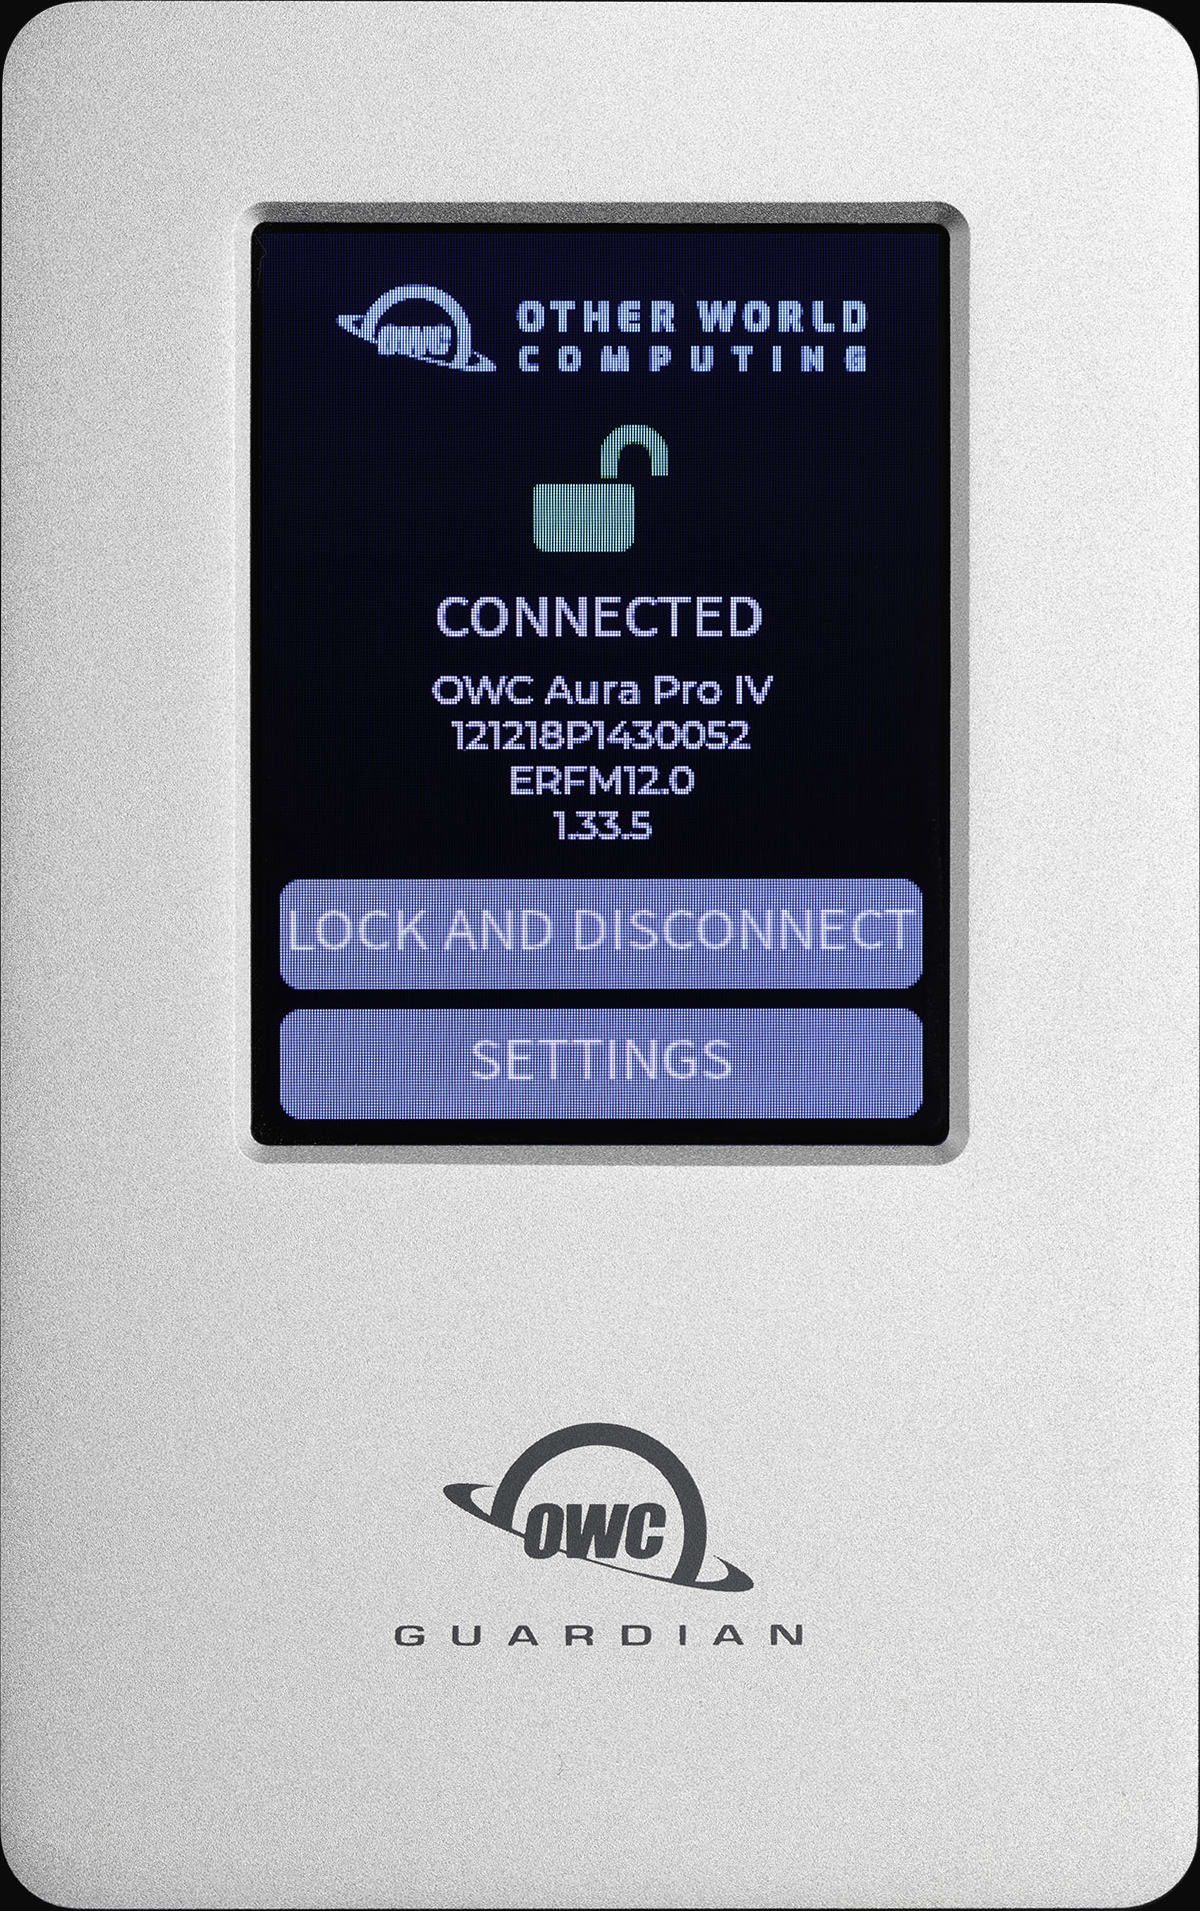
8. A Connected screen will appear confirming the device is fully connected to the system.
- Please view the Device Management section for more usage details including the “Lock and Disconnect” and “Settings” options available on the Connected screen.
- NOTE: The OWC Guardian will disconnect from a computer that enters sleep or hibernation. Disable the computer's sleep or hibernation function to avoid data interruption.
Device Management
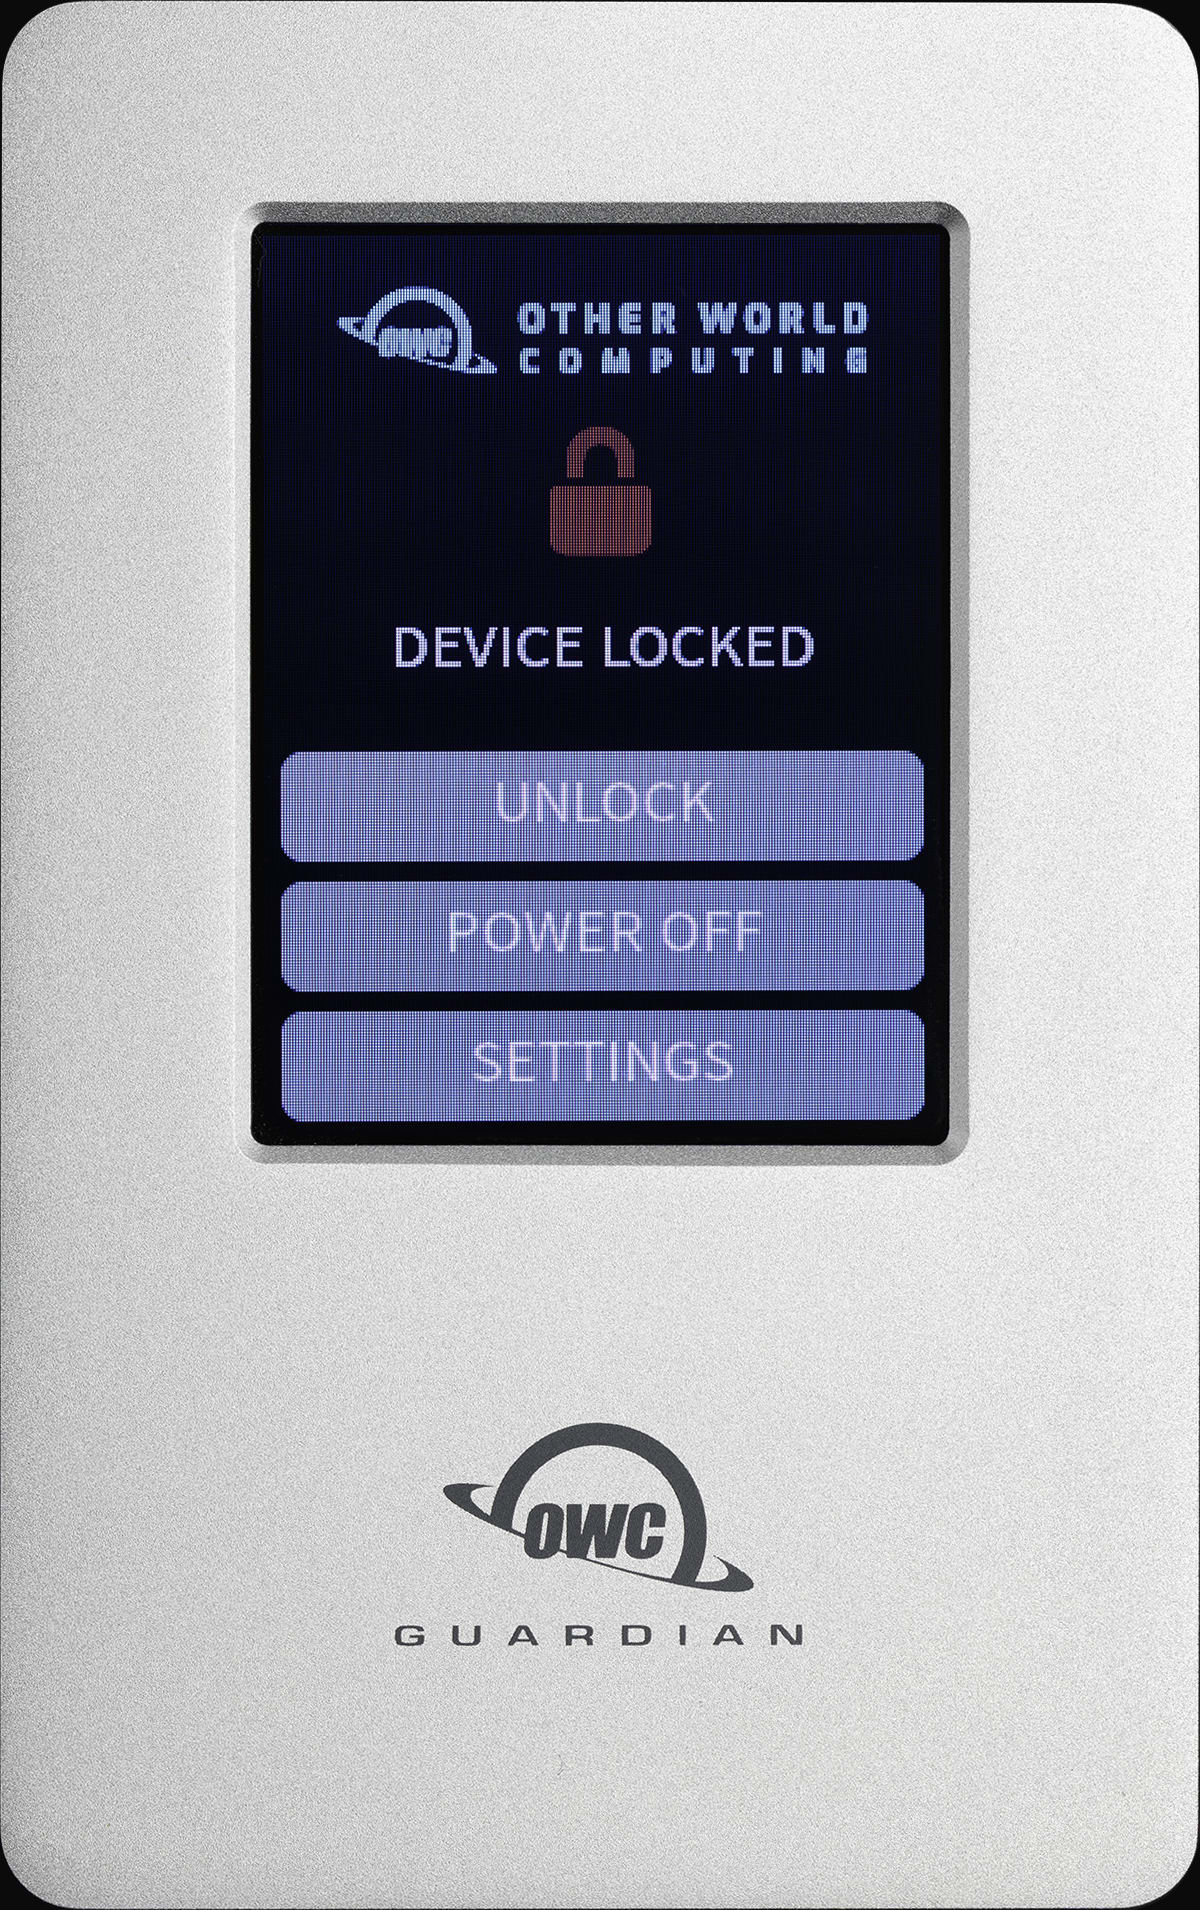
3.1 Locking Device
- To ensure no data is lost during normal use, always eject or unmount the OWC Guardian volume from the operating system before locking the device. Locking the OWC Guardian will disconnect communication between the volume and host system. The settings can still be configured while the device is locked.
- Safely unmounting the volume will not lock the volume.
- macOS
- Drag the icon for the device you wish to unmount to the trash can; OR
- Right-click the device icon on the desktop, then click “Eject”; OR
- Highlight the device on your Desktop and press Command-E.
- Windows
- Windows 10 build 1809 (October 2018) or later:
- Eject the drive by clicking the ‘Show hidden items’ menu in the Taskbar, then clicking ‘Safely Remove Hardware and Eject Media’, and last select the ‘Eject’ option for this volume.
- Windows 10 build 1803 and earlier:
- Go to the System Tray (located in the lower right corner of your screen). Click on the “Eject” icon (a small green arrow over a hardware image).
- A message will appear, detailing the devices that the “Eject” icon controls, i.e., “Safely remove...” Click on this prompt.
- You will then see a message that says, “Safe to Remove Hardware.” It is now safe to disconnect the device from the computer.
- Windows 10 build 1809 (October 2018) or later:
- macOS
1. Press "Lock and Disconnect" from the Connected screen.
2. A Device Locked status screen will appear stating The OWC Guardian is locked.
3.2 Unlocking Device
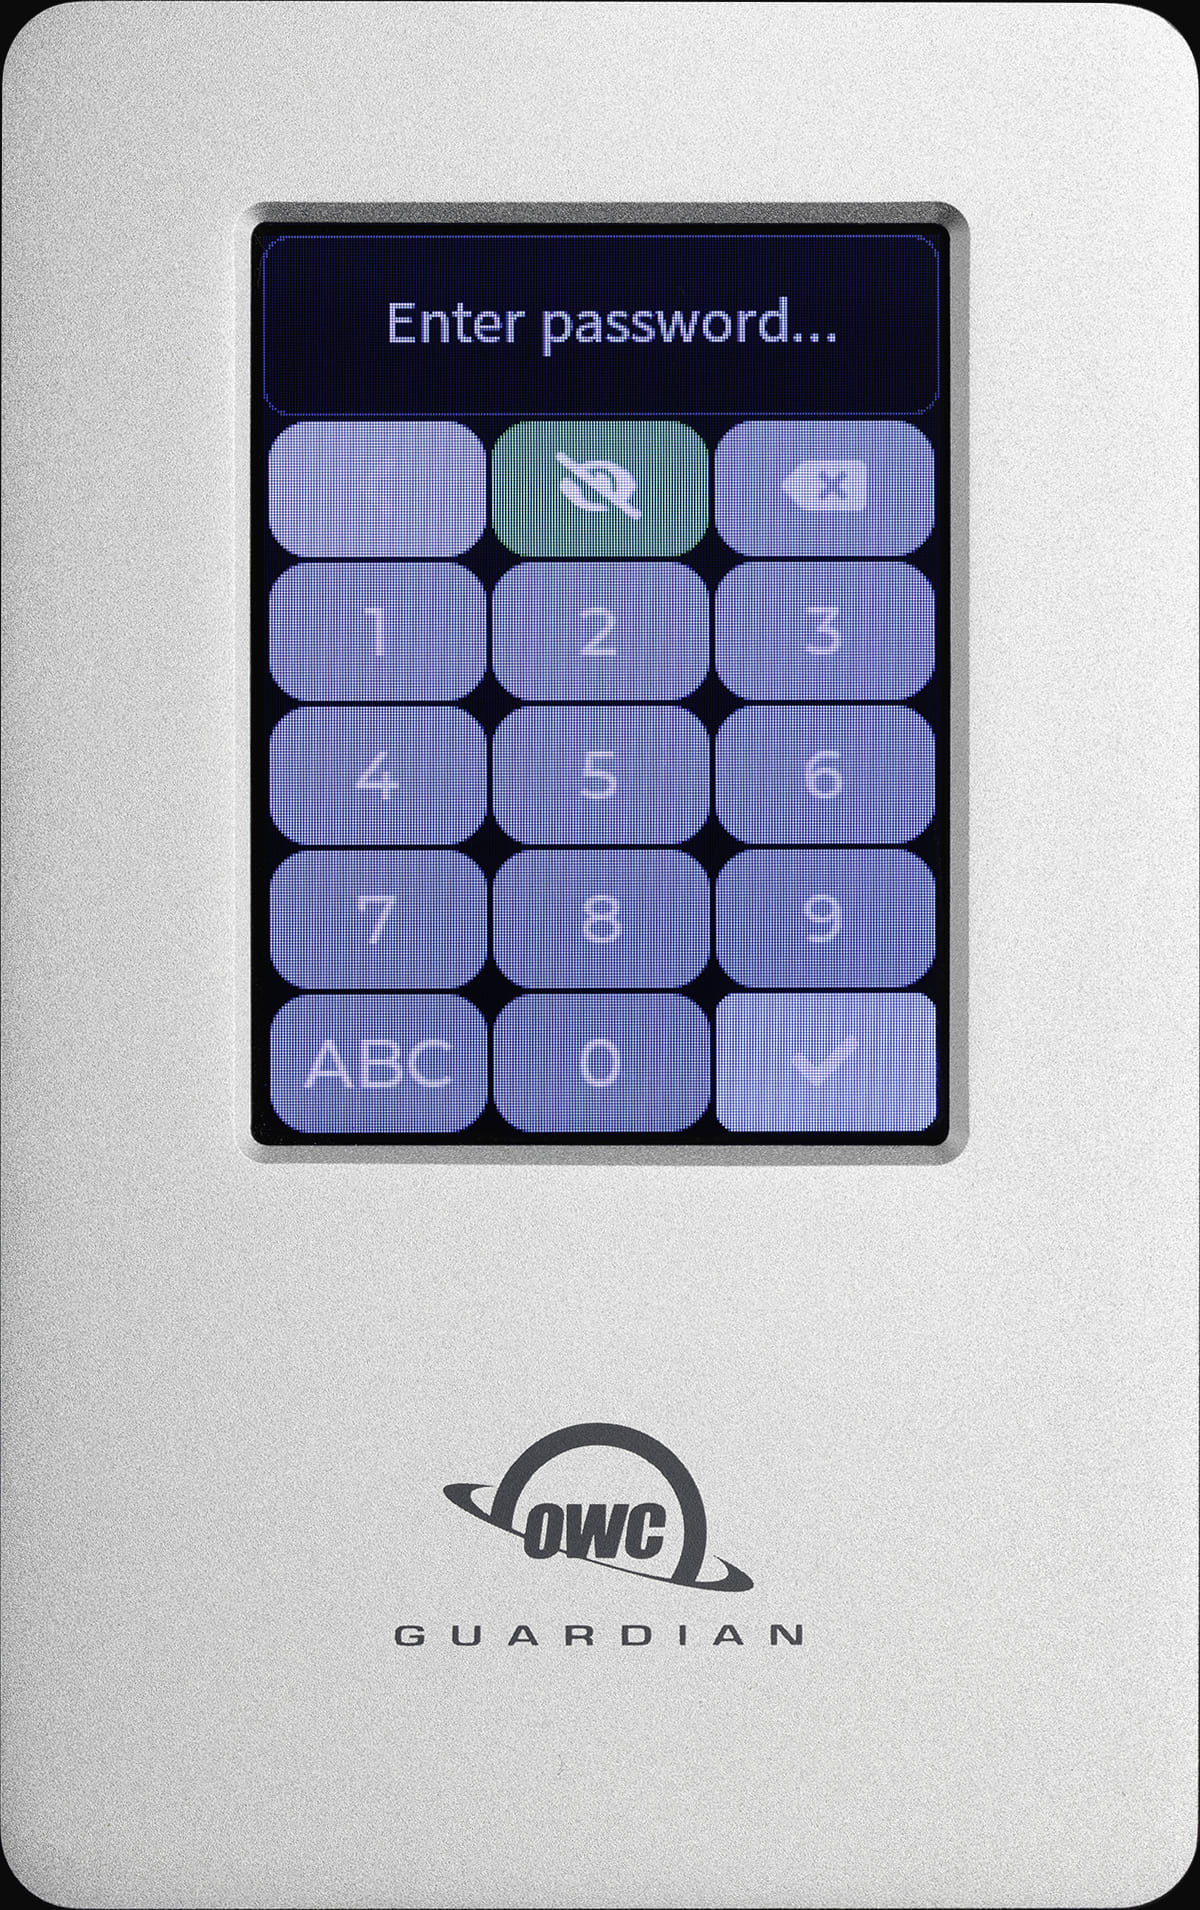
1. Press “Unlock” from the Device Locked screen to unlock the OWC Guardian.
- An Enter password screen will appear. Use the keypad to enter the current device password. Select the check mark box when complete to unlock the device.
3.3 Device Settings
The OWC Guardian has many customizable features that allow the user to choose their level of security and how their drive can be used.
- The device Settings can be accessed from the Connected status screen.
Change Password
1. An Enter password screen will appear. Use the keypad to enter the current device password. Select the check mark box when complete.
2. A New Password screen will appear. Use the keypad to create a new secure password. Select the check mark box when complete.
- NOTE: Password must be between 6-30 characters. Entering a smaller password will trigger a "Password does not match" prompt.
3. A Confirm Password screen will appear. Use the keypad to enter the new secure password again. Select the check mark box to confirm the password.
- NOTE: There is no option to recover or reset the device's encryption password if forgotten. OWC strongly recommends securely storing the password.
- Users will be provided options to reset the OWC Guardian and make it accessible again if the password has been forgotten or lost. However, the volume data will not be recoverable. Please contact OWC support if this occurs.
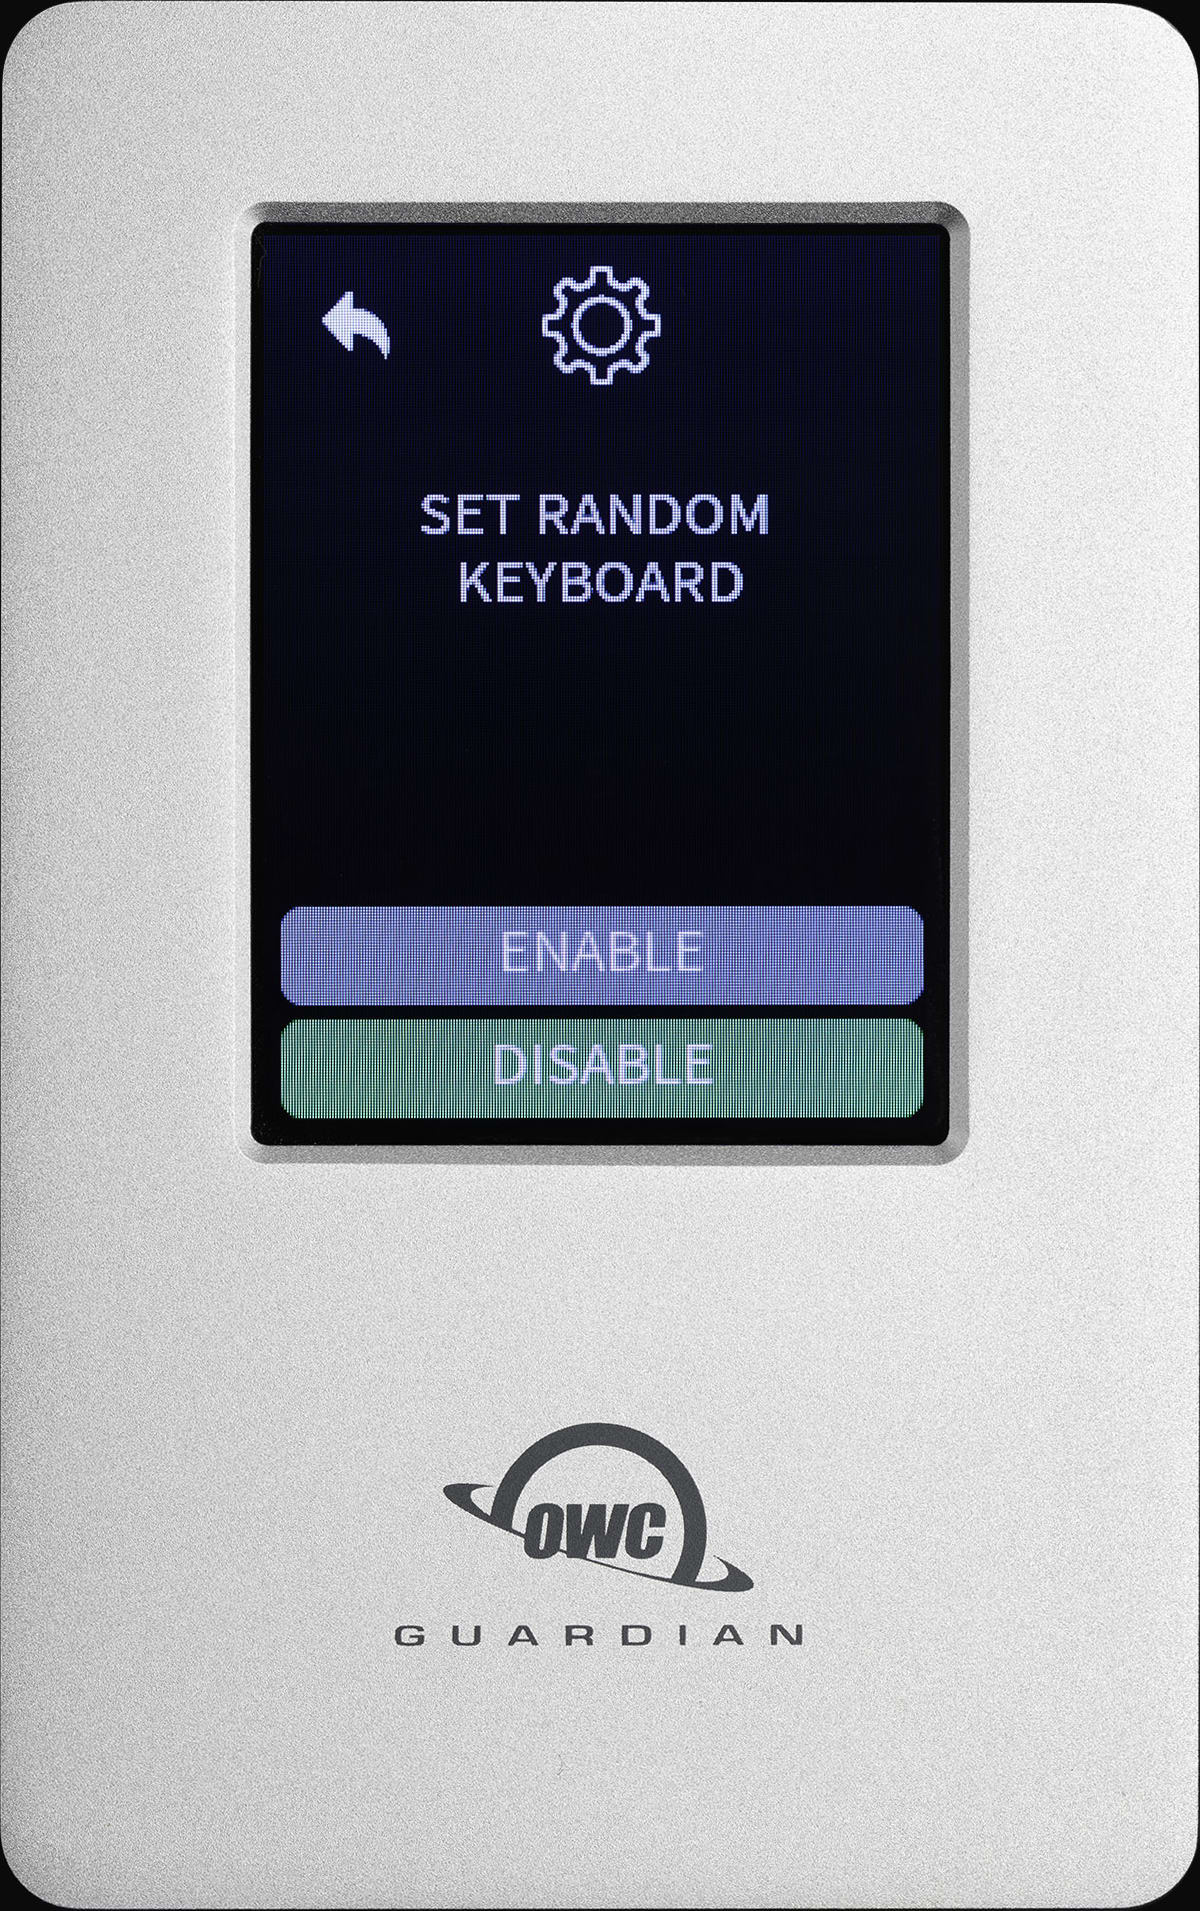
Randomize Key
- This setting can be enabled or disabled.
- When enabled, the positioning of the keys on the keyboard becomes scrambled with each instance. This makes entering the password more difficult. Press the back arrow to confirm the setting.
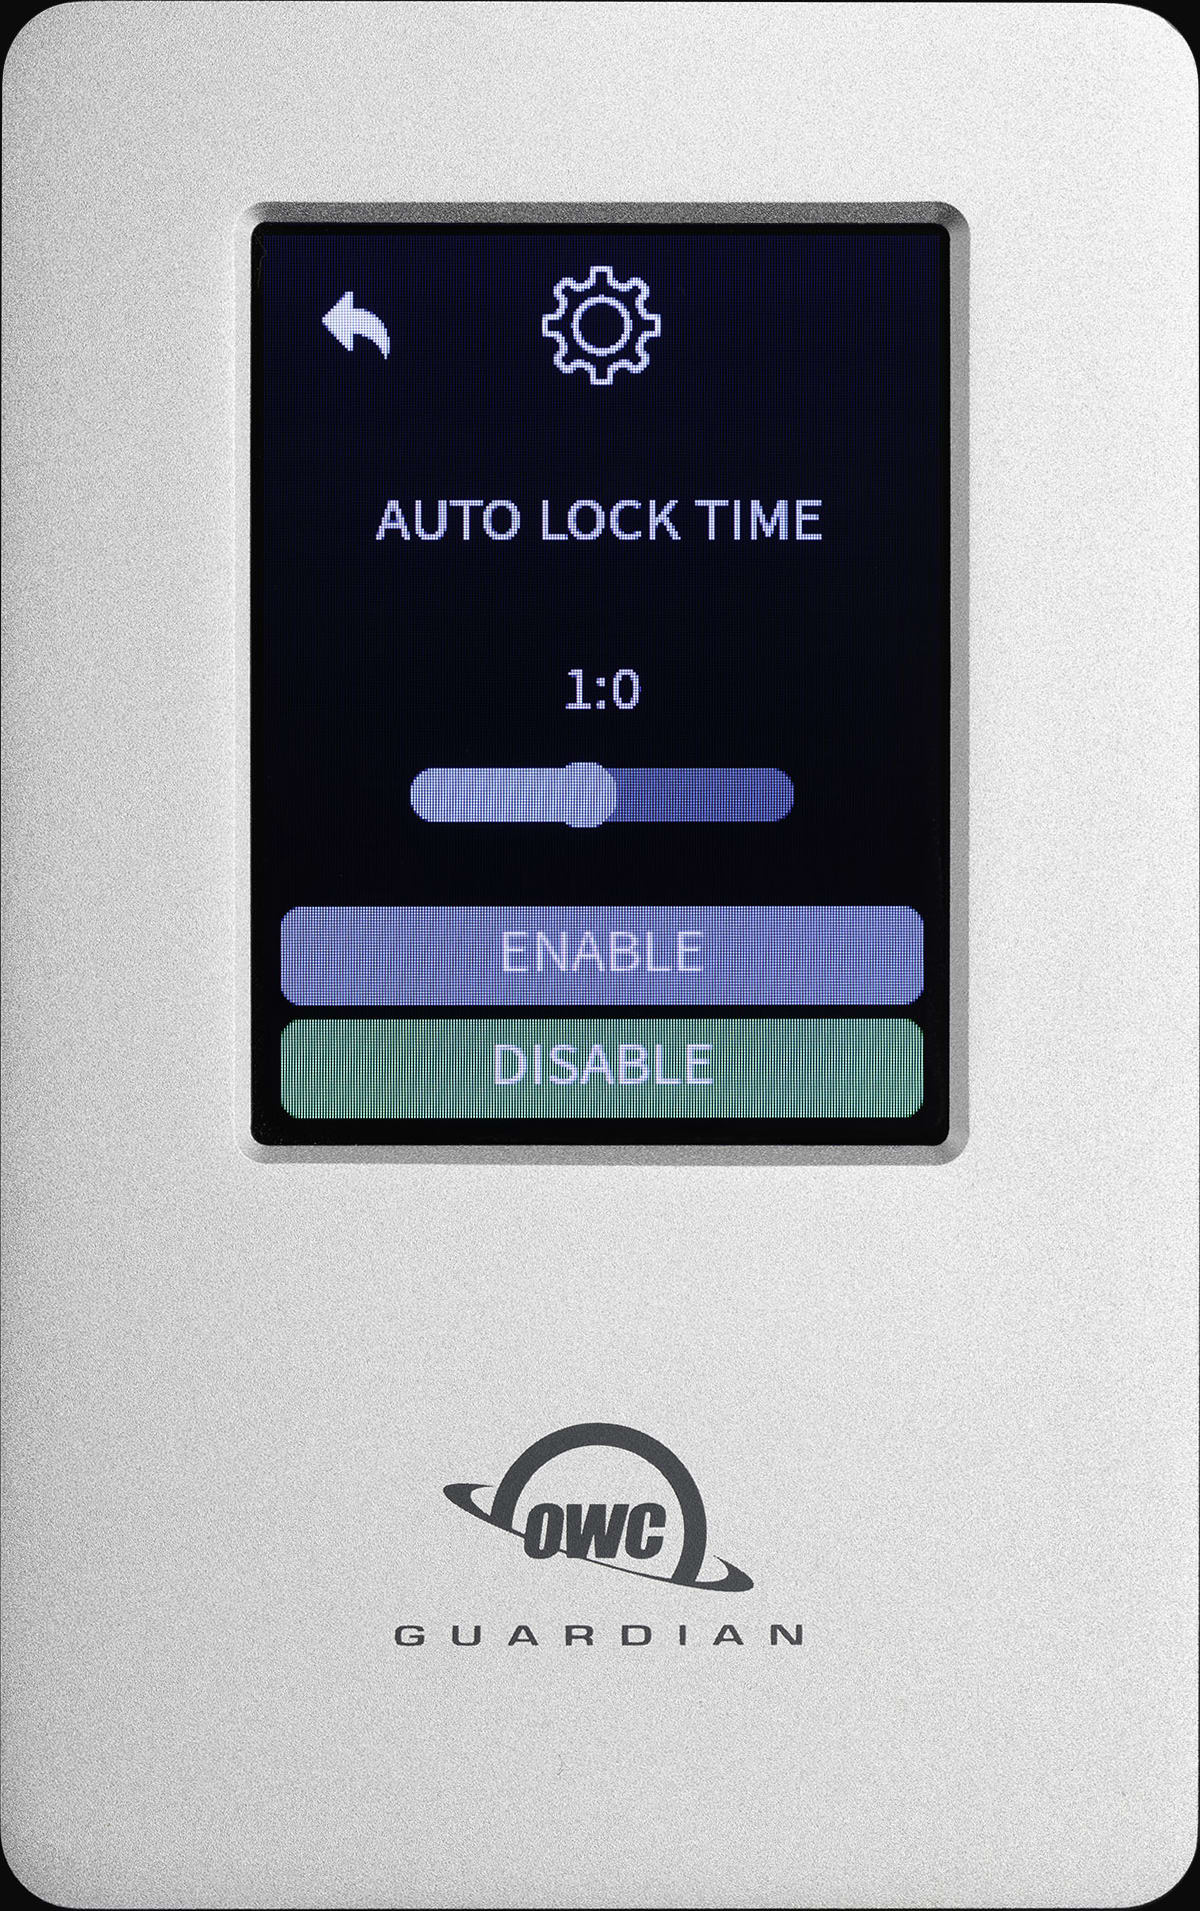
Auto Lock Time
- This setting can be enabled or disabled.
- When enabled, a slider appears allowing the user to set a time between 10 minutes and 2 hours (hour:minute). The OWC Guardian will automatically lock when the set amount of time is reached. Press the back arrow to confirm the setting.
- The set amount of lock time is an active counter. Inactive use doesn't delay the set amount of lock time.
- NOTE: The volume will not safely unmount from the system while in use when the set amount of lock time is reached. To ensure no data is lost during normal use, always eject or unmount the OWC Guardian volume from the operating system within the set amount of lock time.
- When enabled, a slider appears allowing the user to set a time between 10 minutes and 2 hours (hour:minute). The OWC Guardian will automatically lock when the set amount of time is reached. Press the back arrow to confirm the setting.
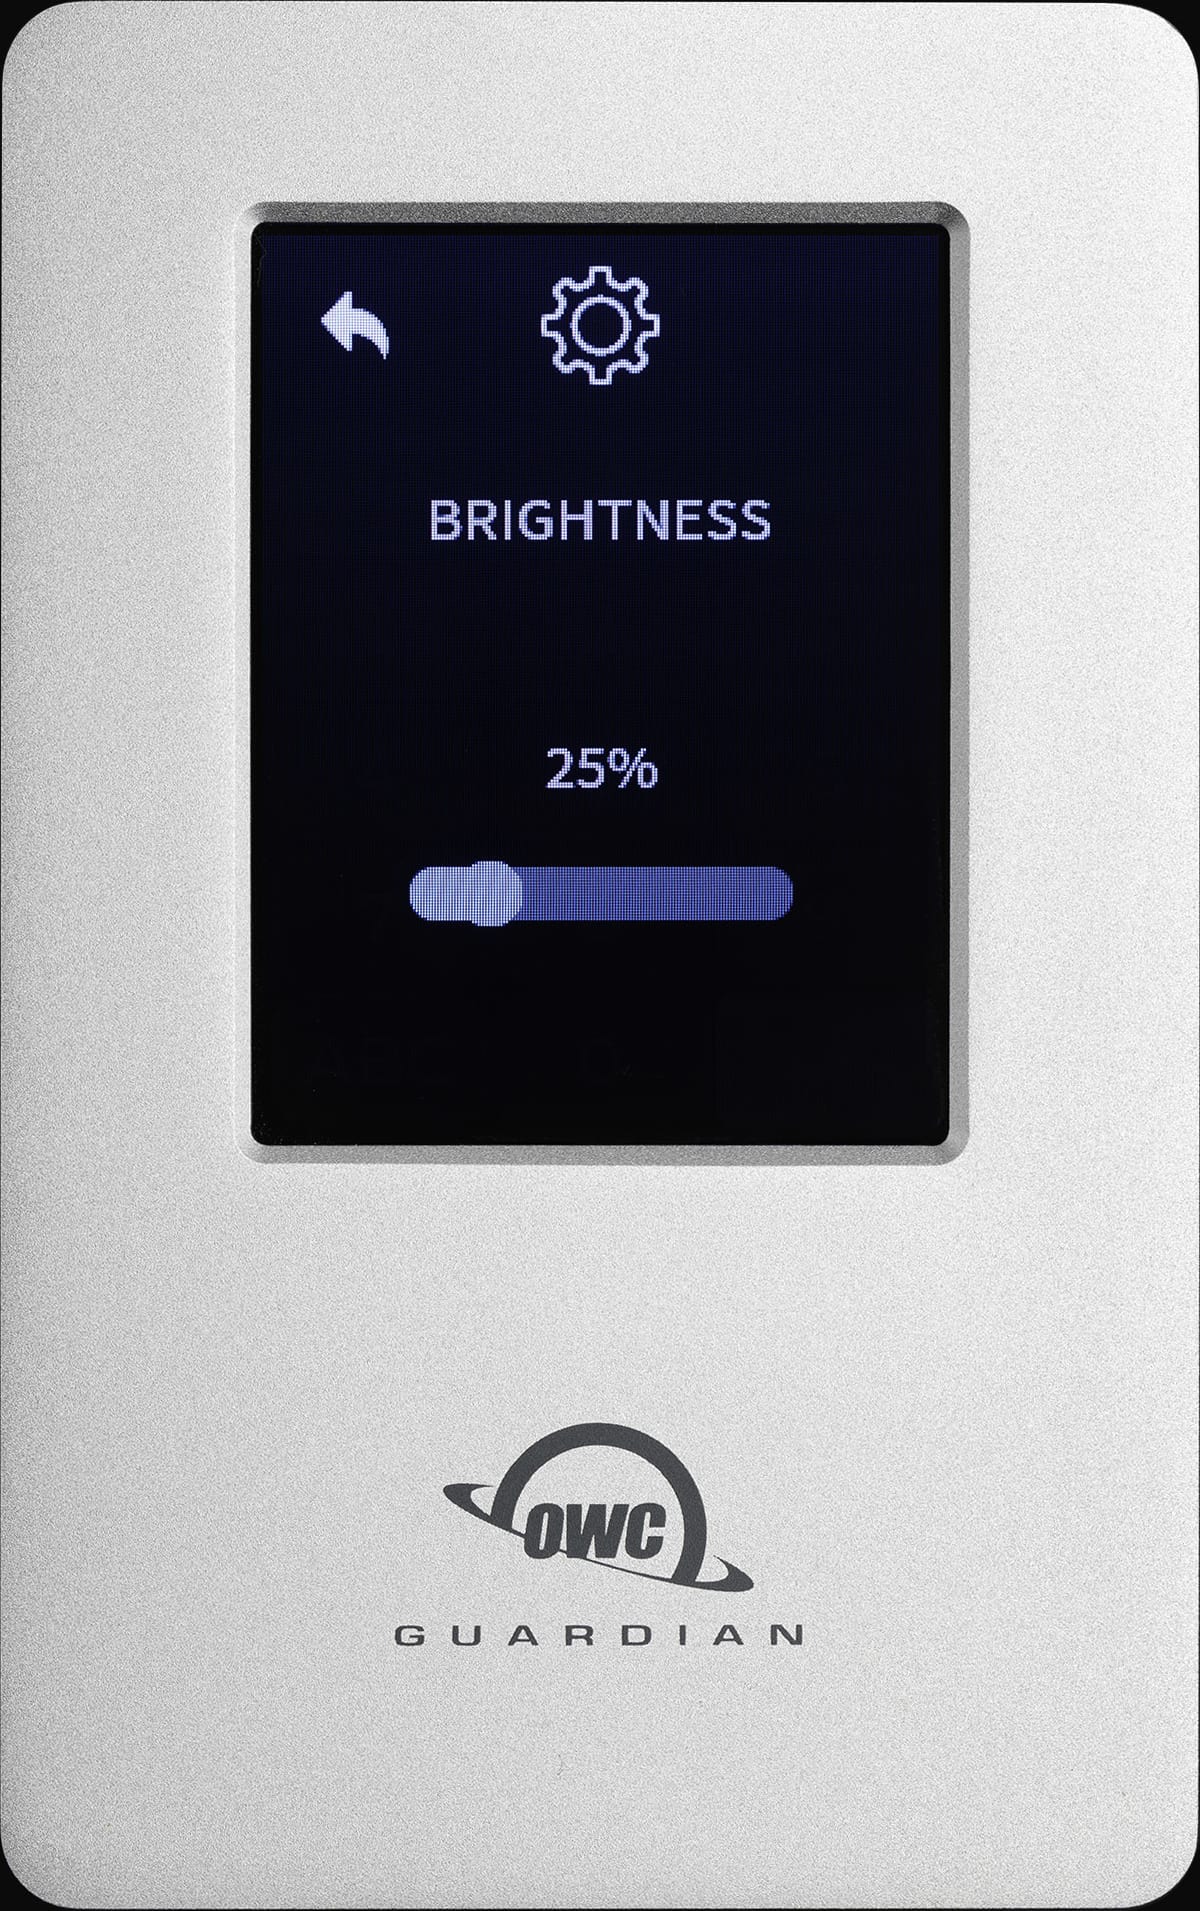
Brightness
- This setting allows the user to change the brightness. A slider appears allowing the user to set the brightness between 5% to 100%. Press the back arrow to confirm the setting.
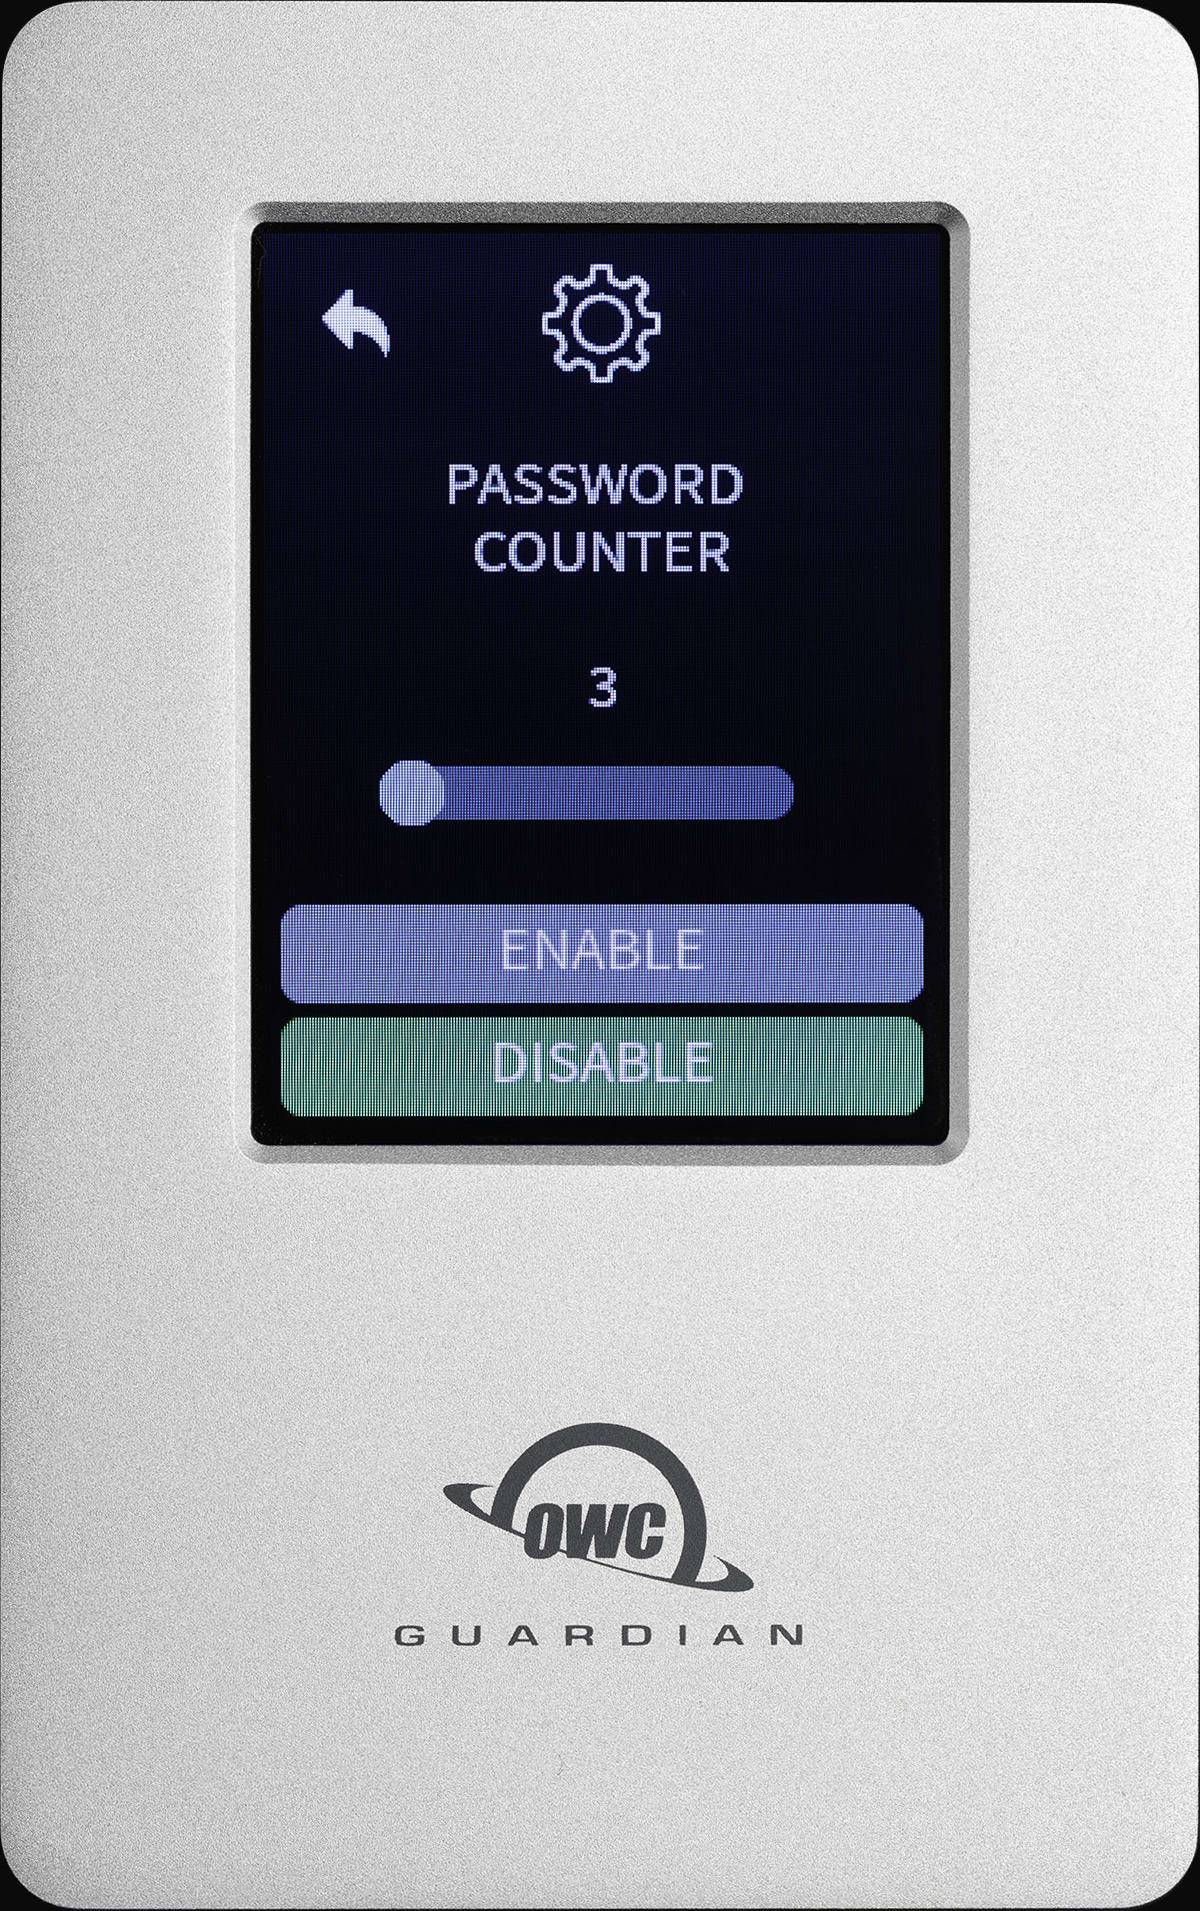
Password Counter
- This setting can be enabled or disabled (Admin access only).
- When enabled, a slider appears allowing the user to set a value between 3 and 5 (number of password attempts). The enclosure will lock the device for 5 minutes if the password is incorrectly attempted that many times. Press the back arrow to confirm the setting.
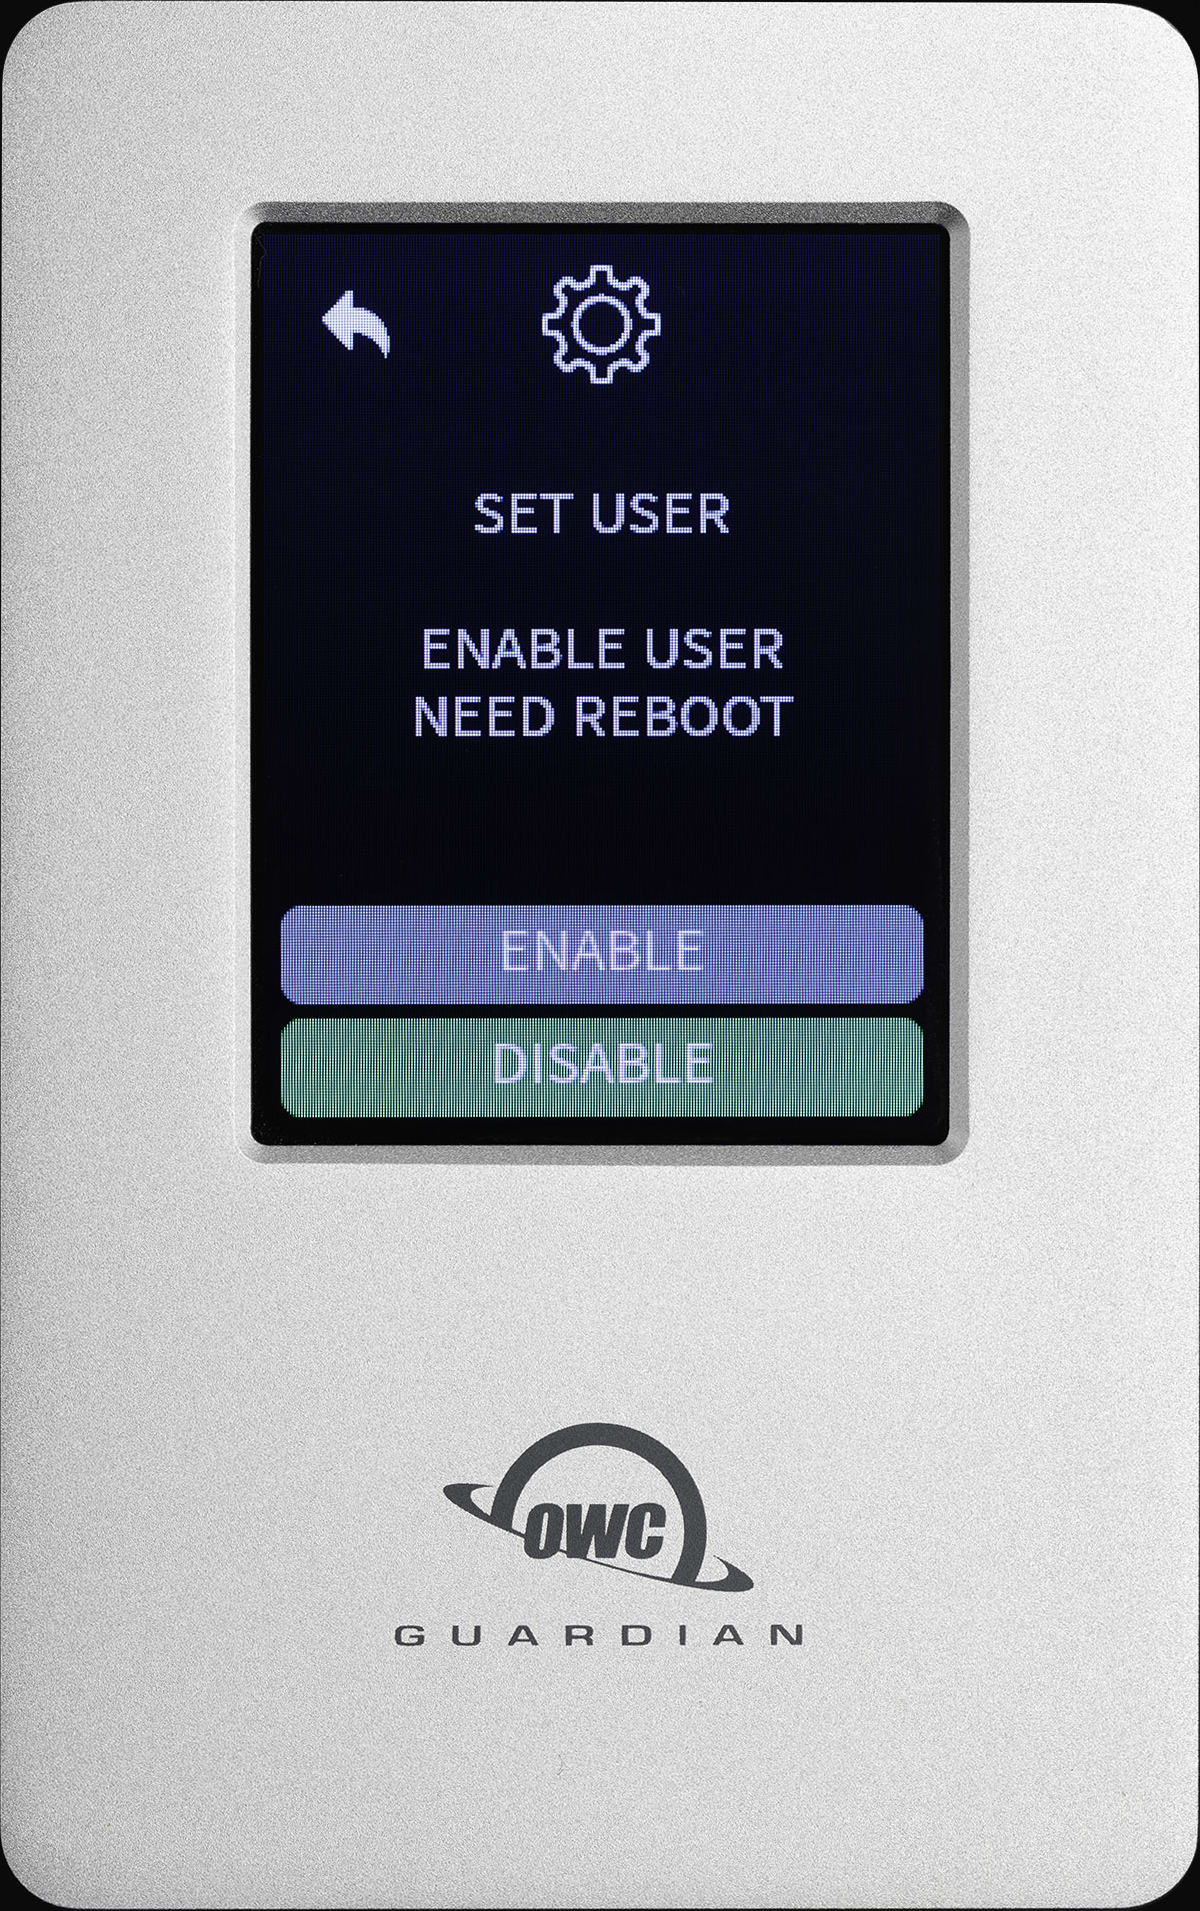
Set User
- This setting can be enabled or disabled.
- When enabled, a secondary user will be added to the OWC Guardian called User in addition to the Admin.
- NOTE: An OWC Guardian User will always be in “Read-Only Mode”. Writing files to the OWC Guardian will not be allowed. Settings will also be limited.
- The device will ask to “Restart immediately for effectivity.” Select “OK” to enable a User for the OWC Guardian.
- NOTE: Enabling a User will unmount the volume from the system while in use. To ensure no data is lost during normal use, always eject or unmount the OWC Guardian volume from the operating system before confirming the Set User setting.
- When enabled, a secondary user will be added to the OWC Guardian called User in addition to the Admin.

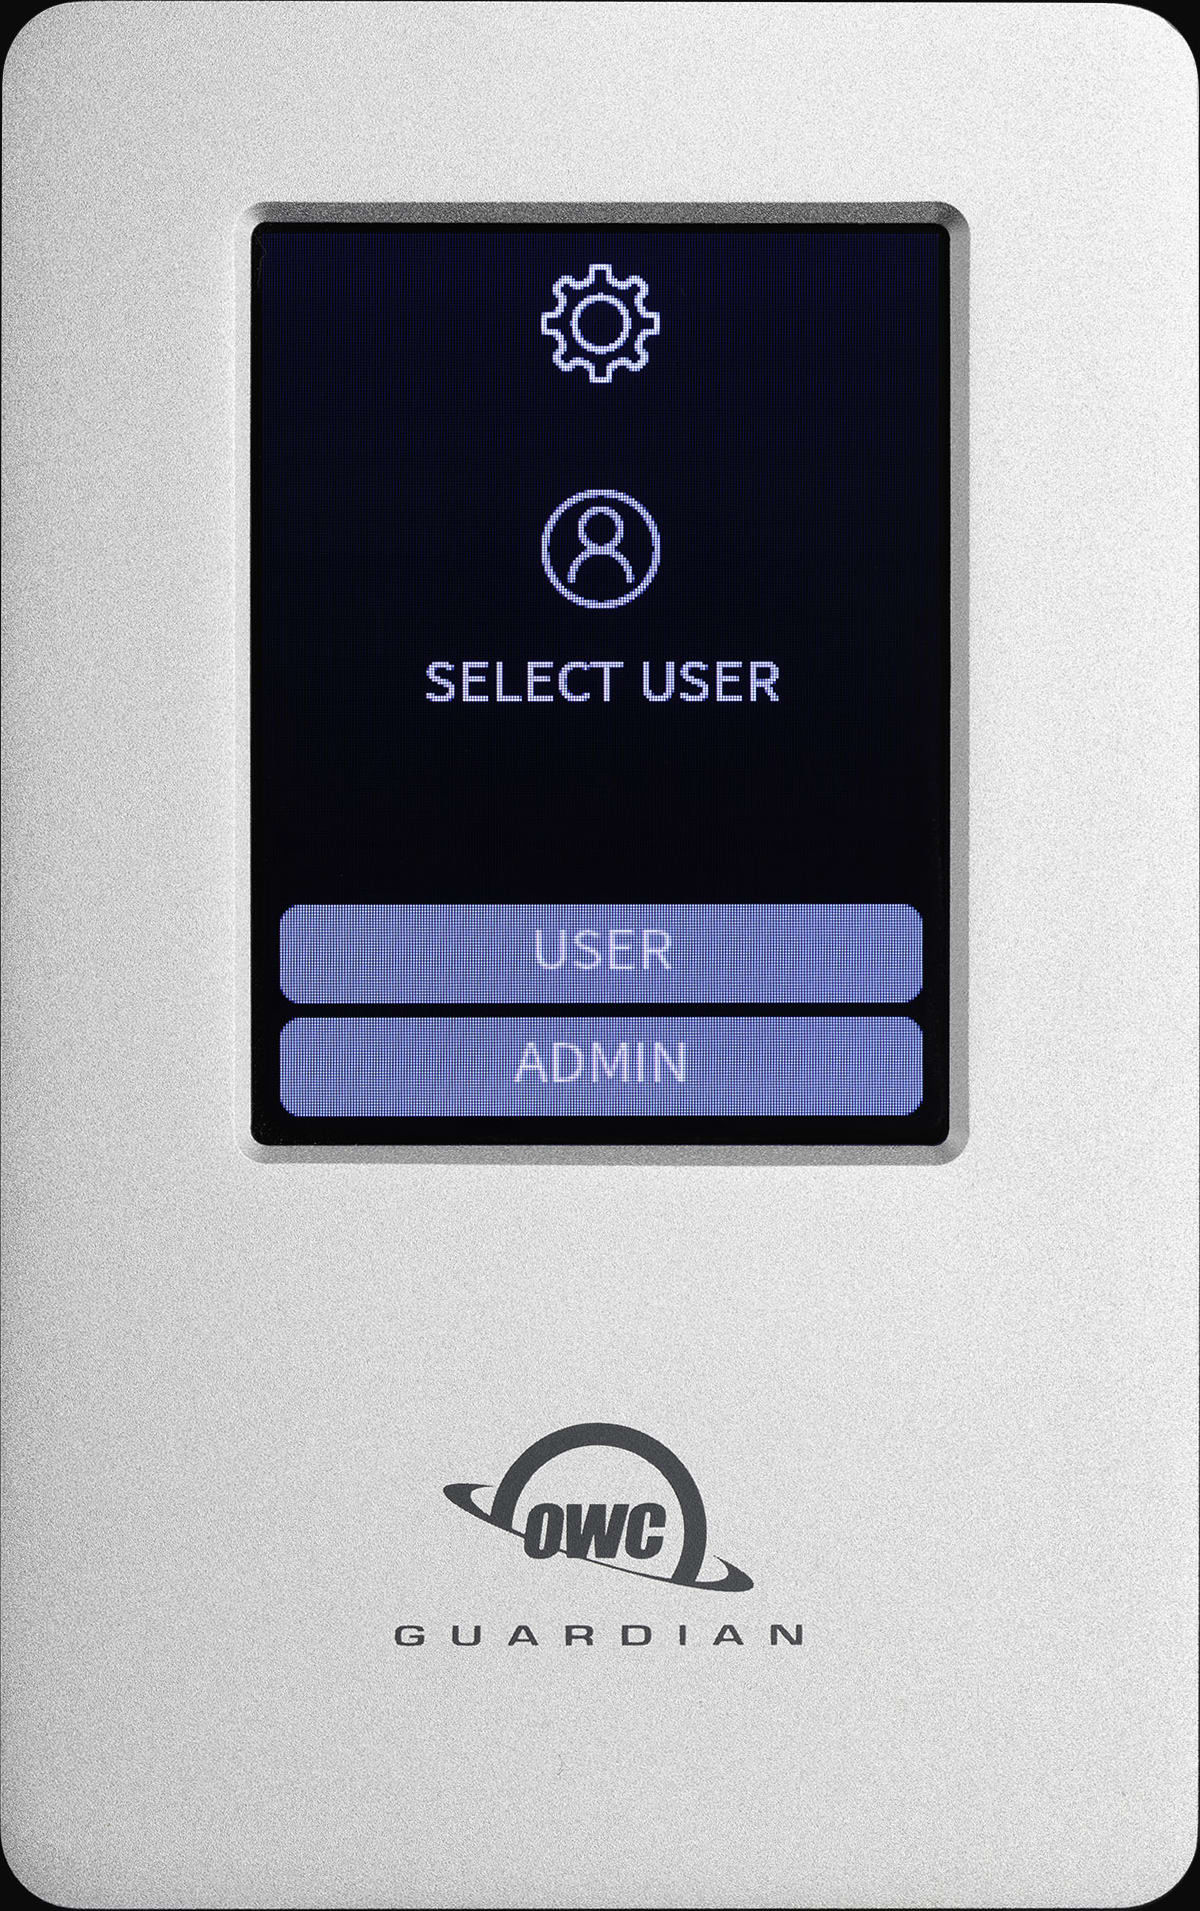
1. After reboot, the device will ask to "Select User". Select “User”.
2. A Welcome screen will appear after loading is complete. Create a new secure password to access the User profile by selecting the check mark box under “Create Your Password".
3. A New Password screen will appear. Use the keypad to create a new secure password. Select the check mark box when complete.
- NOTE: Password must be between 6-30 characters. Entering a smaller password will trigger a "Password does not match" prompt.
4. A Confirm Password screen will appear. Use the keypad to enter the new secure password again. Select the check mark box to confirm the password.
- NOTE: There is no option to recover or reset the device's encryption password if forgotten. OWC strongly recommends securely storing the password.
- Users will be provided options to reset the OWC Guardian and make it accessible again if the password has been forgotten or lost. However, the volume data will not be recoverable. Please contact OWC support if this occurs.
5. A Connecting screen will appear with a loading status bar while the device is connecting.
- “Read-Only Mode” will disable write mode and not allow written files to the OWC Guardian.
6. A Connected screen will appear confirming the device is fully connected to the system.
- NOTE: An OWC Guardian User is always in “Read-Only Mode”. Writing files to the OWC Guardian will not be allowed.
Secure Erase
- This setting provides (2) options: Use PSID and Erase. Either one must be pressed three times to confirm the users action.
- Erase: Removes all the data off the drive. A new secure password will need to be created for encrypting the device and the drive will need to be formatted.
- Select Erase (3) times to confirm removing all the drive data.
- Use PSID: DO NOT USE. Only use if instructed by OWC Support.
- Erase: Removes all the data off the drive. A new secure password will need to be created for encrypting the device and the drive will need to be formatted.
Reboot
- This setting gives the option of “OK” or “Cancel”. Selecting “OK” will reboot the device and cycle back to the Enter password or Select User screen.
- Selecting “Cancel” will take the user back to the “Settings” menu screen.
- NOTE: The volume will not safely unmount from the system while in use. To ensure no data is lost during normal use, always eject or unmount the OWC Guardian volume from the operating system before rebooting the device.
3.4 Device Connection
1. Connect the included 0.3M (12") USB-C cable to the USB-C port on the back of the OWC Guardian. Connect the other end of the cable into a compatible system.
- NOTE: macOS users will receive a pop-up notification stating “The disk you attached is not readable by this computer”. This notification can be “Ignored”. The operating system is locked from seeing the drive until the password is successfully entered.
2. The OWC Guardian will power on and the screen will display a brief “Performing Self Test” message, followed by an OWC branded status loading bar screen.
- NOTE: A "Select User” screen will appear if a User was added in addition to the device Admin. Select whether to log in as the Admin or User.
3. An Enter password or screen will appear. Use the keypad to enter the current device password. Select the check mark box when complete.
4. A Connecting screen will appear with a loading status bar while the device is connecting.
- “Connect” will immediately complete the connection process (only available for Admin Users).
- “Read-Only Mode” will disable write mode and not allow written files to the OWC Guardian.
- Locking and Unlocking or Rebooting the device will disable “Read-Only Mode” and allow files to be written.
5. A Connected screen will appear confirming the device is fully connected to the system. The OWC Guardian will now be available for use.
- NOTE: The OWC Guardian will disconnect from a computer that enters sleep or hibernation. Disable the computer's sleep or hibernation function to avoid data interruption.
3.5 Device Disconnection
- To ensure no data is lost during normal use, always eject or unmount the OWC Guardian from the operating system before powering off and disconnecting the device.
- macOS
- Drag the icon for the device you wish to unmount to the trash can; OR
- Right-click the device icon on the desktop, then click “Eject”; OR
- Highlight the device on your Desktop and press Command-E.
- Windows
- Windows 10 build 1809 (October 2018) or later:
- Eject the drive by clicking the ‘Show hidden items’ menu in the Taskbar, then clicking ‘Safely Remove Hardware and Eject Media’, and last select the ‘Eject’ option for this volume.
- Windows 10 build 1803 and earlier:
- Go to the System Tray (located in the lower right corner of your screen). Click on the “Eject” icon (a small green arrow over a hardware image).
- A message will appear, detailing the devices that the “Eject” icon controls, i.e., “Safely remove...” Click on this prompt.
- You will then see a message that says, “Safe to Remove Hardware.” It is now safe to disconnect the device from the computer.
- Windows 10 build 1809 (October 2018) or later:
- macOS
1. Disconnect the OWC Guardian by pressing "Lock and Disconnect" from the connected status screen.
- NOTE: The OWC Guardian should first be unmounted from the operating system
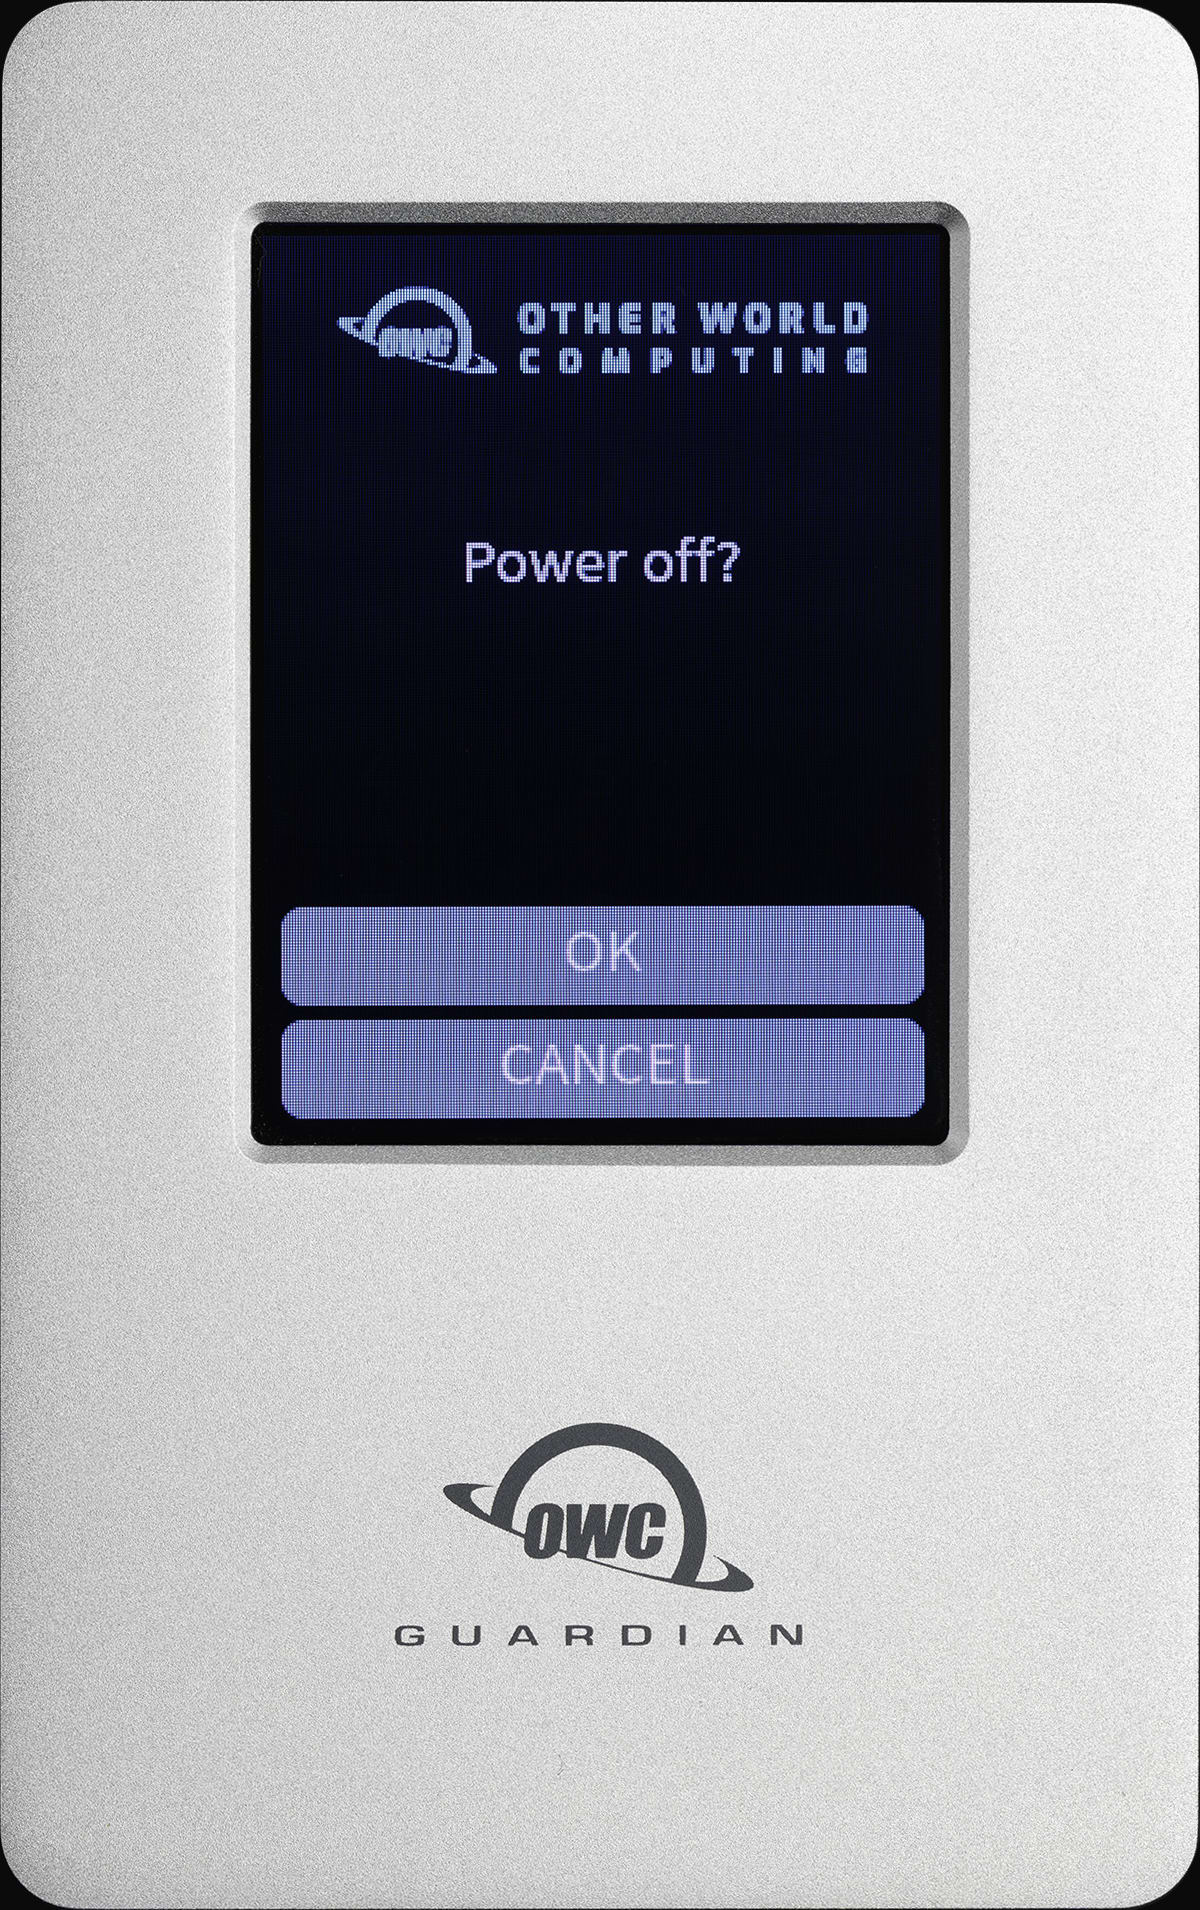
2. A "Locked Status" screen will appear providing the options to "Unlock", "Power Off", or "Settings".
- Press "Power Off".
3. A screen will appear confirming the decision.
- Press "OK". The OWC Guardian will power off and the screen will go blank. The device can safely be disconnected from the host system.
3.5 OWC Disk Performance
- As of Windows 10 v. 1809 the default Disk Removal Policy is ‘Quick removal’ instead of ‘Better performance’.
- NOTE: OWC storage solutions that are experiencing slow read/write speeds should consider checking and changing the Windows disk removal policy. Changing from "Quick removal" to "Better performance" can increase disk performance. OWC offers the application OWC Disk Performance to help change the Disk Removal Policy. Changing from "Quick removal" to "Better performance" can also be changed manually.
- Please review the support article Storage Solutions: OWC Disk Performance for more detail.
3.6 Usage Notes
- NOTE: macOS users will receive a pop-up notification stating “The disk you attached is not readable by this computer” when mounting a volume from an encrypted or locked OWC Guardian.
- This notification can be “Ignored”. The operating system is locked from seeing the encrypted drive volume until the device's encryption password is successfully entered.
- IMPORTANT: There is no option to recover or reset the device's encryption password if forgotten. OWC strongly recommends securely storing the password.
- Users will be provided options to reset the OWC Guardian and make it accessible again if the password has been forgotten or lost. However, the volume data will not be recoverable. Please contact OWC support if this occurs:
- The OWC Guardian encryption password must be between 6-30 characters.
- The OWC Guardian will disconnect from a computer that enters sleep or hibernation. Disable the computer's sleep or hibernation function to avoid data interruption.
- Checking drive health notice:
- macOS Users: Not available
- Windows Users: Available with Crystal Disk
Support Resources
4.1 Troubleshooting
- Verify the USB-C cable is securely connected between the OWC Guardian and host system.
- Connect the OWC Guardian and host system with a different USB-C cable (OWC recommends using a 100W USB-C cable).
- Connect the OWC Guardian to a different host system.
- Users experiencing slow read/write speeds should consider checking and changing the Windows disk removal policy.
- Please review the support article Storage Solutions: OWC Disk Performance for more detail.
- We are very sorry If issues continue to occur. Please know that OWC support is here to help.
- Contact information for our support can be found in section 4.4 "Contacting Support".
- Please have your serial number ready which is located on the bottom of the OWC Guardian and printed on the original packaging.
- Contact information for our support can be found in section 4.4 "Contacting Support".
4.2 Online Resources
- OWC Guardian Product Page
- OWC Guardian Support Guide Page
- Support Manual for OWC Drive Guide
- Drive Guide Support Guide
- OWC Disk Performance Download
- OWC Drive Setup Over Non-Apple Platforms Support Article
4.3 About Data Backup
To ensure that your files are protected and to prevent data loss, we strongly suggest that you keep two copies of your data: one copy on your OWC Guardian and a second copy on either your internal drive or another storage medium, such as an optical backup, or on another external storage unit. Any data loss or corruption while using the OWC Guardian is the sole responsibility of the user, and under no circumstances may OWC, its parents, partners, affiliates, officers, employees, or agents be held liable for loss of the use of data including compensation of any kind or recovery of the data.
4.4 Contacting Support
4.5 About This Manual
The images and descriptions may vary slightly between this manual and the unit shipped. Functions and features may change depending on the firmware version or driver version, if applicable. Please visit the product web page for the most recent product information. OWC’s Limited Warranty is not transferable and subject to limitations.
General Use Precautions
- To avoid damage, do not expose the device to temperatures outside the following ranges:
- Environmental (Operating)
- Temperature (ºF): 41º — 95º
- Temperature (ºC): 5º — 35º
- Environmental (Non-Operating)
- Temperature (ºF): -4º — 140º
- Temperature (ºC): -20º — 60º
- Environmental (Operating)
- Store the OWC Guardian safely to protect the LCD display screen.
Safety Precautions
- Use proper anti-static precautions when handling this device. Failure to do so can increase the risk of electrical shock or short-circuiting.
- Never expose your device to rain, or use it near water, or in damp wet conditions. Never place objects containing liquids on the device, as they may spill everywhere and into the openings. This will increase the risk of electrical shock, short-circuiting, fire, or personal injury.
- To avoid any risk of electrical shock, short-circuiting, fire, or dangerous emissions, never insert any metallic object into the device.
- Please cease use of the device and contact OWC Support if it appears to be malfunctioning.
Terms & Conditions of Sale
Warranty
OWC’s products are subject to OWC’s Terms & Conditions of Sale located at Terms of Sale or other applicable terms. The OWC Guardian comes with a 3-Year Limited Warranty when sold with factory installed drives. Additional warranty information can be viewed by visiting Hardware Warranties.
Changes
The material in this document is for information purposes only and subject to change without notice. While reasonable efforts have been made in the preparation of this document to assure its accuracy, OWC, its parent, partners, affiliates, officers, employees, and agents assume no liability resulting from errors or omissions in this document, or from the use of the information contained herein. OWC reserves the right to make changes or revisions in the product design or the product manual without reservation and without obligation to notify any person of such revisions and changes.
FCC Statement
Warning! Modifications not authorized by the manufacturer may void the user’s authority to operate this device.
NOTE: This equipment has been tested and found to comply with the limits for a Class B digital device, pursuant to Part 15 of the FCC Rules. These limits are designed to provide reasonable protection against harmful interference in a residential installation. This equipment generates, uses and can radiate radio frequency energy and, if not installed and used in accordance with the instructions, may cause harmful interference to radio communications. However, there is no guarantee that interference will not occur in a particular installation. If this equipment does cause harmful interference with radio or television reception, which can be determined by turning the equipment off and on, the user is encouraged to try to correct the interference by one or more of the following measures:
- Reorient or relocate the receiving antenna.
- Increase the separation between the equipment and receiver.
- Connect the equipment to an outlet on a circuit different from that to which the receiver is connected.
Copyrights and Trademarks
© 2025 Other World Computing, Inc. All rights reserved. Mercury, OWC, and the OWC logo are trademarks of New Concepts Development Corporation, registered in the U.S. and/or other countries. Mac and macOS are trademarks of Apple Inc., registered in the U.S. and other countries. Thunderbolt and the Thunderbolt logo are trademarks of Intel Corporation in the U.S. and/or other countries. Other marks may be the trademark or registered trademark property of their owners. No part of this publication may be reproduced, stored in a retrieval system, or transmitted in any form or by any means, electronic, mechanical, photocopying, recording or otherwise, without the prior written consent of OWC.
Free Support Chat
Our free award-winning support team is ready to answer all of your questions. Technical support is available Monday - Friday: 9AM - 6PM. Customer Support & Sales is available Monday - Friday: 9AM - 6PM. Support is unavailable on U.S. Federal holidays. Talk to a human today.