 1-800-275-4576
Look and Feel
El Capitan Look & Feel
El Capitan has a similar appearance to its predecessor (Yosemite), however there are several worthwhile refinements to the user interface that make it easier for users to interact with the system. A few of our favorites are listed below. For the purposes of illustration, the examples given assume the user is working with a mouse rather than a trackpad.
New System Font: San Francisco
A subtle but useful change, especially for users who work with a Retina® display, is the new San Francisco system font. Scanning system menus, dialogs, and button text is now easier, whether you're looking at the tiny screen on an Apple Watch® or the 5K screen on a 27" iMac. Keep in mind this new font is accessible only to the system itself; you will not find it in any of your application font menus, as it was not designed for print or web output. The first screenshot in the gallery below shows a portion of the Yosemite Apple Menu (in both standard and dark menubar mode), captured on a MacBook Pro retina screen, while the second screenshot shows the same menu from El Capitan. The default window and menu transparency is turned off in both examples.
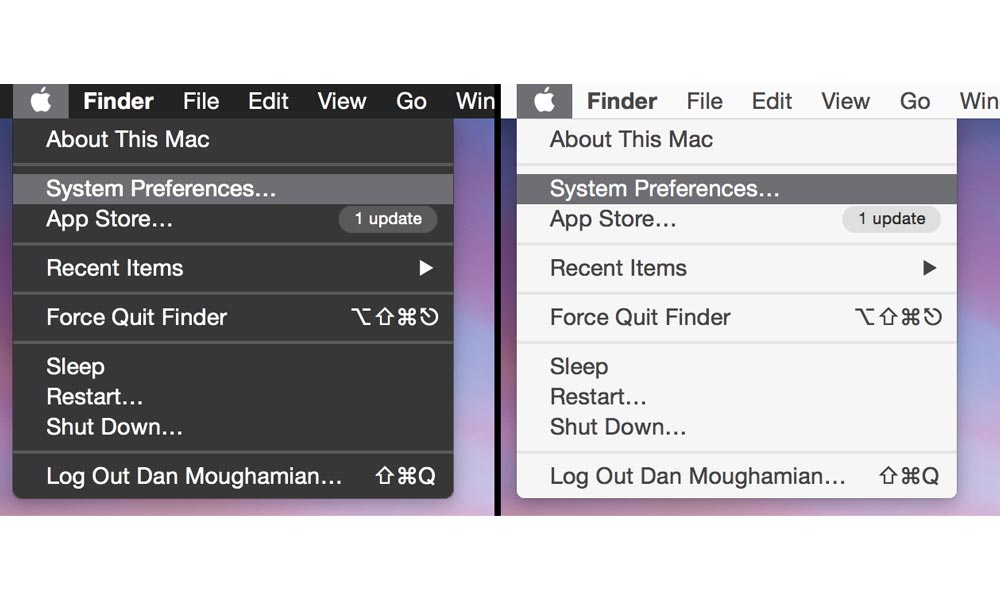
The Yosemite system font Enlarge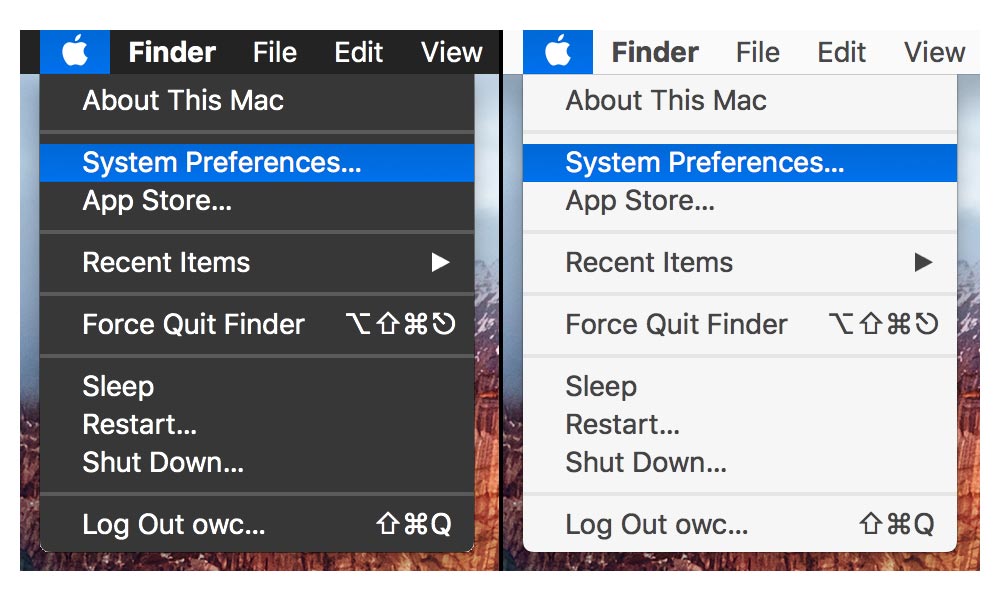
El Capitan's new San Francisco font Enlarge
Mission Control
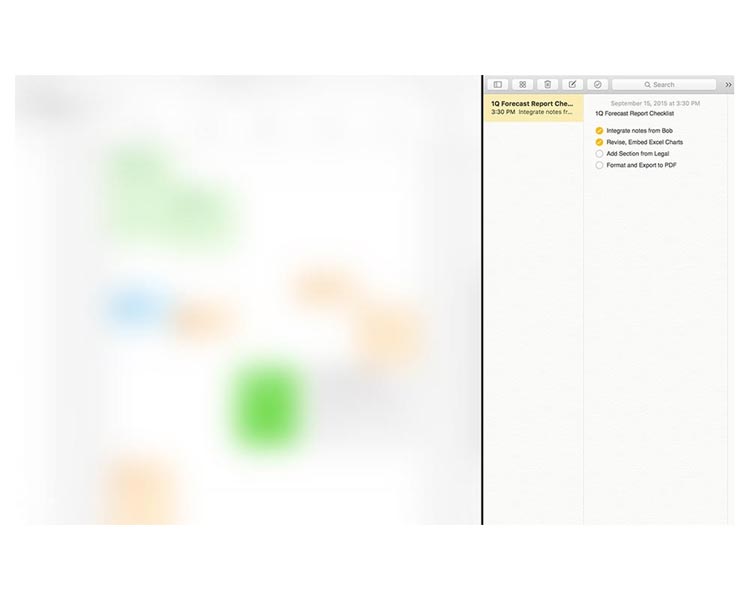
Mission Control is a feature that's been available in OS X for a few years now, and it has been further enhanced in El Capitan, allowing you more flexibility in managing your application windows. Now all windows for a given application are displayed on a single layer, rather than being stacked on top of one another. You can add a new application to an existing Space simply by dragging an application window in the central part of the screen, onto the Space's icon at the top of the screen. When you add an application to a new or existing Space, its relative position on screen is maintained within that Space. The default behavior for showing a list of Spaces now shows the text label only, saving vertical screen space. Mouse over the label to see the Space thumbnails for the active screen.

Mission Control in El Capitan is integrated with Split View.
Enlarge
Split View
One of the nicer changes in El Capitan is the new Split View feature. It allows you to split the OS X full screen mode between two related applications or application windows, hiding anything else on screen that might be a distraction. To activate Split View, open the two applications that you would like to share a full screen, mouse over the green window expander button for one of the apps, then click and hold until half the screen is highlighted. You can then drag the selected window to the left or right side and release the mouse button. This will snap the window to one half of the screen. To complete the process click the other window to expand it into remaining space, then drag the black divider to make one window larger or smaller. Keep in mind this is a form of the Full Screen workflow, so the menubar for your apps will be hidden unless you mouse over the top edge of the screen to reveal the menu of the active application. Additionally, once you've split the screen, Mission Control will automatically add a "Space" for the two apps you chose, allowing you to jump back and forth between a split view and other application Spaces.
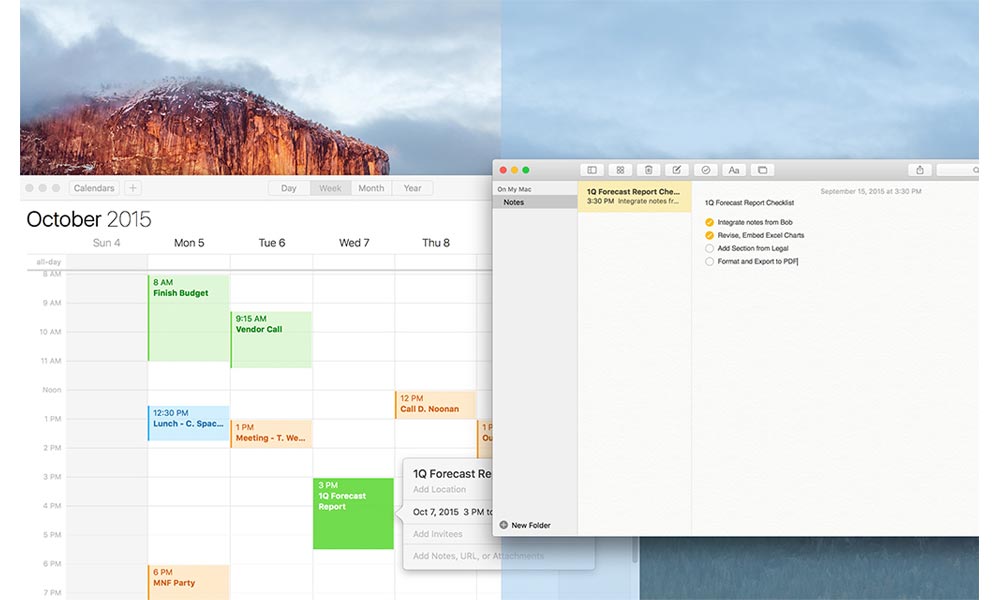
Activating Split View allows you to highlight either half of the screen... Enlarge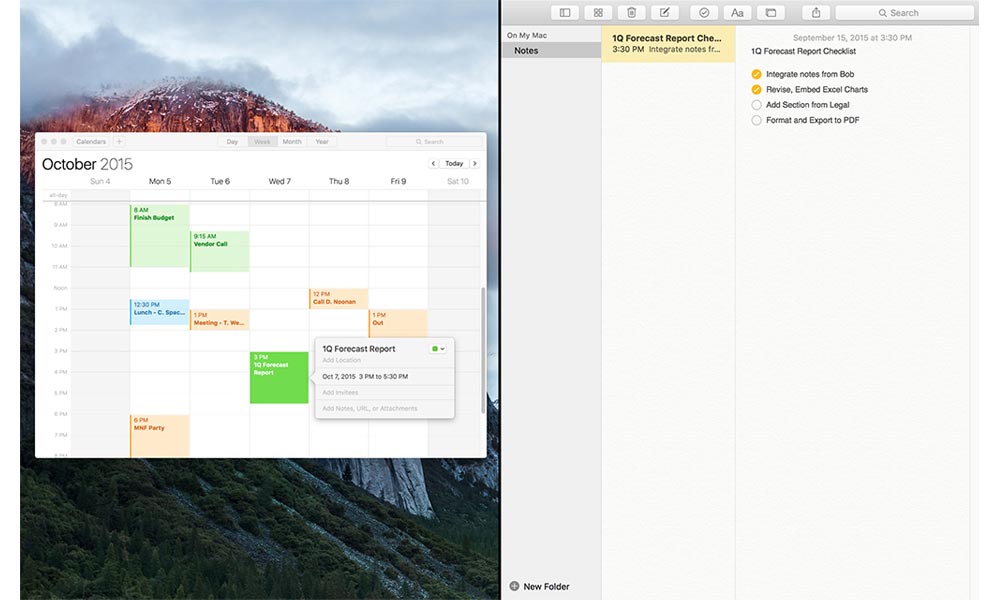
...and then dock an application window to that half of the screen. Enlarge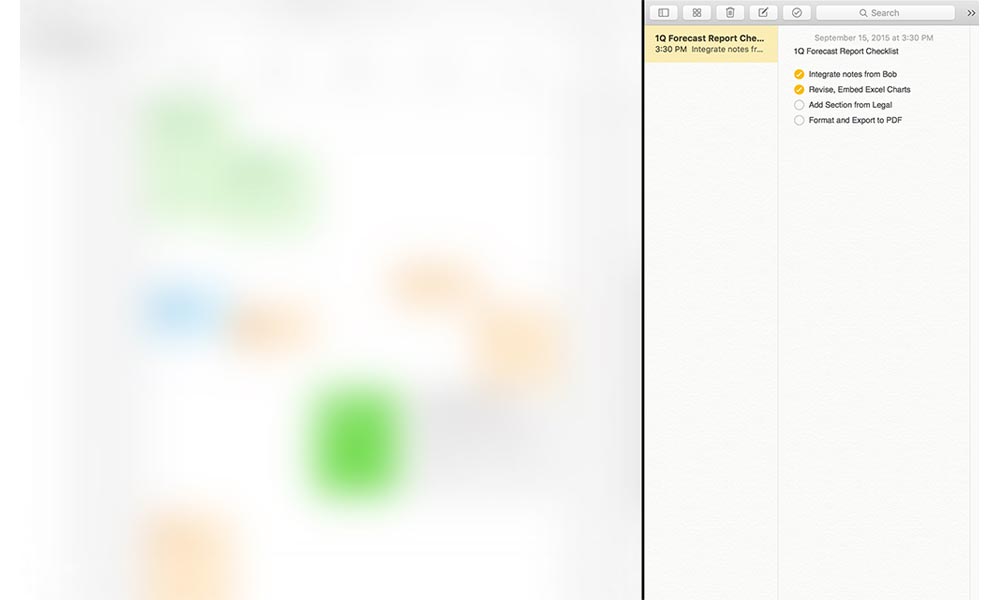
Drag the divider to re-apportion screen real estate to one app or the other. Enlarge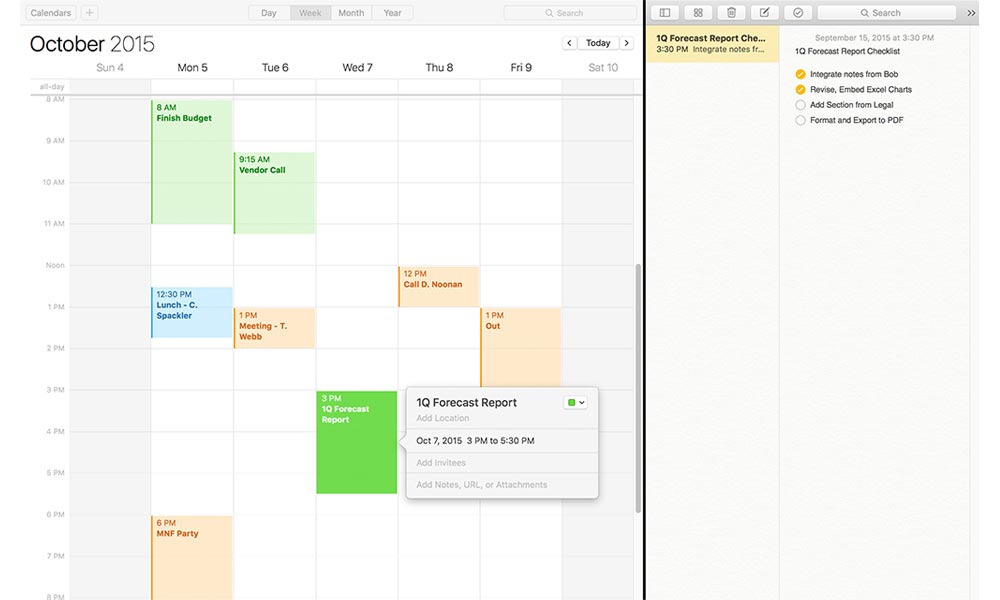
When finished both windows share the screen and work normally. Enlarge
El Capitan has a similar appearance to its predecessor (Yosemite), however there are several worthwhile refinements to the user interface that make it easier for users to interact with the system. A few of our favorites are listed below. For the purposes of illustration, the examples given assume the user is working with a mouse rather than a trackpad.
New System Font: San Francisco
A subtle but useful change, especially for users who work with a Retina® display, is the new San Francisco system font. Scanning system menus, dialogs, and button text is now easier, whether you're looking at the tiny screen on an Apple Watch® or the 5K screen on a 27" iMac. Keep in mind this new font is accessible only to the system itself; you will not find it in any of your application font menus, as it was not designed for print or web output. The first screenshot in the gallery below shows a portion of the Yosemite Apple Menu (in both standard and dark menubar mode), captured on a MacBook Pro retina screen, while the second screenshot shows the same menu from El Capitan. The default window and menu transparency is turned off in both examples.

The Yosemite system font Enlarge

El Capitan's new San Francisco font Enlarge
Mission Control
Mission Control is a feature that's been available in OS X for a few years now, and it has been further enhanced in El Capitan, allowing you more flexibility in managing your application windows. Now all windows for a given application are displayed on a single layer, rather than being stacked on top of one another. You can add a new application to an existing Space simply by dragging an application window in the central part of the screen, onto the Space's icon at the top of the screen. When you add an application to a new or existing Space, its relative position on screen is maintained within that Space. The default behavior for showing a list of Spaces now shows the text label only, saving vertical screen space. Mouse over the label to see the Space thumbnails for the active screen.
Mission Control in El Capitan is integrated with Split View.
Enlarge
Split View
One of the nicer changes in El Capitan is the new Split View feature. It allows you to split the OS X full screen mode between two related applications or application windows, hiding anything else on screen that might be a distraction. To activate Split View, open the two applications that you would like to share a full screen, mouse over the green window expander button for one of the apps, then click and hold until half the screen is highlighted. You can then drag the selected window to the left or right side and release the mouse button. This will snap the window to one half of the screen. To complete the process click the other window to expand it into remaining space, then drag the black divider to make one window larger or smaller. Keep in mind this is a form of the Full Screen workflow, so the menubar for your apps will be hidden unless you mouse over the top edge of the screen to reveal the menu of the active application. Additionally, once you've split the screen, Mission Control will automatically add a "Space" for the two apps you chose, allowing you to jump back and forth between a split view and other application Spaces.

Activating Split View allows you to highlight either half of the screen... Enlarge
...and then dock an application window to that half of the screen. Enlarge
Drag the divider to re-apportion screen real estate to one app or the other. Enlarge

When finished both windows share the screen and work normally. Enlarge
The information contained on the OWC OS Update Guide page is provided as a resource and does not include any implicit or implied guarantee. Usage environments are all slightly different and results may vary from what has been reported. Every effort is made to provide the most accurate information possible, however it is upon your sole judgment as to whether the information and content is applicable to your situation.
By use of this page, you agree to indemnify and hold Other World Computing, Inc., its parent operating company, New Concepts Development Corporation, and its officers, directors, shareholders, predecessors, successors in interest, employees, agents, subsidiaries and affiliates, harmless from any demands, loss, liability, claims or expenses (including attorneys' fees), made against OWC by any third party due to or arising out of or in connection with your use of the Site.
YOU FURTHER AGREE THAT THE SITE AND ITS CONTENT, INCLUDING, BUT NOT LIMITED TO THE OWC OS UPDATE GUIDE PAGE, ARE DELIVERED ON AN "AS-IS" AND "AS-AVAILABLE" BASIS. ALL INFORMATION PROVIDED ON THE SITE IS SUBJECT TO CHANGE WITHOUT NOTICE. OWC DISCLAIMS ALL WARRANTIES, EXPRESS OR IMPLIED, INCLUDING ANY WARRANTIES OF ACCURACY, NON-INFRINGEMENT, MERCHANTABILITY AND FITNESS FOR A PARTICULAR PURPOSE. OWC DISCLAIMS ANY AND ALL LIABILITY FOR THE ACTS, OMISSIONS AND CONDUCT OF ANY THIRD PARTIES IN CONNECTION WITH OR RELATED TO YOUR USE OF THE SITE AND/OR ANY OWC SERVICES. YOU ASSUME TOTAL RESPONSIBILITY FOR YOUR USE OF THE SITE AND ANY LINKED SITES. YOUR SOLE REMEDY AGAINST OWC FOR DISSATISFACTION WITH THE SITE OR ANY CONTENT IS TO STOP USING THE SITE OR ANY SUCH CONTENT.
For the full Site Terms, please visit: http://eshop.macsales.com/service/terms