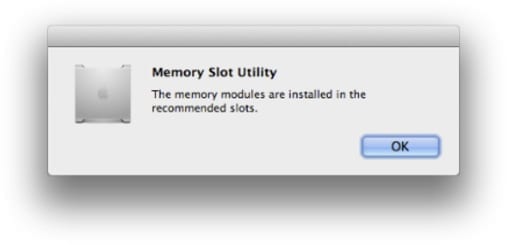
Recently, we’ve seen an increase in calls from bewildered Mac Pro users wondering why the Memory Slot Utility keeps appearing at start-up, even if they haven’t upgraded their memory.

Normally, this dialog box only shows up after you’ve changed the memory configuration in your Mac Pro. Apple has been silent as to the reason(s) why some users have this dialog pop up every time they restart, while the vast majority of users do not.
Until Apple releases a fix, we’ve identified two methods to keep this message from appearing each time the computer boots.
Method 1: Removing the Property list.
- In the Finder, open a new window.
- Either hit Command-Shift-G or select “Go to Folder…” from the Go menu in the menu bar.
- In the box that pops up on the Finder window, type in: /System/Library/CoreServices/
- Locate “Memory Slot Utility.app”, right-click on it and select “Show Package Contents”.
- In the new window, open the Contents folder and move the “Info.plist” and the “version.plist” files to another location, such as the Desktop.
- Close all the open windows and reboot the computer.
In effect, this disables the Memory Slot Utility until an OS update is run. At that time ,the update will most likely rewrite both files and the message may reappear. If it does, simply repeat the steps.
Method 2: Booting with Root User activated.
This method is the preferred way to go, as it does not disable the Memory Slot Utility, but many users are not enthusiastic about activating a Root User account. As long as these instructions are followed to the letter, there is little chance that any problem could arise.
- Select “System Preferences” from the Apple menu.
- In 10.7 and later, choose “Users & Groups”; for 10.6.x and earlier, choose “Accounts”.
- Click the lock in the lower left corner and authenticate with an “Administrator” username and password.
- Select “Login Options.”
- Click the “Edit” or “Join” button next to “Network Account Server” (it may be one or the other, depending on your system’s setup).
- Click the “Open Directory Utility” button in the lower left of the dropdown window.
- The Directory Utility window will open. If the lock in the lower left corner is closed, click on it to open and enter an administrator account name and password to unlock.
- Go to the Edit menu and choose “Enable Root User.”
- Enter the root password you wish to use in both the Password and Verify fields, click “OK”.
- Restart the computer and log into the newly created Root user just one time. The message may or may not appear, if it does click OK. In OS 10.8 you will see an option for “Other” at the login screen. Select this, the user name will be root and the password is what you chose earlier
- Restart the computer and log into your normal user account and you shouldn’t see the message any more.
At this point, you can disable the Root user account. Go through the same steps above, except that for Step 8, select “Disable Root User” instead.
Once you’ve done that, your Mac Pro will be ready to use without the annoying pop-up!


If signing in as the “root” user and confirming the prompt makes it go away, it sounds to me like some sort of permissions issue. (EG. There’s a setting someplace in one of the prefs files that’s not getting updated to say this dialog box was confirmed, because nobody except the root account has permissions to modify it.)
I had experienced this issue for long, but it was resolved just after OS X 10.7.4 update. I did not try this method.
Harry,
This is true for the vast majority of the small minority of users that have this annoying problem.
Did this, rebooted, popup still pops up. Did not have this problem with previous, non-OWC sticks. Since this is basically an attempt to keep the warning from popping up, and it doesn’t pop up on every memory configuration (I’ve tried several, only occurred when OWC installed), could it be an issue with your RAM?
IF this did work and IF a stick went bad, users wouldn’t know.
Jason,
Which method did you use?
The first method is simply a means to keep the warning from popping up. The second method I outline should correct the problem, not just mask it.