 Feeling the need for speed? Back in 2012, Apple introduced the Fusion Drive to Macs in the Mac mini and iMac, merging the speed of a Solid State Drive (SSD) with the low cost of high capacity hard disk drives (HDD). The result is that users get fast boot up and app loading, while having access to tons of storage. In this article, the Rocket Yard shows you how to create your own Fusion Drive for an older Mac to give it a major boost.
What You’ll Need:
- A Mac mini, iMac, Mac Pro or “Hackintosh” with at least two available SATA data/power ports
- OS X 10.8.2 or later
- Solid State Drive: MacSales.com offers a wide lineup of SSDs that are perfect for a Fusion Drive
- Hard Disk Drive: Take a look at the MacSales.com selection of 2.5-inch and 3.5-inch HDDs
- Familiarity with the OS X Terminal command line
Installation of Drives
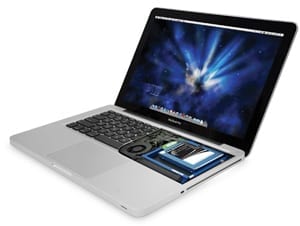
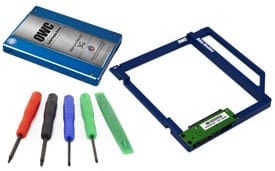
Once again, remember that you’ll need a Mac with enough internal space and at least two SATA connectors in order to put both an SSD and HDD inside. Fortunately, OWC has a library of videos showing how to open and install drives. Note that the proper tools — a spudger, guitar pick, and suction cups are necessities for an iMac teardown — and some skills are required in order to take the old drive out and install a new one.
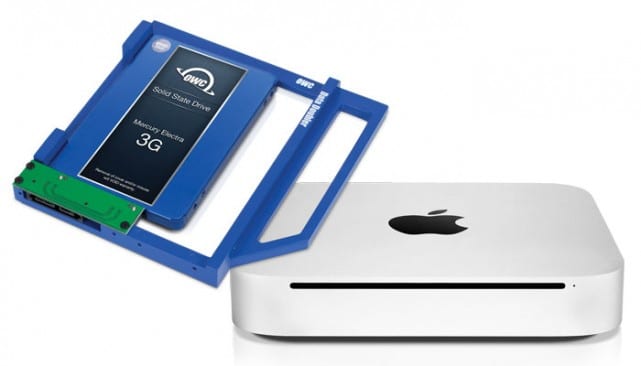
OWC’s Data Doubler mounting solutions are highly recommended for installing both the HDD and SSD that you’ll be placing into your Mac. Data Doublers are available for Mac minis and iMacs that replace the built-in optical drive (AKA SuperDrive) with a second drive, while older (pre-2013) Mac Pro models have four SATA hard drive bays with internal hard drive carriers. Adding a 2.5-inch drive to a 3.5-inch drive bay in a Mac Pro is easy using OWC’s MultiMount (photo right), and that same product can be used to put up to two 3.5-inch drives in a 5.25-inch optical drive bay.
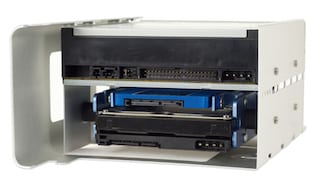
Needless to say, installation of extra drives is much easier in Mac Pro and Hackintosh devices, since they already have multiple drive bays that are easily accessible. The Mac mini and older MacBooks are next in terms of ease of upgrading, while iMacs can be difficult to upgrade.
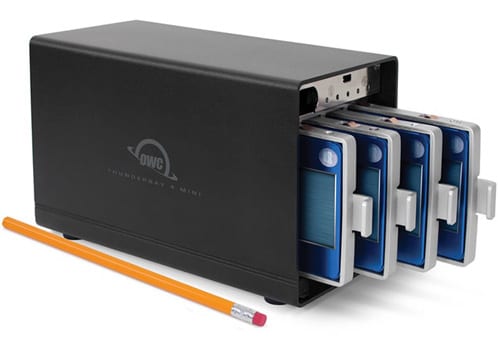
There’s also one other solution — using an external OWC ThunderBay 4 or ThunderBay 4 mini (see image below) with an SSD in one bay and a large HDD in another bay as a Fusion Drive. This is very useful for storing large iTunes libraries with many video files, as it places recent movies and TV shows on the SSD for quick retrieval and improves access time for less frequently watched videos as well.
Boot into OS X
Next, you’ll want to install OS X and boot the device into the operating system. For those who are planning on making the Fusion Drive the boot drive, you’ll want to boot the Mac from a bootable USB Install Drive with the latest compatible version of OS X. Fortunately, The Rocket Yard has articles on how to create USB Install Drives with DiskMaker X to help you with that task.
Now comes the fun part, working with Terminal!
1) Launch the Terminal app. It’s located in Applications > Utilities > Terminal. You can also launch it in seconds by pressing Command-Space on the keyboard, then typing in terminal and pressing the Return key.
2) We want to see a list of the drives installed in the Mac. Type in the following command at the terminal prompt:
diskutil list
A sample of what the output of the diskutil command produces can be viewed here:
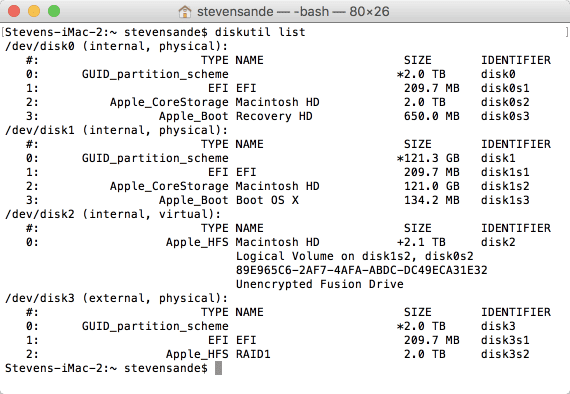
3) For each drive, there will be a mount point listed in the format:
/dev/disk#
The # is a number assigned to the drive by OS X. Find the mount points for the SSD and HDD that will make up the Fusion Drive, and write them down.
4) Next, let’s type in a command to create the logical volume group using OS X’s Core Storage. This acts like a container for the pooled drives. We’ll need the exact drive mount points we found in the last step – aren’t you glad I had you write them down? The command has the following format:
diskutil coreStorage create LOGICAL_VOL_GROUP_NAME DRIVE_1 DRIVE_2
LOGICAL_VOL_GROUP_NAME is a name that defines your storage group, while DRIVE_1 is the mount point for the SSD and DRIVE_2 is the mount point for the HDD. As an example, let’s assume that we call the group name “FUSION”, that the mount point for the SSD is /dev/disk1 and the mount point for the HDD is /dev/disk2. In that case, we’ll execute the following command in Terminal:
diskutil coreStorage create FUSION /dev/disk1 /dev/disk2
5) We’re almost there. The last command creates the logical volume where data is stored when we’re done. This command requires that we find the LVG UUID – that’s a unique identifier assigned by OS X to all storage groups. That ID is created by the command in step 4 and is displayed at “Core Storage LVG UUID”. Write down the ID.
Our final command has the format:
diskutil coreStorage createVolume lvgUUID type name size
You have the LVG UUID from the last step, and that goes into the lvgUUID spot. “type” refers to the file system that will be used, which should be the OS X native file system Journaled HFS+ . That is abbreviated for terminal as “jhfs+”. For “name” enter a name for the volume. OS X usually calls this “Macintosh HD”. The “size” is the volume size, which can be entered as numbers in GB, TB, or as a percentage. Since we want to use the entire storage pool as our Fusion Drive, we’ll enter 100%. Here’s the final command to enter (be sure to replace the lvgUUID with the one you wrote down):
diskutil coreStorage createVolume 89E965C6-2AF7-4AFA-ABDC-DC49ECA31E32 jhfs+ “Macintosh HD” 100%
6) After the command has executed, you’ll have a Fusion Drive and the volume should be viewable from within Disk Utility from your USB boot drive. Go ahead and install OS X on the Fusion Drive, selecting it as your installation drive.
Disabling a Fusion Drive
If you should ever need to replace a bad drive in your Fusion Drive or want to upgrade either the SSD or HDD drive — or both — you’ll need to disable the Fusion Drive. This simple Terminal command does the job:
diskutil coreStorage delete lvgUUID
To find the lvgUUID, just run the diskutil list command again from Terminal. Replace lvgUUID with the real identifier, and execute the command — it breaks the fused drive. Remember that all data on those combined drives is lost, so back it up first!


Have done this with 2012-13 + iMacs with a PCie and internal HDD. And also using APFS file formats.
What I’d like to try is I have a Aura Pro x2 in my motherboard and a ^g SSD as the main dive. Have you or anyone tried using them both? I don’t think this is a good idea, as it isn’t the same as an SSD + HDD combo as Fusion.
I run one the PCie Aura 2x on a higher OS X Catalina, and the lesser one still on High Sierra. Works for me as my Test iMac for repair support purposes.
One question:
Why?
If one already has a SSD installed, WHY would they want a “fusion” setup?
Chris, any chance you can write us a step-by-step for the terminal challenged? My 2010 iMac crashes on Mohave update so I’m starting over; need to reformat OWC SSD + HDD combo into APFS fusion drive.
Dan, a 2010 iMac won’t run Mohave, so no APFS Fusion drive for you. You’ll have to follow the instructions that OWC lists on this page (just scroll up). Their instructions will make a CoreStorage Fusion drive. The CoreStorage version works fine too, just more manual terminal steps to create them.
My suggestion:
Make a bootable external complete backup of your system (Carbon Copy Cloner or SuperDuper.
Boot from the external copy. Launch Terminal, and use the commands above to make your internal drives into a Fusion Drive.
Copy the contents of your external drive back to the new internal boot drive (Carbon Coy Cloner or SuperDuper).
Will do! Actually it’s a, early 2012 iMac, but it’s still not on Apple’s list of Mohave-compatible machines. Thx!
With MacOS10.14, Apple now supports APFS Fusion drives, and will convert a CoreStorage Fusion Drive to APFS as part of the OS install.
Better still, DiskUtility (command line) now has a 1-step command to create a Fusion Drive. No more messing around with odd CoreStorage commands. Just like the old method, this new method wipes the disk as part of the process, so make sure you’ve got a good copy to restore from once the conversion to Fusion Drive has completed.
Read the diskutil man page, and look at the new option “resetFusion”
I’m very Terminal-challenged. Could you provide an example of exactly how to create a Fusion drive in Mohave and APFS? The update crashed my 2012 iMac so I’m starting over with OWC SSD and 3Tb HDD.
It sounds like you haven’t successfully upgraded to Mojave yet, so the simplified Disk Utility command resetFusion won’t exist on your machine yet. You’ll have to follow the more complicated terminal commands in the OWC article.
You can actually just type “DiskUtil cs”
instead of typing out coreStorage. Also the commands aren’t case sensitive so camel case isn’t necessarily needed.
So what happens with an upgrade to High Sierra…. does the upgrade protect the do-it-yourself Mac Mini fusion drive (physical HD and SSD drive) from APFS?
I got the OWC Data Doubler kit and installed a 240GB SSD into my 2012 Mac Mini. The instructions for creating the Fusion drive worked perfectly. I now have a 740GB Fusion drive created from the new SSD and the stock 500GB spinning disk.
I used Carbon Copy Cloner to clone the original disk to a 1TB external drive. Then I installed the SSD (be careful not to accidentally unseat the SATA connector when reinstalling the wifi antenna like I did). Then I booted off of the external drive, created the Fusion drive, then used CCC to clone the external drive back to the new Fusion drive.
It definitely feels like a faster system than before, but I need to spend more time with it to get a better idea of just how much faster it is.
We have a 2011 iMac with an Extreme Pro 240 SSD and factory 1 TB HD turn-key upgrade we received from OWC back in 2012. Today we used your instructions to turn it into a Fusion Drive. Thank you, it worked like a charm.
Does this really work like a fusion drive? I.e., are frequently used blocks mapped to the SSD? I don’t see how this process creates a fusion drive in the sense people are looking for. Yes some blocks are on the SSD, but are they the right ones? If not YOU JUST WASTED A LOT OF TIME, EFFORT AND MONEY for your clickbait title.
Yes – this is the actual fusion drive setup, same recipe that Apple used. Your concern about the “right blocks” being used for fast access of commonly used on the SSD part is indeed handled by the CoreStorage subroutines. Once the fusion drive is created, CoreStorage knows what to do.
Great tutorial! But when I tried it, I got an error in the diskutil coreStorage create LOGICAL_VOL_GROUP_NAME DRIVE_1 DRIVE_2 step (error was that it couldn’t unmount a drive). This left my SSD completely inaccessible via Disk Utility in Sierra.
To solve, I had to: (1) use diskutil in Terminal to repartition the SSD, and (2) reboot in Safe Mode and then try these instructions again. All worked well this time!
Got all the way to the last step when terminal said that the uuid was not a real uuid. Re entered but no dice. Restarted off external drive and the HDD is wiped, ok, but the brand new internal SSD is just gone. Not in disk utility or the system profile. How can I get it to mount again?
Thank you for this. After putting in a new 2 TB HDD and a 120 GB SSD into the 2011 iMac, I booted from an flash drive. I followed these instructions in terminal and confirmed via Disk Util and it appeared that creating the Fusion drive worked.
However, after booting from a CCC (carbon copy cloner) the new fusion drive did not appear on the desktop. I checked in Disk Util and the fusion drive was red and I could not do anything with it. I then went into terminal and checked via diskutil list and only the 2 TB HDD showed up,. No SSD. No unique UUID.
Now what?
Thanks for the great tutorial. It would be great if there was an application with GUI to do it all with a simple click. You know, the Mac way.
But even better would be to have cheap SSD. Say, 4TB for 500 USD or so, as promised by some manufacturers for this year 2016.
Looking forward to both products (software and SSD) from OWC.