![]() One of the old Mac OS X utilities, Disk Utility, has received a makeover in macOS Sierra. The updated app now presents a streamlined appearance while retaining all of its former functionality, and it’s still useful for verifying or repairing disks. This can be useful if you’re running into odd issues with a Mac, so we’ll take a look at the process of verifying and repairing disks with macOS Sierra’s Disk Utility.
One of the old Mac OS X utilities, Disk Utility, has received a makeover in macOS Sierra. The updated app now presents a streamlined appearance while retaining all of its former functionality, and it’s still useful for verifying or repairing disks. This can be useful if you’re running into odd issues with a Mac, so we’ll take a look at the process of verifying and repairing disks with macOS Sierra’s Disk Utility.
Some of the issues you might encounter that indicate a disk that might need repair:
- Multiple apps quit unexpectedly
- A file is corrupted
- An external device doesn’t work properly
- Your Mac refuses to start up
Verifying Disks
Verifying a disk subjects it to a series of checks, all of which are done through a process called “Live Verification”. This means that Disk Utility can check the status of a disk, its catalog file, multi-linked files, catalog hierarchy and more the Mac needing to be started up with another disk drive. It does this by “freezing” the volume, so while you’re running the verification tests you may find that your Mac becomes slow or unresponsive.
To verify a disk, simply launch Disk Utility (found in Applications > Utilities), click on the drive volume you wish to check, then click on the First Aid button in the Disk Utility toolbar. Disk Utility responds by stating what it’s about to do:
 Click the blue Run button to begin the process of verifying the disk. Disk Utility informs you of what’s about to happen, specifically noting that apps will become unresponsive during the tests.
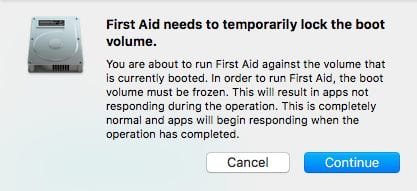
Click the blue Continue button, and Disk Utility begins to perform its battery of tests on the hard drive. The process usually runs quickly, taking only a few minutes to verify a large (2 TB) boot drive. You’ll get a notification that the First Aid process is complete (see image below), with either a green check mark indicating that everything appears to be OK or a red X indicating that there are some issues that need to be repaired. To repair a disk, it’s necessary to boot from another drive, then run Disk Utility again. We’ll cover that in the next section of this post.
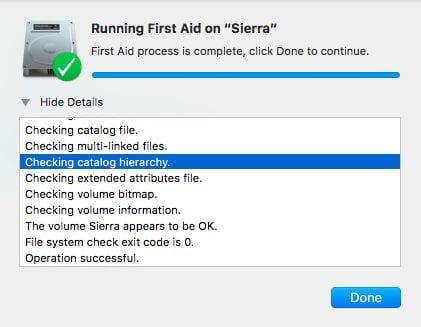
Note that the Live Verification process only works on volumes that have been formatted as “Mac OS Extended (Journaled)”. If you run First Aid on a volume that is not journaled, Disk Utility responds with an error message saying “ERROR: could not freeze volume (Operation not supported). In addition, you may not be able to interrupt the Live Verification through First Aid, so it’s best to let it continue to run until completed. Finally, an alert message that says “Incorrect size for file temp” is no cause for alarm.
Repairing a Disk
If First Aid and the Live Verification process indicate that repairs are required on a volume, it’s time to boot from another disk drive and then run Disk Utility again. Fortunately for Mac users, there’s a built-in “boot disk” in the guise of the Recovery Partition.
To boot from the Recovery Partition, restart your Mac and hold down the Option key. When the Mac restarts, you are greeted by icons for all of the available drives. In the example below, there’s a Sierra drive, a Windows drive (Boot Camp), and a drive designated “Recovery-10.12”. macOS Sierra is also known as macOS 10.12, so this is the Recovery Partition for our Sierra boot drive.

Use your mouse, trackpad, or keyboard arrow keys to highlight the “Recovery-10.12” drive, then press Return. Once the system has booted, four macOS Utilities are listed, one of which is Disk Utility (see image below). Click Disk Utility to select it, then click the Continue button. The familiar Disk Utility window appears. Click on the drive requiring repairs, then click First Aid again. As before, Disk Utility will take the volume through the Live Verification process. When it finds errors on that volume, it can now repair them since you’ve booted from another disk.

Should you require additional detail not found in this post, be sure to check these two Apple knowledge base articles:
- Disk Utility for Mac: Verify a disk using Disk Utility
- Disk Utility for Mac: Repair a disk using Disk Utility
Further reading on macOS Sierra:





What OBS means for gaming
a pdf/print button would be very useful here.
Thank you for this splendid explanation of the disk utility on sierra. I searched multiple web pages and YouTube and this one from you has no doubt been the clearest one I have found! thank you again as I have now been able to find out how to verify disk et cetera with the new disk utility
pls help me what i do if there is not Recovery-10.12
Will this erase all of my data on my computer or will it be intact? Also after I choose a different drive to use while the original one is being repaired , how do I switch back to the drive I just fixed? Will it automatically switch back after I restart? Thank you.
An article on using Sierra’s disk partitioning would be useful. The old interface was straightforward but the new one ……
Hi, Richard. Here’s an article we have just finished: http://blog.macsales.com/38191-rocket-yard-guide-using-macos-sierra-disk-utility-to-partition-erase-drives
Does Drive Genius 4 sork with Sierra?
Drive Genius 4 certainly works with Sierra. I use it on a daily basis.
Thanks, that’s what I was hoping for
thx for the info good to know