

 A few weeks ago, The Rocket Yard ran an article detailing the many services that will be removed from macOS Server in the near future. Today, I’ll discuss how to bring back one of those services — web hosting — using both the Apache web server that is built into macOS and the full MAMP suite.
Apache Web Server
Most Mac users don’t realize it, but macOS comes with its own built-in web server. Apache is an open-source web server that has been available since 1995, and as of 2016, it was the engine behind 46% of all websites and 43% of the top million websites in terms of traffic.
Having a web server built into macOS is perfect for those who want to share information in a small workgroup or set up and test sites on a development web server before deploying them to an internet server. These instructions show you how to set up Apache server in macOS High Sierra. You’ll need to have some knowledge of the Terminal app and how to run command line programs, an understanding of web servers, and a familiarity with the vi editor.
To begin, we edit the Apache configuration file as root:
sudo vi /etc/apache2/httpd.conf
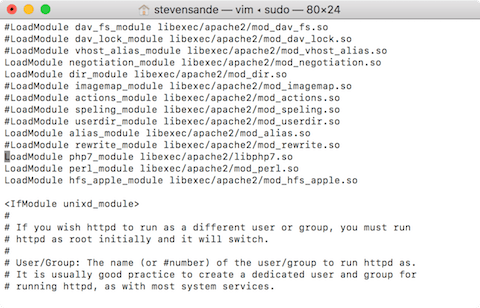
A web server is relatively useless without a server-side scripting language with which to handle interactions; the most popular languages are PHP, Perl, and Python. In this example, we’ll enable PHP and Perl. To do so, you’ll need to uncomment line 176 of the configuration file. In the vi editor, you can do this easily by typing 176G to go directly to line 176. Next, type an x over the # at the beginning of the following line to delete the # comment marker:
#LoadModule php7_module libexec/apache2/libphp7.so
We want to do the same to be able to run Perl scripts, which is in line 177 of the configuration file. Use your arrow key to go down to the beginning of the next line, then type the x over the # to delete the comment marker. The configuration file should then looks something like this around line 176 (see screenshot below):
To save your changes in the editor, type :w!
We still need to enable personal websites by uncommenting line 173, so type 173G and press return, then type an x over the # to delete it. The same must be done with line 513 of the file — type 513G and press return, then type an x over the # to delete it. Now we’ll save these two final changes and quit the editor by typing ZZ.
The last command just enabled a file named http-userdir.conf, and we now need to edit it: In Terminal, enter:
sudo vi /etc/apache2/extra/httpd-userdir.conf
In this configuration file, we need to uncomment line 16. Type 16G and press return, then type an x over the # to delete it. Save and exit by typing 16G.
Up until Mac OS X Lion, it was possible to share websites with a local workgroup and create personal websites with a click; to publish web pages, you simply put your html files into a Sites folder. Now we have to do a lot more work. Let’s manually create a Sites folder in Terminal and make a small test file so we know our web server is working.
Enter the following commands:
mkdir ~/Sites
echo “<html><body><h1>Welcome to my site</h1></body></html>” > ~/Sites/index.html.en
Next, we need to make sure that we have a user configuration file. To create one, type in
sudo vi /etc/apache2/users/<your short user name>.conf
Where <your short user name> is your Unix short user name. Don’t know what that name is? Look at the top of the Terminal window and you’ll see a name listed — that’s the short user name. In my case, it’s stevensande, so I’d enter
sudo vi/etc/apache2/users/stevensande.conf (don’t use this for YOUR configuration file!)
In that configuration file we want to enter the following (cutting and pasting into vi works):
<Directory “/Users/<your short user name>/Sites/”>
AddLanguage en .en
AddHandler perl-script .pl
PerlHandler ModPerl::Registry
Options Indexes MultiViews FollowSymLinks ExecCGI
AllowOverride None
Require host localhost
</Directory>
Once again, remember to replace <your short user name> with your short user name. Type ZZ to save the new configuration file and quit the editor.
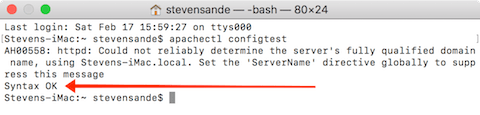
If you’ve made it this far… congratulations! Now let’s check our configuration of Apache by running the following command in Terminal:
apachectl configtest
You’ll probably get a warning message that says “http: Could not reliably determine the server’s full qualified domain name” along with how to resolve that issue; since this is just for a local web server, ignore that warning — what you do want to see is the last line: Syntax OK.
If everything is fine up to this point, you’re ready to start up Apache. If any of the configuration file syntax is incorrect, you’ll receive warnings on what needs to be fixed.
At long last, we’re ready to launch the Apache httpd service:
sudo launchctl load -w /System/Library/LaunchDaemons/org.apache.httpd.plist
To see our one line web page, launch Safari or your favorite browser and enter http://localhost/
You should see:
It works!
To see your user home directory, enter http://localhost/~<your short user name>, once again replacing <your short user name> with your Unix short user name. It should say:
Welcome to my site
Should you decide to shut down the Apache service, there’s a simple one-line Terminal command to do so:
sudo /usr/sbin/apachectl stop
Making life easier with MAMP
That was a lot of work to get things up and running, wasn’t it? There’s a much easier way to set up a local test server! For quite a while, developers have realized that packaging Apache, MySQL (a database server), and PHP/Python/Perl was the best way to get a very powerful web server. Add “Mac” to the beginning of this, and you have MAMP — Mac, Apache, MySQL, and PHP/Python/Perl. The “AMP” distributions (LAMP for Linux, WAMP for Windows, MAMP for Mac) are the backbone of the wildly popular WordPress platform, so if you want a very complete WordPress development environment on your Mac, you’ve come to the right place.
MAMP comes in two varieties; the free MAMP solution for a personal web server and MAMP Pro ($59), which adds additional services like email, dynamic DNS, and more. For this post, we’ll install and configure the free MAMP.
1) Download MAMP from the MAMP website
2) Open the .pkg file and follow the installation instructions to install MAMP to your Mac
3) Once the installation is complete, you’ll find two folders in your Applications folder — one for MAMP, and another that is a 14-day free trial for MAMP Pro. Open the folder named MAMP and launch the MAMP app. You’ll see something that looks like this screenshot:
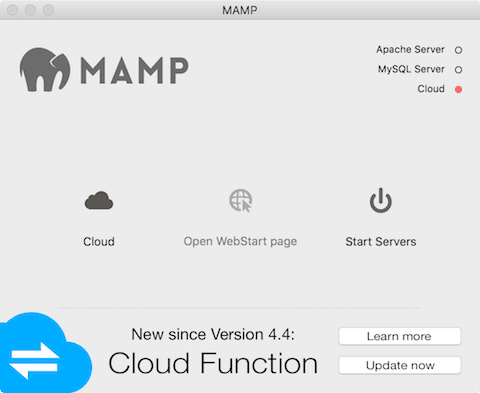
4) Click the “Start Servers” button.
MAMP will start both the Apache and MySQL servers, then launches a webpage that confirms that your MAMP installation is complete (see screenshot below):

The “My Website” link shows an empty page, but you can change that by placing an index.html file into the htdocs folder found in the MAMP folder. It’s easy to change the Document Root directory by going to MAMP > Preferences > Web Server.
Note that MAMP Pro also brings “Extras” to the table; these are packages designed by the MAMP team to install quickly and bring added functionality. Remember my comments about WordPress? There is not only a MAMP Extra for WordPress, but for Joomla, Drupal and other content management systems as well.


Appreciate the effort, but this’d be a lot more useful to a broader audience if instead of…
“We still need to enable personal websites by uncommenting line 173, so type 173G and press return, then type an x over the # to delete it. The same must be done with line 513 of the file — type 513G and press return, then type an x over the # to delete it.”
…you told use what the contents of lines 173 and 513 would be.
This was not only great for setting up the Apache web server on my Mac, but a great vi tutorial/refresher as well.
Just to note, in macOS Sierra 10.12
– Each user already has a ~/Sites
– the line number have changed in
/etc/apache2/httpd.conf
171 LoadModule userdir_module libexec/apache2/mod_userdir.so
172 LoadModule alias_module libexec/apache2/mod_alias.so
173 #LoadModule rewrite_module libexec/apache2/mod_rewrite.so
174 LoadModule php5_module libexec/apache2/libphp5.so
175 LoadModule perl_module libexec/apache2/mod_perl.so
176 LoadModule hfs_apple_module libexec/apache2/mod_hfs_apple.so
Thank you!
I have Mamp PRO and they have little to know help when setting anything up. You need to have server experience to get this thing to work with a Vps. Your welcome to come over and do it for me. I’ll even give you $100. :) lol
Please help. I cannot get MAMP working at all. I have used MAMP successfully before so I cant figure out why there is a problem.
Installed as it should. Opens the start page. Says servers are running.
I am trying to install wordpress but I ge this error:
Not Found
The requested URL /lyourspot/wp-admin/install.php was not found on this server.
MUCH APPRECIATED
Apologies. Running High Sierra
I guess I’m lucky I haven’t migrated to High Sierra yet. There is still a Sites folder in my user folder. And Internet Sharing is still available in the Sharing preferences. That said, do I still need to set up Apache as you describe? What, if anything, is different for systems prior to High Sierra?
Of course MAMP has it’s own advantages, including PHP, Python and Perl, which are essential for backend support if a website uses any fancy scripting—beyond JavaScript. But that, along with WordPress, is beyond me at the moment.
~/Sites does not go away with upgrading to High Sierra. At least it didn’t for me. Always have a good back up or two or five before doing an upgrade! I had 3 clones and two separate Time Machine backups for my last upgrade that failed, the first time. Several backups wouldn’t boot to restore, but one Time Machine did!