Your Mac is full of secrets; special files and folders hidden away so you don’t accidentally make changes to critical system components. But Apple isn’t the only one that hides items on your Mac; some developers use similar tricks to keep important secret app files, such as licensing credentials, from being used willy-nilly.
You can get in on the secrets of hiding files and folders so that others can’t easily find them, or make use of their content, with just a few simple Terminal tricks.
Using Terminal to Hide a File or Folder
Terminal has always been a favorite app of mine, so much so that I keep it in the Dock for easy access. Terminal can be used to invoke a couple of commands that can be used to hide or unhide a file or folder.
You may have already made use of the Terminal chflags command to unhide the user’s library folder, which Apple hides by default. If you’re wondering about the user’s library, often written out as ~/Library, you can learn a bit more about it in the article: Access Your Hidden Library Folder With These Five Easy Tricks.

Let’s take a look at hiding a folder using Terminal by first creating a folder that we can hide.
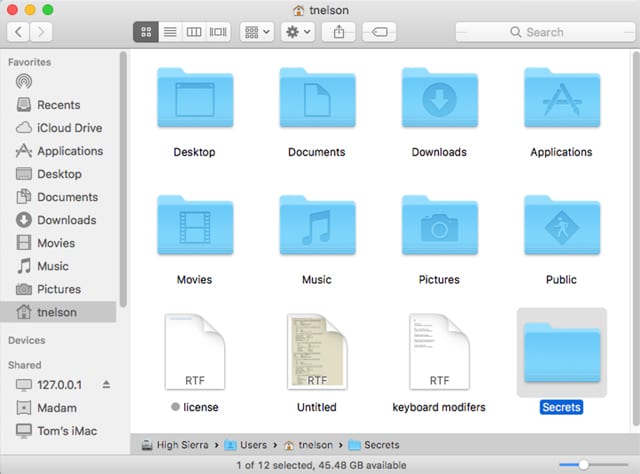
Open a Finder window, and navigate to your home folder. You can do this by selecting your home folder from the Finder sidebar.
Within the home folder window, either right-click in an empty area and select New Folder from the popup menu, or select New Folder from the Finder’s File menu.
A new folder will be created, and the name (untitled folder) highlighted. Enter a new name for the folder, such as Secrets.
With the Secrets folder created, it’s time to make it disappear.
Launch Terminal, located in /Applications/Utilities, and arrange the Finder and Terminal windows so that you can see both of them.
In the Terminal window, enter the following at the prompt:
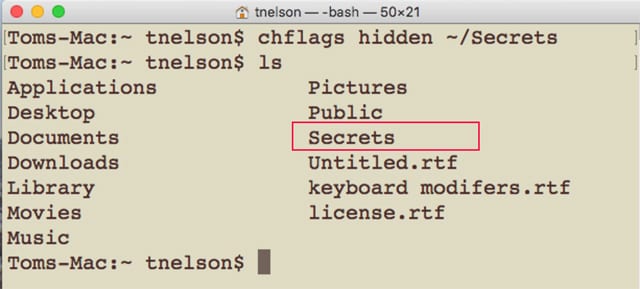
chflags hidden ~/Secrets
Hit the Enter or Return key.
The Secrets folder should disappear from the Finder window.
The Secrets folder wasn’t deleted; it simply had a flag changed that told the Finder not to display it in a Finder window. The folder is still right where you created it.
We can bring it back by typing a magic word or two in Terminal:
chflags nohidden ~/Secrets
Press Enter or Return.
The Secrets folder is back.

That’s not the only Terminal method for making a file or folder disappear. You can also make a file or folder disappear by prepending a period to its name. If we change the Secrets folder name to .Secrets the folder will become invisible to the Finder.
Alternatively, you can use the Terminal mv command, which is designed to move a file or folder to a new location, but can also be used to change a file or folder name.
In the Terminal window, enter the following:
mv ~/Secrets ~/.Secrets
Press Enter or Return.
Just as before, the Secrets folder becomes invisible in the Finder.
You can make it visible again by using the mv command to remove the period from its name.
In the Terminal window, enter:
mv ~/.Secrets ~/Secrets
Hit Enter or Return.
The Secrets folder is now visible within the Finder.

With both the chflags and the mv Terminal commands, you’re able to make a folder and all of its contents become invisible in the Finder. You can also use the same commands on a single file, if you wish. But since the Terminal commands we mentioned require knowing the pathname to the item, it’s a good idea to just use a single folder to hide one or more items within. That helps simplify the process of remembering the required pathname when it’s time to make the items visible.
Hiding a File or Folder is Only for Casual Security
Using Terminal, you were able to hide the Secrets folder from prying eyes – or were you? The answer is, you only hid it from those who were casually using the Mac and not actively examining the system for hidden items. With either of the Terminal methods, it would be easy to uncover the hidden Secrets folder using tools that come with the Mac.
Terminal will happily show hidden files in a directory just by using the list command (ls). Go ahead and give it a try. Hide the Secrets folder using the chflags command. Once hidden, enter the following in Terminal:
ls
Press Enter or Return.
Terminal will list all items in the current directory, including the hidden Secrets folder. This is because Terminal, as well as a few other utilities, will ignore most, if not all, file flags.

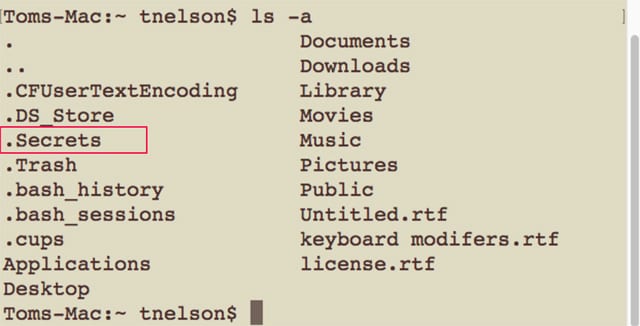
On the other hand, if you use the mv command to change the Secrets folder name to .Secrets, the Terminal ls command won’t show the Secrets folder. Success! The Secrets folder has been hidden. Well, not quite. Try the ls command again, this time with -a appended to it:
ls -a
-a instructs the ls command to list all items within the directory, so once again, the .Secrets folder shows up.

There are other ways to list the Secrets folder when it’s hidden. Many apps can reveal the Secrets folder in an Open dialog box. To see how this works, launch TextEdit, located in the /Applications folder.
The Open dialog box should appear when you launch the app; if not, select Open from the File menu.
In the Open dialog box, press and hold Command, Shift, and Period. The dialog box will now display any hidden items.
If you already know the pathname to the Secrets folder, you can force it to be displayed in a Finder window by using the Finder’s Go menu and selecting the Go to Folder menu item. In the dialog box that opens, enter the pathname to the Secrets folder, and then click the Go button.
The Secrets folder will open, displaying its contents in a Finder window.
Why Use Terminal to Hide a File or Folder
We’ve seen that while using Terminal to hide a file or folder isn’t the most secure method, it’s easy to do, and can provide adequate protection for casual use. It may be just the thing for preventing accidental access to sensitive documents by other family members. It’s also an easy way to keep files from accidentally being deleted or moved about by other users of your Mac.
If you do decide to use Terminal to hide a few files or folders, I recommend using a single folder located in your home directory to keep all hidden items in. That may seem like an easy way for someone else to find a hidden item, but it also ensures that you can find it. It’s easy to remember where you hid something this week, but what about next year? I also recommend not naming it Secrets.
If you need a bit more security, you can create an encrypted disk image to contain important items, and then hide the disk image using Terminal. You can use the methods outlined in the article: How to Create Encrypted Disk Images with Disk Utility to Protect Private Data.
Using an encrypted image file, along with using Terminal to hide the encrypted file, can be a pretty good way to ensure files you don’t want others to know about are safely hidden, and should they be discovered, their content can’t be seen. Just make sure you remember where you hid the files.
Spotlight Can Reveal Some of Your Secrets
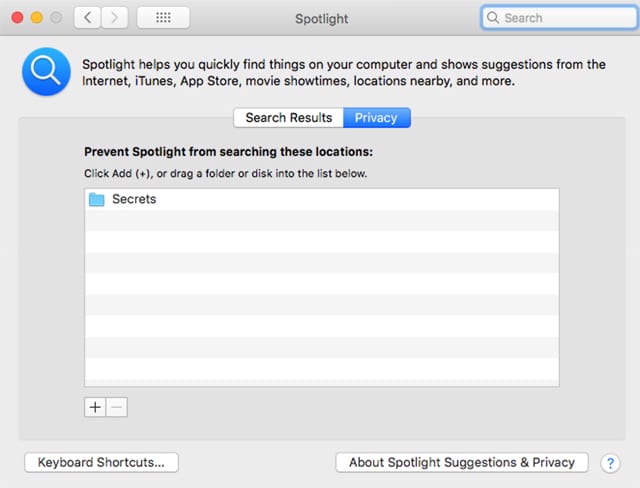
Spotlight will normally index the items you add to your Secrets folder, which could lead to them being discovered accidentally in a Spotlight search. You can either add the Secrets folder to Spotlight’s Privacy list using the instructions found in the How to Exercise Control Over Spotlight Indexing article, or you can hide an encrypted disk image, whose content can’t be indexed by Spotlight.

It’s a bit of a catch-22 as to which is the better method. Adding the hidden folder to the Spotlight Privacy list ensures its content won’t be indexed, but the hidden folder is now listed in Spotlight’s Privacy list.
If you hide an encrypted disk image, its content won’t be indexed by Spotlight, but the encrypted disk image name will be available in a Spotlight search results.
Final Thoughts
The methods we outlined here for hiding files and folders makes use of standard Mac file system services. As a result, experienced users who are well versed in using a Mac could gain access to your hidden data.
If you need to securely protect files, the use of an encrypted disk image to protect a number of files may be a better alternative. You can also use FileVault to encrypt all of the data on a startup drive.


