![]() The Mac OS is chock full of hidden areas where data, information, or features have been secreted away from Mac users. One of these clandestine locations is the users library folder, commonly written out as ~/Library/.
The Mac OS is chock full of hidden areas where data, information, or features have been secreted away from Mac users. One of these clandestine locations is the users library folder, commonly written out as ~/Library/.
What’s In Your Library?
Although hidden, the users library folder contains quite a lot of useful information. This is one of the places where apps tend to keep any necessary support files. It’s also a preferred location for preference files used by apps to customize their user interface to meet your needs.
The ~/Library folder may also contain logs, preference panes, printers, screen savers, and fonts. Essentially, the users library folder can contain any application- or service-related information that is specific to a user. As an example, consider the Safari browser. It stores individual preference files in each user’s library folder. This allows each user to customize Safari independently of the others, without requiring multiple copies of the Safari app to be installed.
Why Hide the ~/Library Folder?
The users library folder hasn’t always been hidden. It used to be just another folder in a user’s home directory, readily available from the Finder. That changed when Apple released OS X Lion, and the ~/Library folder was banished from the Finder.
We don’t know Apple’s reason for removing the ~/Library folder from sight, but we can guess: Apple support was tired of calls from users complaining about various apps no longer working, or acting strangely. In many cases, tech support was probably able to trace the problem to app support files in the users library folder being deleted or manipulated without authorization, so to speak.
Hiding the ~/Library folder was an easy, and effective, solution.
How Is the Library Folder Hidden?
The file system used in the Mac OS supports various flags, which are ways to indicate special attributes of a file. One of these is the hidden flag. Set the hidden attribute to true on a file or folder, and it will no longer be displayed.
How to Unhide the ~/Library Folder
If you set the hidden attribute to false for the ~/Library folder, it will become visible in the Finder once again. It’s really that simple, at least in concept. Turns out there are many ways to regain access to the ~/Library folder, so many in fact that we’ll only look at a few of the available methods to unhide the library folder.
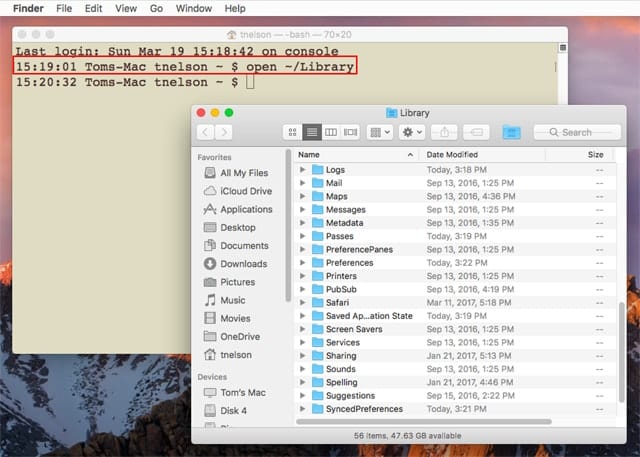
Open in Terminal
The Terminal command “open” will open a file or folder in the default app. Since folders like the ~/Library folder use the Finder as the default app to open them, you can use the open command as shown below:
Launch Terminal, located in the /Applications/Utilities/ folder.
At the Terminal prompt, enter:
open ~/Library
Press return or enter.
A Finder window will open, containing the contents of the ~/Library folder.
Use the Go to Folder Command
The Finder includes a command that will open any folder on your Mac, provided you know the pathname to the directory.
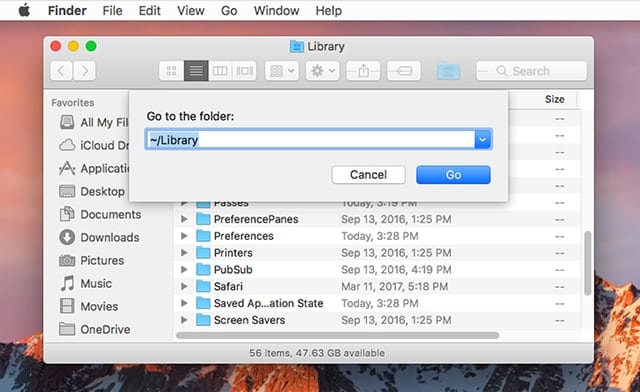
Either open a Finder window, or click on the Desktop to make it the frontmost app.
From the Finder’s Go menu, select Go to Folder.
In the dialog box that opens, enter:
~/Library
and then click the Go button.
The ~/Library folder will open in a Finder window.
Just an Option-Click Away
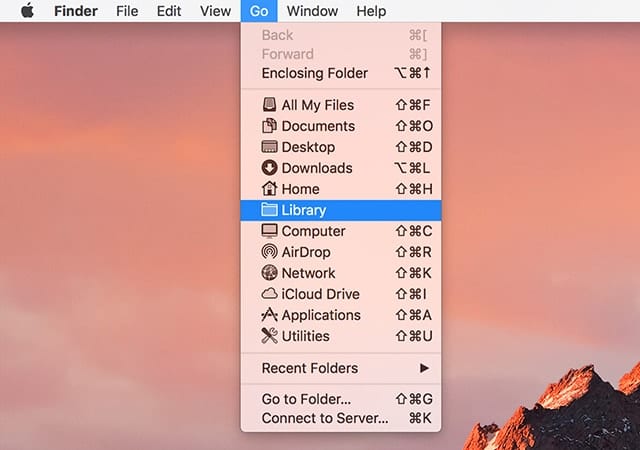
With the Finder as the frontmost app, move the cursor to the Finder’s Go menu.
A list of common folders, such as Documents and Downloads, that you can quickly jump to will be displayed. If you hold down the Option key, the Library folder will be included in the list.
Select the Library folder from the list (while holding down the Option key), and the Library folder will open.
Permanently Unhide the ~/Library Folder
So far, the methods we’ve mentioned provide you with access to the hidden ~/Library folder without actually making it visible; that is, changing the folder’s hidden flag. The next set of methods of accessing the folder do so by changing the ~/Library folder’s hidden flag, thus making it visible all the time.
Use Terminal to Change the Hidden Flag State
Launch Terminal, located at /Applications/Utilities/.
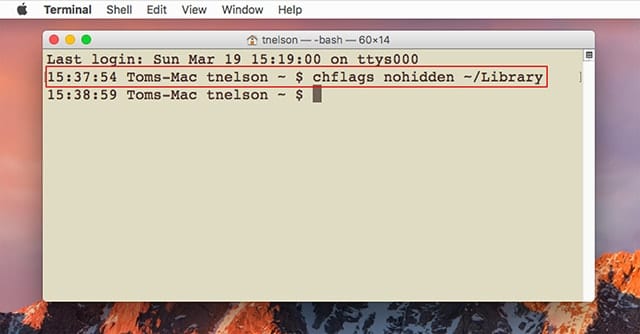
At the Terminal prompt, enter the following:
chflags nohidden ~/Library
Press enter or return.
The ~/Library folder is now visible and will remain so until you set the hidden flag. You can check this by opening a Finder window on your home folder. You should see the Library folder listed.
To hide the ~/Library folder, use the following Terminal command.
chflags hidden ~/Library
Press enter or return.
Note: If you had a Finder window open on your home folder, you may still see the Library folder listed. The Finder window needs to be refreshed to bring it up to date. One method is to simply close the Finder window, and then open it again.
Use the Finder’s View Options
Starting with OS X Mavericks, Apple included an option within the Finder app to make the ~/Library folder always viewable. By default, the ~/Library folder is still hidden, but you can change that setting by using the Finder’s View settings.
Open a Finder window on your home folder.
From the Finder’s View menu, select Show View Options.
In the View Options dialog box, place a checkmark in the Show Library Folder box. You’ll find the checkbox near the bottom of the dialog box.
As we noted previously, you may need to refresh the Finder window before the Library folder appears.
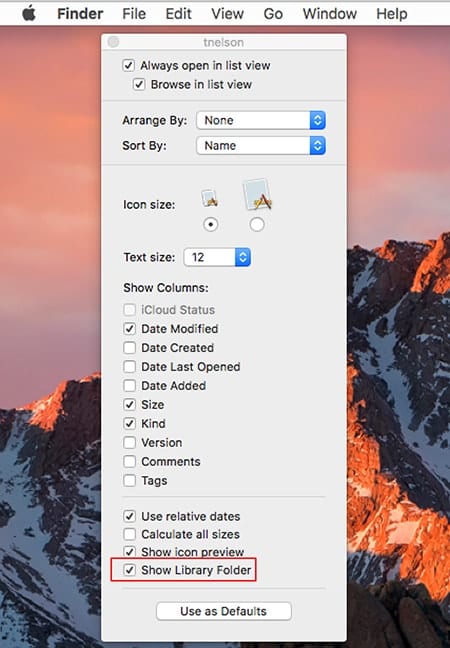
To return the Library folder to its previous hidden state, just remove the checkmark from the Show Library Folder box.
Ways to Access the ~/Library Folder Without Changing Visibility
We think the ability to quickly access the ~/Library folder is an important consideration, especially for troubleshooting app-related issues you may come across.
And while there’s nothing particularly onerous about any of the methods we’ve already described for gaining access to the ~/Library folder, it just seems that having a simple and quick method that’s only a click away is a good idea.
Add the ~/Library Folder to the Dock or the Finder Toolbar
Our last method for quickly going to the ~/Library folder requires a slight bit of preparation, but once set up, it’s by far the easiest method for accessing the folder, mainly because there’s no typing or multistep process involved, just a simple click on an icon.
Start by opening the ~/Library folder using any of the methods described above.
Open a Finder window to your home folder. You should see the Library folder listed in the Finder window.
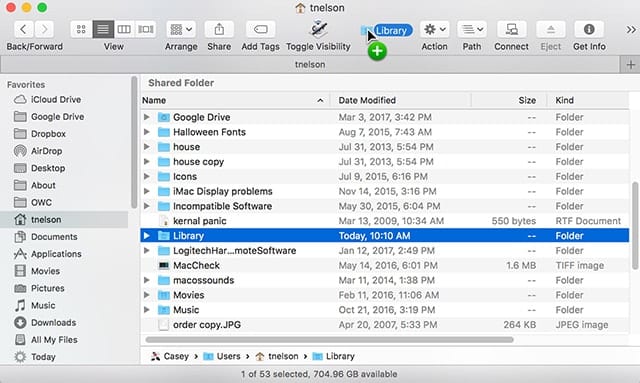
Drag the Library folder icon to either the Finder toolbar or the Dock. If you’re dragging it to the Finder toolbar, you may need to hold down the Command key while you drag the icon. If you’re dragging the Library folder to the Dock, remember that folders have to be placed to the right of the Dock divider.
There Are Many More Ways to Access the ~/Library Folder
We looked at five, six, or seven ways to access the ~/Library folder. The actual number depends on your definition of access. It’s five if you only count unique ways; it’s six if you include the last entry, which is really just a means to simplify any of the previous methods (so, it’s not unique); or it’s seven if you count the last one as two different ways.
But even with the methods pointed out here, there are still other ways you can access the hidden ~/Library folder. If you would like to help fill in all the methods, leave a comment that includes instructions. I think we should be able to come up with at least five additional methods; ten if we’re feeling a bit creative.


I accessed the Library folder with the “Option >Go+Click”, in my User folder, then dragged the Library folder to the sidebar & placed it under the “Applications” folder. I’m using Mac OS Mojave on a 2018 Mac Mini, and it was easy peasy.
The widow shown in the example above does not appear in Yosemite
However, I was able;e to display the library folder by requesting int in the GO to folder command box in the Go pulldown menu. It opens they library window, evidently complete.
Then under the File menu it allows the folder to be added to the sidebar list.
Using El Capitan 10.11.6, I had no problem directly accessing Library. It did require using the option key when selecting GO, not just using the second mouse button. It did not matter that it was in Column or List view as others have said.
Show View Options does not work in column view and in any case it shows the enclosing folder instead of the selected folder. I guess that is a macOS bug.
Thank you for this. It works even in Canada!
Thank you it helped a lot have been trying to find the hidden links library
The “Show Library Folder” is not visible in my OS Sierra v 10.12.3
Can you be more specific? Which of the Terminal commands is causing an issue in Yosemite? I’ve gone through all of the Terminal tricks in this article while using the Yosemite operating system and have not had an issue.
Tom N.
For the “Show Library Folder” option to appear in the Finder’s Show View Options menu, you have to first make sure the Finder window is displaying the contents of your home folder.
If you open a Finder window on any other directory, or you access the Show View Options item from the Desktop, you will not see the Show Library Folder option because the Library folder is not located in the directory you are viewing.
Tom N.
Does not have that option in El Capitan:
In the View Options dialog box, place a checkmark in the Show Library Folder box. You’ll find the checkbox near the bottom of the dialog box.
The Terminal technique doesn’t apply in Yosemite–the list of options is not there.
Can you be more specific? Which of the Terminal commands is causing an issue in Yosemite? I’ve gone through all of the Terminal tricks in this article while using the Yosemite operating system and have not had an issue.
Tom N.
Is there any way in the terminal (for example, an option on the ls command) to view the setting of the hidden flag?
You can use the ls command with the following switch -aOl. This will display the list in long format which includes the permission set, file owner, and extended attributes. You should see the word hidden after the file owner is the file is hidden.
Tom N.
Thank you. This is very useful. I have discovered that this displays other “secret” flags like “compressed.”
Thank you, thank you.
I had actually asked Apple Technical Support how to unhide the Library folder, and they were either unable or unwilling to tell me.
Open “Cocktail.” Select the “Interface” menu item. Select “Finder.” Check the “Show user Library directory” box. This is a permanent enable; probably sets the “no hidden” flag.