Disk Utility’s Restore function can be used to copy the content from one volume to another. In this respect, it’s similar to the process of cloning a volume, and indeed, the Restore function can be used to create bootable clones. But if this is your primary reason for using the Restore function, I recommend the use of dedicated cloning apps, such as Carbon Copy Cloner or SuperDuper, that have a great deal more features that are highly serviceable in the cloning process.
The Restore feature can also be used to copy disk images to a target volume, restore an image of your startup volume, or simply copy the content of one volume to another.
We’ve already covered the basics of using the Restore feature for cloning in the Rocket Yard article: Tech Tip: How to Use the Restore Feature of Disk Utility to Clone a Drive.
In this guide, we’re going to look at how Disk Utility’s Restore feature has changed in macOS High Sierra; specifically, the new support for APFS containers and volumes, and how they bring new capabilities as well as limitations to how you restore data from one storage device to another.
What Hasn’t Changed in the Disk Utility Restore Function
The basic concept remains the same; you use Disk Utility to select a destination volume from the sidebar, and then choose a source to copy from. Once the copy (Restore) starts, the destination device is unmounted and erased, and the content from the source is copied to the new location. Once the copy is complete, the destination is mounted, and you’re ready to make use of the information.
Restore can also make copies of disk images, as well as just about any device that can be mounted on the Mac’s Desktop. This means you can make copies of just about anything you wish, including creating archives of videos from your camera’s flash drives before you perform any type of edits, creating clones before upgrading an OS or important app, and just as important, being able to return to a known good state should something befall an upgrade.
Warning: The destination volume you select from the sidebar in all of the restore processes outlined below will have all of their contents erased. Make sure you have valid backups before trying any of the restore instructions.
Restore Basics: Copy a Volume
Launch Disk Utility, located at /Applications/Utilities.
Select a destination volume formatted with the HFS+ file system from the Disk Utility sidebar.
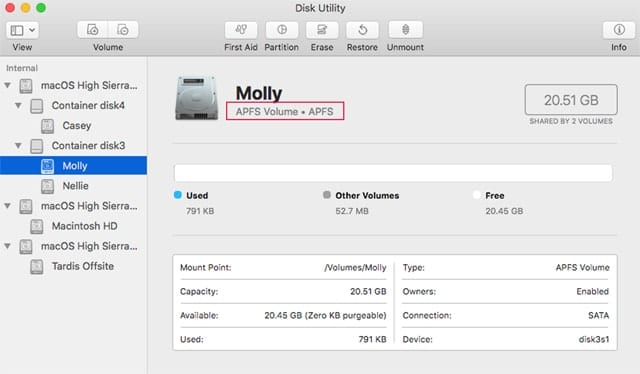
You can tell the format by looking at the description just below the device’s name in the main Disk Utility panel. As an example, when I select my startup volume it shows up as a standard HFS+ volume: Macintosh HD SATA Internal Physical Volume, Mac OS Extend (Journaled).
APFS volumes, on the other hand, will say Volume Name APFS Volume . APFS (or they could say APFS Encrypted).
With an HFS+ volume selected as the destination, click the Restore button in the toolbar, or select Restore from the Edit menu.
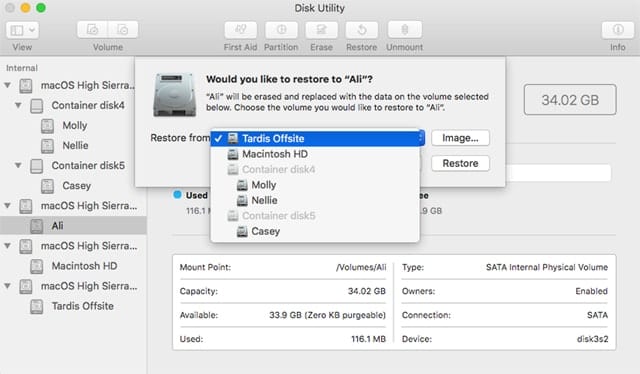
A sheet will drop down asking if you would like to restore to “the selected device name”? Just below is a description of what will occur, including a warning that the destination device will be erased during the process.
From the dropdown sheet use the dropdown menu to select a source to be used to copy data from.
When you’re ready, click the Restore button.
The restore process will start and a new sheet will appear with a status indicator. When the copy is complete, the status indicator will have filled up and you can click the Done button.
Restore Basics: Copy From a Disk Image
This process follows the same steps: select a destination volume from the Disk Utility sidebar, and then click on the Restore button in the toolbar.
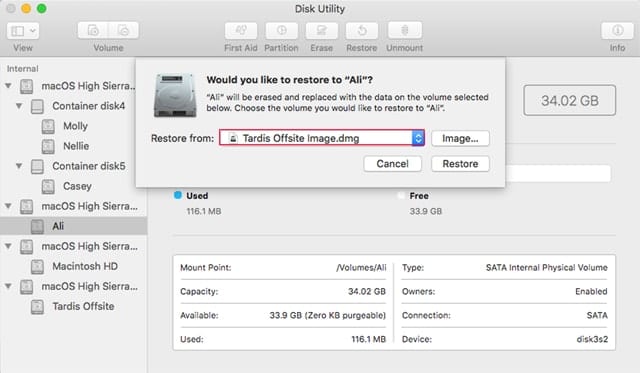
At this point, the Restore dropdown sheet is asking you to use the dropdown menu to select a source. Instead of using the dropdown menu, click the Image button just to the right of the menu.
A standard Finder Open window will appear; navigate to the disk image file you wish to use as the source. Disk Image files usually end in .dmg. Once you locate the disk image, select the .dmg file and click the Choose button.
The Restore from dropdown menu will now contain the image file name.
When you’re ready, click the Restore button.
The restore process will begin, displaying its status bar. When it completes, you can click the Done button.
Restore Basics: Copy an APFS Volume
So far, we’ve looked at restoring when the source volume is formatted as HFS+. In this example, we’re going to select an APFS volume as the source, to see how the process works.
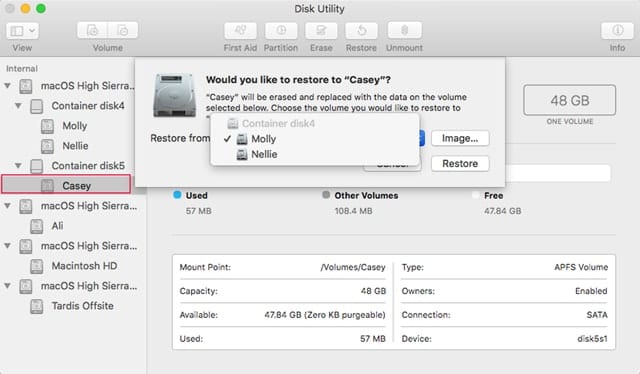
In Disk Utility’s sidebar, select an APFS volume. You can verify that it’s an APFS volume by reading the volume description in the main panel.
With the APFS volume selected, click the Restore button in the toolbar.
In the sheet that drops down, use the dropdown menu to select a source for Restore to use.
You may notice that only APFS volumes are being displayed in the menu’s list. Restore in Disk Utility can only use devices formatted with APFS as sources for copying to APFS formatted volumes.
Select an APFS formatted source, and then click the Restore button.
Disk Utility will display the process sheet. When the copying is complete, click the Done button.
Restore Basics: Copy APFS Disk Images
When the destination is an APFS formatted volume, only APFS formatted disk images can be selected as the source. Otherwise, copying an APFS disk image works the same way.
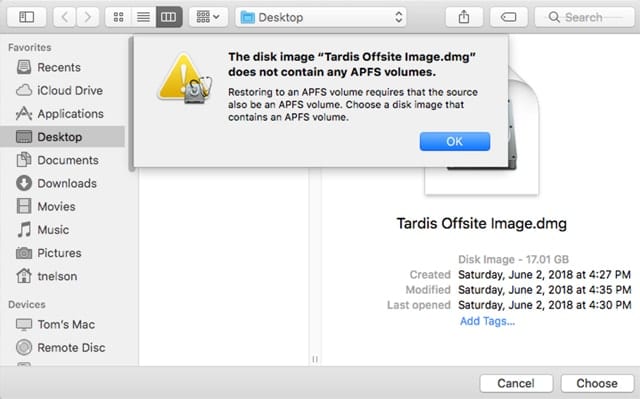
Select an APFS formatted source in the sidebar.
Click the Restore button in Disk Utility’s toolbar.
In the dropdown sheet, click the Image button.
Navigate to the APFS disk image you wish to use, and then click the Choose button.
The disk image name will be placed in the Restore from: dropdown menu.
When you’re ready, click the Restore button.
The status sheet will drop down, displaying the copy progress. When it’s complete, click the Done button.
Restore Advanced: Copy to Containers
Disk Utility doesn’t support using the Restore function to copy the content of a container, including any volumes it may contain. However, you can select a container as the destination for restoring.
When you select a container to restore to, all of the volumes within the selected container will be erased and a new volume containing the content of the selected source will be created.
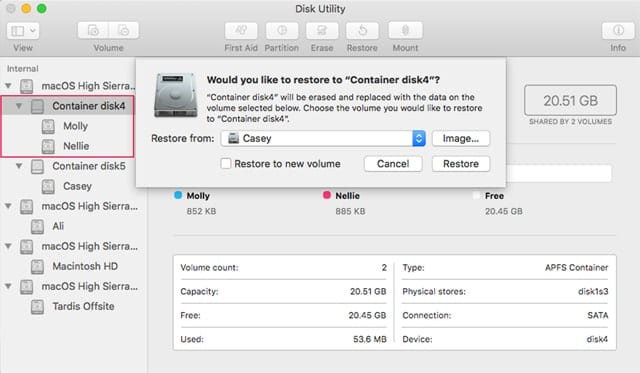
In Disk Utility’s sidebar, select a container as the destination for a restore.
If you’re only seeing volumes in the sidebar, you can alter the sidebar settings to view containers as well by clicking on the View button in the Disk Utility toolbar and selecting Show All Devices.
With a container selected in the sidebar, click the Restore button in the toolbar.
Use the Restore from: dropdown menu to select a source for the restore. When the destination is a container, you can select any type of volume as the source, including those formatted as HFS+ or APFS.
You can also use the Image button to select a disk image to use as the source.
Once you have the source selected, click the Restore button to start the erase of the destination and the copying from the source.
Disk Utility will display a progress bar. Once the process is finished, click the Done button.
Restore Limitations
Disk Utility’s Restore function has a few limitations that may not be apparent right away. Many of these limitations are caused by the Disk Utility app itself, and not the underlying file formats being used. You may find the use of dedicated cloning apps a more versatile choice for making copies of volumes and disk images.
- When you’re restoring to an APFS volume, the source volume must also be formatted as APFS.
- When you’re restoring to an APFS container, the source volume can be any supported format, including APFS and HFS+.
- An APFS container can’t be used as the source, which prevents you from restoring multiple volumes at one time.
- Using an APFS container as the destination will cause all data within the selected container to be erased; this includes all volumes the container may house.
Common Errors and Troubleshooting
Disk Utility’s Restore feature generally does a good job, and the copying of data should go off without a hitch, providing you pay attention to the limitations mentioned above. Beyond those limitations, the most common problem you’re likely to encounter will be displayed with the following cryptic message:
Restore process has failed. Click Done to continue.
At this point, do not click the Done button; doing so will dismiss the error message as well as a log that contains details about the problem, which you can use to help fix any issues. Instead, click the disclosure arrow next to the Show Details text.
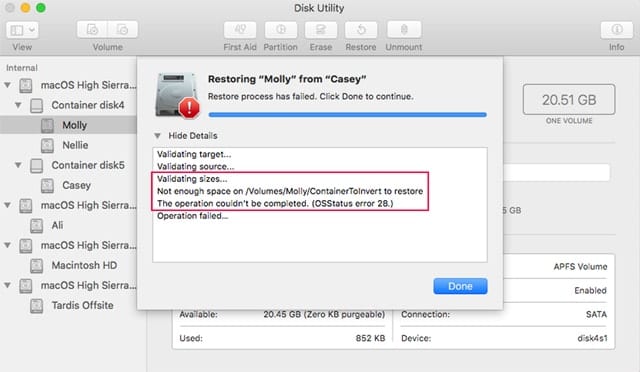
In the log that displays, the following are common errors you may see:
Size errors: Restore performs a size validation to ensure the destination is large enough to contain the source. If the log entry includes the line: Not enough space on VolumeName, then there’s a size error. Check that the size of the destination is large enough to hold all the data from the source.
Resource busy error: This error usually shows up as a log line saying: Could not restore – Resource busy. There are two common solutions; both involve ensuring that no files on the source or destination are in use at the time of the restore. In the first case, try closing all apps except for Disk Utility, and then try the restore again. If that doesn’t work, boot from another startup drive, or your Restore HD partition, and try the restore process again.
Mount or unmount errors: Within the logs there may be an error indicating failure to unmount a disk or to mount a disk. Most unmount errors are caused by files that are in active use, preventing the disk from unmounting. Try the same fixes as outlined in the Resource busy error, above.
Mount errors, on the other hand, are usually just a minor nuisance and can be corrected by selecting the volume that failed to mount from the Disk Utility sidebar, and then selecting Mount from the File menu. This should cause the volume to complete the mount process.


Does the restore function work correctly in the newest MacOS Catalina, version 10.15.6 (19G73)? I am trying to restore a non-boot volume from one mac to another, both running this newest MacOS. All APFS on USB-C MacBook Pros. Source Mac is mounted in target disk mode and the volumes are visible in the destination Mac. I can select the destination volume for restore as expected. But when I try to use the the selector to choose the source volume, it allows me to select it at first, but then strangely the selector reverts to the default source volume after a few seconds. I know this sounds strange, but yes the selector actually changes on it’s own a few seconds after I have set it. Any ideas?
Trying to use Disk Utility in 10.13 to restore my internal APFS SSD to an external APFS disk. It runs for 14 hours, doing both restore and verify, then it reports the verification failed with an ioctl error and a checksum mismatch. Any ideas?
Recently my Late 2011 MacBook Pro has messed up and now it is having problems booting up so I’ve had to go into Internet recovery mode and disk utility. My internal hard drive has the volume “Macintosh HD” which was my startup disk and is formatted in APFS and has “Used Space” with all of my files. I need to recover/ back up that USED SPACE onto my external hard drive before I reset my mac, but I dont know how to do it. I need help please?!!
I just got an OWS drive to upgrade the internal HDD on my MacBook Pro from 128GB to 420GB. Followed all the instructions here for cloning the drive (https://eshop.macsales.com/guides/Cloning-Your-Data-to-a-New-Hard-Drive) and Disk Utility totally fails.
I’m running 10.14.6 and I get the following error:
“APFS inverter failed to invert the volume – Invalid argument
The operation couldn’t be completed. (OSStatus error 22.)”
:(
Hi Brian, I would encourage you to reach out to OWC Customer Support – they should be able to help you figure it out!
i cant figure out how to create a image from a apfs volume.
i need to backup and recover a apfs volumes.
but everytime i select a volumes “create image from ist greyed out.
tips ?
Same here buddy, and I’ve just about given up. Did you ever figure it out?
I tried recovery mode, internet recovery mode, turning off encryption on the APFD volume and going back into recovery mode. Mounting and unmounting. It’s always frayed out.
Do you happen to know what the solution was to the issue seen in the last screenshot? Error saying “OSStatus error 28”?
I am trying to restore an AFPS 1tb iMac to another identical computer (with a 1tb drive) and getting this error. Can’t figure it out. Thanks!
The OSSStatus error 28 usually means there is not enough space on the destination drive to perform the restore.
It can be deceiving because the error message actually refers to the number of free blocks on the drive, so it is possible for the destination drive to be reporting enough raw room, but still not have enough free blocks.
Try making more room on the destination drive.
Tom
This error is a result of a broken size routine. It’s a fallacy of the encryption process. Basically, I barely use 1 tenth of my HDD, and the size of the SSD is listed as LARGER than the HDD total, which means I’m well within the limitations. APFS uses a CONTAINER model that doesn’t take into account the actual data contained on the disk, only the theoretical maximum, and the restore routine looks for exact copies of the block sizes. How do I know that’s the problem? MacHD shows 988.x gb SSD shows 999.7 gb. The block sizes are all that do not match. It’s a block size mismatch. That means you cannot restore an HDD to an SSD using disk utility. You have to backup your system, (most likely with time machine), then install OSX to the new drive, then pull your data from either time machine or a sync command in the terminal. In other words, you need to copy file by file and have the SSD formatted with SSD block sizes. CCC or Super Duper may have a way around this, I think they do a file by file after formatting, but so far, Apple has REMOVED any capability in Disk Utility to do anything more but screw up your work.
I wonder if High Sierra’s Disk Utility has managed to correct the problem that image operations don’t actually, well, work when run from the recovery partition. This has been true ever since they revamped disk utility to its current incarnation in 10.11. The only way to perform image operations is to boot into a full OS X environment, which is an additional step that introduces its own set of issues. Having a read-only environment that grunts can’t mess up for imaging operations is a nice feature and I was sad to see Apple throw it away.
In some ways I like the new DU but in other ways (e.g. try to create a disk with five partitions in the new DU vs. the old DU) its a colossal and monumental step towards insanity. I guess the guy who wrote the resize function was really proud of his work? I have yet to see the new DU create partitions the exact same size too, they’re always a little off, no matter how carefully you record and execute every step.
Personally I look at APFS being a boon for people who can’t be bothered to organize their files. But I wonder if maybe including a “Computers For Dummies” book with every system might have been an better long-term solution.
I’ve yet to see the upside of APFS far anyone not using a Mac laptop. That includes all current and future iMacs, which use Fusion or mechanical hard drives. And it includes, potentially, the upcoming Mac Pro which will also likely use Fusion drives, as large SSDs remain too expensive compared to the alternatives.
Apple has succeeded, though, in making the use of Mac laptops with SSDs more complex and confusing. So while they may run more efficiently with APFS, maintaining them is more difficult and less efficient. I’d call that a win/loose proposition. I guess I remember the old days when Apple was all about simplicity and ease of use. That’s no longer the case; from the new image and video formats to APFS, among other things, they’re twisting themselves into pretzels tying to justify smaller and smaller laptops. And leaving users in a fog in the process.
The new file system, image and video formats are all needed. This is for everything Apple makes.
There were similar complexity arguments about HFS+ when it first debuted.
APFS is coming to Fusion drives finally.
Mac Pro has been SSD since 2013, it would be extremely unlikely to go back to HDDs or Fusion except through add-on devices.
There are some performance negatives and other positives – it’ll get optimized over time – and hardware improvements will reduce or eliminate the negatives as well. Some of the issues listed here like size issues have required 3rd party utilities to work around always.
I’m having an issue where both drives start Os extended (journaled) but as soon as I click restore the Blank drive changes to APFS then ASRNewVomume and the restore fails…