![]() Disk Utility has long been the workhorse of choice for dealing with hard drives, SSDs, and disk images. With the advent of APFS (Apple File System) with macOS High Sierra, Disk Utility acquired some additional capabilities that allow it to work with APFS and its support for containers.
Disk Utility has long been the workhorse of choice for dealing with hard drives, SSDs, and disk images. With the advent of APFS (Apple File System) with macOS High Sierra, Disk Utility acquired some additional capabilities that allow it to work with APFS and its support for containers.
We’re going to look at how to use Disk Utility to partition drives into multiple containers, and how to add volumes to containers. If you need to partition and manage standard HFS+ volumes, you’ll find detailed instructions in the Rocket Yard guide: How to Use macOS Sierra Disk Utility to Partition, Erase Drives.
What Are Containers?
Containers are a new abstract used in the APFS system to define a storage system that can share available free space among one or more volumes. Apple calls this Space Sharing. It allows volumes that are within a common container to grow or shrink as needed, without any type of repartitioning.
Related article: How to Revert a drive from APFS back to HFS+
Containers, then, define a block of space on a physical drive that will be assigned to and used by volumes you create in the container. Volumes you create in a container can have a minimum size and a maximum size, but the actual amount of space they use is dynamically assigned from the container’s free space, as each volume within the container needs the space.
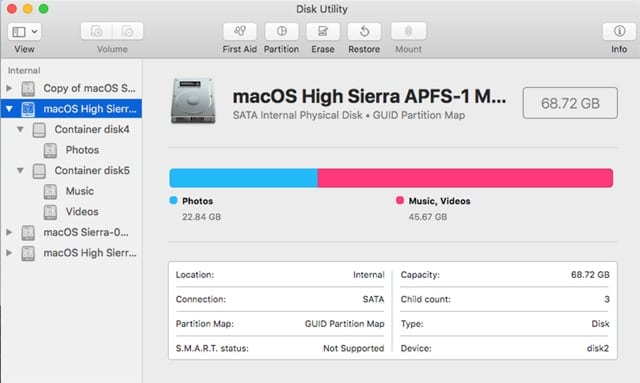
Use Disk Utility to Create an APFS Container
Containers are only supported on drives formatted with APFS. You can format a drive or convert an HFS+ drive to APFS using the version of Disk Utility found in macOS High Sierra or later.
APFS was designed primarily for use with SSDs, though it should also work with standard hard drives. But before you decide to format a hard drive to use APFS, you may want to read: Using APFS On HDDs …And Why You Might Not Want To. At the moment, Apple doesn’t support APFS being used on Fusion drives.
Before you begin this process, take a moment to make sure you have a current backup of the information on your Mac, and that the drive used for backups isn’t one of the drives that will be involved in any of the processes we will be performing. The best way to do that is to eject the backup drive and, if possible, disconnect it from your Mac.
With your backups current, you’re ready to explore the APFS file system, including working with containers and volumes.
Launch Disk Utility, located at /Applications/Utilities.
In the Disk Utility toolbar, click on the View button and select Show All Devices. You can also use the View menu to perform the same task.
To convert an HFS+ volume to an APFS volume, select the HFS+ volume on the Disk Utility sidebar. (HFS+ volumes appear just below the physical drives in the sidebar.) Once selected, choose Convert to APFS from Disk Utility’s Edit menu. A sheet will drop down asking if you would like to convert the drive to APFS. Converting to APFS shouldn’t cause data loss on the selected drive, but it’s a good idea to make sure the data on the drive has been backed up first. When you’re ready, click the Convert button.
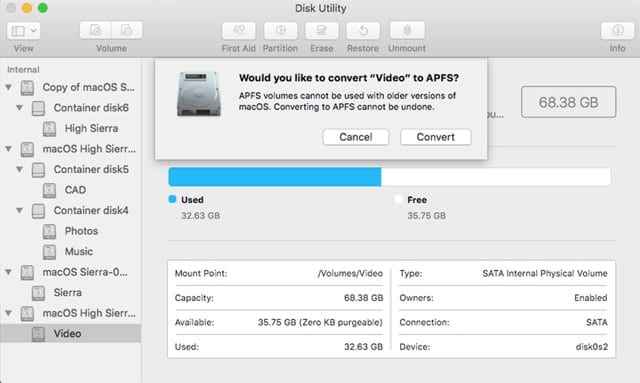
To format a drive in APFS, select the drive in Disk Utility’s sidebar. Select Erase from the toolbar or from the Edit menu. Provide a name, and then select one of the APFS formats from the Format dropdown menu. Formatting a drive will erase all of the data it contains, so make sure you have a backup of the data, if needed, before proceeding. When you’re ready, click the Erase button.
Disk Utility will create an APFS container, along with a single volume within the container.
Adding Containers
A drive formatted to use APFS can have multiple containers. Each container can have multiple volumes, and the volumes within a container share the space within their container. You can add additional containers in order to isolate one group of volumes from another and prevent volumes from sharing space. This is done by partitioning the APFS drive.
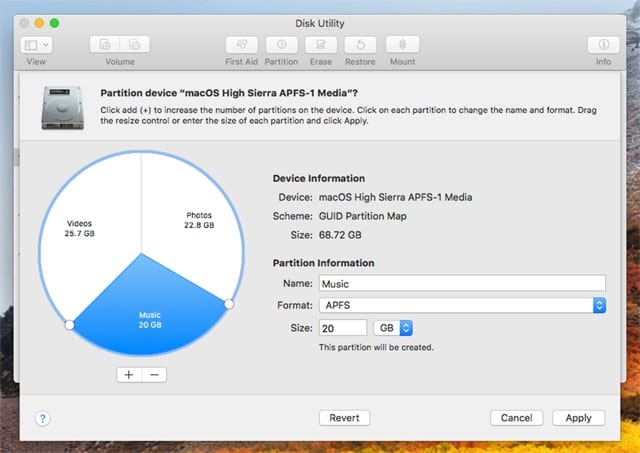
Select the APFS drive from the Disk Utility sidebar, then click the Partition button in the toolbar or select Partition from the Edit menu.
A sheet will appear asking if you wish to add a Volume or Partition the drive. Click the Partition button.
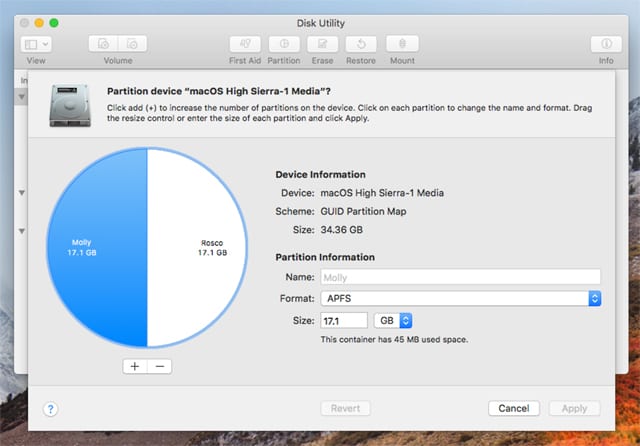
The Partition sheet will drop down. Use the plus (+) button to add a partition.
Enter a name for the partition.
Tip: Disk Utility uses the term partition, but since this is an APFS formatted drive, you’re actually creating containers.
You can add multiple partitions/containers by clicking the plus button.
You can resize the partitions/containers by dragging the anchor point on the pie chart to increase or decrease the size of a container. You can also modify a container’s size by selecting a container in the pie chart and entering a new value in the Size field. When you’re done, click Apply.
Adding Volumes to a Container
With the older HFS+ system, volumes were added to reserve space on the physical drive. With APFS, volumes are added to containers and every volume within a container shares the container’s available space.
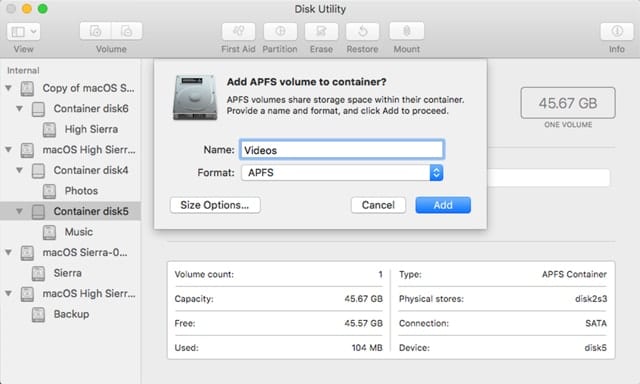
To add a volume, select the container you wish to use in the sidebar, then select Add APFS Volume from the Edit menu.
A sheet will drop down, allowing you to give the volume a name. You can add size limitations by clicking the Size Options button.
Although a volume can grow and shrink as needed within the confines of a container, you can apply reserve size and quota size restrictions for each volume you create. The reserve size defines a size the volume is guaranteed to never go below; consider this the minimum volume size. The quota size defines the largest size the volume is allowed to grow to. You can use these size restrictions to ensure a volume doesn’t expand to completely fill the available space, or that another volume in the same container doesn’t take space away from a volume that needs a minimum amount of free space.
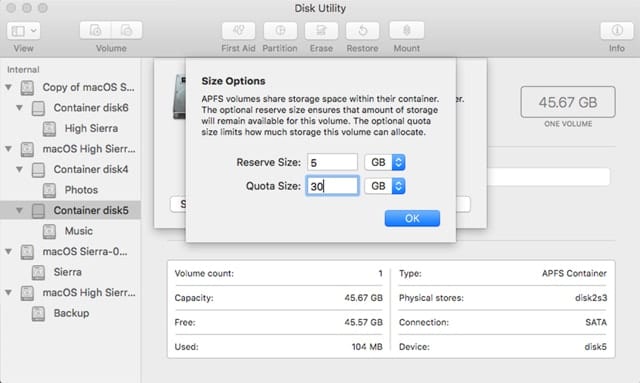
It’s not advisable to make use of the Size Options unless the volume you’re creating has a real need for them. Size options can’t be easily changed once a volume is created.
Enter the Reserve Size and Quota Size, if you wish to use these features, and click OK.
Resizing APFS Volumes
APFS volume sizes are dynamically adjusted; as a result, you don’t need to manually adjust the size of a volume. A volume will grow in size as long as there’s free space in the container and the quota size, if assigned, hasn’t been reached.
Resizing Containers
Containers on a physical drive can be reduced in size to make room for additional containers. You can’t, however, enlarge a container without first deleting the adjacent container to make room. You can also add containers or delete containers you no longer need.
The rules for resizing containers follow the same ones used for resizing partitions. You can find more information about resizing rules in the Rocket Yard Guide: Partition 101: Rules to Resizing Volumes & How to Without Losing Data.
To resize containers, you make use of Disk Utility’s Partition function.
Select the physical drive in Disk Utility’s sidebar whose containers you wish to modify.
Click the Partition button in the toolbar.
A dropdown sheet will ask if you wish to Add a Volume or Partition. Click the Partition button.
The Partition map will be displayed, showing all of the containers in the selected drive. To reduce the size of a container, click within the container on the map, and then enter a new lower size for the container. You can’t reduce a container to a size smaller than the amount of data taken up by any volumes the container has. If you need to squeeze a container down to a smaller value, you’ll have to delete one or more volumes within the container (see Deleting Containers and Volumes, below).
Disk Utility will show the new smaller size of the container, as well as display a new container made up of the unassigned space. You’ll also see a resize anchor point appear on the pie chart. You can use this to fine-tune the container size.
Once you have the container sized as you wish, click the Apply button to make the changes permanent.
Deleting Containers and Volumes
Volumes can be removed from a container by selecting the volume you wish to delete from the Disk Utility sidebar. Once selected, choose Delete APFS Volume from the Edit menu, or right-click on the volume and select Delete APFS Volume from the popup menu.
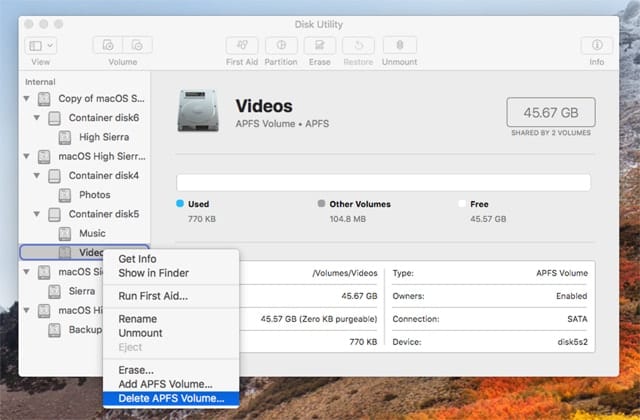
Containers can also be removed, though there is a restriction that any APFS formatted drive must have at least one container. As a result, the first container that was created can’t be removed.
Any other containers a drive may have can be removed using the Partition tool. In the Disk Utility Sidebar, select the container you wish to remove, and then click the Partition button in the toolbar. In the sheet that appears, click the Partition button.
The partition window will open with the selected container highlighted in the partition map. You can delete the selected container by clicking the minus (-) button. If the minus button is dimmed, you may have selected the first container, which can’t be deleted.
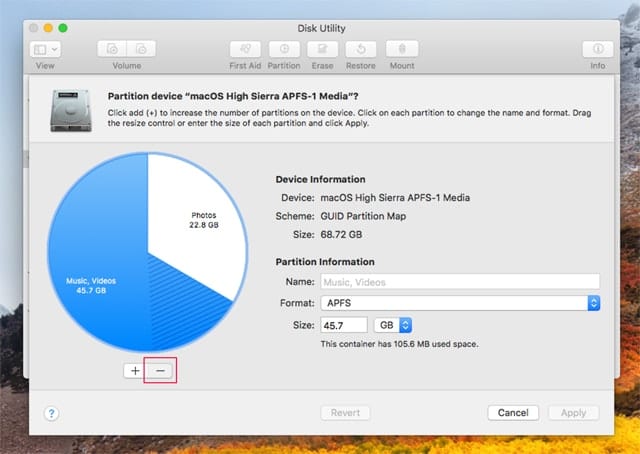
Working with APFS disks, containers, and volumes may seem a bit cumbersome with Disk Utility, but given a bit of time, Disk Utility should see a few enhancements to make working in APFS storage systems as easy as the older HFS+ system.




Tom,
Kudos on a well-written, super clear, grammatically correct, and perfectly organized piece. I feel like I now know everything I need to know about containter disks, which is such a refreshing and welcome accomplishment that many of your techie colleagues on other websites should aspire to emulate. Rocket Yard is lucky to have you.
Thank you!
Hi
my Disk Utility is “stuck” in the SHOW ALL DEVICES view and won’t toggle to the SHOW ONLY VOLUMES view.
It was ok earlier today but it has gone a bit funny now.
I am using a 2017 iMac 27″ with Mojave OS and 1TB SSD (APFS) internal drive.
I use a two external hard drives and a 1TB SSD that is just for Time Machine. These 3 drives are Mac Extended ( Journaled )
Is there a clear reason why I can no longer switch from the SHOW ALL DEVICES view to the SHOW ONLY VOLUMES view. It feels like the viewing options are stuck in SHOW ALL DEVICES.
Is there a key that I may have pressed which has locked it?
If I create an APFS formatted drive, using one container for Mojave, can I then add additional containers for the purpose of shrinking the Mojave container, and then remove those additional containers and partition that space as HFS+?
What I’m aiming at here is a portable SSD that I can use with my clients to boot both new (APFS only) macs, and older HFS+ macs.
Can I achieve this bootability using only a single USB drive?
Well, I’ll answer my own question: “Yes.” Using exactly the technique I proposed. Just did it. Now have a thumb drive that will boot virtually any Mac, as it has Snow Leopard, Yosemite, Sierra and Mojave partitions, all with repair software appropriate to the age of the OS.
Can you use different containers for different operating systems, as you might use partitions?
Yes, containers can be used to house different operating systems as well as different drive formats. A container can be formatted with the various flavors of:
APFS
Mac OS Extended (Journaled)
MS-DOS
ExFAT
Tom
thanks Tom appreciate the info.
Not sure if this thread is still monitored?? But…
I thought an APFS Container could ONLY house APFS volumes??
If you create a Mac OS Extended, MS-DOS, or ExFAT volume, you create an HFS+ partition NOT a Container??? Unless we are using the terms Partition and Container interchangeably???
Thank you so much! I was trying to merge my ssd back after using Bootcamp, but that was not obvious at all how to remove containers. So this article helped me a lot!
I did the same as told. clicked partition and then my internal drive shows two disk. one is macintosh hd and second is bootcamp, they both are under internal apple ssd option. but the partition i created shows as external> container disk2> data(partition name i gave).
I think the partition i created should be under internal but i dont know what i am missing. i bought new mac just want to use different drive so that if in future system has to be restored one partition is safe.
please help
thank you
the words quota & reserve are opaque and require the reader to psychically divine what Apple means.
Should have simply said maximum & minimum.
Why can’t Apple speak English anymore?
@Henry: It does have those sentences. Paragraph 3 describes the addition of containers. If you have a container, and two or more disk volumes within the container, you don’t have to worry about allocating space to each volume, only a minimum size. Space will be allocated to each volume as the volume fills up, from the container. This isn’t necessarily the most useful for individuals, though it can be handy to have separate “OS” and “data” volumes. But it can be very useful for people who have large amounts of storage to manage, especially when the containers may map to more than one physical disk, thanks to RAID, cloud storage, etc.
I suppose. I’m already doing this where I need to with sparse bundles.
The only place this might be really handy would be on my multi-release external boot drive that runs back to Snow Leopard that I use to boot old client machines, but I can’t use it there because those older releases don’t talk APFS.
This just smells like the “partitioning” fad all over again… people started partitioning large disks just because they could, and eventually discovered they were artificially limiting themselves when they didn’t have to, and that the best solution was just not to partition the drive (unless they needed multiple boot volumes, which was the only really valid reason to partition anything).
This is all technically informative… but what this article could have used is a couple of sentences explaining why someone would want to use these containers — what they make possible that wasn’t possible before. Not that I claim a world-class imagination, but I can’t figure out a way I could use these things to do something new and useful, or to do something I’m doing now but in a better way.
Thanks for the primer on containers. No doubt I’ll need to get used to them eventually, just as I’m accustomed to using partitions on HFS+ volumes now. But since APSF works less well on HDDs, chances are it won’t be any time soon.