![]() Disk Utility, the all-purpose tool for working with storage devices connected to the Mac, has long had the ability to create partitions and manage the resulting volumes. It has been the go-to tool for formatting a Mac’s drives, erasing data, securely wiping information, and creating multiple partitions.
Disk Utility, the all-purpose tool for working with storage devices connected to the Mac, has long had the ability to create partitions and manage the resulting volumes. It has been the go-to tool for formatting a Mac’s drives, erasing data, securely wiping information, and creating multiple partitions.
With the advent of OS X Leopard, Disk Utility picked up a much-prized feature: the ability to non-destructively resize existing volumes and partitions. Before OS X Leopard, you needed to fully back up all the data on a drive if you intended to alter the drive’s partition map in any way. That’s because changing the partitions, by adding, removing, or resizing, resulted in the loss of all data on the volume.
Thankfully, you can now resize a partition without losing data, provided you follow a few basic rules.
Resizing was pretty straightforward with OS X Leopard through OS X Yosemite, but starting with OS X El Capitan, Disk Utility underwent a user interface makeover that altered how partitions were resized.
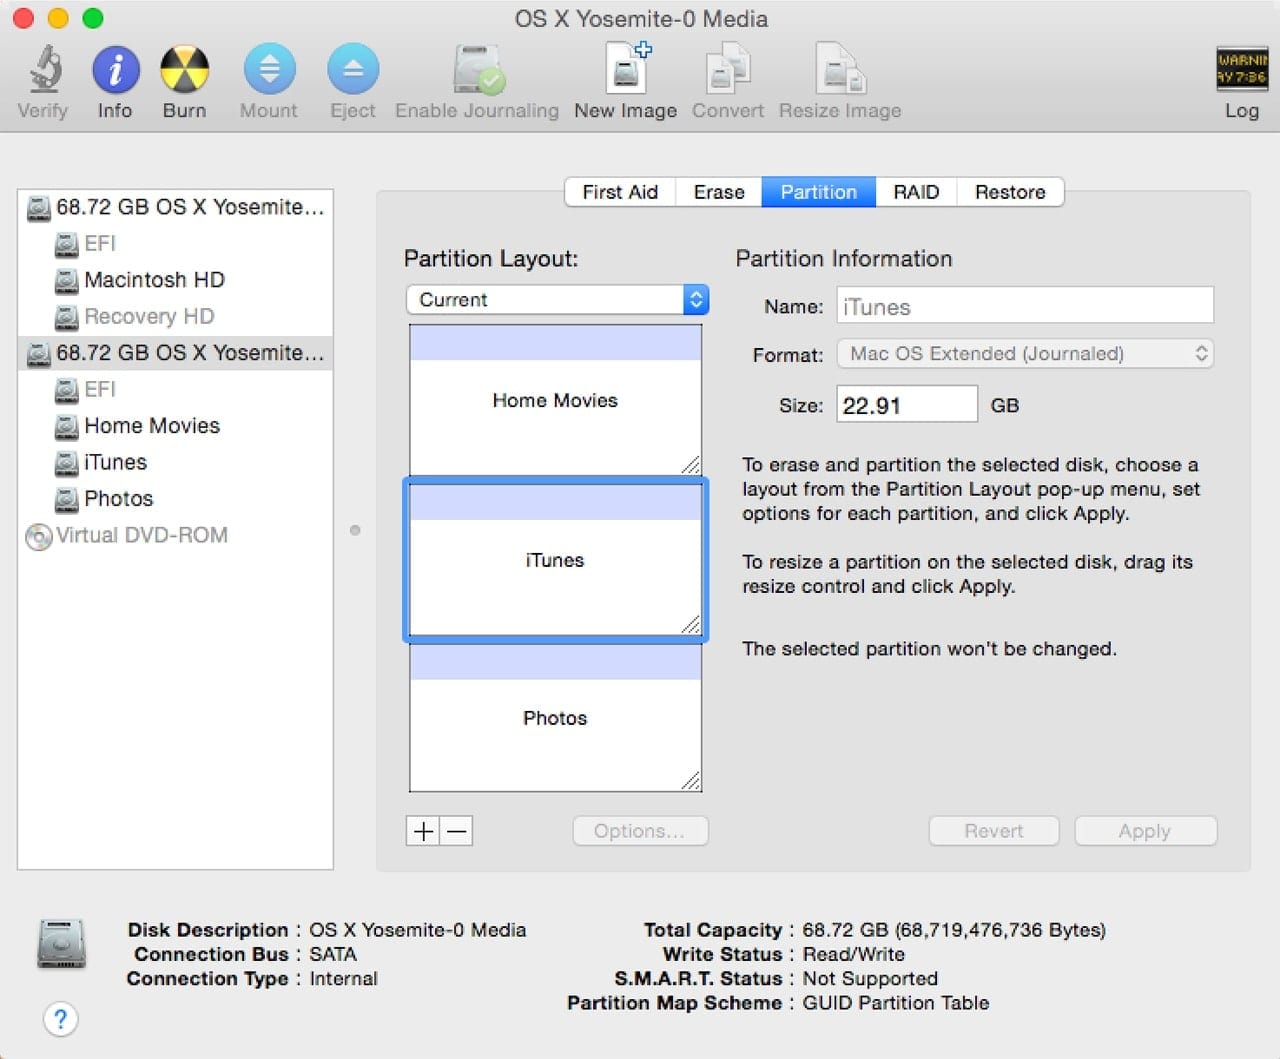
We’re going to look at how to resize a partition without losing data with the new (OS X El Capitan and later) version of Disk Utility.
The Rules of Resizing a Partition
Disk Utility can be used to resize existing partitions you may have on a disk, but there are some rules that govern whether you’ll be able to make the changes you envision. For the most part, the resizing capabilities in Disk Utility need some careful attention to details to ensure the results you want will occur. Be sure to pay attention to these rules.
Also, it’s a good idea to have a current backup. Although the basic idea is to resize a volume without losing data, it’s always better to play it safe. In addition, there are times when, because of the type of changes you wish to make, you’ll be forced to delete one or more partitions to accomplish your goals; having a backup is key to a guaranteed successful completion.
Resizing Rules
Resizing is limited to specific disk formats. Currently, only disks formatted with the GUID Partition Map support resizing.
Fusion Drives are a special case. They’re made from two separate disks: a fast SSD and a slower, but much larger, conventional disk drive. Apple allows a Fusion Drive to have up to two partitions; however, the SSD is never included in the second partition, which is made up only of the conventional hard drive. To add another wrinkle, partitions that are part of a Fusion Drive can’t be resized using the Disk Utility GUI, even though it’s possible (though very complicated) to resize using the Terminal core storage commands. Because of the complexity, we won’t be addressing core storage tricks, or resizing or partitioning Fusion Drives in this article.
Fusion Drives and Boot Camp are another special case. Removing a Boot Camp partition that is part of a Fusion Drive and resizing the remaining partition should be performed with the Boot Camp Assistant and not Disk Utility.
Some other quick rules:
- The last partition on a disk can’t be enlarged, though it can be deleted.
- Enlarging a partition requires that the partition coming after it be deleted.
- Reducing the size of a partition will cause a new partition to be created directly behind the partition you’re reducing. This new partition will be sized to fill the available space.
- Deleting a partition will cause the freed up space to be added to the partition that precedes it.
OK, with those mind-boggling rules out of the way, let’s try an example of resizing a partition using Disk Utility that encompasses many of the resizing issues you may encounter.
Enlarging a Partition That Is Running Out of Space
In this example, there’s a disk that had previously been partitioned into three equal size volumes. Originally, the idea was to store three libraries, each on their own partition: a home videos library, the iTunes library, and a photo library. After a while, it become apparent that the home videos library needed more room, due to all the movies you enjoy making, and the iTunes library was much larger than needed, while the photo library partition was about the right size, though still having plenty of free space.
To make room for a bigger Home Videos partition, use the Finder to copy the data in the iTunes partition to the Photos partition. You can now remove the iTunes partition to allow you to enlarge the Home Videos partition to meet your expected needs. Once the Home Videos partition has been enlarged, you can reclaim some of the space for the smaller iTunes partition you also need.
This somewhat complex example turns out to be a good model for the type of resizing commonly performed. It also includes many of the resizing rules, and requires moving data around, deleting partitions, expanding partitions, and recreating a previous partition that is smaller than it used to be.
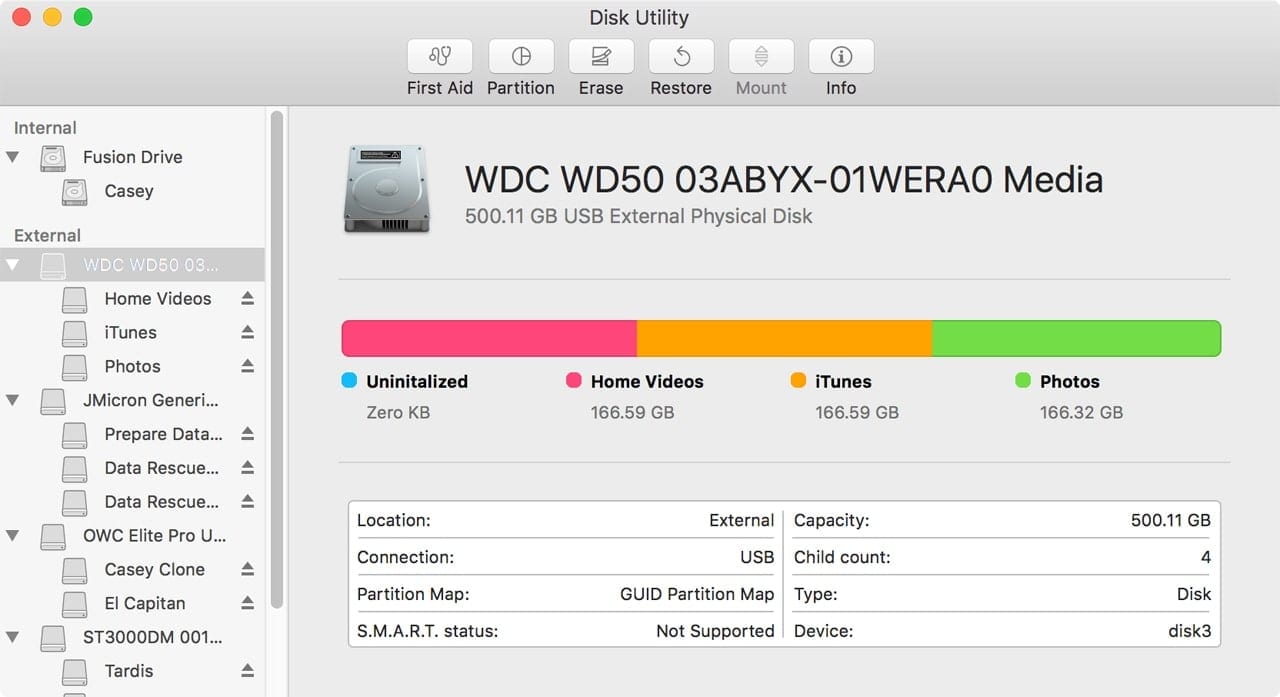
1.) Launch Disk Utility, located at /Applications/Utilities/.
2.) In the Disk Utility sidebar, select the disk associated with the three partitions.
3.) Click the Partition tab.
4.) The current partition map for the selected disk will be displayed.
5.) Select the iTunes partition by clicking once within it. The partition should be highlighted, and the Partition information panel will contain data about the selected partition.
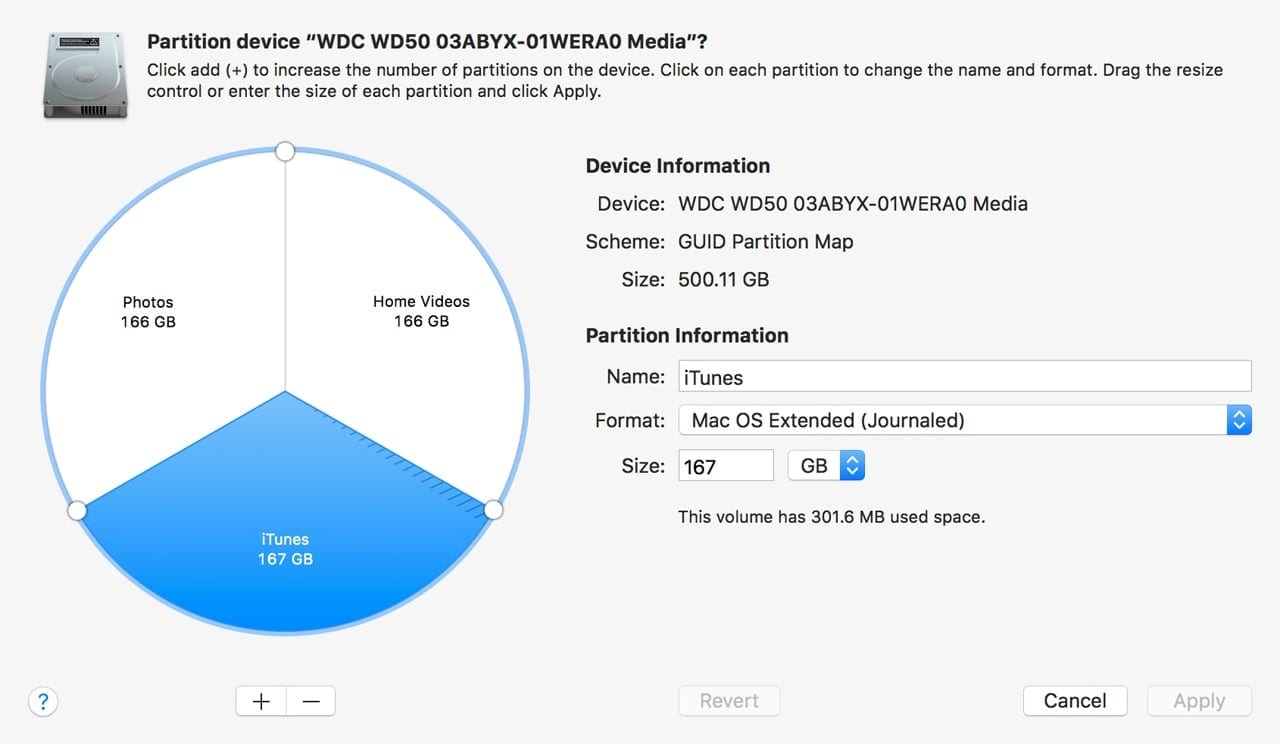
6.) With the partition selected, click the minus button (-) to delete the partition.
Note: The rules require the partition behind the one you wish to enlarge to be deleted to allow for the enlargement of the partition.
The partition map will display the anticipated results; in this case, the iTunes partition is removed, and its space is assigned to the Home Videos partition.
You could now click the Apply button to proceed, if this setup is to your liking.
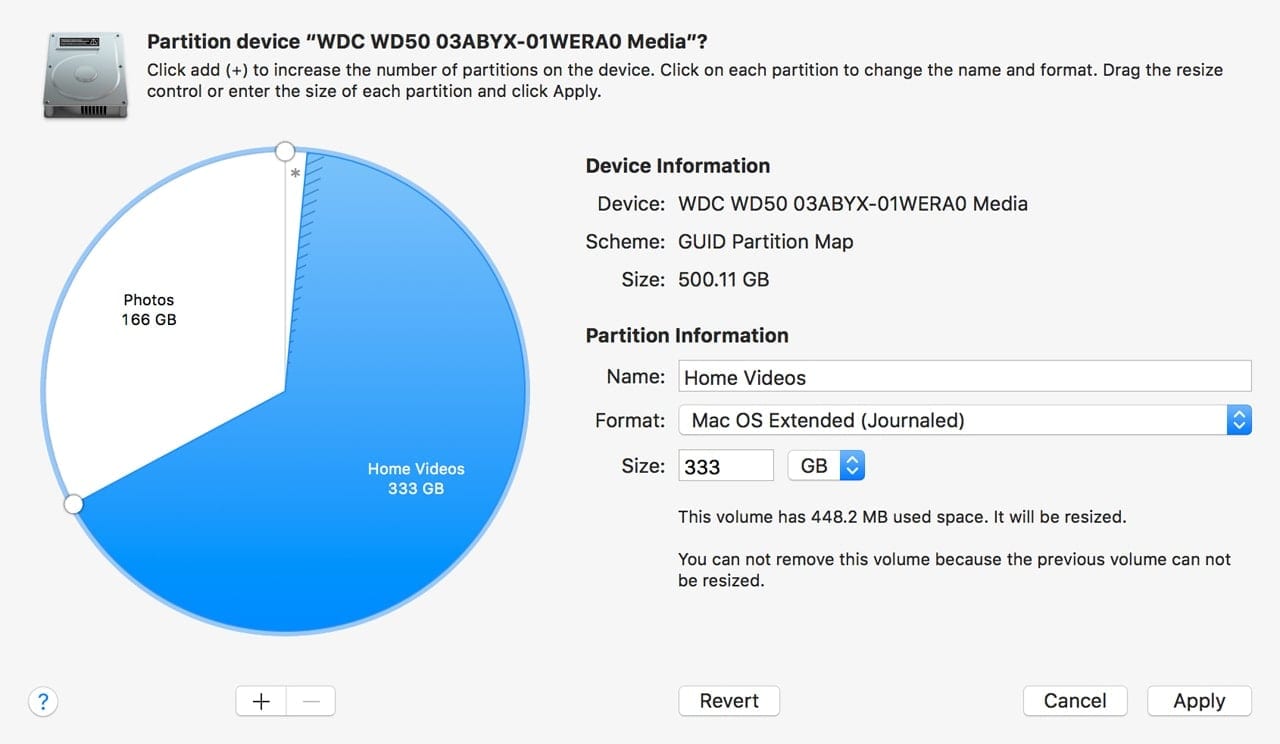
Or, you could resize the now larger Home Videos partition to make it a bit smaller, and create an additional but smaller partition for the iTunes Library.
Select the Home Videos partition, and then change the value in the Size field to a new smaller value. In my example, the Home Videos partition ended up being 333 GB, but 250 GB would be more than large enough, and would leave enough space left over for the iTunes partition. (Your numbers may vary, depending on the sizes of your drive and partitions.)
Enter 250 GB in the Size field, and then hit the tab key for the Partition map to show the expected results.
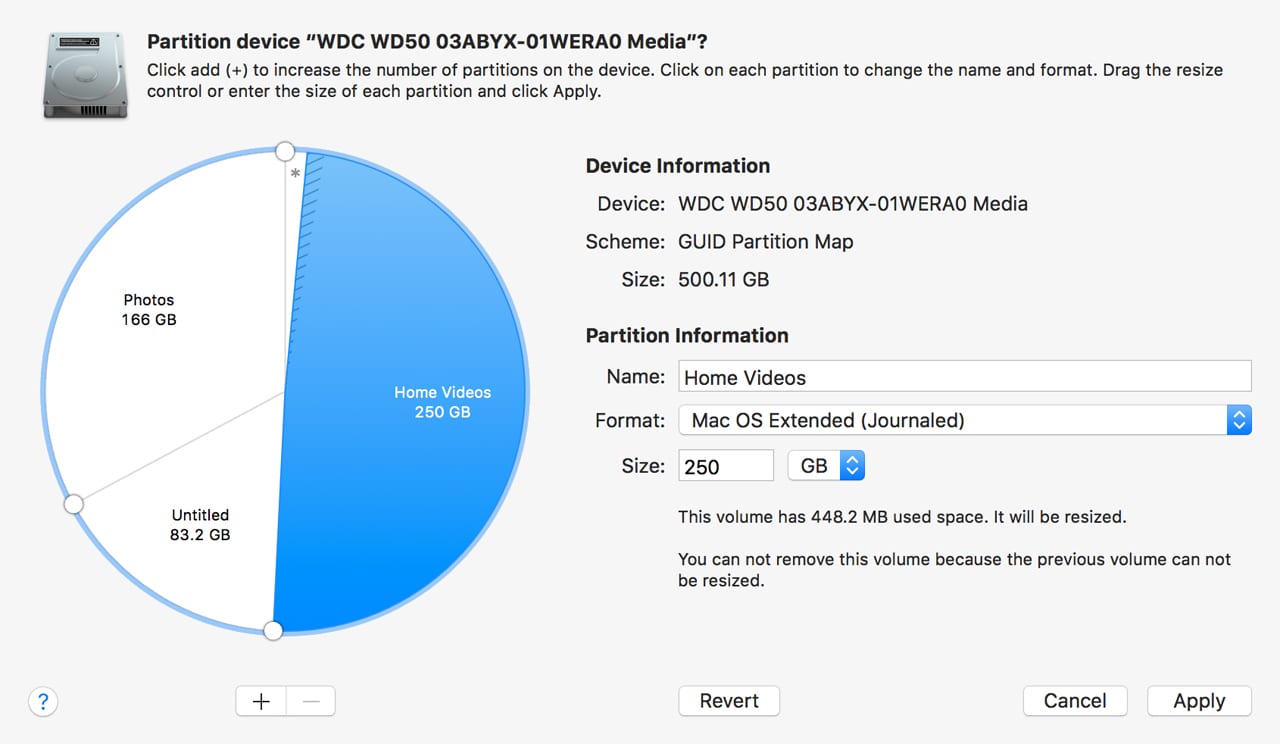
Note: The rules state that when you reduce the size of a partition, a new partition is created with the space you freed up.
Notice you now have an Untitled partition you can use for iTunes, and you also have a resize control (small white circle) on the partition map that you can use to adjust the size of the new Untitled partition, and the Home Videos partition.
Make the resize adjustments you wish, and when satisfied, select the Untitled partition.
Note: You’re resizing two partitions that have yet to be set in stone (having the changes applied). Since there’s no additional free space being created, no new partition is needed.
Enter a new name for the Untitled partition; in this example, we’re setting it back to its original name of iTunes.
If everything looks correct, click the Apply button.
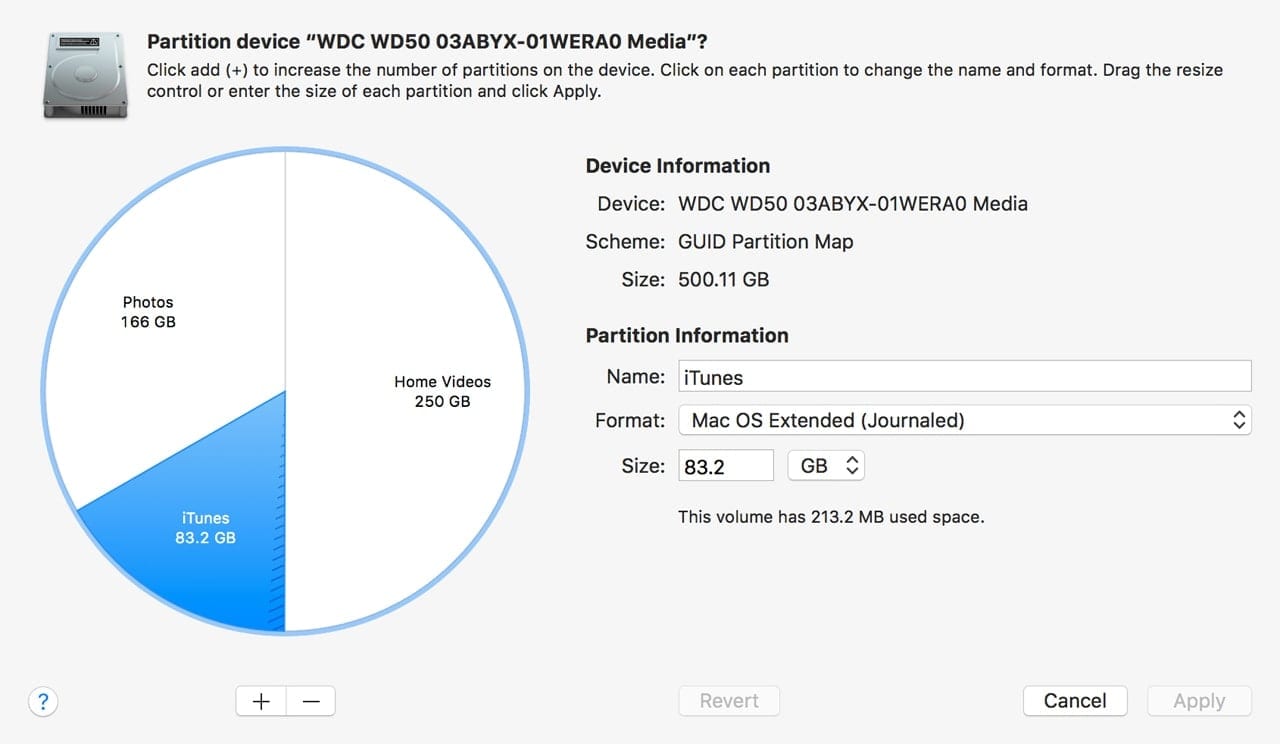
A sheet will drop down to show you the status of the partition resizing being applied. When complete, click the Done button.
Return to the Finder and copy the iTunes Library back to the now smaller iTunes partition.
Things to Come
Disk Utility’s resizing system could use a nice overhaul. There are quite a few additional capabilities supported in the underlying file system, and much more to come in the APFS (Apple File System) that is believed to be the core filing system in the next major version of the Mac OS. We hope to see a nice upgrade to Disk Utility at that time.


I am trying to resize an existing volume… Partition button is gray and is not letting me to use it to manage partitions on an external disk. Any suggestion?
I bought a SSD from OWC that I call OWCSSD on which I have the OS and necessary files. The original HD from Apple holds all users files and files necessary for the system. Originally the PATH was /Users/karl/ and so on. Now I have to change all scripts to /Volumes/macproHD/Shared/ and so on. I would like to change the system so the relative path points to the macroHD. Thanks
>
The last partition on a disk can’t be enlarged, though it can be deleted.
Enlarging a partition requires that the partition coming after it be deleted.
>
Except that with a circular display you cannot determine the sequence of partitions.
I lost 500 GB of data because Apple changed the user interface from an easy to interpret vertical bar to a “circular perimeter” graphic. It is not at all apparant whether you are supposed to move clockwise or counterclockwise. I chose wrongly.
Apple’s fetish for changing look and feel is killing their company. Don’t change the way its been done since 1986; people don’t want to constantly re-learn skills that have become reflexive.
Serious societal implications for when people start their age related mental decline. People with dementia CANNOT change their skill set; so they are locked out of technology.
It would be delusional, at best, to expect that Apple’s leadership would give much credence to the societal implications of their decisions.
After all, Apple is not a man, with a conscience. -And back when Apple was essentially one man, it was no different.
I agree. I can’t figure out how to effectively merge the second and third partitions on an external drive. It keeps doing what I don’t expect.
There are too many changes being made to perfectly good and useful user interfaces in OS X and various Apple apps, and usability is degrading IMHO.
I wouldn’t re-size a partition, buy a new HD, they are cheap!