Have you found that some websites are using text that is too small or too big, forcing you to either squint to see the text, or perform excessive scrolling to take in the entire site?
Most browsers have methods to allow you some control over how a website appears, including adjusting the size of the web page’s text and images. In this Rocket Yard guide, we’ll look at how to use the Safari browser to adjust font size and zoom levels for the site you’re currently viewing, and for all sites you view, as well as only for a specific site, whenever you stop by for a look.
Web developers spend a good deal of time designing their websites to appeal to most of their users, but it can be difficult to always get the size right, what with so many different devices and screen sizes viewing the website. If you’re having difficulty viewing text or images on a website, you can try these various tips to get a site looking just the way you like it.
Safari Zoom
 Safari has long had the ability to zoom in or out of a web page, letting you see more of the page at one time, or get in close to see details. Safari’s zoom feature normally affects both text and image sizes, but you can also choose to just expand or decrease the text size, leaving the images alone.
Keyboard zoom commands:
- Zoom in: Press the command and plus (+) keys at the same time.
- Zoom out: Press the command and minus (-) keys at the same time.
If you would like to just increase or decrease the text’s font size while leaving the images at their original size, give the following a go:
- Zoom in, text only: Press the option, command, and plus (+) keys at the same time.
- Zoom out, text only: Press the option, command, and minus (-) keys at the same time.
Note: If the zoom function isn’t working as expected with the keyboard commands, chances are the keyboard shortcuts are being used by the Accessibility preference pane, to zoom the display in or out. You can change the Accessibility settings, if needed, by following the instructions in the Rocket Yard guide: macOS 101: Using Accessibility’s Vision and VoiceOver Options.
Menu zoom commands:
- Zoom in (menu): From the Safari View menu, select Zoom In.
- Zoom out (menu): From the Safari View menu, select Zoom Out.
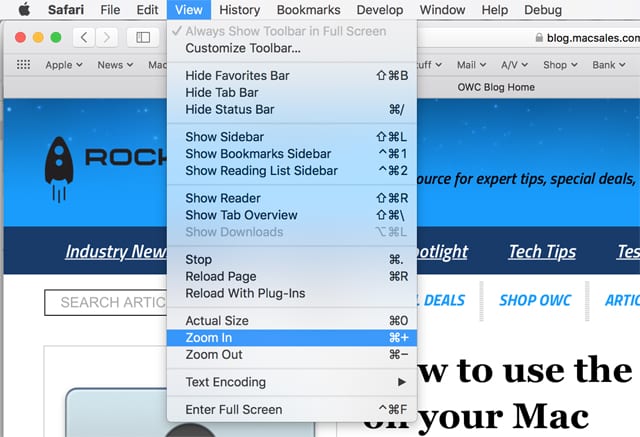
OS X El Capitan and earlier included an option in the View menu to force the Zoom command to only apply to the text on the page, leaving everything else at the original size. To set this option, do the following:
From the Safari View menu, select Zoom Text Only. This will place a checkmark next to the Zoom Text Only menu item, indicating that any subsequent use of the Zoom menu item will affect only the text on the website.
- Zoom in, text only: From the Safari View menu, select Zoom In.
- Zoom out, text only: From the Safari view menu, select Zoom Out.
macOS Sierra and later did away with the Zoom Text Only item in Safari’s View menu; instead, you can use this trick for increasing or decreasing only the text size in a web page:

- Zoom in, text only: Hold down the option key, then open Safari’s View menu and select Make Text Bigger.
- Zoom out, text only: Hold down the option key, then open Safari’s View menu and select Make Text Smaller.
Safari Toolbar Zoom Options
Safari’s toolbar does not show any zoom options by default, but you can add the zoom capacities using the toolbar’s customization options.
Open a web page in Safari, and then right-click or control-click on an empty area of the Safari toolbar.
From the popup menu, select Customize Toolbar.
A sheet will drop down, displaying a number of buttons that can be added to the Safari toolbar.
Drag the Zoom buttons to an empty place on the toolbar, and then click the Done button.
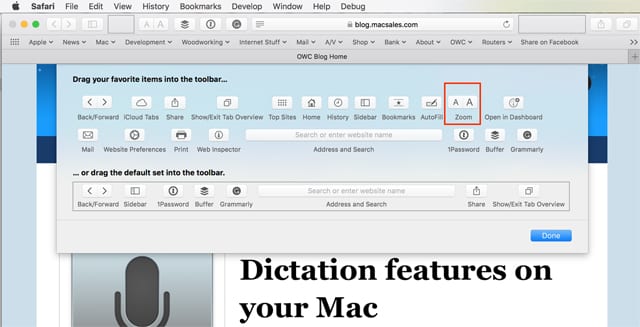
The Zoom buttons in the toolbar affect the entire webpage, increasing or decreasing the size of both text and images.
Set Zoom Levels by Website
The zoom settings mentioned above are temporary, lasting until either Safari’s history is manually deleted, as outlined in the guide: Ensuring Privacy When Using the Mac Safari Browser, or the history for the website becomes out of date.
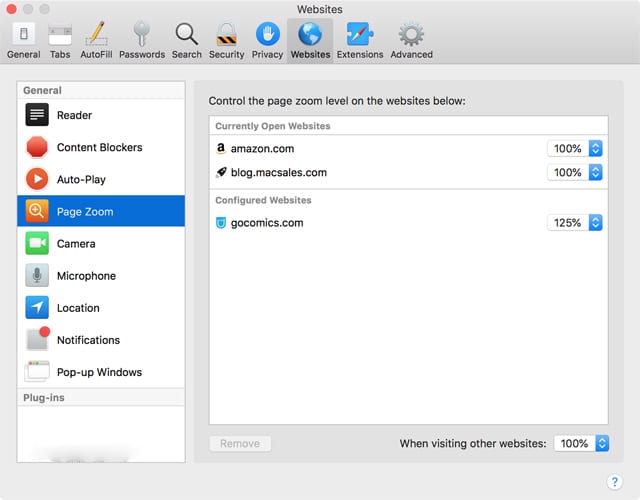
Starting with macOS High Sierra, Safari picked up the ability to create custom settings for specific websites. If you would like to always view a website with a predefined zoom, you can do so using Safari’s website customization options, as outlined in the Rocket Yard guide: How to Customize Safari Website Preferences. Besides presetting zoom levels, you can also control Auto-Play settings, Content blockers, and much more.
Using Safari’s Reader
Another option that can make viewing a website easier is to make use of Safari’s built-in Reader function. The Safari Reader can strip out most website distractions and render the page with just the main content, the text, and the images. In most cases, Reader will display the text a bit larger and with an easier-to-read format.
The basic zoom in and zoom out functions work with Reader, though you can only zoom text and images, and not just the text. You can find out more about the Safari Reader, including how to invoke Reader, in the guide: Ride the Waves: 8 Tricks for Better Safari Surfing.
Setting Minimum Text Size
Another way you can affect just the text size on a website is to impose a minimum font size. When set, this will cause any text on a website that is smaller than the selected minimum size to be replaced by the size you select.
It’s best to pick a minimum text size that is appropriate for the size and pixel density of the display you use. The best way to decide on a minimum size is to go to a favorite website in Safari and experiment with the minimum font size setting. Changing the minimum font size setting is dynamic, causing the page to re-render as soon as you make a change in the settings.
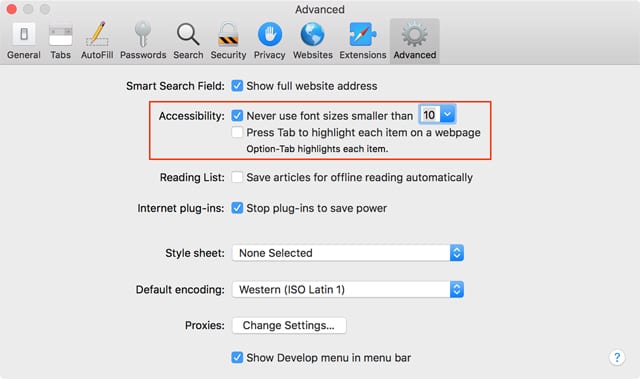
To change the minimum font size, follow these steps:
Launch Safari, and browse to a favorite website.
From the Safari menu, select Preferences.
In the preferences window that opens, select Advanced from the toolbar.
In the Accessibility section, place a checkmark in the box next to the text: Never use font size smaller than…
Use the dropdown menu at the end of the text to set the smallest font size that can be used.
Note: Although the font size dropdown menu has preset values, you can manually enter any font size you wish to use.
The website you have open will be updated with the new minimum font size as soon as you select or enter a new value.
Once you have the minimum font size set, you can close the Safari preferences window.
Forget the Zoom
You may at some point decide you want to return a web page back to its original size. This may seem like a simple task, just zoom back out or back in as needed, until the web page looks right. But if you don’t remember how far you zoomed in or out, you’re just guessing at the correct size.
A quick way to jump back to the size the page developer intended to use is the following tip:
In Safari, select the View menu and pick the Actual Size item from the menu.
If the Actual Size item is dimmed, the web page is already at the size set by the developer.
Using the Actual Size menu item will remove any zoom level you preset for a website using the technique outlined in the Set Zoom Levels by Website section, above.
Customizing Safari
What are your favorite methods of customizing Safari? Do you use the various zoom options we mentioned or have you found that website designers pretty much get it right?
Let us know in the comments section below.


Is there a way to make the text darker? I have a very difficult time reading the grey text that websites are using now. Especially when it is such tiny text.
Grey text on white is such an awful idea!
My work-around is to copy the text and paste it into a TextEdit document, change the color to black and enlarge it. But that interrupts my workflow.
What I’m wanting is a way to make the text for the Bookmarks Bar bigger. (Like the original Brave browser had}. Maybe a terminal command?