Back in December of 2018 when APFS was brand-new in macOS 10.14 Mojave, The Rocket Yard featured an article showing the rather arduous method of reverting an APFS (Apple File System) drive to the older HFS+ format. One of the commenters on that original post pointed out a few months ago that it’s now possible to perform the APFS to HFS+ conversion without all of the steps, and that’s what this article will show you how to do.
The drive I’ll convert is a 2TB mobile USB-C hard disk. If we launch Applications > Utilities > Disk Utility, we see that the drive is currently set up with APFS:
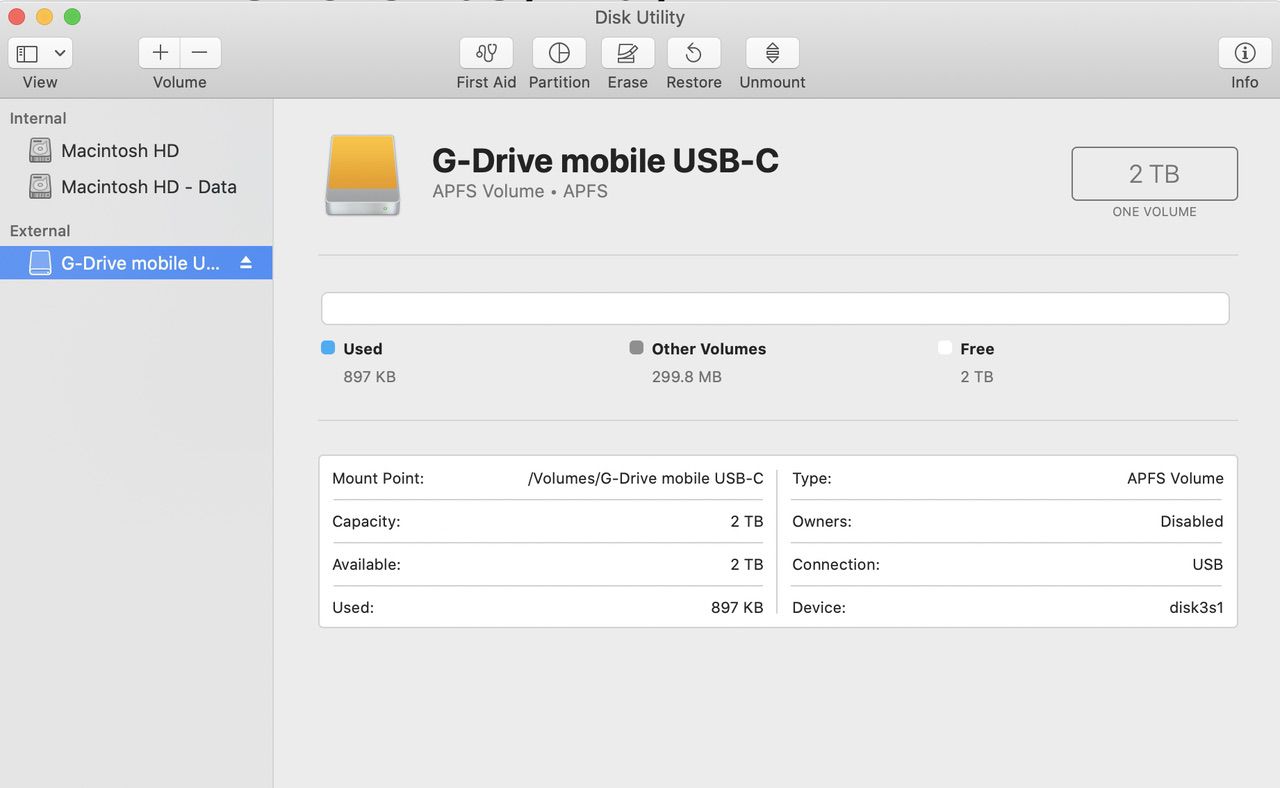
Previously, there was no easy way to do the conversion other than to fire up Terminal and enter a bunch of arcane commands. If I were to try to erase this external volume, the only format that appears is APFS. What do we do?
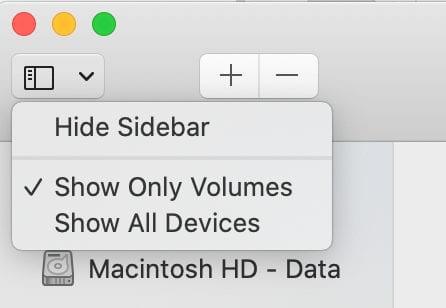
Here’s the trick. See that “View” button in the upper left corner of the Disk Utility window (screenshot above)? Click it, and you have a choice of viewing only volumes (the default) or all devices. Select Show All Devices, and the left sidebar changes a bit:
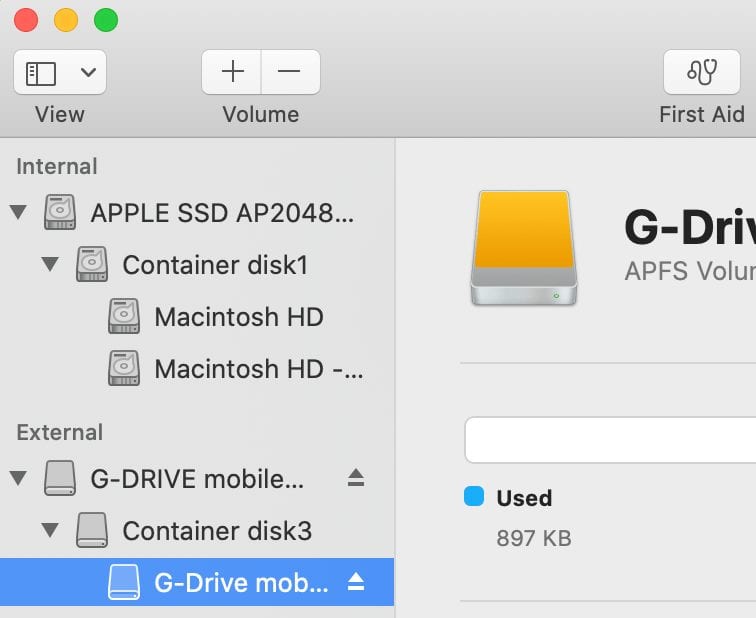
We can now see the APFS container on the external drive volume. To reformat our drive as HFS+, we need to click on “Container disk3” (or whatever your APFS container is named) to select it, then click the Erase button in the Disk Utility toolbar. As you can see when you click the Format pop-up menu, there are many choices available other than APFS:
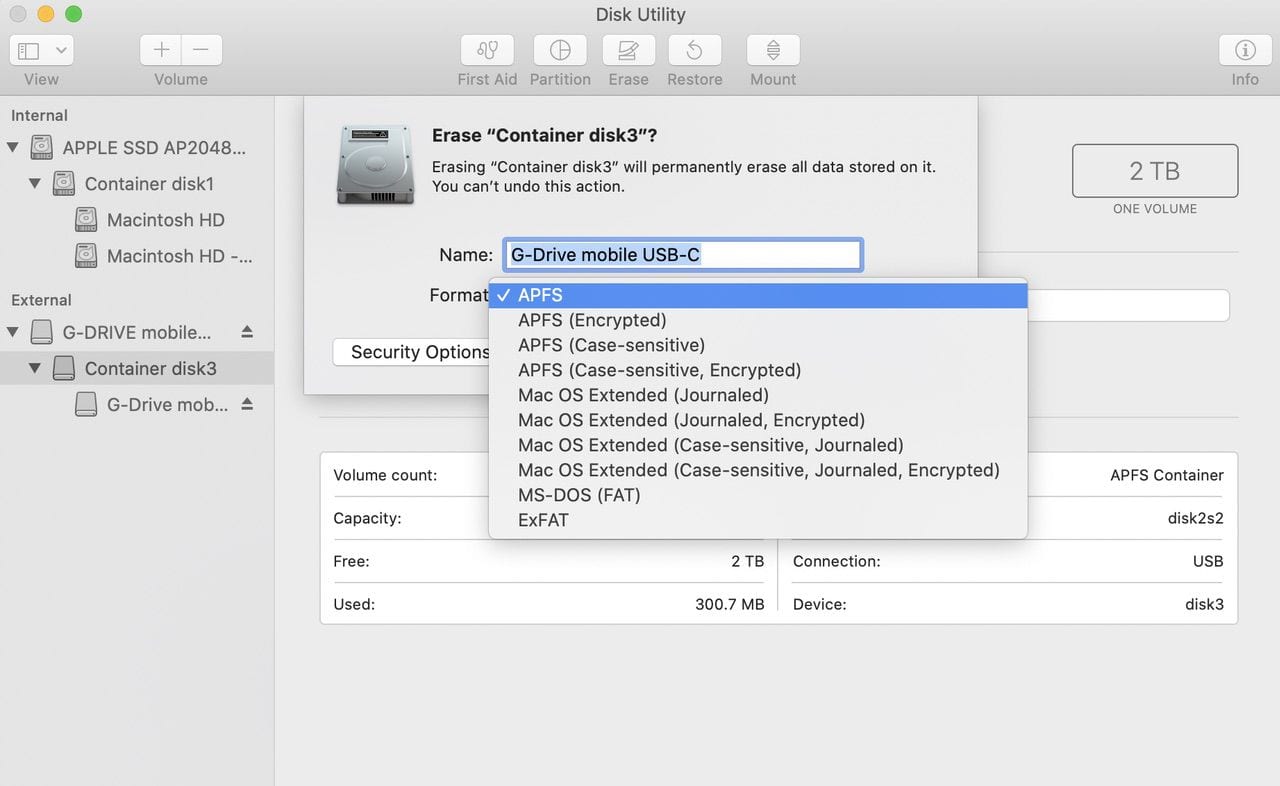
We’ll select Mac OS Extended (Journaled), which is the “old” HFS+ format, then click the Erase button. Looking at the container after the Erase is completed, we see that the drive is indeed using the Mac OS Extended (Journaled) HFS+ format.
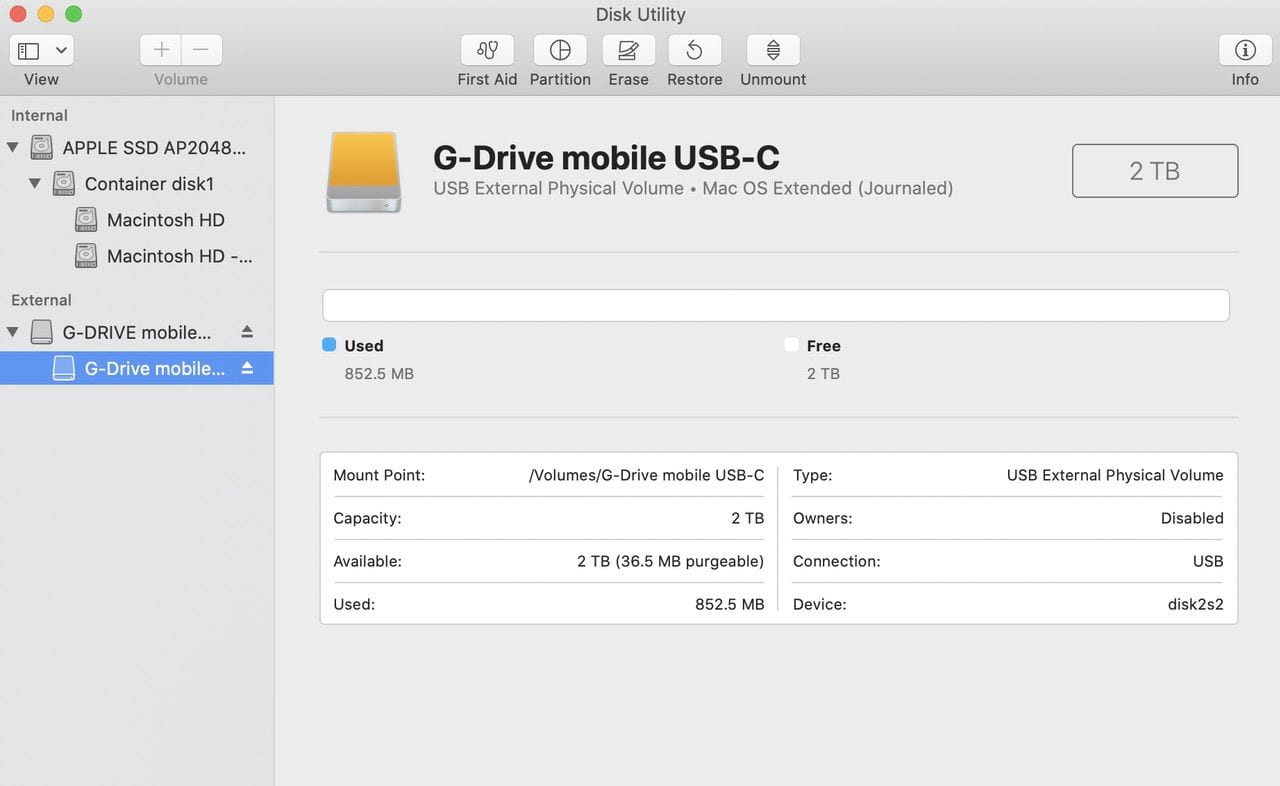
Many thanks to commenter smayer97 for pointing out that the Disk Utility in macOS 10.15 Catalina provides the ability to easily reformat an APFS drive as HFS+.


Thank you! This was incredibly helpful and I barely had to read anything because of your screenshots!!!
thank you so much, your article really helpmed me in changing my new drive from APFS to Mac OS journaled . Thanks a bunch,really appreciate
Oh, wow. Took me a complete evening of frustration. And in a minute i’m up and running, Thanks!!
Is there an easy way to revert the Macintosh HD main drive back to HFS? I tried out the APFS to create 4 different storage drives on a 4TB drive but I wish to go back because installing Windows 10 on one of the partitions is not working or installing due to the other 3 partitions (MacOS , Flac music and Alac music partitions ).
I have to go back to MacOS journaled then I believe I can install Boot Camp easily and not cause partition limit issues with the Windows 10 installation disc or .cdr/.iso .
Steve, this article was a lifesaver! Thank you!!!
Hello,
yes it worked. But when I tried to migrate my computer from the old APSF partition to the partition reformatted from APSF to HFS+, it had switched back to APSF during migration. (A migration taking 15 hours, during which I was happily thinking it was converting to HFS+, but no)
so, it’s formatting, NOT converting!
YES! The title of this article is quite deceiving. You are doing nothing but ERASING the drive and REFORMATTING into HFS.
ALL DATA ON THE DRIVE IS LOST
Paragon used to distribute a free converter, which actually converted without data loss. But since Apple made a total mess with their “security improvements” to macOS, that no longer works on more recent macOS releases.
Thank you so so much for this!!! I thought I had ruined my new hard drive by accidentally putting Time Machine on it and I couldn’t figure out how to get it back. Thank you so much for this post it was a life saver!
This finally worked on my new 2TB stick (purchased on Amazon) when I erased the stick’s “VendorCo ProductCode Media,” put there by the manufacturer. This deleted the existing partitions and I guess, erased any remaining gunk, creating a backup with my new name and the proper HFS+ format (Journaled, Extended). Whew! Thanks for the tip, not available via formal Apple Support online.
A twisty little passage for this appeared recently. I found myself with a partitioned -internal- that Mojave et al. wanted nothing to do with, as far as reformatting && repartitioning the entire drive. That includes the much-vaunted Disk Utility and Super Duper!. I went the Command-R route and that Disk Utility had 0 qualms about re-everything-ing that drive in whatever format I wanted. (I confess it was an older MBP’s internal SSD, so whether this method would work on an external remains to be seen.)
Thank you!! I was going insane trying to figure out how to change the format on my external.
Thanks. Really helpful. Would have been fine with arcane UNIX commands, but this was way more elegant.
Hi, I wanted to try installing OS Big Sur on an external usb 3 hard drive to see how it worked. On my MacMini (2018) I had OS Catalina 10.15.7 installed. I then formatted the external usb drive in the APFS format with Disk Utilities (an old original 1Tb Apple disk, which I called Big Sur) and started the installation of the OS Big Sur. Once the installation was finished, the computer automatically rebooted from the external disk with OS Big Sur. I took a look at the new system and then rebooted from OS Catalina, no problem but when I got to my desk I saw a disk named “Update” while I called it Big Sur. Inside I don’t see – Applications – Library – System …… but other things. If I try to delete it, with the procedure described here, the initialization does not start, nothing happens! Has anyone happened the same thing? What can I do to reformat it?
I did essentially the same thing you did … put Big Sur on an external drive etc. Now I’m stuck with lots of data on the external drive I cannot delete. When I try to reformat as Mac OS extended etc and hit erase NOTHING HAPPENS, just like yours. Did you discover a way out of this?
I found my answer at least. The info from the terminal run that could not erase the disk said that it could not unmount the disk b/c the process com.apple.MediaLibraryService was using the disk. Went to Activity Monitor, searched for MediaLibraryService and found 2 processes running. I had to force quit both (right click to see the force quit) Once both were quit this process about in disk utility worked just fine. Daniel
Hi Steve that’s a nice hack. I am presently using Mojave and thought my drive was useless. You have just saved me a lot of trouble. Much appreciated. Have a great Weekend you deserve it.
Thank you very much for the revert-to-HFS procedure. It works. I thought my goose was cooked.
You’re welcome. :-)
P.S. Again, as I have pointed out back in July 2019 (see link way below) this is not limited to Catalina. Mojave can do the same thing using the same steps.
But thanks to Steve for writing this article. :-)
Oh crap, my 2019 MBP is going to have APFS on the internal HD, isn’t it?
So before I Migrate, how do I change the internal drive back to HFS+ ??? I’d guess:
1) clone w/ SuperDuper running on another computer, with the 2019 computer in Target Disk Mode, to an external drive
2) reformat 2019 computer while still in Target Disk Mode
3) Copy from external clone back to 2019 internal drive
Yes, that is definitely one way.
OR you can create an HFS+ partition on the same drive and copy to it…reformat APFS partition and copy back.
Will a mere “copy all” work on the hidden System files, and the Recovery Partition?
No. cloning is the only way to copy bootable drives.
I’ve noticed that if I have an APFS formatted drive and split the drive to make a partition for Time Machine, Time Machine will make its partition Mac OS Extended (Journaled). Even if I explicitly reformat as APFS, it will change back to Mac OS Extended (Journaled).
It seems happier that way, so I have stopped fighting it.
That is because Time Machine does not currently work with APFS formatted volumes, only HFS+.
Eventually that will probably change but for the time being a Time Machine volume MUST be HFS+.
WHY !! change from APFS to HFS+
Because some apps are still not APFS savvy or compatible.
Also as pointed out by @a, one shortfall is that APFS does NOT make true copies. It only saves the changes for new copies. So other than true backups, you cannot make true duplicates of the same file on the same drive.
Another problem is that APFS is NOT friendly with mechanical drives because of the way APFS saves files changes…causing a huge amount of fragmentation. Not a problem for SSDs BUT DOES slow down mechanical drives. This has yet to be addressed by Apple (and it is unclear if they will ever address this, though it is REALLY simple in concept…just turn off copy-on-write on mechanical drives…time will tell).
I reformat as a windows drive then reformat again as a hfs+ to undo the apfs ick out :-)
Why would anyone want to revert back to HFS+?
Because it does not actually make copies of your files. Just pointers to the changed bits, to save disk space.
So if some part of a track gets damaged, you may lost ALL the pseudo-copies.
Totally defeats the purpose of saving multiple copies of your work.
I’m assuming you mean APFS doesn’t actually make copies of your files.
The simpler way to get around formatting issues is to plug a mac drive into a windows system which won’t recognize it and will ask to format it. Format (non NTFS) move back to mac and reformat as desired.
As a side note, when coworkers have problems with windows drives, and can’t access the data because of the restrictive stupidity of the OS, they bring it to me to connect to my mac -oh look the windows drive has all your data you couldn’t recover through windows- copy data to flash drive. Send them back to circle 101 of hell (windows).
I recently upgraded to Catalina but want to revert to a previous OS backed up in Time Machine. I tried the normal way via command-R and using the Utilities menu but got an error about APFS not being compatible with HFA and so couldn’t use my Time Machine backup.
I tried your method above to convert the hard drive (correctly I believe) along with the Apple suggested comment on this page: https://discussions.apple.com/thread/251202759 but was given an error and that the drive could not be converted.
Do you have any other suggestions? I have an 32 bit app that isn’t usable on Catalina.
Thanks for this most useful technique. What needs adding is detail about the effect of hitting the Erase button. Does hitting that button merely convert the file-system, or does it erase everything on that disk? If it erases all data then strong backup advice will save less experienced users much grief.
@Steve thanks for noticing my comments on the previous article.
Just FYI, it has been possible to reformat APFS to HFS since at least Mojave, macOS 10.14.4 (cannot speak to earlier versions of Mojave; that is the first version I noticed after moving from Snow Leopard, Mac OS X 10.6.8 (I know… a big jump). So Catalina is not the first version to offer this ability.
(my first time commenting to point this out on that article, was July 2019 before Catalina was even out, here:
https://blog.macsales.com/46896-how-to-revert-a-drive-from-apfs-back-to-hfs/#comment-108900