Perhaps you’ve been working on your home Mac since the pandemic started and are suddenly realizing that you can’t find documents when you need them. Maybe that Mac has been in use for a much longer time and the struggle is even worse. Today, I’ll provide some tips on keeping your digital life organized on your Mac.
Let’s start off with a caveat:
There’s no one perfect way to organize files. You need to find something that works for your mindset and workflow, then stick with it. I’ve been using Macs since late 1984, and both the organizational tools and my workflow have changed significantly during the years since I clicked my first mouse. However, there are some methods I’m using right now that are quite helpful for keeping things organized.
Let’s Get Started
To begin with, I’d suggest that you use iCloud Drive so your files are available from anywhere with almost any of your Apple devices. iCloud Drive also provides a way to sync your Mac Desktop and Documents folders, once again making them universally available to you. Many apps can save documents by default into iCloud Drive, and you can also create your own folders for other purposes.
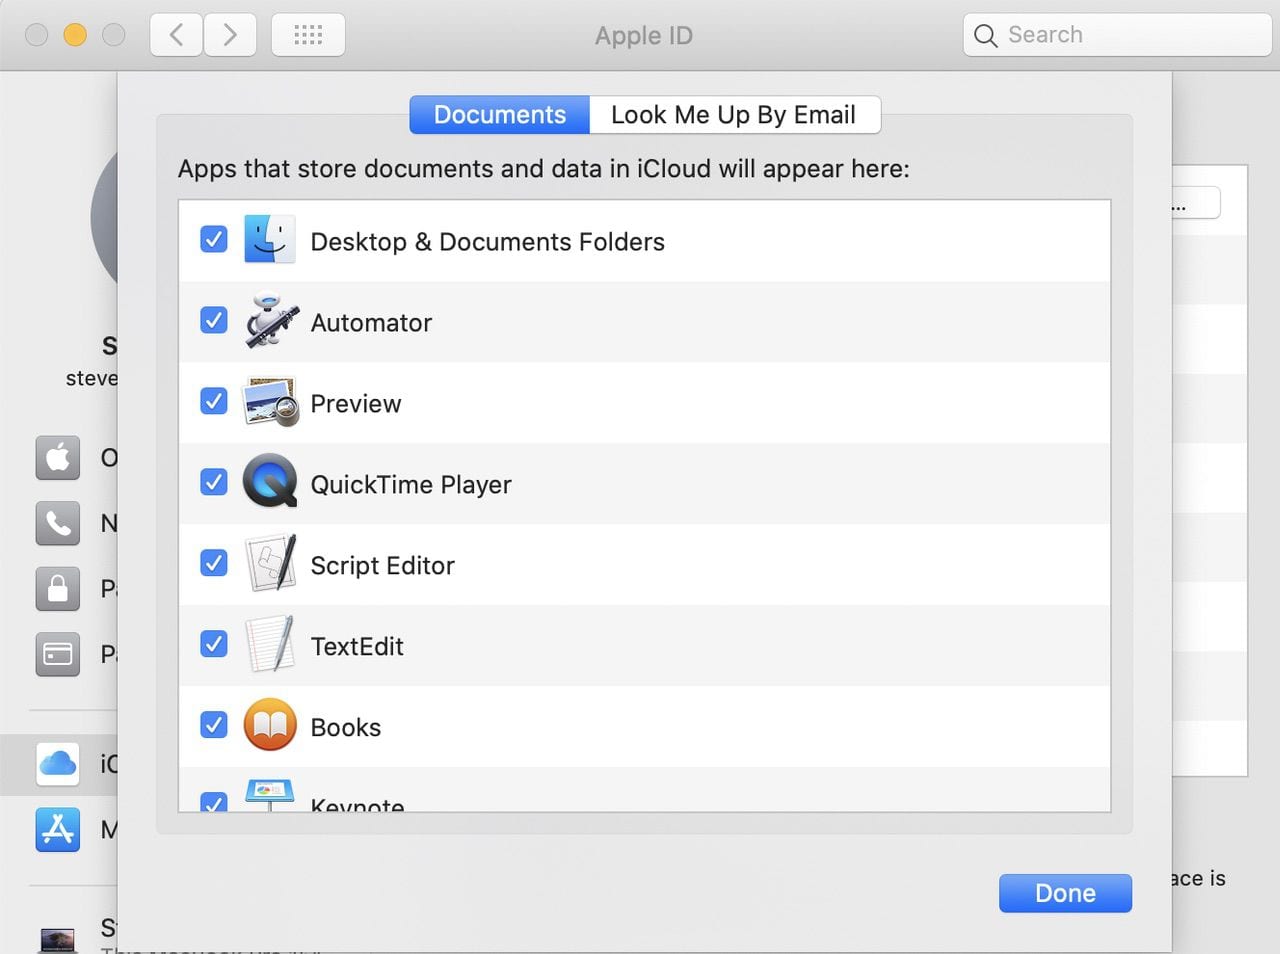
If you haven’t yet set up iCloud Drive to sync these folders, it’s easy to do. On your Mac, launch System Preferences, click on Apple ID, then click on iCloud in the left sidebar. A list of apps that are using iCloud on your Mac appears, and at the top of that list should be iCloud Drive (see image below). There’s an “Options” button next to iCloud Drive — click it, and if the “Desktop & Documents” checkbox is not checked, click it. Note that it may take a while for your desktop and documents folders to sync the first time.
The Mac Desktop
Now, the Mac Desktop is not necessarily the best place to store all of your files and folders, although I know a lot of people who do just that. Although my “real” desktop is a total disaster area, at least I keep my Mac Desktop spotless (see screenshot below):
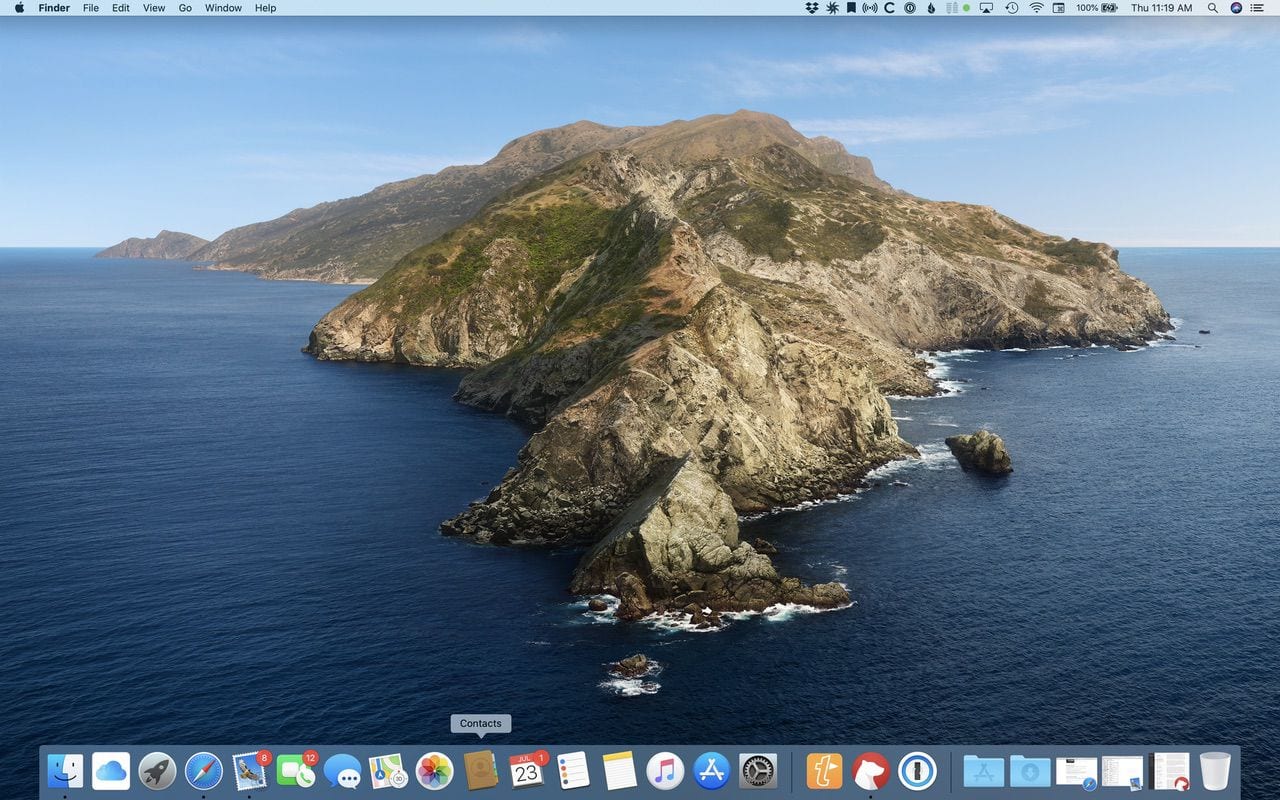
See? Nothing but beautiful Catalina Island (Big Sur on my other Mac). I use the Desktop for “temporary storage” when I’m working on a project that might encompass several different apps. For example, perhaps I am writing a book in Pages, bringing in photos from the Photos app, and making illustrations in a third-party iPad app like Pixelmator. I’ll make a temporary folder on the Mac Desktop for that project and its component files, simply because it’s a convenient place to have everything regardless if I’m using the Mac, iPad or even my iPhone to work on the project.
Any folder I create on the Mac Desktop — like “My Book Project” — also appears in iCloud Drive in the Desktop folder. Since iCloud Drive is available on my Apple devices, I know precisely where that temporary work folder is on any of them.
Like I said, I don’t like to keep folders on my Mac Desktop, so when I’m done with a project, I’ll drag that folder from the desktop to another spot in iCloud Drive. If it’s associated with a particular business (I have several), it goes into a folder for that business.
I’ve given you my personal preference, but is there anything wrong with keeping all of your folders and files on the Mac Desktop? Not really. For some people, it’s like wanting to keep a neat stack of file folders for different projects on top of your real desk for easy access.
The Documents Folder
OK, we’ve talked about the iCloud Drive Desktop folder, but what about the Documents folder? For many people, that’s where all of the documents created by various apps will end up. Many Mac apps create their own folders in Documents as a default location for storing their documents. That can be a bit confusing when you go to look for a document, as you might not know (or remember) exactly what app you used to create it! That’s why I personally like to group things by project or by type.
I mentioned my predilection for project folders before, but what do I mean about grouping things by type? Well, in my quest for a paperless office, I have done a lot of scans, so I created a “Scans” folder in iCloud Drive that is shared with my wife (click here to read about iCloud Drive Folder Sharing).
It’s easy to create a new folder:
In the Finder, just selected File > New Folder from the menu bar or type Command (⌘) – Shift – N and a new folder is created with the catchy name “untitled folder”. Be sure to give it a logical name so you’re able to find things more easily.
Each folder can, of course, have subfolders. Within my Scans folder is a Taxes folder, and in the Taxes folder are folders containing completed tax returns and supporting documents by year. This nested folder/subfolder concept is quite standard and very useful, although you don’t want to next folder levels too deep.
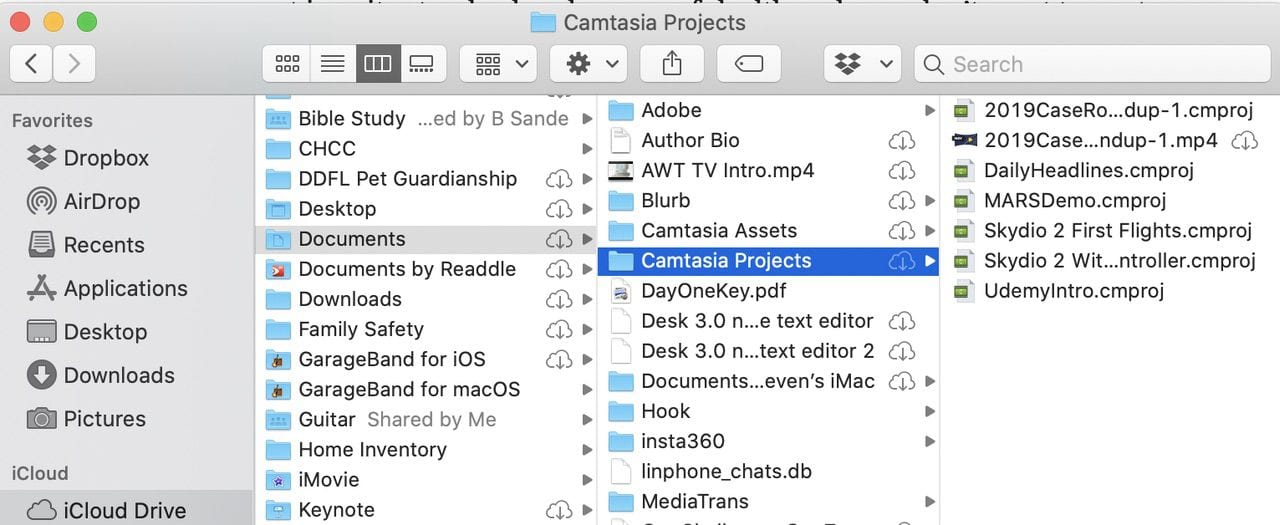
When you’re thinking about how to organize your files, think about how you organize your life. For example, people usually have “personal” and “work” lives, so perhaps that’s a good top-level to start with. Under personal, you might have different parts of your life that you wish to classify: let’s say things like health, home improvements, cars, travel, owners manuals, recipes, and so on. For work, you could have things like pay and benefits.
As a freelance consultant turned author and entrepreneur, I have folders for several different business ventures, with each of those having subfolders for general information, certifications, specific projects, website logos, release forms, and so on.
I know that as computer users, we’re all supposed to do everything on our Apple devices, but I found it handy to just sit down with a blank sheet of paper and a pencil and write out the different folder names and what they contain. Talk about old school!
Smart Folders
Finder provides a way to create Smart Folders. Smart Folders automatically gather together files by type and subject matter, so that any document you create that is of the same type or contains a specific phrase shows up in the folder. Now, the documents aren’t actually moved to the Smart Folder — they’re still in their original locations, but Smart Folders make it simple to organize documents about a particular topic.
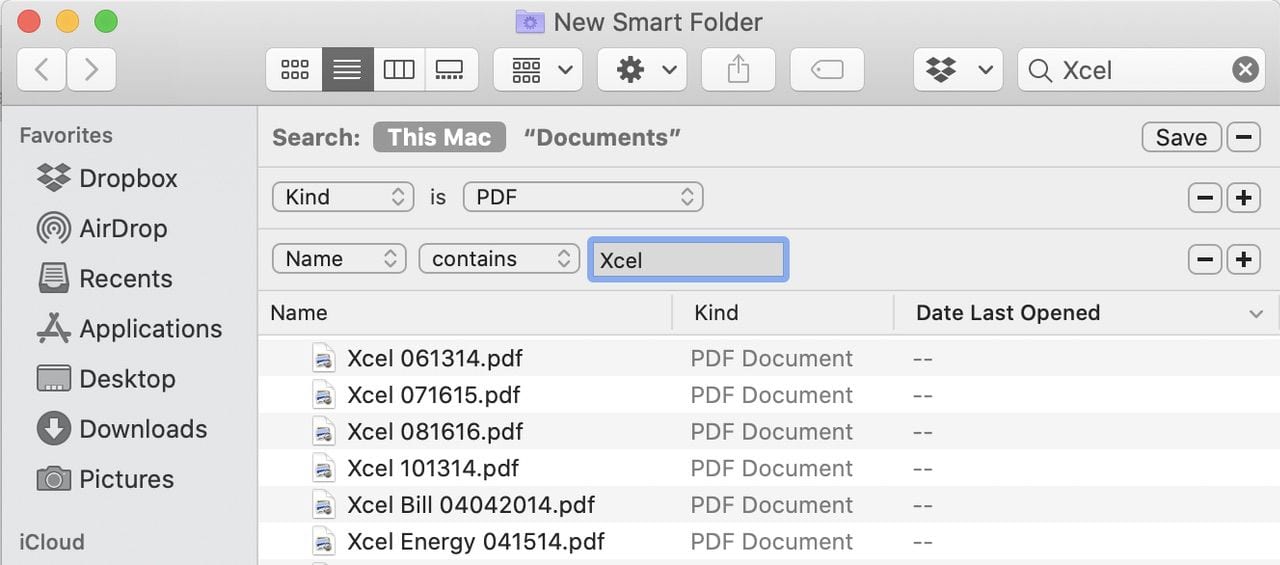
To create a new Smart Folder in Finder, go to File > New Smart Folder. A window appears with a search field. That’s where you begin to add search criteria for organizing documents. In this example, I want to create a folder containing every bill or document dealing with our local electric and gas utility, Xcel Energy. I don’t want to include documents that aren’t in PDF format. By clicking the + (plus) button I can add other search criteria to further narrow down the content of the Smart Folder. In fact, there’s a way to add an exhaustive number of search criteria with items like comments, the application used to create a document, latitude/longitude, type of lens used to take a photo, you name it!
One cool thing about Smart Folders is that you can “toss” documents into a big, unorganized folder — perhaps the Documents folder — and then pull up just those docs you want to see by looking at the Smart Folder. Smart Folders are stored in the Finder sidebar by default.
Get Organized, Stay Organized
Good organization on your devices doesn’t come easy. Many people I’ve talked to have done a great cleanup job at one point or another, only to find that within a year or two their system has gone awry because they didn’t stay disciplined.
I suggest planning on a specific time or day to do your organization work. If there’s a folder or document in a place it shouldn’t be, put it away at the end of the day, or perhaps at the end of the workweek. It’s easier to just put the file into its properly organized location NOW than it is to wait until things get out of hand.
It’s also a good idea to give your files names that really describe what they are all about. I may look at a file named “W9.pdf” and see that it’s the famous IRS Tax ID form, but a longer name like “W-9 for Raven Solutions 01-01-2019.pdf” makes a lot more sense. It tells me when the file was made and which company it was for.
Using Comments and Tags can also help you to find and organize documents. If you click on any file in the Finder and then type Command (⌘) – I (or select File > Info from the menubar), you’ll see a LOT of information about the file (see screenshot below).
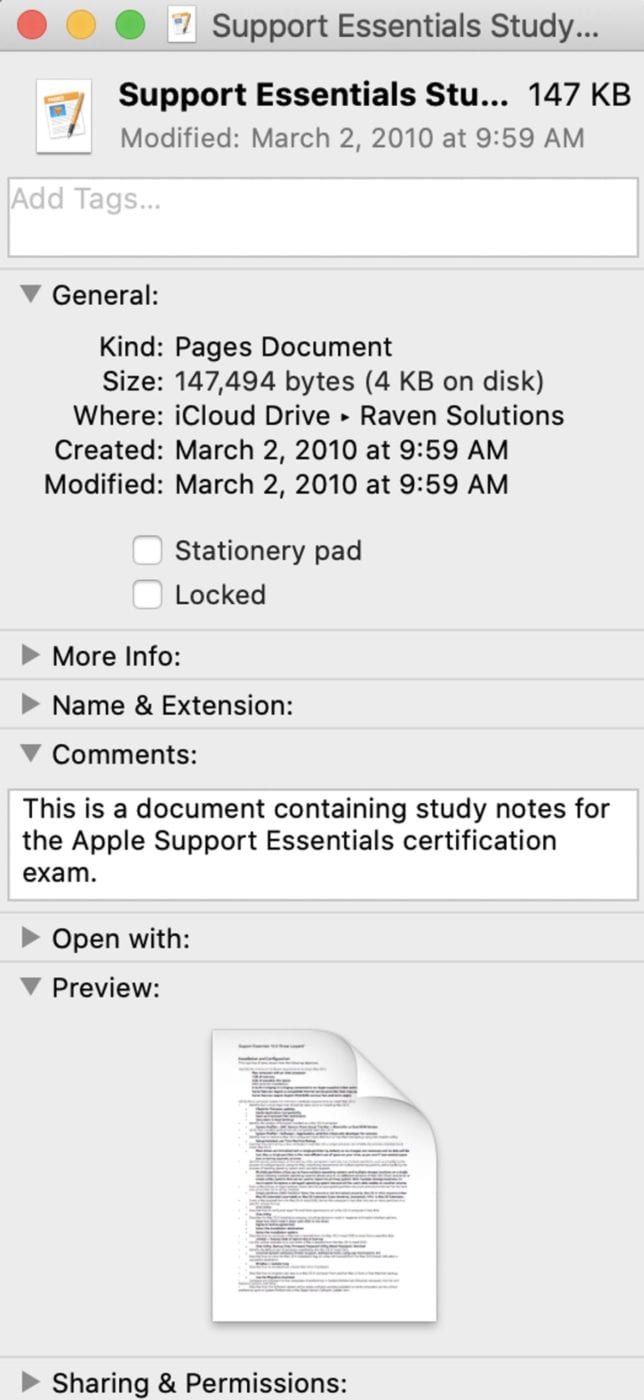
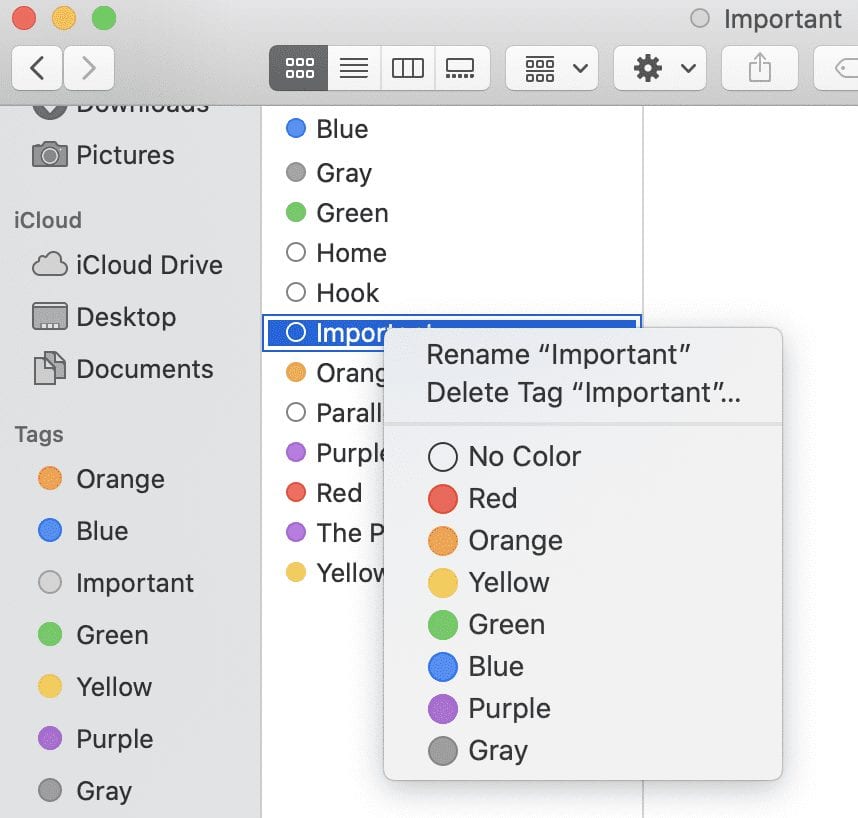
Type in a description about the document in the Comments area, and you have one more piece of information to search for. Tags provide a way to search for something by a color and/or a word. Open a Finder window and you’ll see Tags listed. Click on All Tags, and you get a list of the color and title of each Tag. To change a tag name, right-click it in the list and then select “Rename”. (Personal note: I don’t use tags, but you may love them).
Remember, even if your organization methodology isn’t perfect, you’ll still be able to search for documents using Spotlight. For instance, that Smart Folder I created earlier as an example is helpful, but not really necessary. A Spotlight search for “Xcel” has a subcategory called “PDF documents” that I can click to see every PDF file with that four-letter name.
If you find that your Spotlight searches aren’t providing you the results you’re expecting, consider rebuilding the Spotlight index. That’s an internal database that contains all of the information about every file on your Mac and on your iCloud Drive.
Rebuilding the Spotlight index is easy to do, but can take some time. Launch System Preferences, then click the Spotlight button. Click on the Privacy tab. Now, find a folder or drive that you want to re-index and add (+) or drag it to the “Prevent Spotlight from searching these locations” screen. Now click on that folder or drive that you just added and click the minus sign ( – ) button at the bottom of the Privacy tab, and the folder will be reindexed.
Know When To Delete Things
One other thing that can help keep you organized is to know when to delete files. Since storage is so inexpensive these days, we can store millions of files — we’ve become digital packrats! Sometimes it’s nice to keep something around just for old time’s sake, but in other cases, it just makes no sense to keep the files.
For example, Apple’s groundbreaking Newton MessagePad device was discontinued by the company in 1998. During the 1990s, I was a developer and wrote apps for Newton, PocketPC, and the Palm platform. I still have all of the original source files, documentation, and marketing materials for the products.
Now, I’m a sentimental guy and I can’t bear to get rid of this digital legacy, but it’s cluttering up my 2019 MacBook Pro! What did I do? I moved the files to an external disk drive that I purchased solely for “archived files” — those items that I want to keep, but just don’t need to have on my Mac. That drive is sitting on a shelf, marked as “Archives”.
In addition, you might want to delete scans of old bills, tax returns, and other documents. Do you really need to keep those tax returns from 1998? According to the IRS, “Keep records for 3 years from the date you filed your original return or 2 years from the date you paid the tax, whichever is later, if you file a claim for credit or refund after you file your return. Keep records for 7 years if you file a claim for a loss from worthless securities or bad debt deduction” There’s even more space I can clear up on my Mac!
Don’t Use Trash for Storing Documents – A Cautionary Tale

Back in the days when I was an Apple Consultant for hire, I got into (and out of) some deep trouble one day when I was visiting a client. Usually when I was out and about doing my consultant gigs, one of the common issues was “my Mac is slow”, which at that time could be caused by having a lot of documents on the Desktop (it’s no longer an issue). This person had a sparkly clean desktop, so that wasn’t the problem. In fact, I couldn’t find much in terms of documents anywhere.
I usually went in and emptied the Trash on client Macs; some had a real problem with deleting files that they had thrown out. In this case, I emptied trash…and it took forever to empty. In fact, the dialog that appears when there are a lot of files to be moved or deleted showed, “45,678 files remaining”, so I figured the client had never emptied the trash.
After that process was done and I had done some other things, I rebooted the Mac and found that it was running much faster. The client was thrilled! I told him that he had a lot of items in the Trash and that’s apparently what was slowing down the computer. That’s when he turned pale and yelled “You just threw out all of my work!!”
For some reason known only to my client, he had thought that his Trash can was a convenient place to store files. I asked him if he would take his business paperwork and put it into his office trashcan every day, and he said no — I replied that there’s no difference, the trashcan should be emptied every so often whether it’s real or virtual, and a trashcan is no place to store documents!
No harm was done; he had a backup (I refused to take clients who didn’t do regular backups or let me set them up with a backup strategy), and we restored the files…this time into a proper folder. From then on, I asked clients where they stored their work files. Fortunately, I never had another client who used the Trash for “organizing” files.
What Are You Waiting For?
If you’re having problems finding files on your Mac, even with the help of Spotlight, you should seriously consider spending some time to organize those files. You don’t have to do all the work at once; just set aside some time each day to create an understandable hierarchy of folders and put files into their proper place. When you’re done, keep up the good work.




thanks. sadly icloud has been a nightmare and definitely not worth the effort and work, simpler to use thumbdrives and light backup drives. All icloud did was clutter up my storage instead of reducing it.
Hello
OMG where to I even start. I really like this article and I so need to get my computer organized and decluttered like I have been doing with my home. I can’t find anything and exactly like you mentioned at the beginning….. my desktop is wall to wall stuff. Its terrible. Why have I gotten to this point to finally want to clean it….. I was looking for a photo for something and found all these other photos and files of things that don’t belong to me. Guess they just download when I am on a site. I can’t believe the junk that is in here. How do I stop it. Going to try following what you mentioned above but I think I am a sinking ship. Thank you
I have a TimeMachine backups file sitting in my trash, and I can’t get rid of it. It
appeared one day, and when I tried to trash it, this led to catastrophe.
Do you know about this problem? I have a Mac Desktop OSX El Capitan
“I don’t like to keep folders on my Mac Desktop”
The easy solution I use is to make an alias of a folder in my documents folder to place on the desktop. The alias gives me the security of knowing those files are backed up each day and easily accessible from the desktop.
Yeah, I got a comment. If you are having trouble finding files w Spotlight, get a REAL search app: Find Any File. Have used it for years if I want to find EVERYTHING. Not sure why Apple Spotlight even exists.
If there is one app I miss more than any others I’ve used over the years, it is Brian Hill’s Launcher (AKA, LauncherX), which ceased to function when Apple abandoned Rosetta. It sat in your menu bar. Click that, it opened a resizable window, with whatever tabs you had created (apps, games, files, folders, etc) from which you could launch or open whatever you had put in that tab, each creating a button that made a click sound and acted just like an alias. There are many launcher apps available today that function in a similar manner, displaying icons that act as aliases – but in the case of folders, not entirely. Click them, they open that folder. But drag and drop a file from your desktop (or any place else) onto a folder icon, nothing happens. With LauncherX, drag something to a folder icon/button in any tab, that file disappeared into that folder, just as it would with any folder or folder alias you dragged it into directly.
Here’s a screenshot of what a Launcher “Folders” tab might look like: https://i.ibb.co/3zsmLQh/Launcher-XFolders-Tab.jpg
Why none of the launcher/dock replacement apps I’ve tried the past few years that let you store folders in them allow you to drag and drop things onto (into) those folder icons is beyond me.
It was how I kept my desktop clean. I can have 50 files or more on my desktop at the end of a day. I would open my LauncherX Folder tab, containing perhaps 20-25 of my most used folders, and drag each of these desktop files/folders onto the folder icon where I wanted to store them – and, presto, I had a clean desktop. I’ve written many of the developers offering launcher/dock replacement-type apps asking them to include drag and drop for folders, and they all say “great idea,” but so far not one has actually added it.
Perhaps I’ve missed one — is there a folder launcher/dock replacement app out there that lets you create a pallet of folders that you can drag and drop desktop files onto to put those files away?
You mention using Comments to describe a file’s contents. This has been a feature of the Finder since the very beginning. Unfortunately, iCloud Drive does not support it. If you add a comment to a file on one Mac, the comment will not appear on other devices. This is a real downside to me of using iCloud Drive for most of my files. (I use Dropbox instead, which does preserve file comments across devices.)
The Comments feature in the Finder is basically broken if you use iCloud.
Another longtime Mac feature that is not supported with iCloud is resource forks in files. macOS and Mac OS X have always supported this locally, but they get stripped out if you put such a file on iCloud Drive and try to access the file on another device. This isn’t really a problem unless you have older pre-OS X files, such as font suitcases or files with no file extension (the file type and application creator code were stored in the resource fork). These files will appear empty (zero k) or as blank icons with no associated app if they are accessed on other devices via iCloud Drive. Again, Dropbox does not have this problem.
It boggles my mind that Apple is missing iCloud support for longtime Mac features like this, which are still supported by macOS, and by third-party cloud services like Dropbox. It’s kept me from using iCloud Drive more than I do, which is not very much. There are many things I don’t like about Dropbox, but until it has better macOS support (!), I can’t really make the switch to iCloud Drive as my main cloud service.
I’ve been playing around with this Spotlight Comment thing. As I explained above, if you add a comment to a file on one Mac and store it on iCloud, the comment disappears when you view it on a second Mac.
BUT, I’ve discovered that the comment doesn’t get removed, either. It’s still there, even though it doesn’t appear on the second Mac. It only shows up on the Mac where you entered it. You can add a different comment to the same file on a second Mac. The comments are preserved on both Macs separately, even though it is the same file. Each Mac gets its own version of the comments field.
Changing the contents of the file has no effect on either copy of the file. The comments entered on each Mac are preserved. You can even move the file out of iCloud and back. Both versions of the comments are still preserved.
Interestingly, if you copy the file over the network, from Mac 1 to Mac 2, sometimes the comment will be gone. In cases when it is still there, it shows the version of the comment for Mac 2. But if you do Get Info over the network from Mac 1, it will display the Mac 1 version of the comment.
This seems bonkers, but at least you’re not losing data (usually). It’s just that each Mac seems to get its own instance of the comment field, and comments entered into the same file on a different Mac are not accessible.
Smart folders are great to save searches with multiple fields and conditions for routine use, but you must create them and they get corrupted over time. The Mac should have a default search (Command F or File – Find) like that by default. Much as Sherlock worked on Mac OS 9 Classic.
Besides, it should be possible to search also disks that have not been indexed yet, or never indexed because you do not want to index them for whatever reason, or because the index is corrupted and it may take 10 hours to index, or whatever.