

I recently showed you how to use a used Mac mini as a media server for your home. Today, I continue the theme of recycling and reusing older Mac minis by turning one into a Linux server.
What’s a Linux Server?
For businesses, a server is a computer that provides services for a group of users. The services can include:
- Mail server
- File server (shared and private directories)
- Directory server
- Domain Name Service server
- Web server
- Wiki server (not widely used anymore)
- Calendar server
And more…
When you set up an email account on your Apple device, you’re connecting to a mail server. Visiting a website? Your computer is connecting to a web server. You get the picture…
Many companies find it is more cost-effective to use cloud services instead of their own server. For the security of your data, nothing beats having a server on-site in a locked server room. Running your own server also provides more flexibility in customizing services.
Linux is a family of open-source UNIX-like operating systems and is used on many servers.
Why a Linux Server and not macOS Server?
Are you wondering why I’m talking about using the Open Source Linux operating system and not macOS? Apple used to sell and support a Server version of macOS. The Rocket Yard featured a series of articles on Mastering macOS Server in 2017. By early 2018, Apple removed most of the useful features of macOS Server and rendered it essentially useless.
For an Apple-centric shop, buying into the Microsoft Windows Server world is a costly and counterintuitive move. All Apple operating systems are UNIX-based, and Linux is a form of UNIX. Linux was estimated to run 67% of all web servers in 2016, and that number has probably grown since that time.
Most important for our experiment is that Linux distributions (“distros”) easily run on Intel-based Macs. That may change in the future when Apple Silicon rules the world of Mac, but since Linux runs on ARM processors (the heart of Apple Silicon), it should run on future Macs.
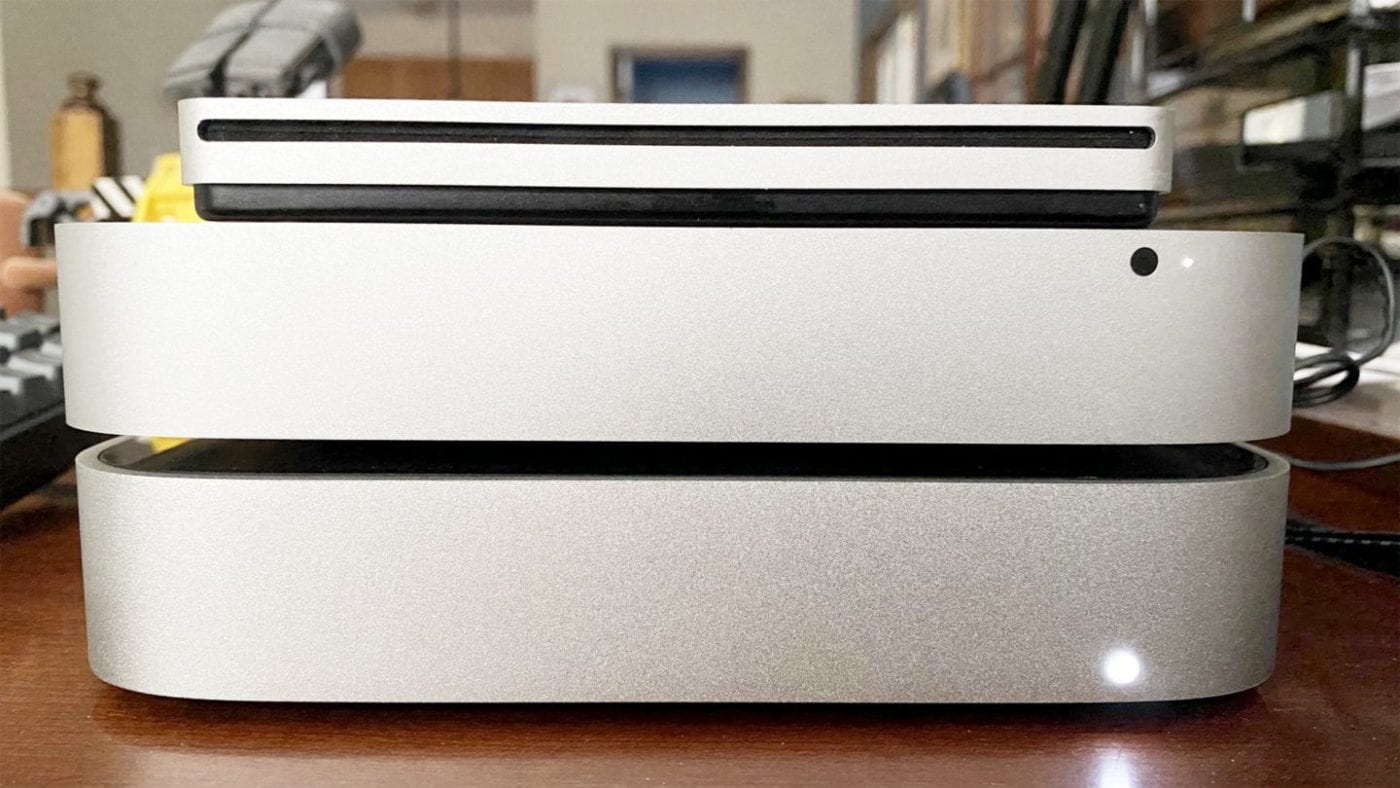
The Hardware for our Linux Server
For this article, I’m using the same 2014 Mac mini that took the starring role in the Plex Media Server article. One thing that’s important for this experiment is to have a Mac that supports EFI — Extensible Firmware Interface. EFI lets users select between multiple operating systems at boot time by holding down the Option key on the keyboard. EFI came along with the advent of Intel processors in Macs in 2006, and any Intel-based Mac should support the dual-boot setup we’ll use in this article.
Selecting a Linux Server Distribution
There are about as many Linux distros as there are stars in the sky. OK, I’m exaggerating, but there are a lot of different possibilities. You can choose openSUSE, CentOS, Debian, RedHat, or one of the other hundreds of distros. One of the most popular is Ubuntu Linux by Canonical, which comes in many different subtypes. I’m most interested in a version that runs on “desktop” hardware like our Mac mini.
I have a choice of Ubuntu Desktop or Ubuntu Server. While you might think I’d jump on the Server version, I want to make this as simple an exercise as possible. I’m going with the Desktop version because it has a graphical user interface. For Mac users who might not have much experience using a command-line interface (like the one available from the macOS Terminal app), a GUI just makes a lot more sense.
Create a Bootable Clone
It is a very good idea to create a bootable clone of your Mac mini prior to beginning the installation. Should something go wrong during the process, you can always plug in the bootable clone for access to Disk Utility and other Mac apps you may need.
Trust me on this point: I needed to completely restore our Mac mini’s SSD while writing the post. It would have been impossible without having a bootable clone. To create the clone, we used Carbon Copy Cloner. This is an excellent backup utility for Mac in that it creates exact clones of any drive, and it’s extremely easy to use.
Note: Mike Bombich, developer of Carbon Copy Cloner, recently expounded on the use of the app with macOS 11 Big Sur. It’s worth reading if you’ll be upgrading your Mac to Big Sur.
Prepare Your Mac
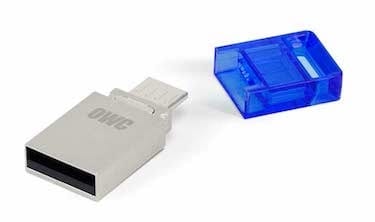
I recommend using an Ubuntu installation DVD to install Ubuntu on the Mac mini. There are other methods available that require an Ethernet connection and a USB flash drive, but I found that the DVD method helped by letting me set up a Wi-Fi connection during or just after installation.
I have an Apple SuperDrive connected to this Mac mini, so I created an Ubuntu installation DVD. This page on the Ubuntu website describes the process.
Cleaning Up
The test Mac mini has only 120GB of SSD storage and iCloud synchronization had quickly filled that. I found it useful to “nuke it from orbit” by booting into Recovery Mode (hold down Command (⌘) – R during a restart), selecting Disk Utility, selecting the disk volume that contained “Macintosh HD” and “Macintosh HD Data”, and erasing it.
Once that was quickly completed, I quit Disk Utility, then selected “Reinstall macOS Catalina”. Within about 25 minutes my Mac had a fresh installation of macOS. To keep things from getting crowded again, I immediately shut down iCloud syncing for Photos and Documents. This opened up all but about 20GB of the 120GB SSD.
Create Linux Partitions on the Mac Drive
For dual-booting our Linux server, I need two partitions — one for Linux and the other for swap space. The swap partition must be the same size as the amount of RAM in the Mac. To find that number, go to > About This Mac.
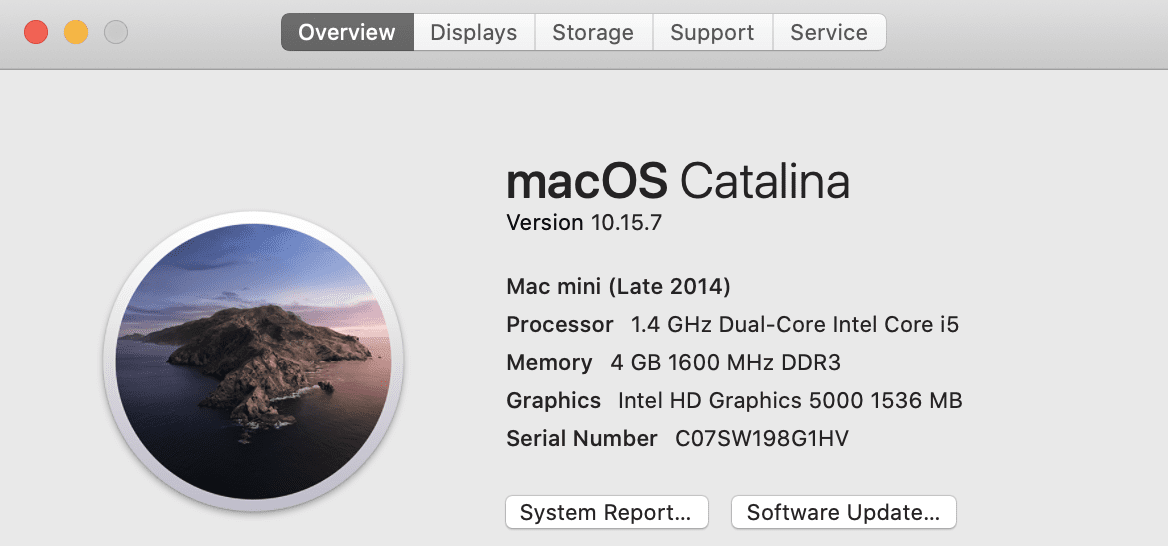
Our Mac has 4GB of memory, so our Linux server swap partition will also be 4GB in size.
Launch Disk Utility in Recovery Mode
It’s best practice to resize the startup volume from the macOS Recovery partition. We begin by rebooting the Mac mini while holding the Command (⌘) and R keys, then releasing the keys when the Apple logo appears.
1 – Select Disk Utility from the macOS Utilities window that appears, and click Continue.
2 – In the top-left corner of the Disk Utility window, click the View button and select View > Show All Devices
3 – Select the highest-level drive listed. On the test Mac mini, that drive is called OWC Mercury EXTREME Pro 6G SSD Media. Click the Partition button in the Disk Utility toolbar.
4 – Our drive is set up as an APFS volume. A dialog appears asking if you wish to add a volume to the APFS container or partition the device. Click Partition.
Create the UBUNTU Partition
5 – A pie chart appears showing the current partitions for the drive. Click the Plus button below that chart to create a new partition. If you wish to make the UBUNTU partition a specific size, drag the “dot” slider on the pie chart to make the partition larger or smaller. Name the partition UBUNTU and set the format to MS-DOS (FAT).
6 – Click Apply and a dialog appears. Click Partition to partition the storage. When Disk Utility displays “Operation successful”, click Done.
Not every partitioning attempt may be successful. In my case, it showed that the partitioning failed and it had left the partition as an APFS volume. I then erased the volume in Disk Utility as MS-DOS (FAT) and it partitioned the volume successfully.
Create a SWAP Partition
7 – Now repeat step 5 to create the SWAP partition, also formatted as MS-DOS (FAT). In this case, you’ll need to drag the handle in the pie chart so that the SWAP partition is exactly 4GB in size (or matches the RAM amount for your Mac mini). Click Apply, and then Done when Disk Utility affirms that the operation was successful.
8 – Select Disk Utility > Quit Disk Utility. This takes us back to the macOS Utilities.
9 – Remember the Ubuntu DVD we created earlier? Place it into the DVD drive attached to your Mac mini. You may see a message that says the disk is not readable; click the Ignore button.
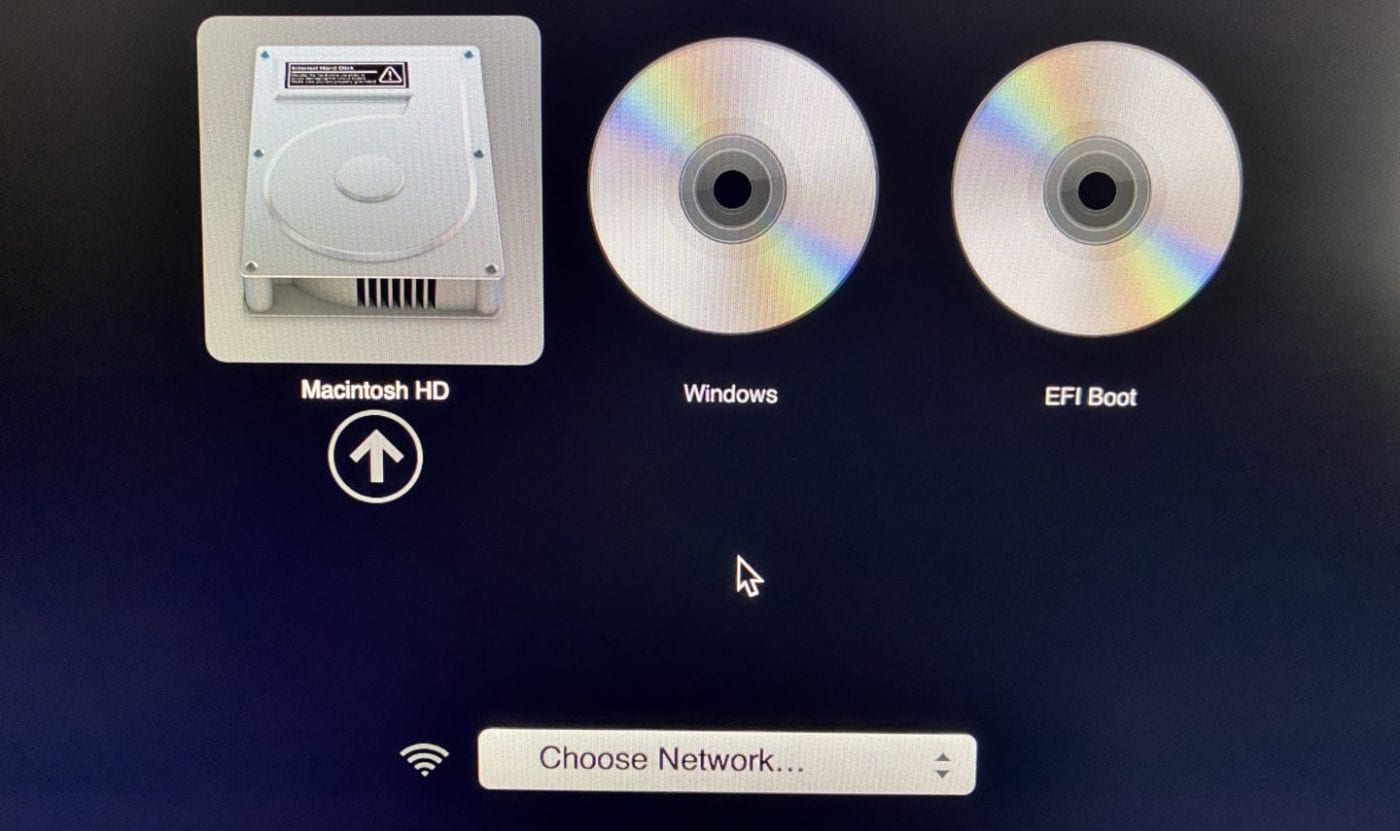
10 – Restart the Mac by selecting > Restart. Hold down the Option key on the keyboard to select a boot drive. You should see three: one that says Macintosh HD, another that says Windows, and one that says EFI Boot. Select EFI boot with your mouse, then press Return to begin loading Ubuntu. Warning! From now on, the screenshots you see are from my iPhone as it’s impossible to take screenshots while setting up Ubuntu. Sorry!
Install Ubuntu Linux
The first thing that happens is that you see a lot of text commands scrolling by on the screen, after which the installer begins doing a lengthy series of disk checks. Go ahead and let it happen, although you may feel like it’s never going to stop! Eventually it finishes and you’ll see this:
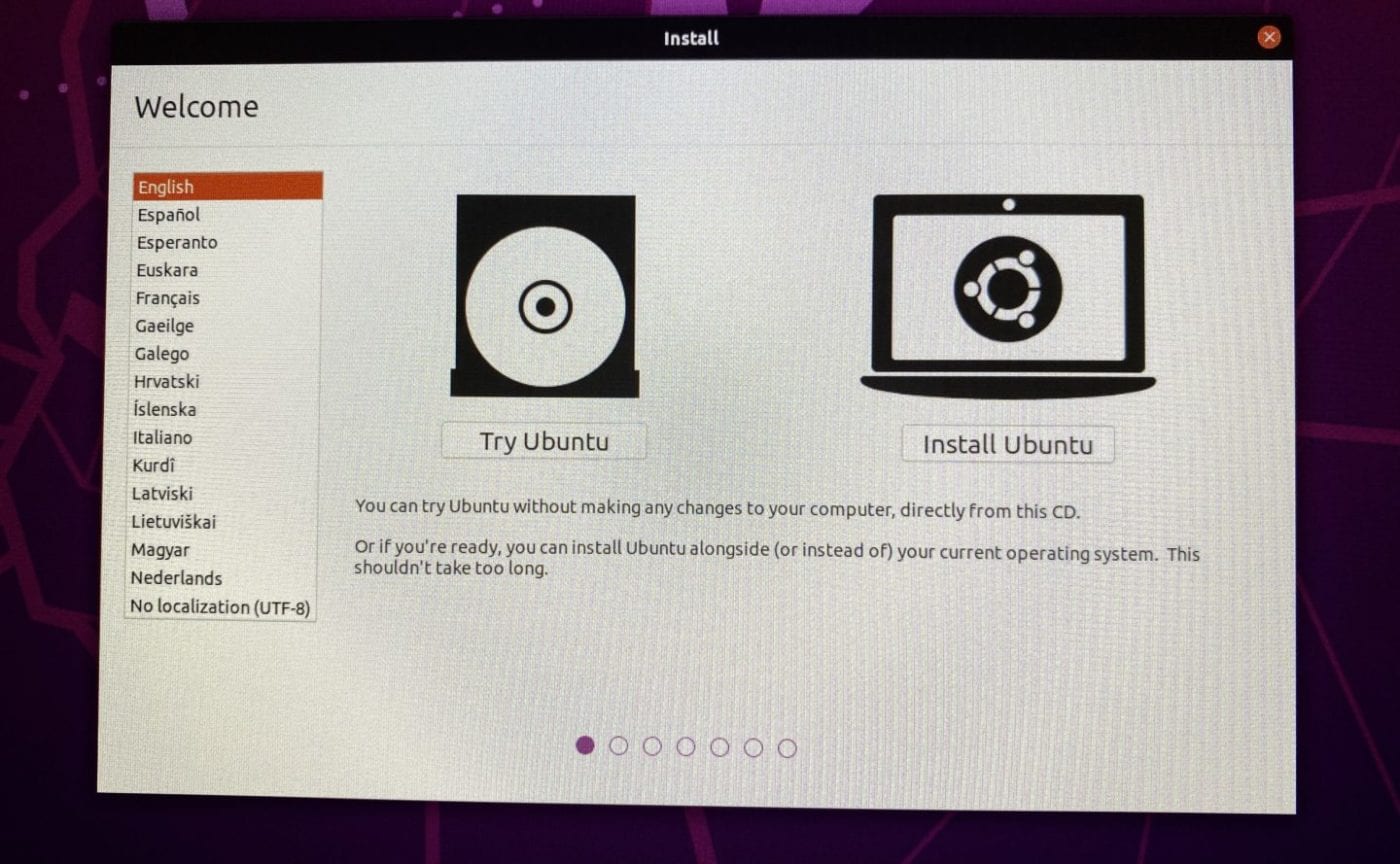
Select your language choice on the left, then click Install Ubuntu. On the next screen (Keyboard Layout), select the keyboard layout you’re using. We selected English (US). Click Continue.
Join a Wi-Fi network if you’re asked to
At one point, you may see a prompt to select and join a Wi-Fi network. If this appears, go ahead and enter the Wi-Fi network name (SSID) and password. This helps along with the installation by allowing Ubuntu Linux to download updates. If not, you’ll have the opportunity to select your Wi-Fi network later once Ubuntu is installed.
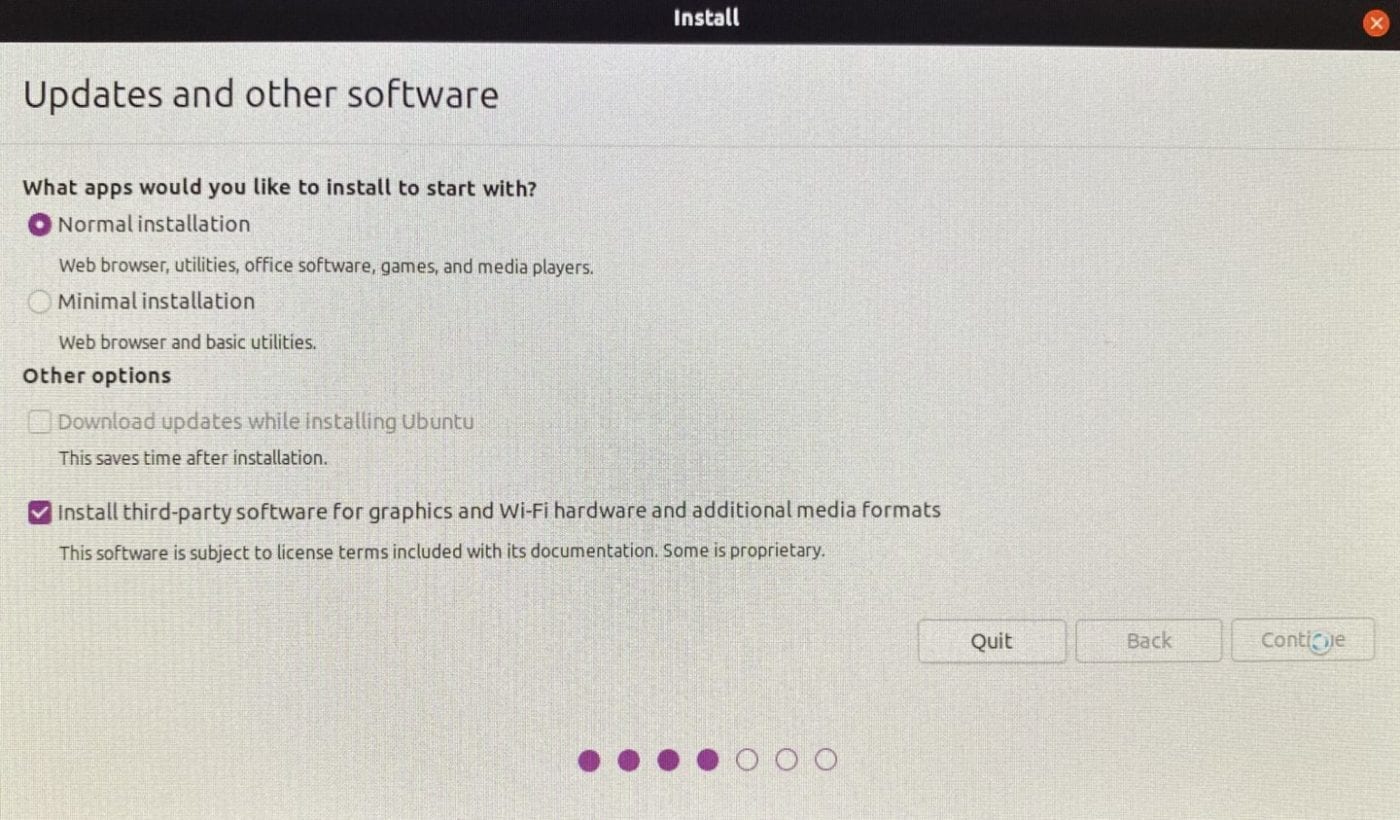
On the next screen (see screenshot above), select “Normal Installation” and Install third-party software for graphics and Wi-Fi hardware and additional media formats. Click Continue.
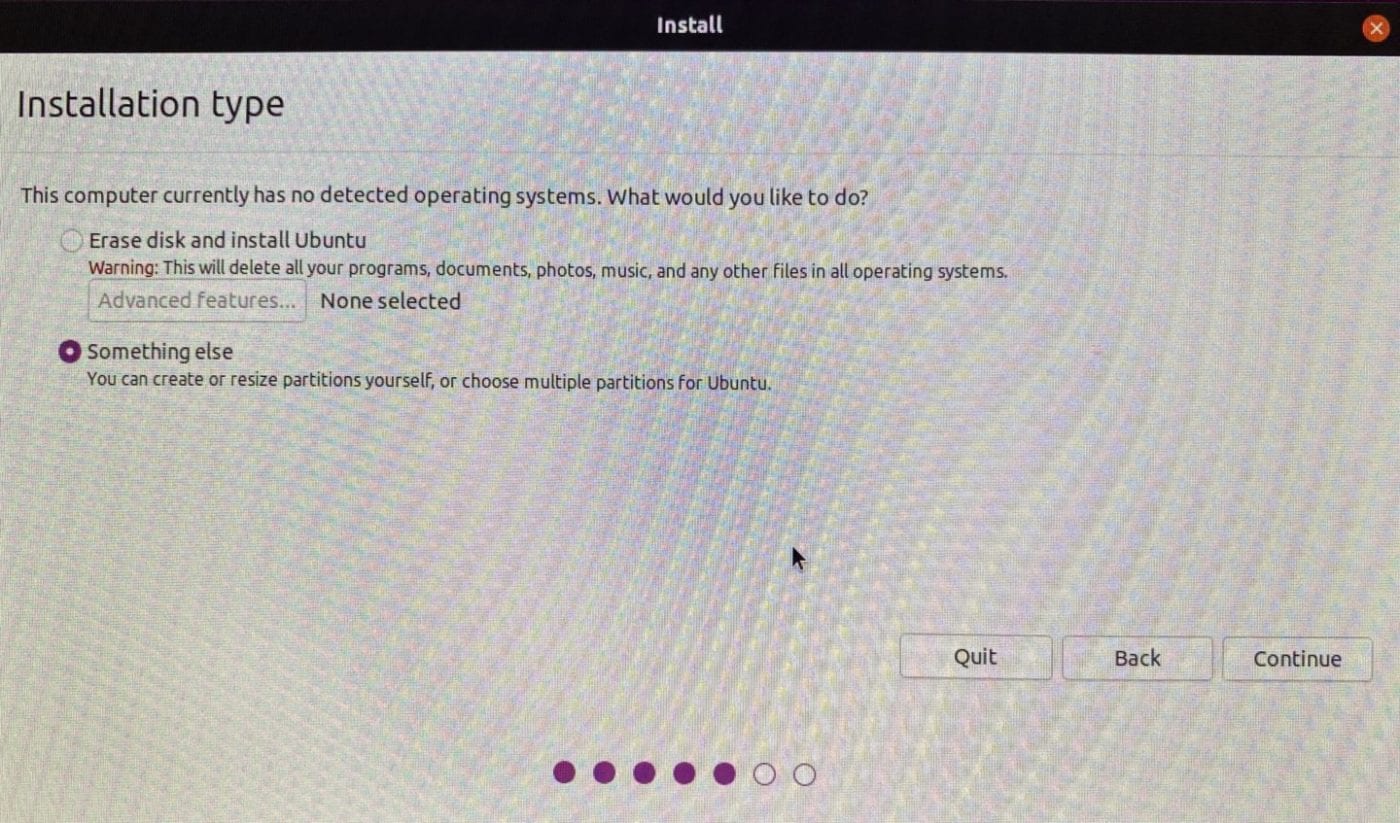
Now we get to an Installation Type screen. Do NOT just “Erase disk and install Ubuntu”, because this erases everything…including your macOS partition. Instead, click “Something else” and then “Install Now”.
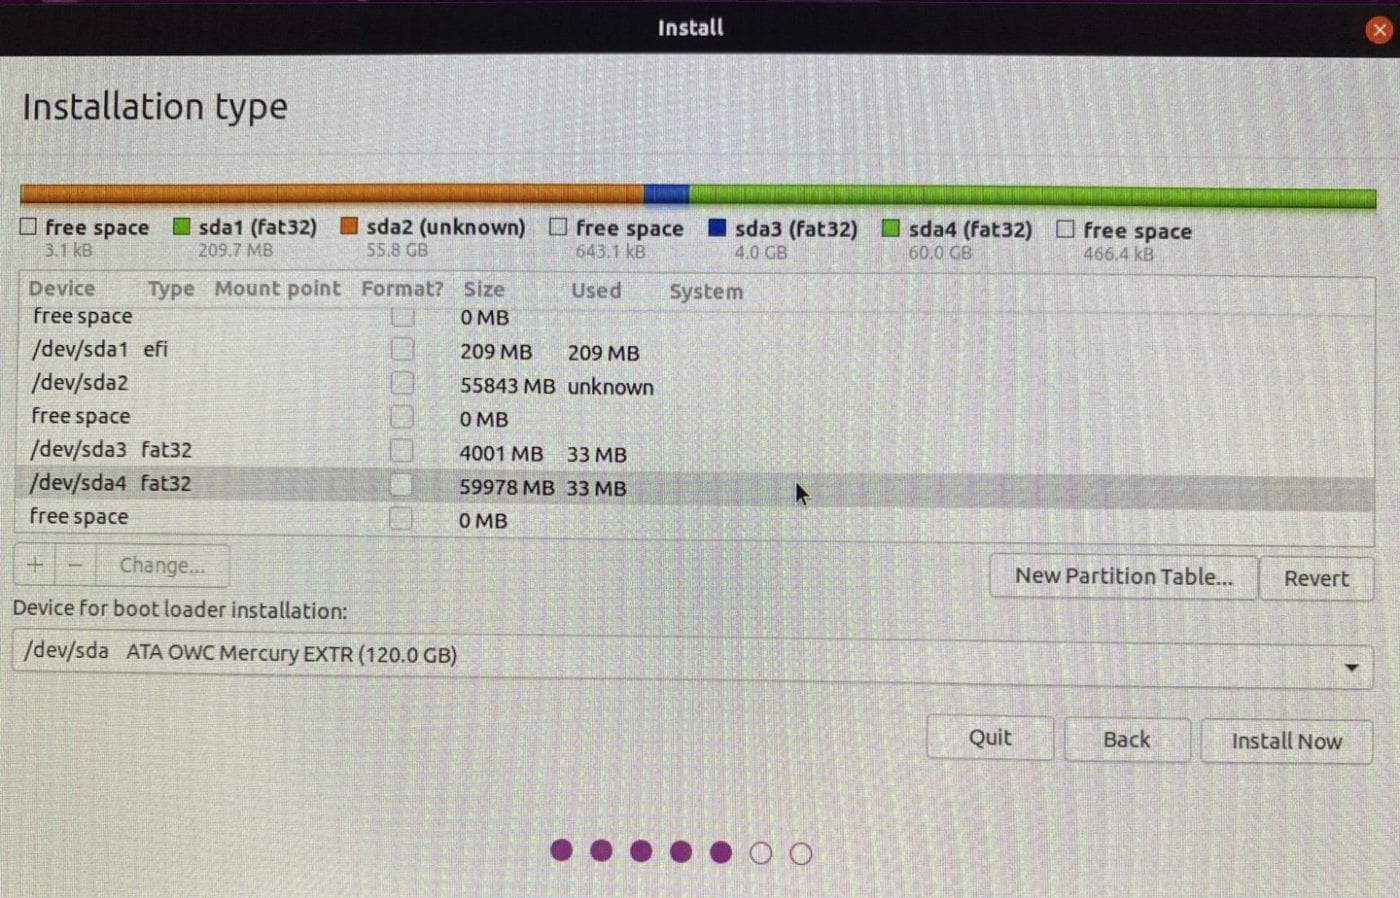
The next screen (below) displays how the disk is formatted. The Orange (sda2) is macOS, the blue (sda3) is the Swap partition, and the green (sda4) is our Ubuntu partition.
Assign the partitions to Linux
To set up the partitions to use Linux, select the Swap partition first (4GB in our case) by clicking on the correct Device (/dev/sda3 fat32 in my example) to highlight it, then click Change…
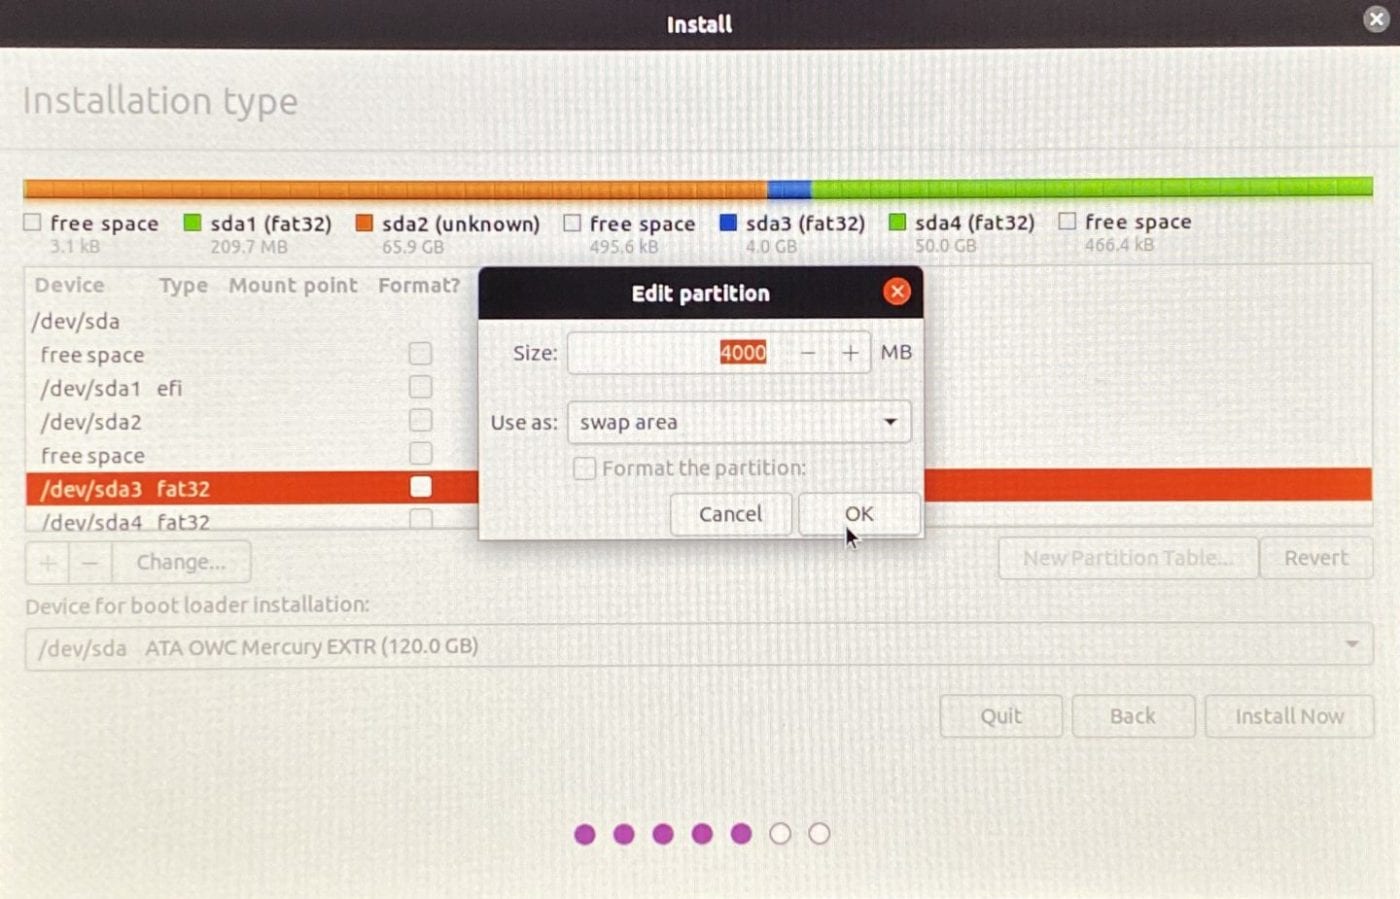
A dialog titled “Edit Partition” appears (see screenshot above). See the “Use as” drop-down? Select “swap area” from the list, and then click OK. Note that you’ll see a “Write previous changes to disk and continue?” dialog — click Continue and let the installer do its thing.
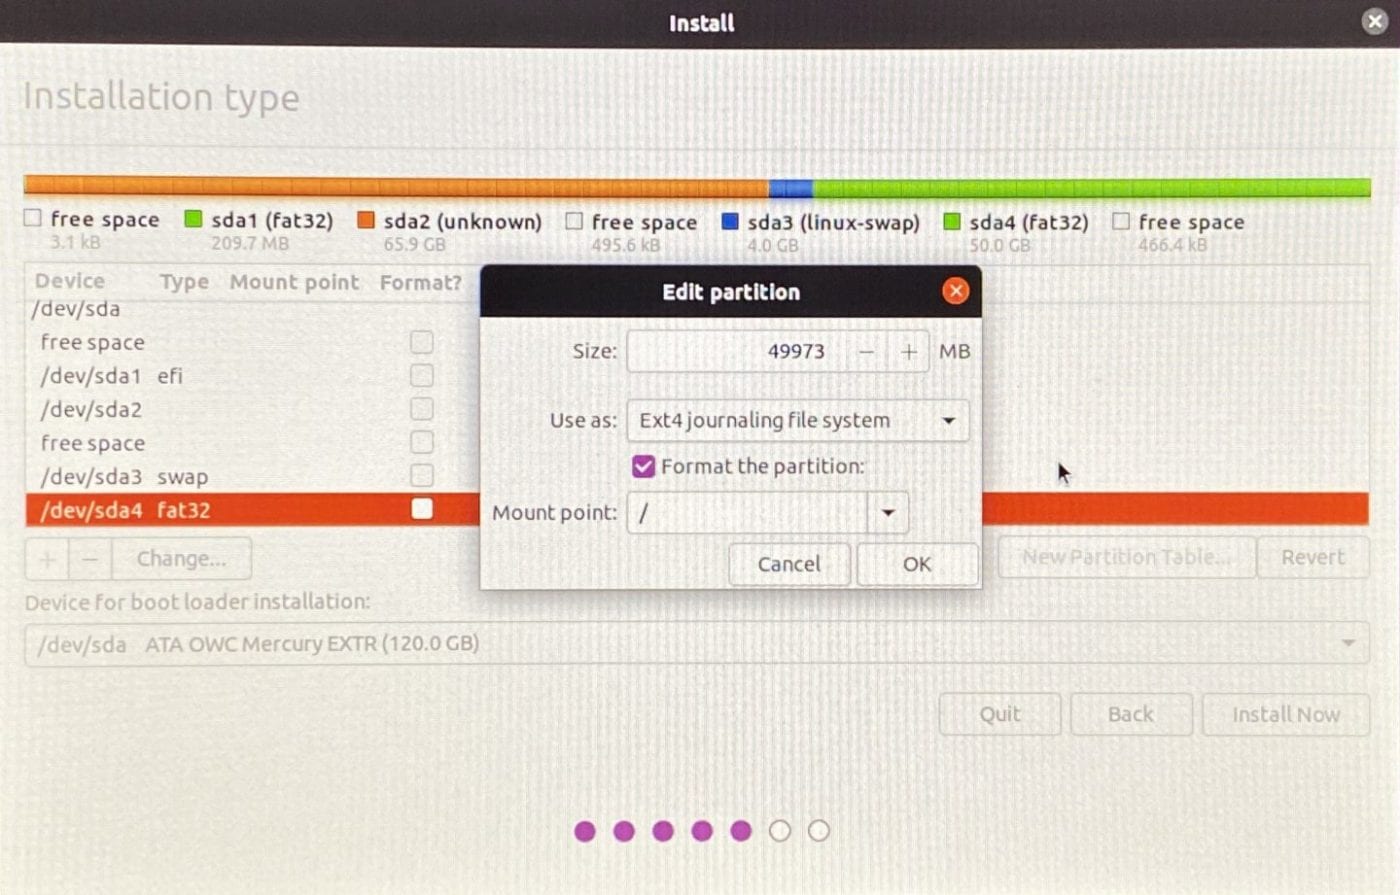
Now it’s time to allocate the larger partition to be our main Ubuntu partition. Click on the Ubuntu partition (/dev/sda4 fat32 in this example) to highlight it, then click Change. The Edit Partition dialog appears again. In this case, select “Ext4 journaling file system” from the drop-down menu, check the “Format the partition” box, and select / as the mount point. Click OK.
At this point, you should have two partitions — a smaller one of type “swap” and a larger one that is going to be formatted as “Linux ext4”. These partitions coexist with the macOS partitions.
Time to Install Ubuntu on our Linux Server
Feeling lucky? Click the Install Now button. Before anything happens, the Ubuntu installer gives you one more chance to make sure you’ve done everything right.
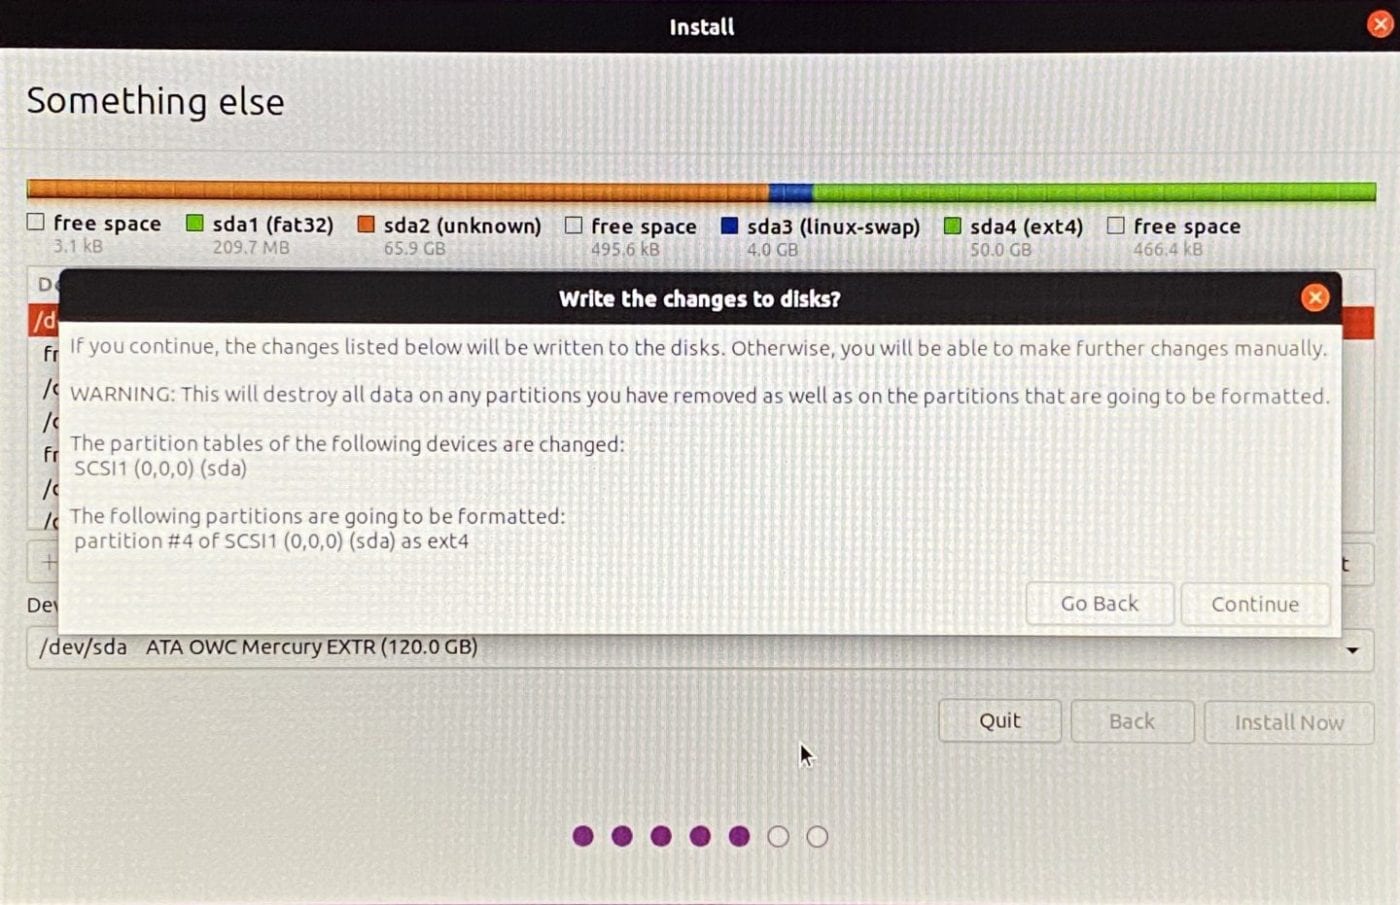
I’m feeling lucky, so with a click of the Continue button, we’re on our way to setting up our Linux server.
You’re asked to pinpoint your location on a map in order to set the proper time zone. If Ubuntu has selected the correct time zone, click Continue. If not, click on the map to denote your time zone, then click Continue.
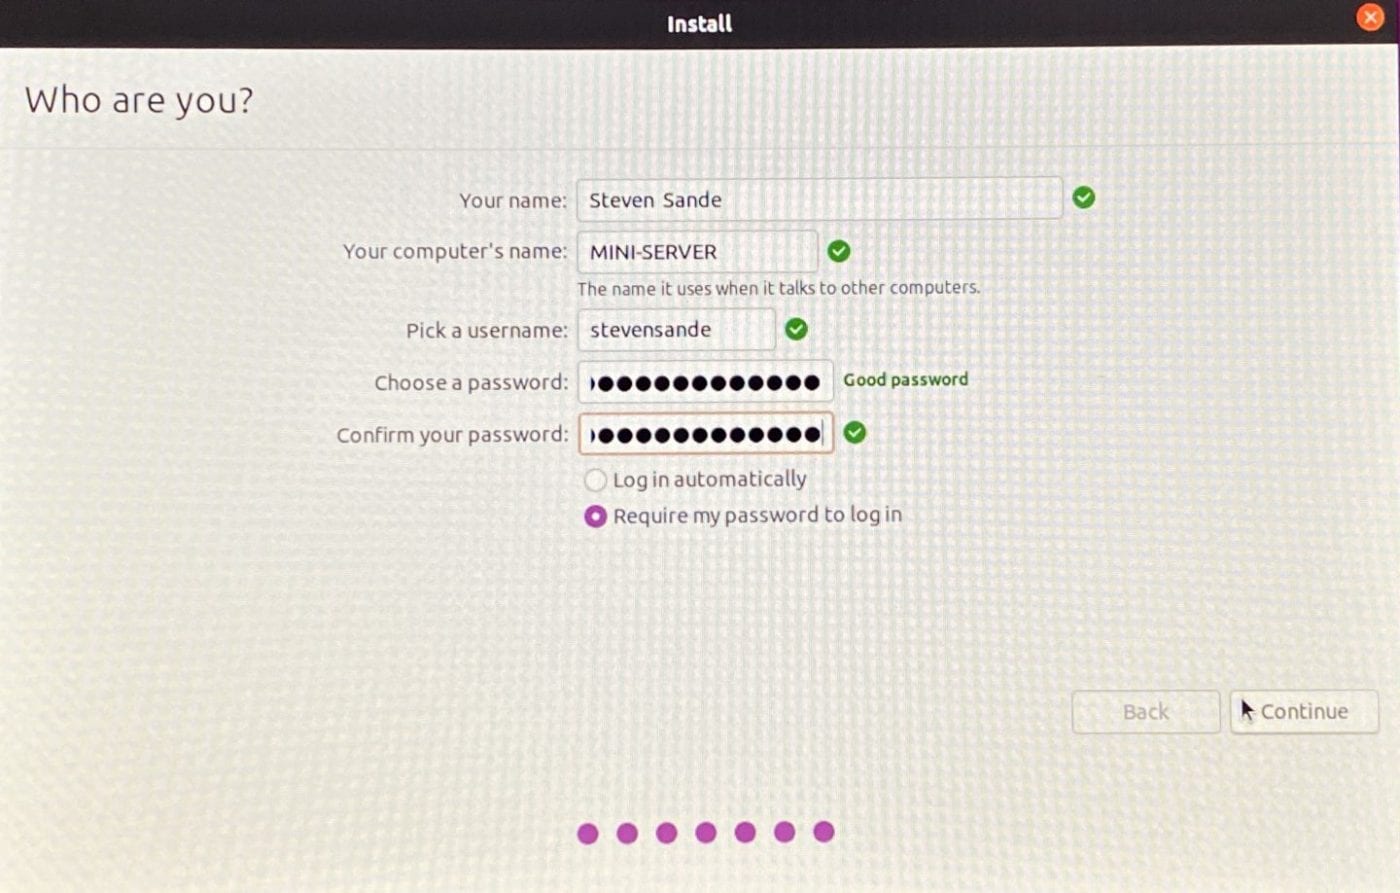
Set up a user account on our Linux server
The next screen asks information for setting up your administrative account. It asks for your name, the name you wish to give the computer (we called this MINI-SERVER), a username, and a password. Fill the blanks and click Continue.
While Ubuntu is installing, it displays a splash screen showing the features of the most recent version as well as a progress bar. When everything is ready to roll, you’ll see an “Installation Complete” dialog with a Restart Now button. Click that button.
You’ll see some code on the screen, then a dialog asking you to “Please remove the installation medium, then press ENTER” (that’s the Return key on your Mac keyboard). Once the install DVD has been kicked out and you’ve retrieved it, press Return.
First boot of our Linux server
The Mac boots into Ubuntu Linux, and you’ll be asked to log in with the password you set earlier. Type it in and press Return.
Before you do anything else, it’s a good idea to set up Wi-Fi. In the extreme upper right corner of your screen, you’ll see what appears to be a “power button”. Click it, and you’ll see some settings. It will show Wi-Fi as “Not Connected”. Click the downward-pointing disclosure triangle, then choose “Select Network” from the choices available.
Click the name of the Wi-Fi network you wish to connect to, click Connect, and then enter the password for the network. As soon as you see that the computer is connected to your Wi-Fi network, you can continue to go about your business.
Livepatch and Ubuntu One
You may see a dialog asking you to set up Livepatch, which is a tool to keep your Linux server machine secure by automatically applying patches that normally require a reboot. You’ll need to re-enter your Ubuntu password to authenticate, and then set up an Ubuntu One account.
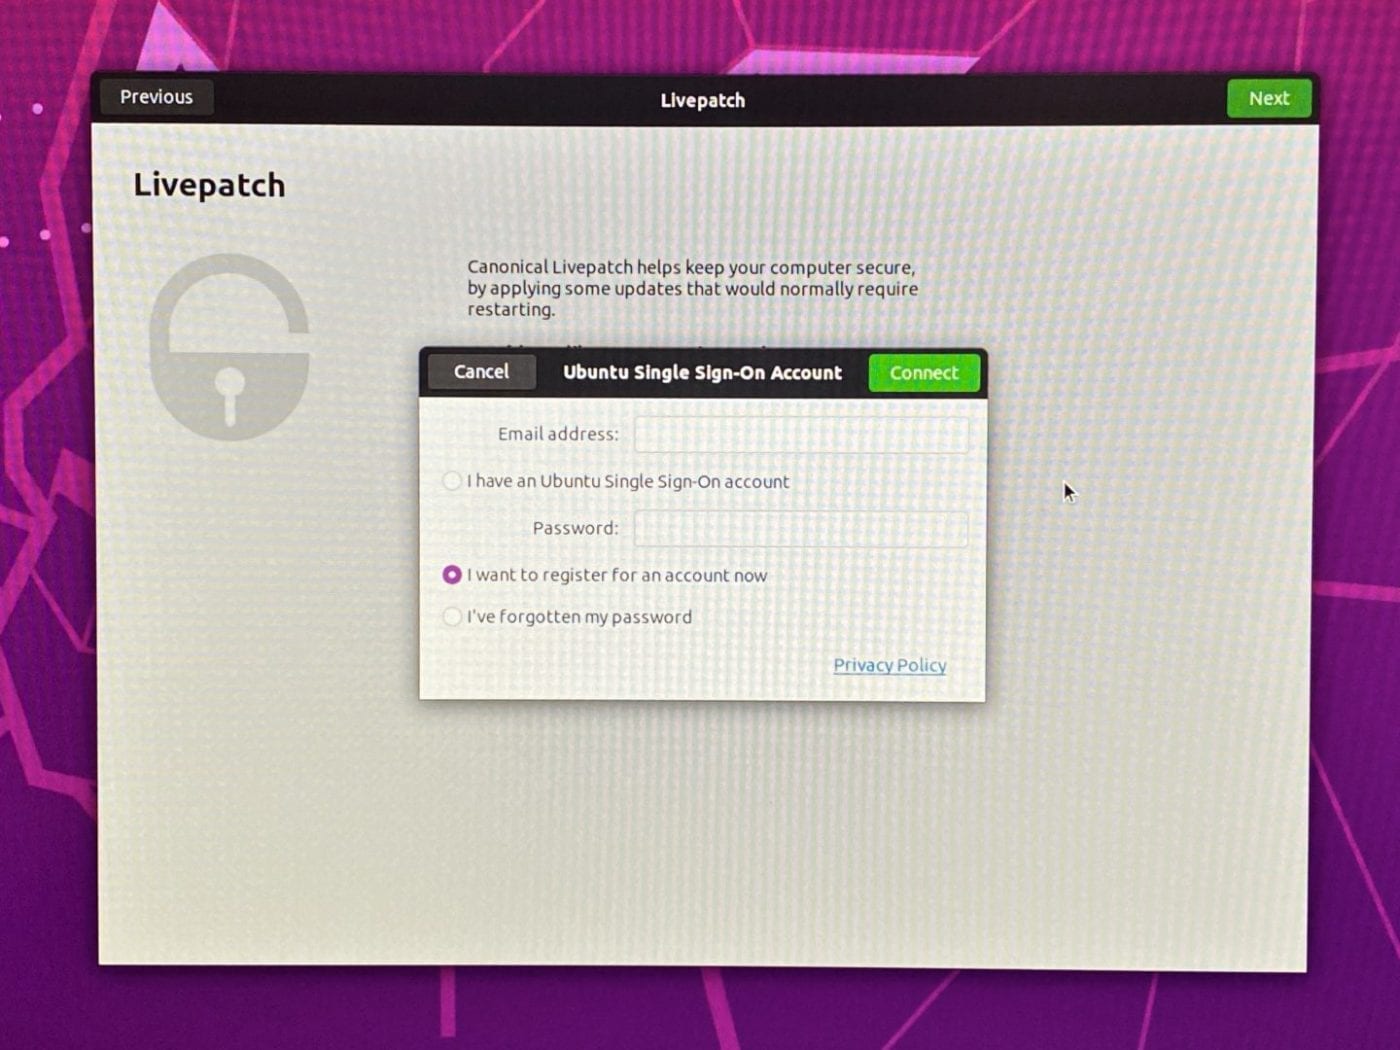
Click the “I want to register for an account now” radio button before clicking Connect. This launches Firefox (the default web browser for Ubuntu). Fill in your email address, select a username, and a password.
You’ll need to verify the email address. Since you haven’t set up email on the Linux server machine yet, check your iPhone, iPad, or another Mac for an email from Ubuntu One. Click the confirmation link and follow the instructions.
When in doubt, test it out
At this point, it’s not a bad idea to make sure that we can actually dual-boot the Mac/Linux hybrid! Go to the upper right corner again, and Power Off.
Now, press the Option key on the keyboard, and power up the Mac mini again. You’ll see two volumes to boot from — EFI Boot (Linux) and Macintosh HD (macOS). Select EFI Boot to head back into Linux, or select Macintosh HD to boot into macOS. I tried both of them just to be sure that everything was working as desired.
Until Next Time…
This has been a lot of time-consuming work so far. The Mac mini is now set up as a dual-boot macOS / Ubuntu Linux server machine.
In the next installment of this series, we’ll look quickly at the basic Ubuntu operating system, then dive into setting this mini to be a full Linux server.


Hello! Perfect article! I’m use a mac mini late 2009 as web/mail/media server, and i replaced the hd, for SSD and increase memory RAM.
The performance, is very good, for my scenario.
Thanks!
I have a Mac Mini 2013 and it doesn’t seem to recognize the ubuntu USB boot device. I think it might be because it is a hybrid ISO. Any idea how to burn a USB that works?
Does anybody have issues with WIFI, I can’t make my wifi work in Ubuntu. I have 2018 Mac Mini, all is good but the WIFI, would appreciate the help.
I myself have not had the problem but there have been reports from others who have, including: https://www.forbes.com/sites/jasonevangelho/2019/12/09/breathe-life-back-into-your-late-2013-or-older-apple-mac-with-linux/?sh=4aba05f076b2
This is a little disconcerting, as my interest is actually in moving a 2012 Mac mini to Linux of some sort 100%, i.e. no dual-boot. I am keeping my eyes and ears open!
Hi Steve,
Great article! I want to move forward on converting my Mac Mini to a Ubuntu Linux Server, but I feel as if I need to see where you are taking this next. Any ETA for your follow-up article? Thank you!
Hi Steve
Thanks for this very complete tutorial. I do have an older MacMini 4,1 and would love to try this.
Why the manual steps and dual boot? Why not just nuke the entire drive and load Linux?
This is what I want to do too. Since Apple has essentially EOL’d my 2012 Mac mini and iMac with the advent of Big Sur, I am contemplating putting some flavor of Linux on one of them lock, stock and barrel, no Mac presence (except the logo!). I haven’t seen articles about that so not sure why people aren’t doing it.
Your series couldn’t be more timely for me. I have a MacMini that was struggling to run High Sierra. That was after RAM upgrade and replacing the HDD with an SSD. It started it’s life as my primary desktop. The when I upgraded to an iMac in 2015, it ran macOS Server and continued being useful as my file/print server. Not being able to use Server any macOS more current I was constantly reminded of what I was missing every time I sat down at my iMac or MBAir. More so now with the release of Big Sur. So I took a long look at my sleek, power efficient, quiet, long-in-the-tooth friend and said, “Let’s try Linux”. I skipped the dual-boot since I accepted that it’s life as a macOS device was over. Made a USB installer and brought up Ubuntu. After all of the updates, patches and the like it’s given a new breath of life and seems “peppy” once again. I’ll be looking forward to the rest of your series as I bring it back to life as a server once again. I have some experience with Linux, but can always use a few pointers.
Many thanks. How to do it for Windows Server? Does it need to install Apple Boot Camp?
MaX –
For Windows Server, I think it would be a much better idea to use a Windows PC as Microsoft optimizes the Server software for Wintel hardware. There are also persistent rumors that Apple may get rid of Boot Camp in the future on Apple Silicon, using virtual machines instead.
Steve
Steve,
Thanks for this series!
We are still trying to determine the best replacement for Server 5.6.3 (we have become highly reliant on having our own in-house mail server).
Thanks! The next article will show how to install LAMP (Linux Apache MySql PHP) and then install other useful things like…a mail server! Since AMP is at the heart of every WordPress install, I’ll also show how to install WordPress and some other very useful apps.
Steve