

Your shiny and speedy new Apple Silicon Mac is missing something – the ability to run virtual machines. While you might be spending most of your time in macOS 11 Big Sur, your job might require you to use Windows-only apps, Perhaps you need a Linux VM for development work. UTM (which I believe stands for Universal Turing Machine) is an open source virtual machine environment.
UPDATE (July 9, 2021): Parallels Desktop now runs on Apple Silicon, a solution that was not available in March of 2021 when this article was first published. VMWare has pledged an Apple Silicon version of Fusion, but it won’t support Windows virtual machines! There’s still no word on whether the free VirtualBox VM environment will ever be updated to run on Apple Silicon.
That’s why I was happy to see that there is a VM environment that works on M1 Macs – UTM. It’s free to download or $9.99 on the Mac App Store. UTM also works on “the other Apple Silicon”, with versions of both iOS and iPadOS. If you’ve ever had a burning desire to run Windows on an iPhone or iPad, UTM does the job. However, your devices must be running iOS 11 – 13; iOS 14 requires a jailbreak. Let’s see an example of how UTM works on M1 Macs.
Download UTM
It’s quite simple to download UTM for Mac. To download the app you go directly to the app download page and either click the Download button or click the Mac App Store button to pay $9.99 for the app.
Why would you want to pay $9.99 when the app is free? Because you’ll get automatic updates just like any other Mac app downloaded from the Mac App Store. Your purchase also funds the future development of UTM. I would suggest downloading and using UTM for Mac for free; if you end up using it regularly for work or pleasure, purchase it.
Install UTM
If you purchased UTM from the Mac App Store, installation is done for you. If you download the app directly, a disk image file named UTM.dmg appears in your download folder. Open it to mount the disk image. Press the Command Key, then drag the UTM application icon from the disk image to the Applications folder.
Launch UTM
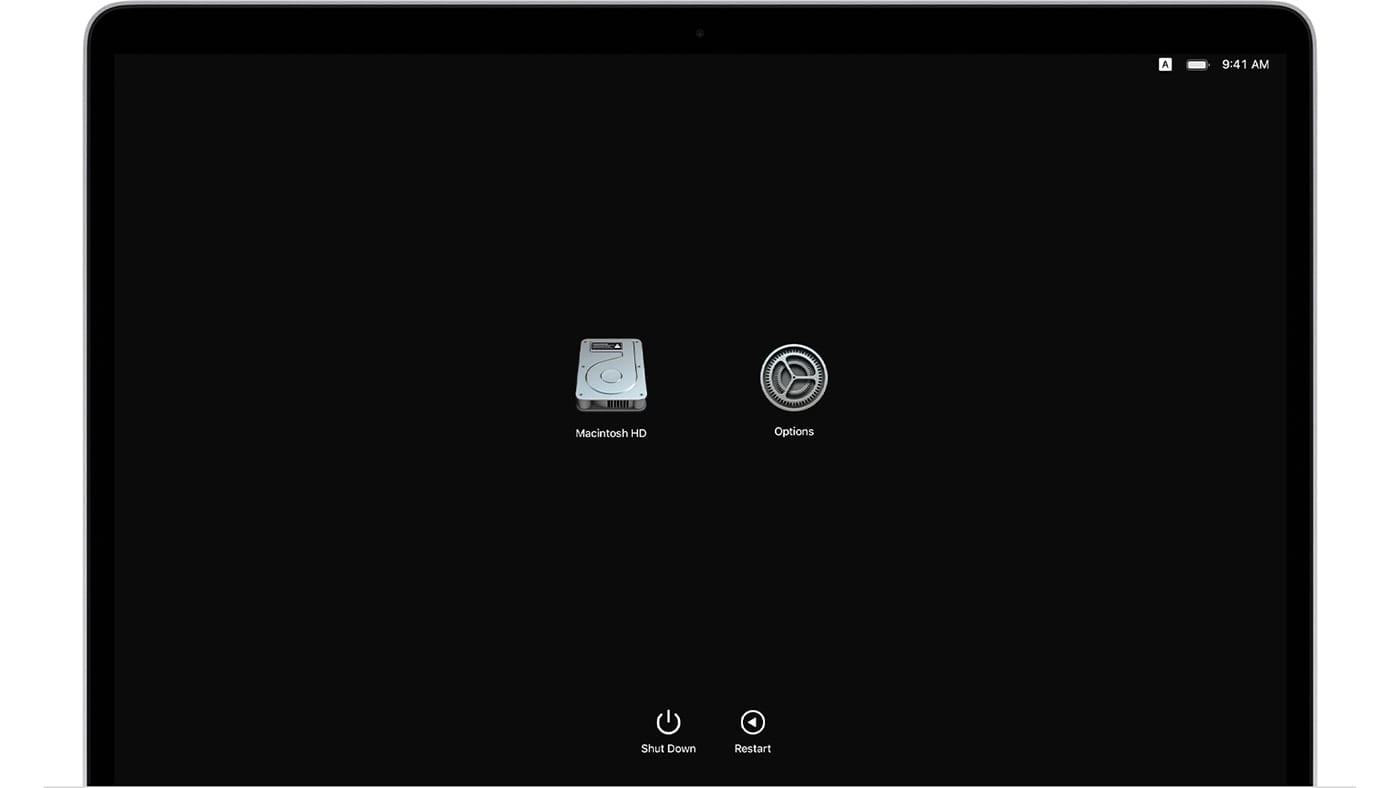
That was easy, wasn’t it? Now launch UTM, and a screen similar to this appears:
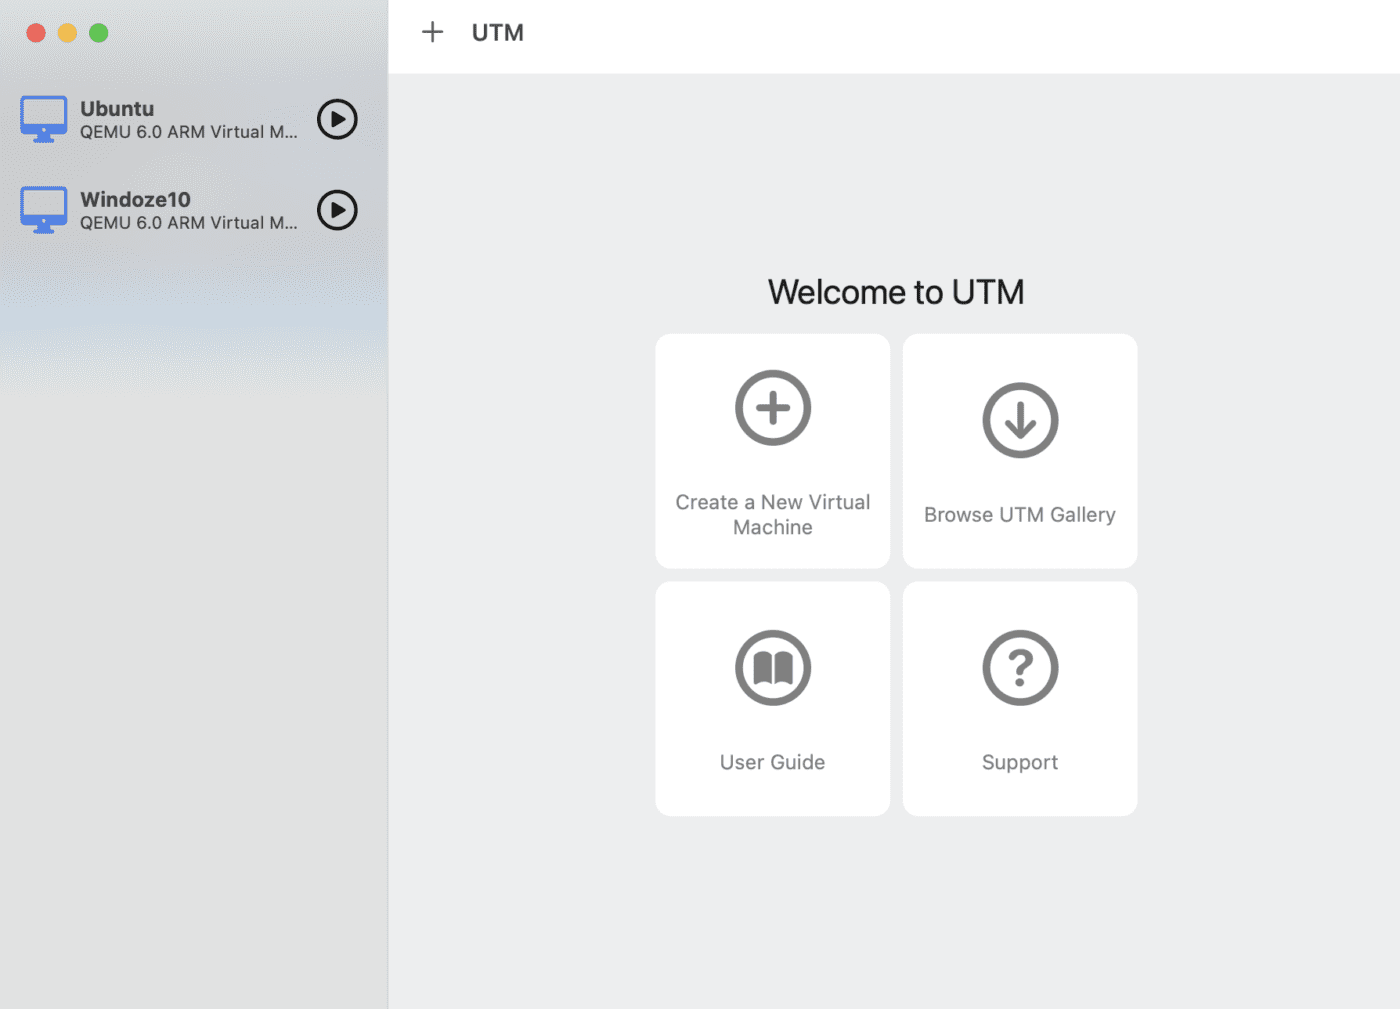
You’ll notice that this startup screen has four buttons: Create a New Virtual Machine, Browse UTM Gallery, User Guide and Support. Clicking the User Guide button launches a web page in your default browser displaying a succinct user guide.
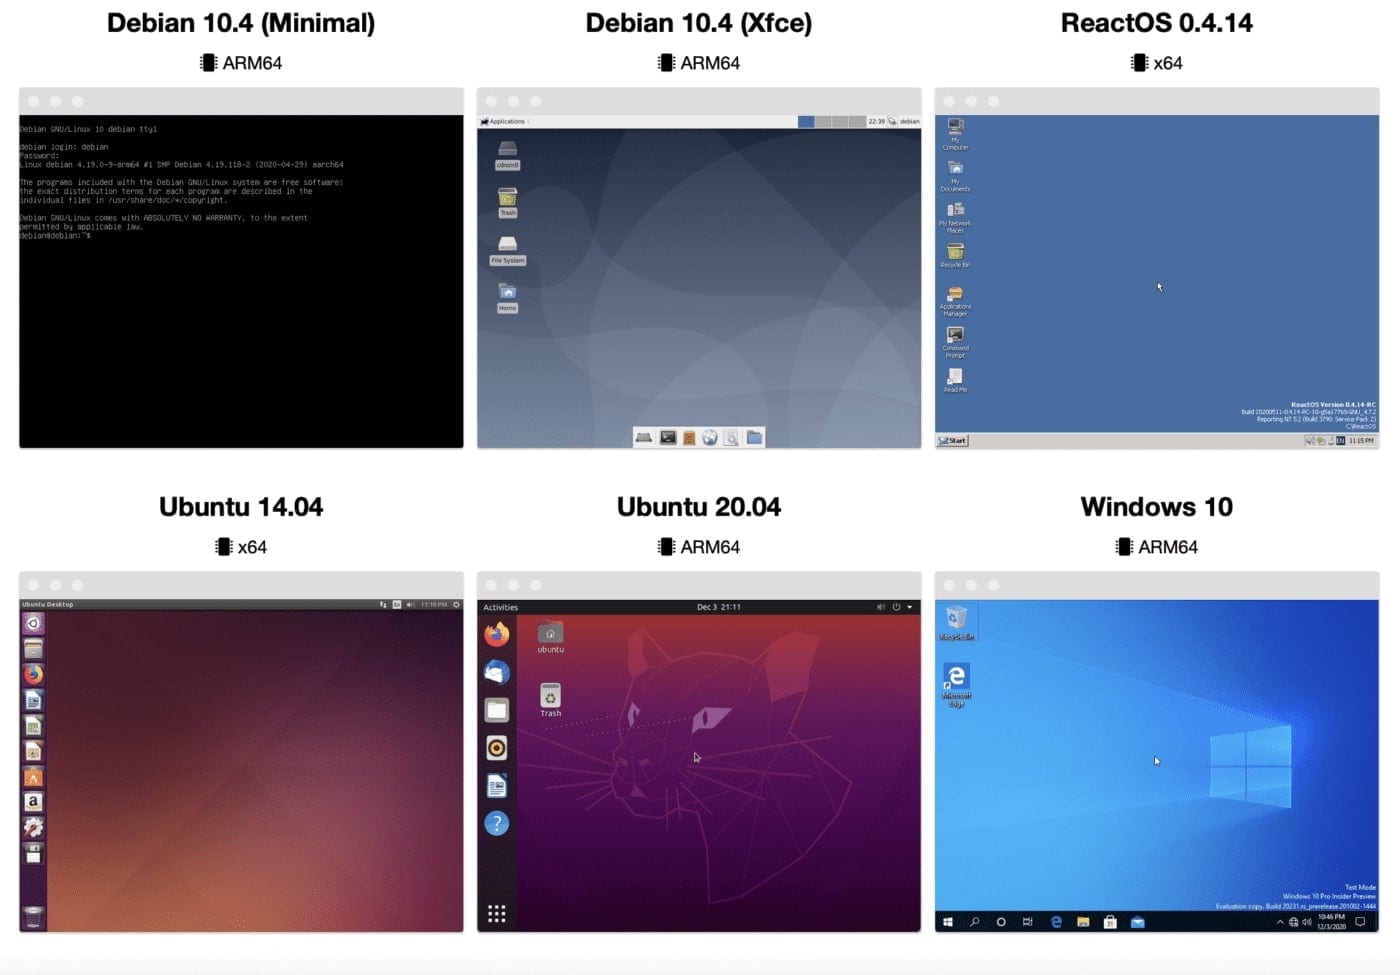
Probably the most useful button for new UTM users is Browse UTM Gallery. Click this to display a web page with links to download pages for a number of virtual machines (screenshot above). At this time, ARM native VMs are available for:
- ArchLinux
- Debian 10.4 (Custom i3, LDXE, Minimal or Xfce)
- ReactOS 0.4.14
- Ubuntu 20.04
- Windows 10 (requires free membership in the Windows Insider Program)
Creating a Windows 10 Virtual Machine with UTM
As an example, I’ll be creating a Windows 10 virtual machine. Click Windows 10 in the Gallery to display a web page showing requirements. Those consist of an Apple Silicon Mac, UTM for Mac, Windows for ARM, and SPICE Guest Tools. Links to the software components appear in the Gallery. Download each file to your Mac prior to starting the installation.
The Windows link downloads a VHDX (Hyper-V Virtual Hard Disk) with the installer. SPICE Guest Tools are a collection of utilities and drivers to aid running Windows on Apple Silicon.
UPDATE: In a previous version of this article, UTM booted from the VHDX file to install Windows. There’s a new critical step — that file must be converted to QCOW2 format. Here’s what the UTM team had to say about the conversion (from https://mac.getutm.app/gallery/windows-10-arm):
Due to an issue with QEMU handling of VHDX images, sometimes Windows will be corrupted from normal usage. This would result in BSOD or random application crashes/errors. To work around this issue, it is recommended that you convert the VHDX image to a QCOW2 image. Currently, UTM does not provide this functionality in the UI so you have to do it directly from QEMU.
- Install Homebrew if you do not have it already.
- Run
brew install qemu - Run
qemu-img convert -p -O qcow2 /path/to/Windows10_InsiderPreview_Client_ARM64_en-us_21286.VHDX /path/to/output/Windows10_InsiderPreview_Client_ARM64_en-us_21286.qcow2replacing the paths with your own. - Use the QCOW2 image with UTM. It is recommended you do this with a fresh VHDX from Microsoft in case your image was already corrupted.
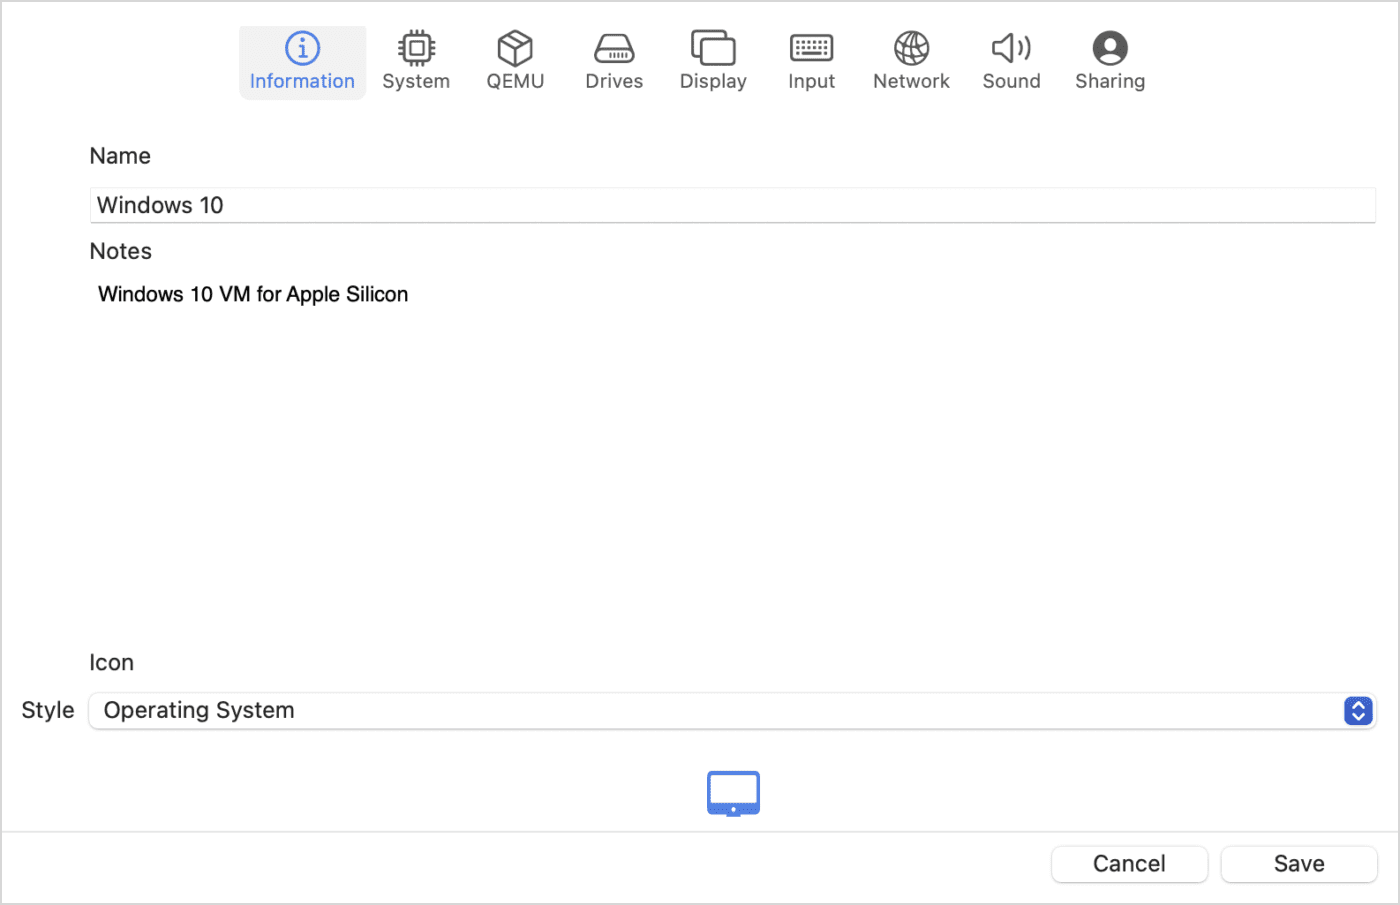
Now comes the fun part! With UTM open on your M1 Mac, click the Create a New Virtual Machine button. I gave the VM the name “Windows 10”, added a note that this is “Windows 10 on Apple Silicon”, and added an optional operating system icon (see image below).
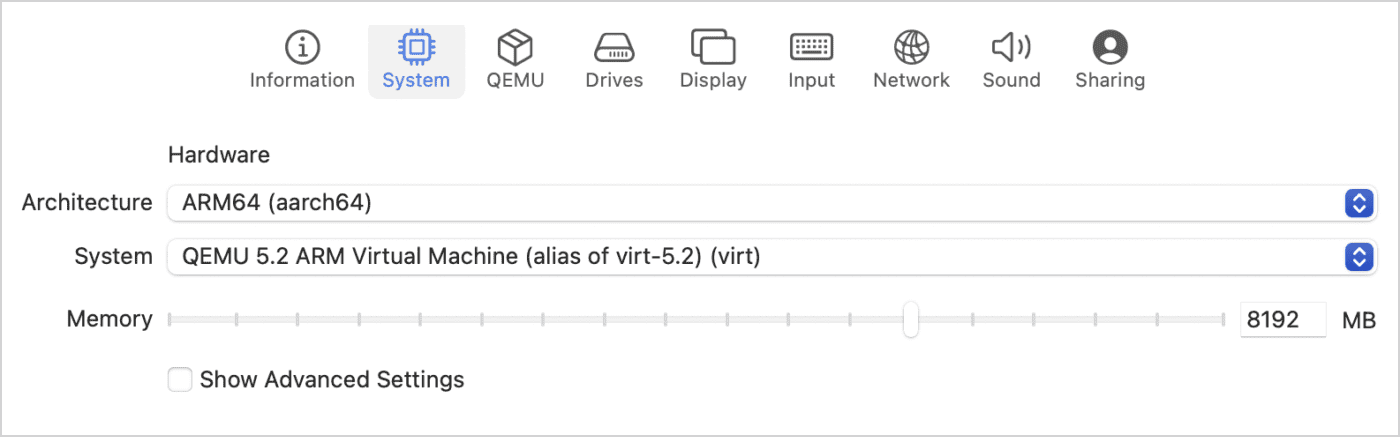
Next, click the System tab. Here, select ARM64 (aarch64) as the architecture, and select at least half of your system’s memory for the virtual machine. For an M1 Mac, that can be as much as 8GB (8192MB).
UPDATE: Note that you should use QEMU 6.0 ARM Virtual Machine (alias of virt-6.0) (virtual) rather than the 5.2 version shown below.
Connecting the Windows Drive
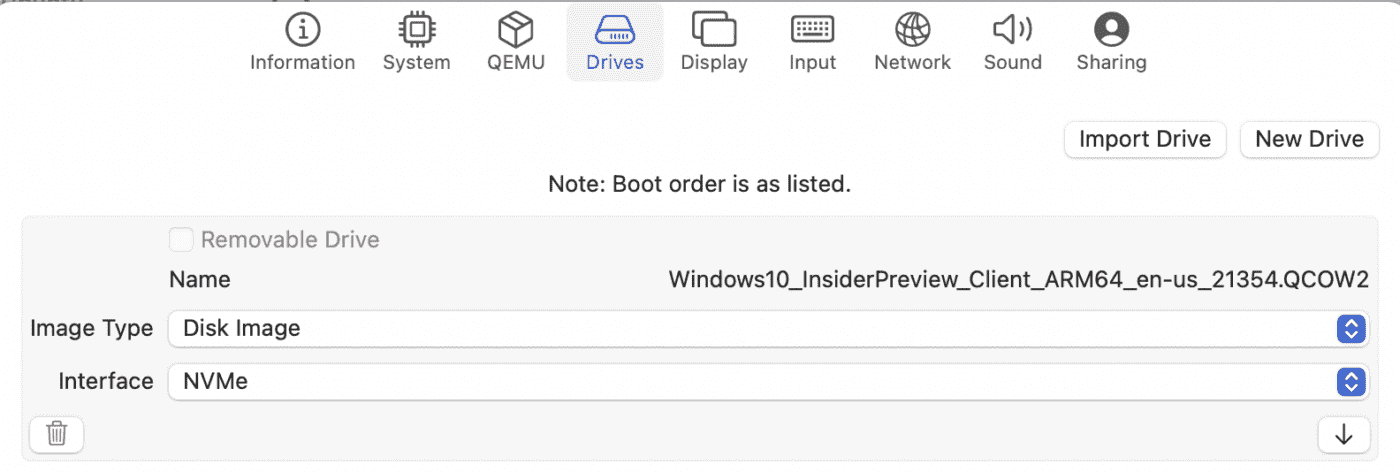
UPDATE: Now click the Drives tab. Click the Import Drive button, then navigate to the Windows 10 QCOW2 file you downloaded earlier. Open it, then select NVMe as the Interface to the drive (important – many people neglect this important step, resulting in boot errors!)
We need to add one more drive – a virtual CD/DVD drive to read ISO image files. Click New Drive, then add a removable drive with a USB interface (image below):

Click “Create”. The Windows Disk Image and the virtual USB CD/DVD Drive appear on the Drives tab. Click Save.
Add the SPICE Guest Tools ISO as a CD/DVD
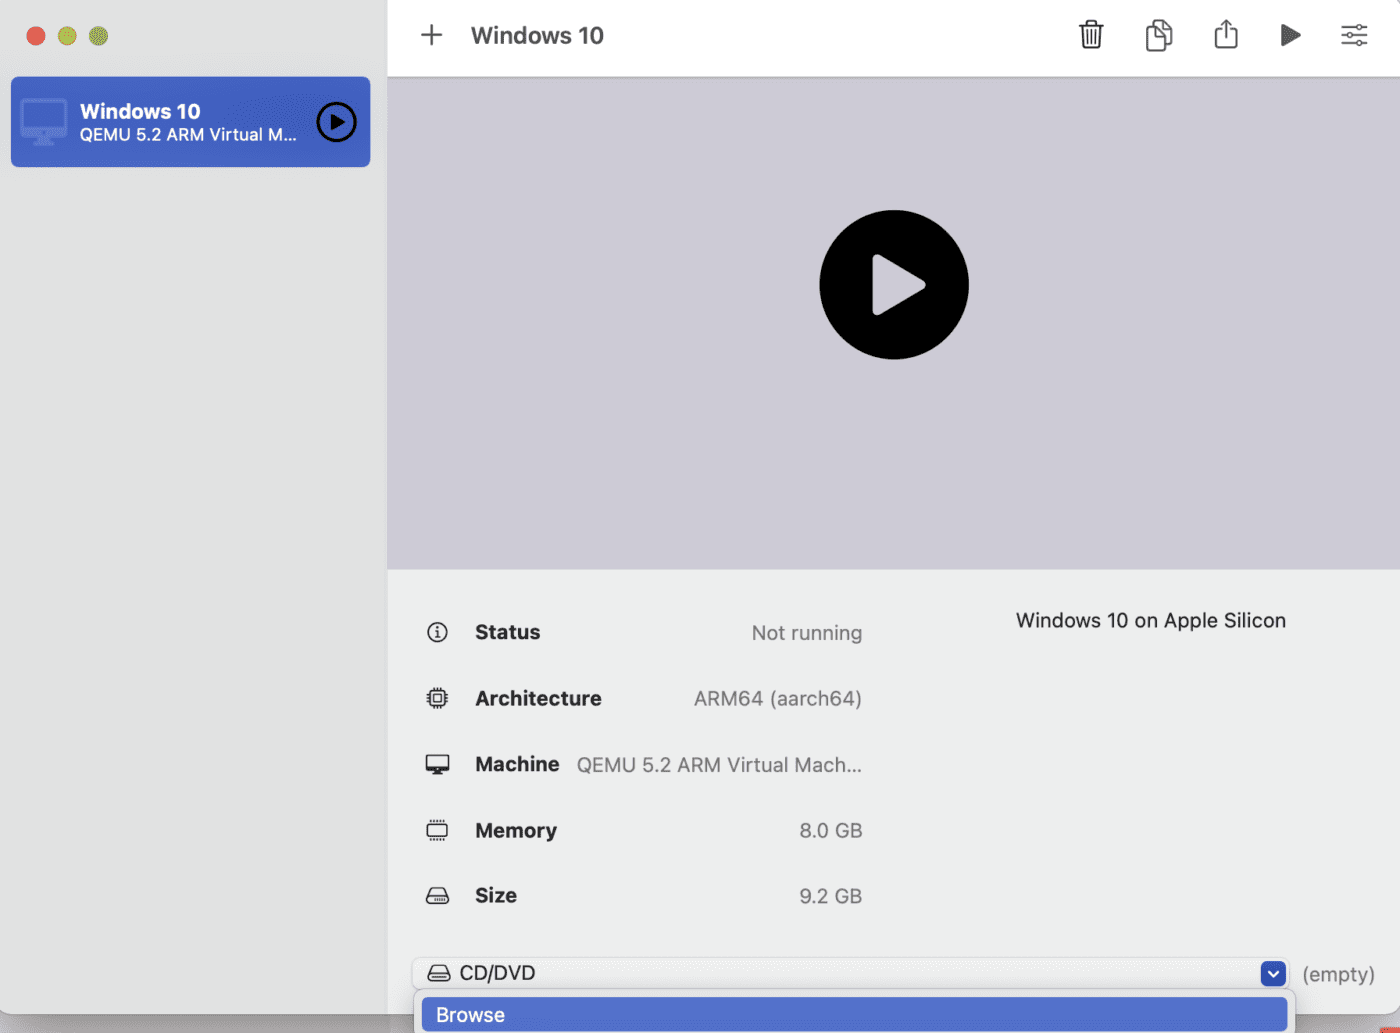
You now see the Windows 10 virtual machine in the left sidebar of UTM. Click it, and on the right side of the screen, you’ll see the information. CD/DVD appears as “empty” – click on it and select Browse. Now find the SPICE Guest Tools ISO file that was downloaded earlier, select it, and Open it to make it available to the virtual machine (image below).
Install Windows
Ready to rock and roll? Click that big button in the middle of the virtual machine window (the “play” triangle in the black circle).
Sit back and watch as the Windows installer goes through its processes. You’ll be asked to select your region – in my case, the United States was selected, so I clicked Yes to continue. Note that you might not actually see the cursor on the Windows installer – if that’s the case, click the cursor button in the toolbar to make the cursor visible. You can also hold down the control and option keys to make the cursor visible in Windows.
Next, Windows wants to know if your keyboard layout is correct. Mine was listed as US, so I clicked Yes. You’ll be asked if you wish to add a second keyboard layout. I chose to skip this step.
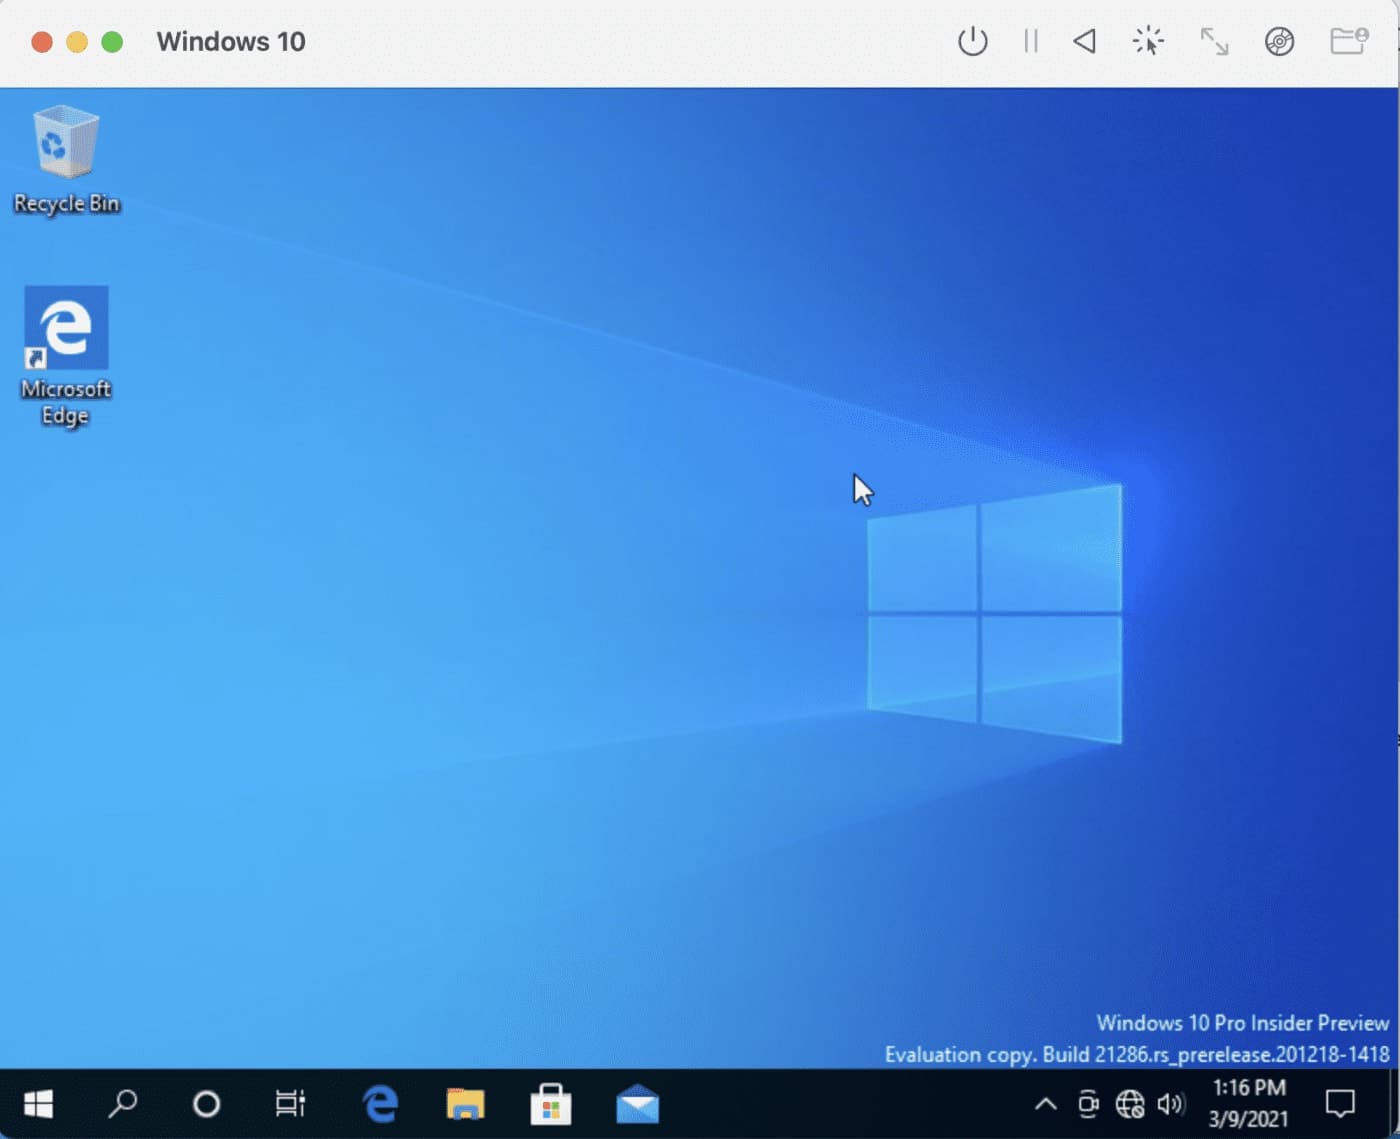
Windows also wants you to connect to the Internet…yet there is no way at this point to actually select a Wi-Fi network. Click the “I don’t have Internet” link and continue the installation. Within a minute or so, the usual Windows 10 desktop appears:
Run the SPICE Guest Tools installer application
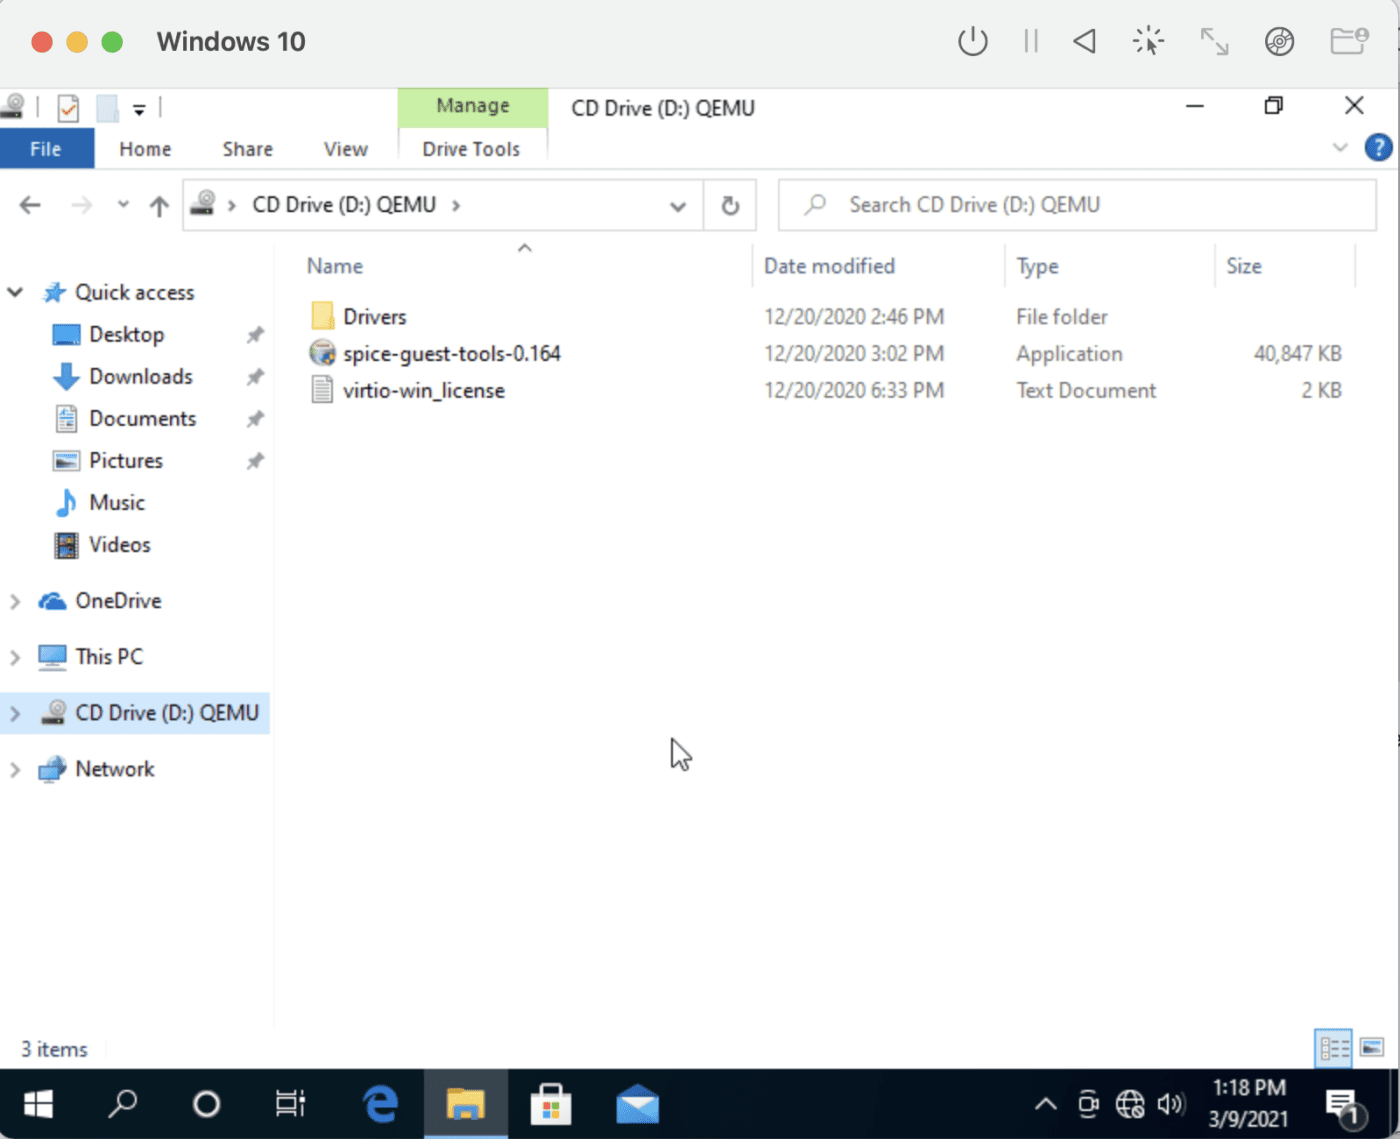
To load drivers and actually be able to do some useful things with the Windows 10 virtual machine, click on the File Explorer button (the file folder icon in the bottom toolbar – see below). Click the CD Drive (D:), and then double click on the spice-guest-tools-0.164 (version number might be different) application. Allow the application to write to your “Windows machine” and let it complete the installation of drivers.
This installs drivers you need for an Internet connection…although Windows may still tell you there’s no connection.
Sharing Files with your Mac
I’m not going to show you how to do everything with Windows, as where’s the fun in that? 😀 But there is one good thing to know, and that’s how to share files with your Mac (the “host” machine).
Shut down your Windows virtual machine, then with UTM running and the Windows VM selected, click on the Sharing tab. Click Enable Directory Sharing, then click Save.

You’ll see Shared Directory listed now under the idle virtual machine. Click it to browse for a Mac directory (folder) you wish to share with the Windows VM. At this point, you can launch the virtual machine again.
How Well Does UTM Work?
There are some little quirks you’ll run into using UTM and Windows. For example, it seemed like the cursor liked to disappear. That was usually resolved by using the control-option key combo to make it visible. I also noticed that after shutting down the Windows VM using the Windows “Shut Down” command, I’d lose the cursor completely. The only way I found to resolve that was to use Command ( ⌘ )-Option-Esc and Force Quit UTM.
Compared to most Windows virtual machines I’ve used, UTM and the ARM64 version of Windows seemed lightning fast. The UTM developers do mention that the app doesn’t do GPU emulation, so it’s probably not wise to try to play graphics-intensive games.
UPDATE: Fast scrolling of any window in the virtual machine also produces a somewhat pixellated image. This is normal.
Ubuntu Server for ARM
As a second experiment, I installed Ubuntu Server for ARM from the UTM Gallery. If you have followed the Ubuntu Server on Mac mini series, you’ll know that it was a rather convoluted and time-consuming process to get it running. Not so with UTM and the instructions on how to install Ubuntu Server for ARM.
I installed the server quickly following the directions, then install Ubuntu Desktop as well to give the virtual machine a friendly non-command-line interface. In less than 15 minutes, everything was up and running:
To be honest, the Ubuntu virtual machine installation went much smoother than the Windows installation, primarily because Ubuntu Linux “knew” immediately how to resize the VM screen to fit the MacBook Air at its highest resolution. The Mac mini server was no slouch in terms of speed, but the virtual machine on Apple Silicon is insanely fast.
Anyone with an Apple Silicon machine – the M1 MacBook Air, MacBook Pro, or Mac mini who has a need to run another operating system needs to take a look at UTM (especially since Virtualbox is not yet an option). It’s not perfect and can be a little finicky during setup, but with a little patience, you can be running Windows 10, Linux, or other operating systems at full speed.


Great. How would one connect a Windows VM in UTM to a Window local network?
Hi Steve,
Thanks for the very detailed step-by-step guide.
Looks like the Windows part is no longer relevant.
They now have a link to a UUP download which converts the files downloaded into an ISO, which you then can install normally using UTM.
I’m new to this kind of stuff. I believe I can understand the instructions for installation, but the windows installation from “Windows Insider Preview Downloads” is not an .iso file as I expected, but is a .VHDX file. How would I install with this file?
Hi Steve,
I’ve managed to install Jupyter Notebooks on the Manjaro pre-built, which makes me very happy. But now I’m wondering, is there the capability to export a UTM to other formats, like OVF?
Hi Steve,
Thank you for the detailed instructions.
Have you had a chance to try the Ubuntu with a mac mini using the 10Gbe card if Ubuntu or UTM supports the 10Gbe card and gives your that speed to your Ubuntu ?
Thanks,
Amit
Why bother with this when Monterey has virtualisation built in?
Because even though Monterey has virtualisation built in, maybe you want to virtualise and isolate machines with different OS (like any Linux distro) to do some labs, test stuff, etc, that depends on the OS.
Any luck installing RHEL 7 or CENTOS 7 in UTM for Mac M1
try parallels desktop for RHEL
Shared directory works for me but the files are all greyed out. And there’s no drag and drop. I have Spice Tools installed. Do I need to enable something on the Mac side?
Hi Steve,
thanks for your execlent instructions which I have complete follow. Everything are working fine until I want to start the virtual maschine on UTM. It crashing always with the error “This version of macOS does not support GPU acceleration. Please change the VM configuration or upgrade macOS.” I’m using an mac book pro with an M1 chip and apple big sure, the UTM version are the last one (2.4.1) so it seems all staffs are well prepared.
Do you have any idears why the setup might be not working on my PC?
Thanks for your support here. Reagrds Peter
hello sir , when i tried to start windows i got
“The operation couldn’t be completed. Connection refused”
im running mac silion big sur version 11
When I install Ubuntu on my Mac Mini M1 the VM has an ip of 10.0.2.15 whereas my local lan is 192.168.0.x
Is there a way to configure the VM to be part of my local lan so I can see it from other devices?
yeah, same problem. why there is no bridge mode ?
It would be nice to have detailed instructions to install os x leopard on utm. I tried to use the ones for ios but with no success. Thanks in advance.
Mario
PS it seems that people are more interested in virtualizing/emulating windows or even linux. For a long-term os x user it may be more useful to emulate older os x versions for apps they have that don’t work on apple silicon or recent macoses.
Agreed! If you google it, there’s a video of someone trying to get it working, with a link to someone who got it working under Windows. I’m trying on an M1 now, and can’t boot the drive after install. Really annoying.
I installed the UTM on my Macbook air m1 and run the ubuntu 20.04 lts on it, but for some reason that I do not know why my keyboard stops to working. Someone knows how can I do to my MacBook Air m1 keyboard functions properly on ubuntu 20.04 its virtualized in UTM?
If you have a windows machine handy, the free StarWind V2V Converter 9 provides a simple way to convert a windows image to qcow2.
I had Parallels on my first Mac. When I got my second Mac I decided it was cheaper, easier, less hassle to just pick up a cheap Windows laptop than to deal with updating Parallels (and tying up my Mac in the process), and updating Windows (and tying up my Mac in the process). Data is shared between the two with either iCloud or a USB Flash Drive.
You can also access your Windows PC via the Mac using MS Remote Access or other screen sharing app.
If I download 64-bit ARM (ARMv8/AArch64) server install image of Ubuntu 18.04.5 LTS (Bionic Beaver), can I virtualize Ubuntu 18 on m1 mac? Hope to hear from your advice please.
Parallels for Mac is now compatible with the M1 models. However, it seems that UTM only gets you non-macOS VMs. I want to get Mojave on an M1 device. What tool do I use for that?
emulate x86 for vm is only possible with utm
just select x86 cpu when creating the vm and install from iso
it is painfully slow
Let me know if you get an answer-I AM IN THE SAME POSITION-I RUN 32 BIT APPS THAT WON’T WORK ON A M1.
Its really helpful blog post I was so happy while to read it.
Hi, Wondering if anyone can advise.
Just installed everything as per instructions and all went well on initial install and load of windows.
But when I close down Windows and restart the VM, Windows will not boot and will look to do an automatic repair which fails.
Ive tried deleting and reinstalling and the same issue returns.
Can anyone suggest a solution.
Running on new Apple Mac mini M1 8GB ram
On my M1 Windows 10 ARM and Office 2016 run fine. Always power down Windows in Windows, then close the UTM VM. Should restart fine then.
thanks friend
How does one get networking on Ubuntu server up and running? I’m confused by UTM’s network options in the VM setup area. My server VM can perform pings and DNS lookups, but it will not connect to the internet and I cannot apt-get anything. My home network uses 192.168.. addressing and I see that by default the VM uses 10.0.2.* addressing. How can I share my M1 laptop’s wifi connection with this VM?
I figured out my own issue. In my case it was necessary to edit /etc/resolv.conf in order for the Ubuntu VM to access the internet. It’s important to note that the VM cannot ping anything outside of its virtual network, still – internet access should work normally otherwise.
What have you typed in your resolv.conf ?
I think I may have figured this out, the DNS server seems to provide by DHCP 10.0.2.3 by manually adding 10.0.2.2 which is the default gateway this allows me to access the internet, you can use ping to resolve addresses but not to contact them. Hope this helps.
Chris, could you expand on this a little please. I have installed UTM, managed to get the VM working, can talk to the local network address 10.0.2.x but nothing further. Info on getting these VM to talk to other networks seems a little thin and I don’t know if this is a UTM/QEMU setting.
Lee, I have managed to install 2 ubuntu server vm on MBA and both came up and i was able to get the package downloaded and installed from repository, but i cannot talk to either of the vm. I also see that both vm has got same ipaddress “10.0.2.15”.
Hi any luck getting different ip’s I am currently stuck there. created 4 clones but all of them have same ip addresses
How did you get wotwork running on ubuntu ?
Is it possible to install ewxi 7 on mac pro m1
I’m really a noob about vm, so better ask to be sure
About the ram, I said that I can use all my 8gb to VM? Or that recommendation is for a 16gb m1?
Hi, Renner – To make it work, you’d need to run the ARM version of Ubuntu server (https://ubuntu.com/download/server/arm).
Steve
Can I run ubuntu live-server-amd64 ?
Thanks Steve. Great help. Looks good. I’m going to follow your advice and try it on my new MacBook Air switching from Pro. Your advice on the $10 thing is appreciated.
Cheers
Bahman
Hello i installed windows 10 works Ok but everytime i shutdown my VM it goes to recovery and i have to reinstall it again what am i missing?
Thanks Steve, but I can’t find the right Spice Tools. Do you have a link to it?
Best
Dario
Im pretty sure that this is the right link, the download link is at the bottom of the page https://slackbuilds.org/repository/14.2/system/spice-guest-tools/
Here’s the official documentation, with link:
https://docs.getutm.app/guest-support/windows/
Hi. Thank you for this great information. I was wondering how I could get the VM to recognize something plugged into my USB drive on my M1. On a normal PC, this device is only recognized when the program is running (which I installed), but it’s not recognizing anything plugged in.
Thank you!
hi thank u for your guiding eevery thing went well and i found a way for file shareing too but the windows can’t find any sound drivers i tried reinstalling it for couple of times but same thing happend and i know my windows arm file is heathy to because it’s run prefectly while using it in acvm should i do sth about it or anyway to fix this issue
I cannot seem to get a VM to boot in UTM ever since the MacOS 11.2.3 update, am I missing something?
Never mind, I got it to boot with less RAM.
There doesn’t seem to be an option for persistency. Or did I miss something?
Question:
I used Ubuntu 14.04 (x64) and Linux Mint (Iso) and neither seemed to have much of an option for persistency.
Does UTM do persistency?
I take it, however, that there’s still no virtual machine for running older versions of the Mac OS on M1 Macs. Is that correct?
That’s correct — there is no VM available for running older versions of Mac OS on M1 Macs. That should be available once the commercial VM apps (Parallels and VMWare Fusion) become Apple Silicon native.
I have a few questions:
1. Does this work on earlier Macs that aren’t Silicone/M1? I have an Intel MacBook Pro running Catalina (will upgrade to Big Sur soon). The website seems to imply that it can be done with earlier machines as well.
2. Does the UTM software work to emulate previous version of Mac, too? I have software used at work that isn’t compatible with the 64bit MacOS upgrade. I have a version that works with an earlier MacOS, but not with Catalina/Big Sur. It would be simpler to use it than the Windows version.
3. I purchased a copy of Windows 10 to install as a second OS possibly using Parallels. Are you saying that I need to download a version of Windows for ARM if used in this setup? I’d like to use a virtual machine rather than allocating up to half my hard drive for the few Windows programs I need to be able to use at times. So, this is a more attractive option than Parallels, but I’m not clear how this figures in.
Thanks for any help you can give.
Hi, Ronda –
1 – Yes, UTM works on earlier Macs that aren’t Apple Silicon as it is a “universal app”. However, it won’t run as quickly as it does on the M1 chip.
2 – No, it doesn’t work for earlier versions of Mac OS as a “guest operating system”. Parallels Desktop or VMWare Fusion will work to run older versions of the Mac operating system.
3 – You only need to download a copy of Windows for ARM (which is beta software) if you’ll be running it on Apple Silicon. If you create a Windows VM in UTM on an Intel Mac, the version of Windows 10 you purchased will work perfectly.
Steve
Any solutions for running 32-bit Mac apps on Apple Silicon Macs? I’m currently running VMware Fusion on my Intel Mac so that I can run Mojave in a VM.
Hi, Rich – basically, you’ve defined the solution! VMWare Fusion running an older version of Mac OS as a guest OS on an Intel Mac is the only way this can be done. Apple has made it impossible so far to run 32-bit apps on Apple Silicon, and I don’t think they’re going to change…
Steve
Do you think x86 emulation will ever be possible on Apple Silicon? I still have some 32-bit apps which I am still running on Mojave.
Thanks for this artile.
BTW, Crossover claims to run on M1.
I’ve had my Mac for close to a year now and NOW you tell me about UTM.
I’d pretty much given up on Linux on my Mac until now.
Now, I’m a happy(ier) camper running Linux Mint and all the other goodies I’ve gotten used to using Linux, like G’Mic for Gimp for example and other such niceties.
THANK YOU!!!!