If you’re excited by all the new features coming down the pike in Apple’s latest operating systems and want to start experiencing them before their official release later this fall, Apple has released the first public betas for macOS Sonoma, iOS 17, and iPadOS 17.
By enrolling in the Apple Beta Software Program, you can download the beta versions of each OS today. We’ll show you how to do it for each device/OS in this guide.
To read more about the features in each new OS update click here:
First Things First
To install the public beta, you’ll first need to register your Apple ID with the Apple Beta Software Program. Here’s how:
- Head to beta.apple.com.
- Click the Sign up button or if you’ve already registered for the beta program in the past, click Sign in.
- If you’re signing up for the first time, you’ll enter your Apple ID email address and password and then click Sign in.
How to install the macOS Sonoma Public Beta

Compatibility
Before you download the public beta, make sure your Mac is compatible. macOS Sonoma supports only the following Macs:
- MacBook Pro: 2018 and later
- MacBook Air: 2018 and later
- Mac mini: 2018 and later
- iMac: 2019 and later
- iMac Pro: 2017
- Mac Studio: 2022 and later
- Mac Pro: 2019 and later
Before installing Sonoma, it is wise to perform a system backup with Time Machine.
Pay close attention to system requirements before proceeding with the installation of Sonoma. Apple warns that installing the operating system unofficially could leave your system damaged and out of warranty.
1. Enroll your Mac for the latest version of the public beta
Once you’ve signed in at beta.apple.com, click on the macOS tab and then click “Download macOS Public Beta Access Utility.” This will download an installer package that you can open from the Downloads window in Finder. Upon opening, this installer will open up System Preferences to the Software Updates subsection.
Once inside Software Updates, the system will see the public beta installer and allow you to click “Update” to upgrade you from your existing version of macOS to the public beta of Sonoma. (If you don’t see the option to update to Sonoma, restart your Mac and try again.)
Once the Sonoma beta has finished downloading, the installer should start automatically. If it doesn’t or if you want to close the installer and finish the install later, you can reopen it from the Application folder in Finder.
2. Create a separate volume to run both the beta and your current version of macOS on the same Mac
If you’d like to run the Sonoma beta but still keep your current install of macOS available, and you’re running macOS High Sierra or later, you can do so by creating a new APFS volume in macOS.
First, open your Applications folder and click on the Utilities folder inside. Then open Disk Utility. In the sidebar, choose your existing APFS volume (typically called Macintosh HD).
Then click Edit in the menubar and select “Add APFS Volume” from the dropdown, or click the add volume button (+) in the Disk utility toolbar. You’ll only see these options if an APFS-formatted volume is selected.
Choose a name for your new volume and click Add. Once the volume has been created, it will essentially act as a partition of the disk that can expand and shrink as necessary. Perfect for running a beta on. You can now quit Disk Utility.
3. Install the macOS Sonoma public beta
From the Sonoma beta installer click “Continue” at the bottom of the window and then again if you haven’t made a backup and would like to. If you’ve already made a backup, you can click Cancel. Continue again on the next screen, Agree to the beta’s licensing terms and agree once more to confirm.
From here you’ll be able to choose which drive or volume you’d like to download the beta to. If you don’t see the disk or APFS volume you’d like to install the beta to, click Show All Disks. Click the disk or volume and then click Continue.
Now, click Install and then enter your administrator password. Click OK and then click Restart if your Mac doesn’t restart automatically.
4. Enjoy the beta
After the install is complete and the Mac reboots, you’ll be running the macOS Sonoma beta. If you installed the beta on a separate drive or volume, you can shut down your Mac and upon hitting the power button, immediately hold down the Option key until you see the Apple logo appear. From here you can choose to boot up either the beta or the version of macOS you were running previously.
Apple releases updates to macOS public betas just as they do official releases. To update to the latest version of the beta, you can open Settings>Software Update>Update Now.
How to Install the iOS 17 Public Beta

Compatibility
Before you download the public beta, make sure your iPhone is compatible. iOS 17 supports only the following iPhones:
- iPhone 14 Pro and iPhone 14 Pro Max
- iPhone 14 and iPhone 14 Plus
- iPhone 13 Pro and iPhone 13 Pro Max
- iPhone 13 and iPhone 13 mini
- iPhone 12 Pro and iPhone 12 Pro Max
- iPhone 12 and iPhone 12 mini
- iPhone 11 Pro and iPhone 11 Pro Max
- iPhone 11
- iPhone XS and iPhone XS Max
- iPhone XR
- iPhone SE (2nd generation or later)
Beta Means Backing Up
While it is always good practice to backup a device prior to upgrading to a new OS, this is especially the case with software currently in a beta state. Having an iCloud account is an easy way to ensure photos and documents on your mobile device are saved in the cloud. If you’d rather backup your iPhone to a local device you can also copy your data to a Mac or PC.
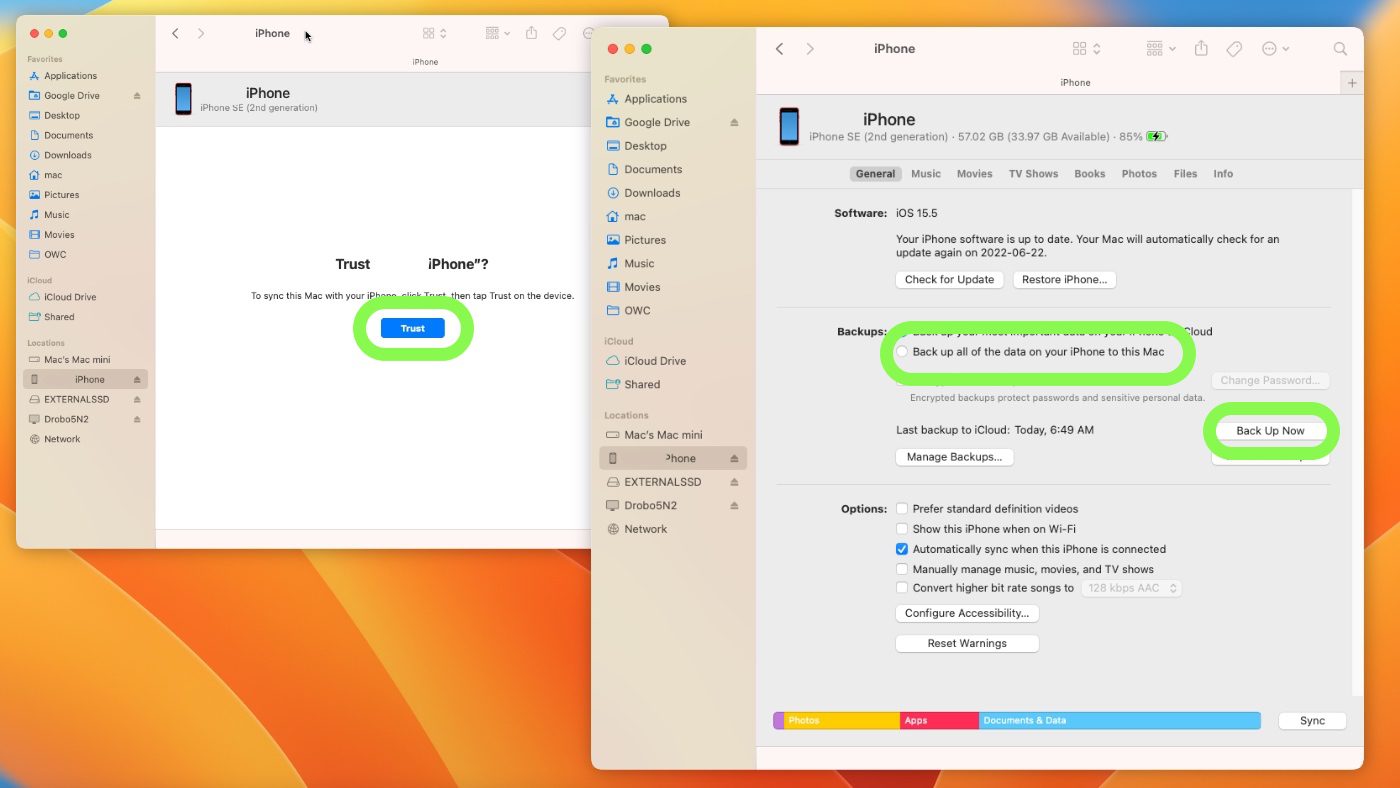
How to Backup an iPhone on a Mac
- Connect the iPhone using a Lightning to USB cable
- Authenticate the iPhone
- One the Mac, launch Finder
- Navigate to the iPhone volume within Locations
- Trust the iPhone
- Choose your desired backup options
- Click Back Up Now
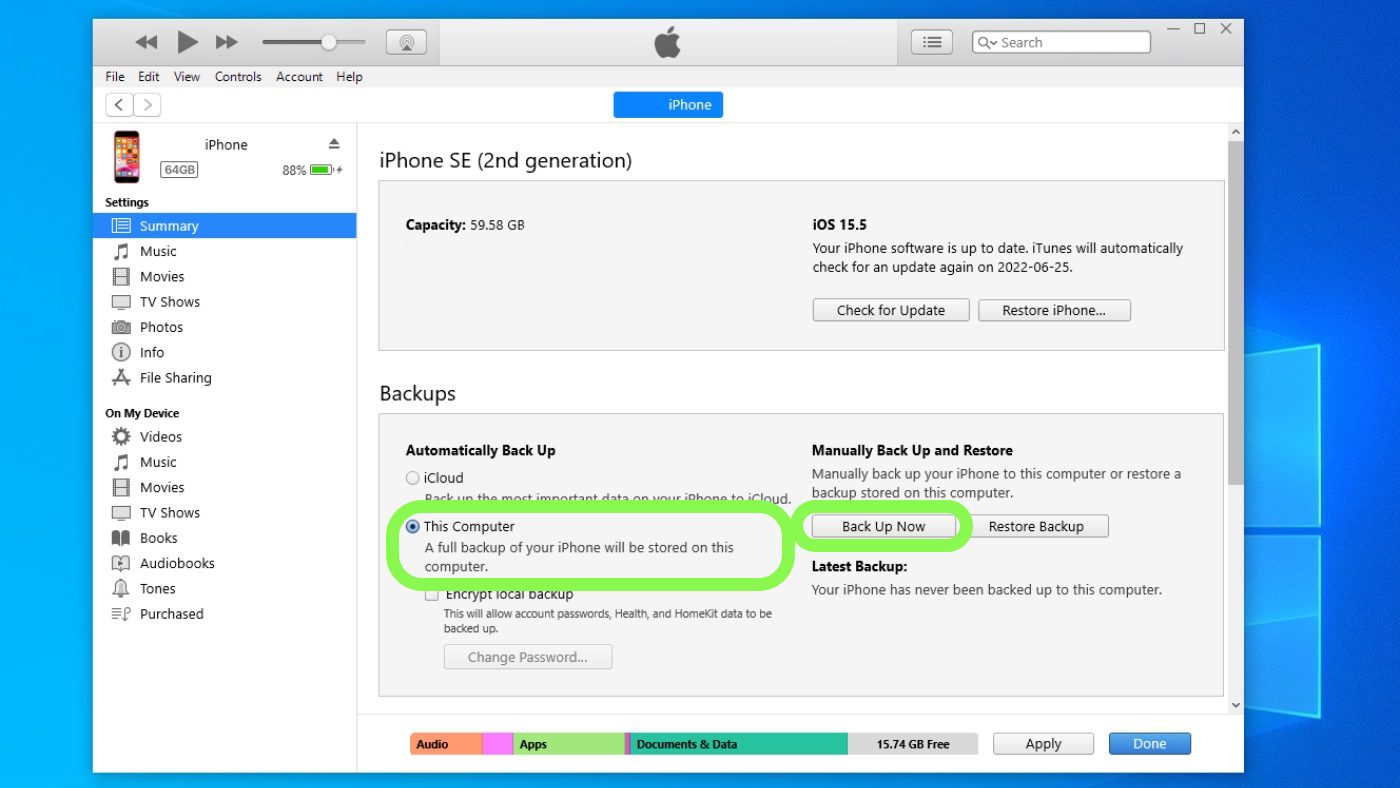
How to Backup an iPhone on Windows
- Connect the iPhone using a Lightning to USB cable
- Authenticate the iPhone
- On the PC, launch iTunes
- Select the iPhone (a small phone icon next to the library pane)
- Choose your backup preferences
- Click Back Up Now
1. Enroll your iPhone for the latest version of the public beta
Once you’ve signed in at beta.apple.com, click on the iOS 17 tab and then click “Download profile.” Tap Allow, then Close. This installs a profile on your iPhone that gives Software Update in Settings the ability to “see” the latest version of the beta so that you can update to it.
Open Settings, then tap Profile Downloaded. In the upper-right corner, tap Install an then enter your passcode. Tap Install and then Install again.
2. Download the latest iOS 17 beta
Once the iPhone has installed the profile, within the Settings app tap General and then Software Update. Within Software Update, you’ll see that the iOS 17 Public Beta is available to download and install. Tap Download and Install and then enter your passcode.
Tap Agree to the beta Terms and Conditions and then tap Agree again.
With the public beta downloaded, it will install automatically, or you can initiate the process manually within Software Update. The install will begin, your device will reboot and you’ll now be using the latest version of the beta.
How to Install the iPadOS 17 Public Beta

Compatibility
Before you download the public beta, make sure your iPad is compatible. iPadOS 17 supports only the following iPads:
- iPad Pro (2nd generation and later)
- iPad Air (3rd generation and later)
- iPad (6th generation and later)
- iPad mini (5th generation and later)
Before installing a beta, backup your device.
It is a good idea to backup your device before upgrading to both protect your data from potential loss, or to offer a restore point to roll back your device to iPadOS 16. Again, iCloud makes this easy, but if you’d rather backup to your Mac or PC, here’s how to do it.
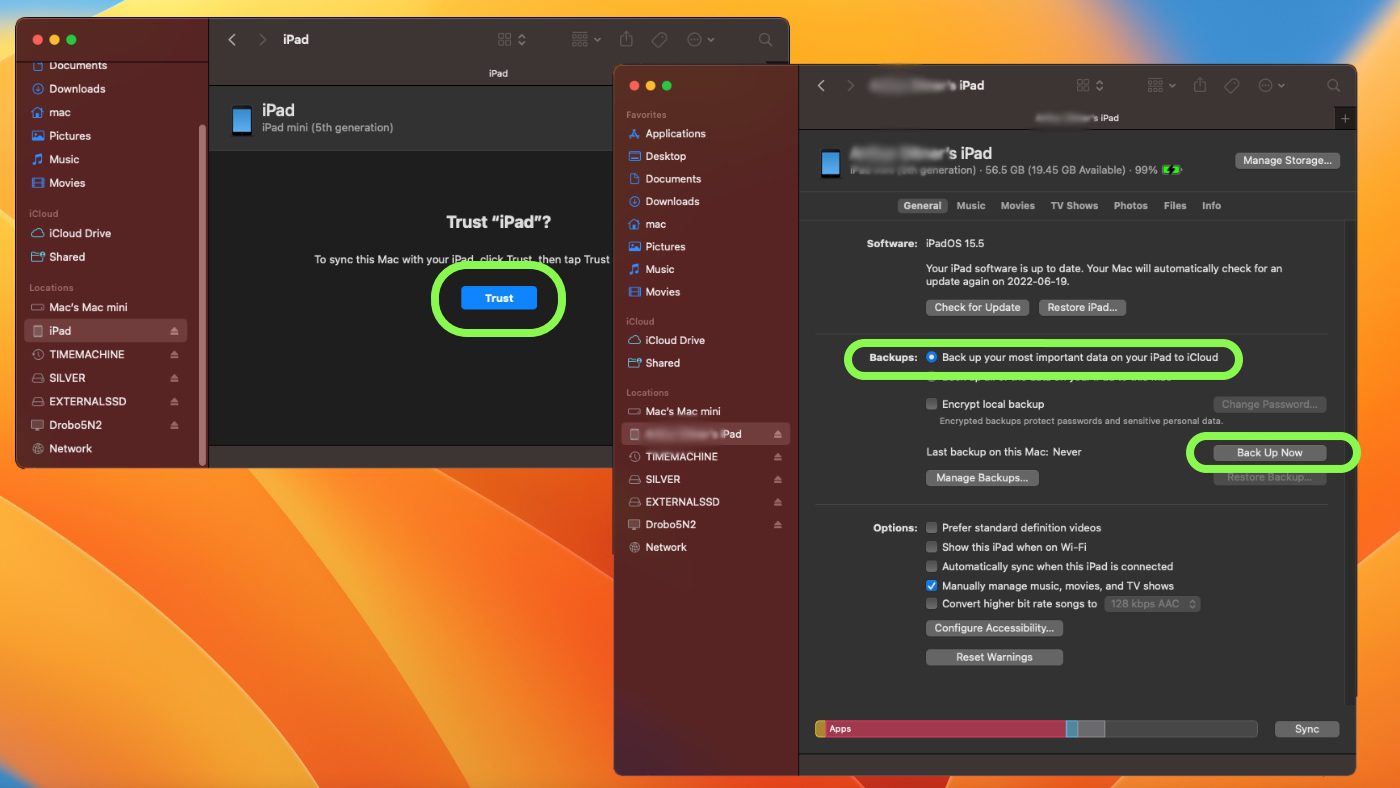
How to backup an iPad on a Mac
- Connect the iPad using a USB-C or Lightning adapter
- Authenticate the iPad
- On the Mac, launch Finder
- Navigate to the iPad volume within Locations
- Trust the iPad
- Choose backup options
- Click Back up Now
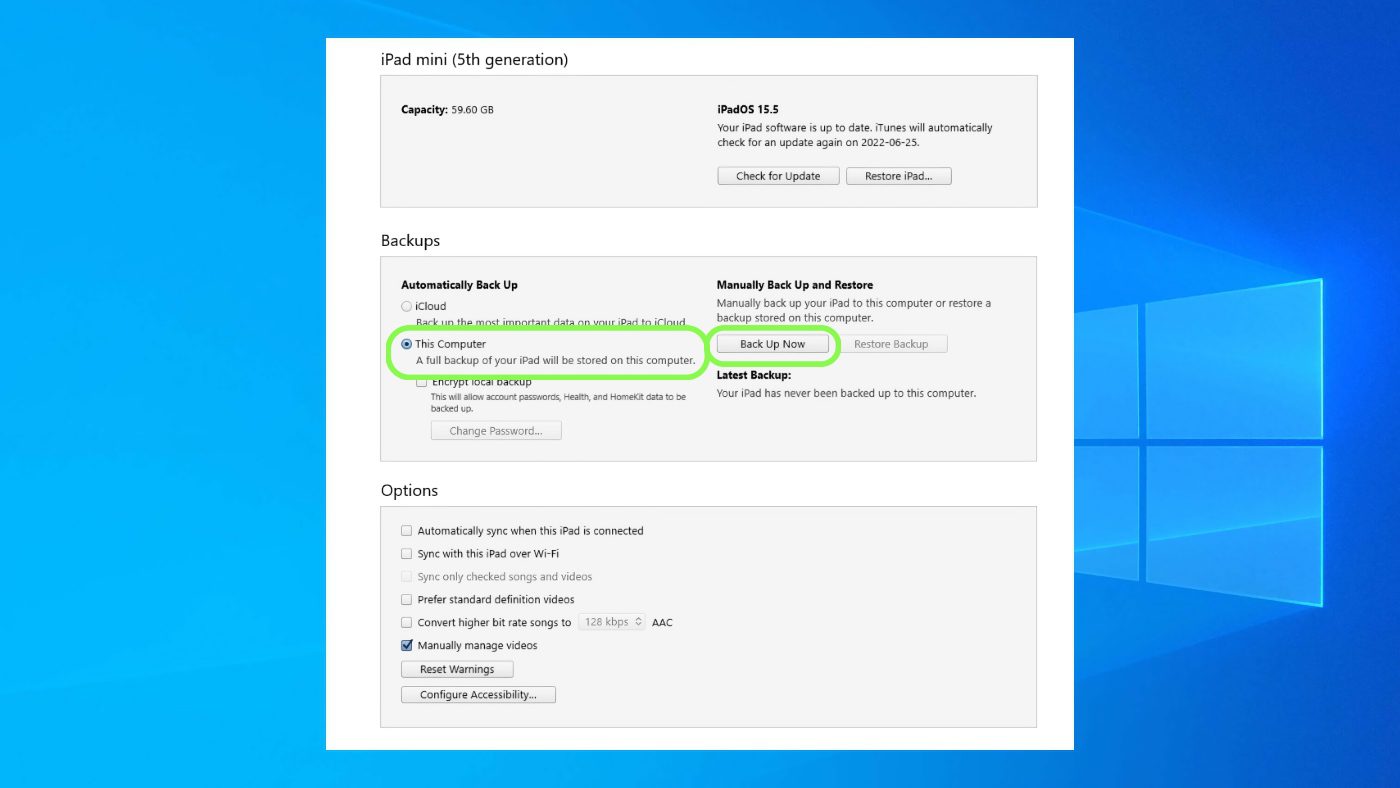
How to backup an iPad on Windows
- Connect the iPad using a USB-C or Lightning adapter
- Authenticate the iPad
- On the PC, launch iTunes
- Select the iPad (a small tablet icon next to the library pane)
- Choose your backup preferences
- Click Back Up Now
1. Enroll your iPad for the latest version of the public beta
Once you’ve signed in at beta.apple.com, click on the iPadOS tab and then click “Download profile.” Tap Allow, then Close. This installs a profile on your iPad that gives Software Update in Settings the ability to “see” the latest version of the beta so that you can update to it.
Open Settings, then tap Profile Downloaded. In the upper-right corner, tap Install an then enter your passcode. Tap Install and then Install.
2. Download the latest iPad OS 17 beta
Once the iPad has the profile installed, within the Settings app tap General and then Software Update. Within Software Update, you’ll see that the iPadOS 17 Public Beta is available to download and install. Tap Download and Install and then enter your passcode.
Tap Agree to the beta Terms and Conditions and then tap Agree again.
With the public beta downloaded, it will install automatically, or you can initiate the process manually within Software Update. The install will begin, your device will reboot and you’ll now be using the latest version of the beta.