You can use the Disk Utility in macOS Sonoma to create a disk image from a disk or a connected device. A disk image (DMG file) is a file that looks and acts like a mountable device or volume.
About DMG files
Because DMG files are disk images, they help reduce the risk of corruption by offering a way to package data in a fairly secure manner. These files behave like a physical disk. In so doing, the operating system interprets them in the same way as if you had just, for instance, inserted a CD-ROM into the computer (not that modern Macs have a CD-ROM/DVD/etc. slot, but you get the point).
DMG files are widely used since they’re easy to mount on macOS and can store a compressed software installer. Such files are oftenused for distributing and installing software on a Mac outside the Mac App Store.

You can create a disk image that contains the contents of a folder or connected device, such as a USB device. This method doesn’t copy a device’s free space to the disk image.
Creating a Disk Image
Launch the Disk Utility app.
° Choose File > New Image.
° Choose Image from Folder.
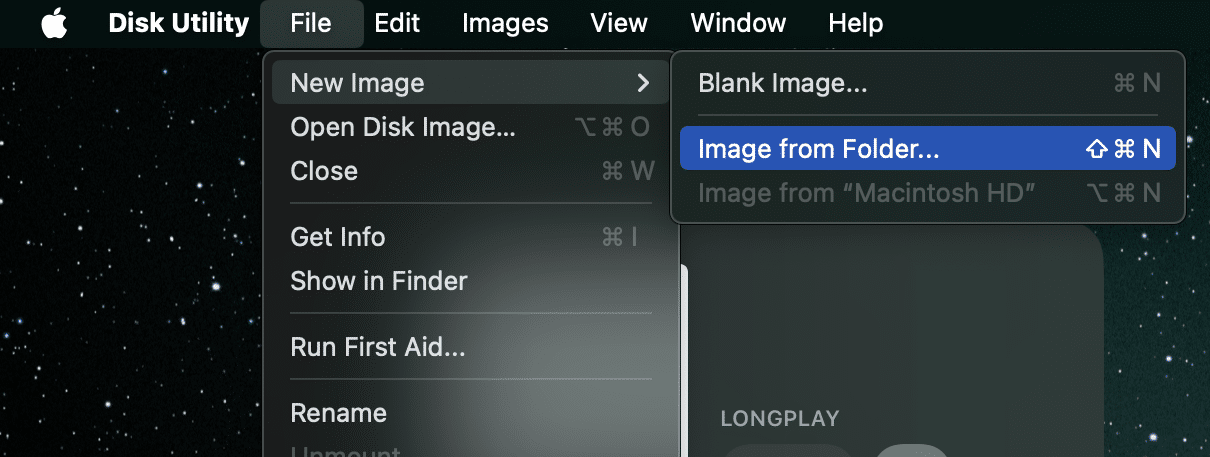
° Choose the folder or connected device in the dialog that appears, then click Open.
° Enter a filename for the disk image and, if needed, add tags if necessary.
° Choose where you wish to save the file.
Encrypting a disk image
To encrypt the disk image:
° Click the Encryption pop-up menu in Disk Utility.
° Click the Image Format pop-up menu, then choose an option:
Read-only: The disk image can’t be written to, and is quicker to create and open.
Compressed: Compresses data, so the disk image is smaller than the original data. The disk image is read-only.
Read/write: Allows you to add files to the disk image after it’s created.
DVD/CD master: Can be used with third-party apps. It includes a copy of all sectors of the disk image, whether they’re used or not. When you use a master disk image to create other DVDs or CDs, all data is copied exactly.
Hybrid image (HFS+/ISO/UDF): This disk image is a combination of disk image formats and can be used with different file system standards, such as HFS, ISO, and UDF.
° Click Save, then click Done.
Disk Utility creates the disk image file where you saved it in the Finder and mounts its disk icon on your desktop and in the Finder sidebar.
How to create a secure disk image
If you have documents that you don’t want others to see without your permission, you can encrypt a disk image. Here’s how”
° Launch Disk Utility.
° Choose File > New Image > Blank Image.
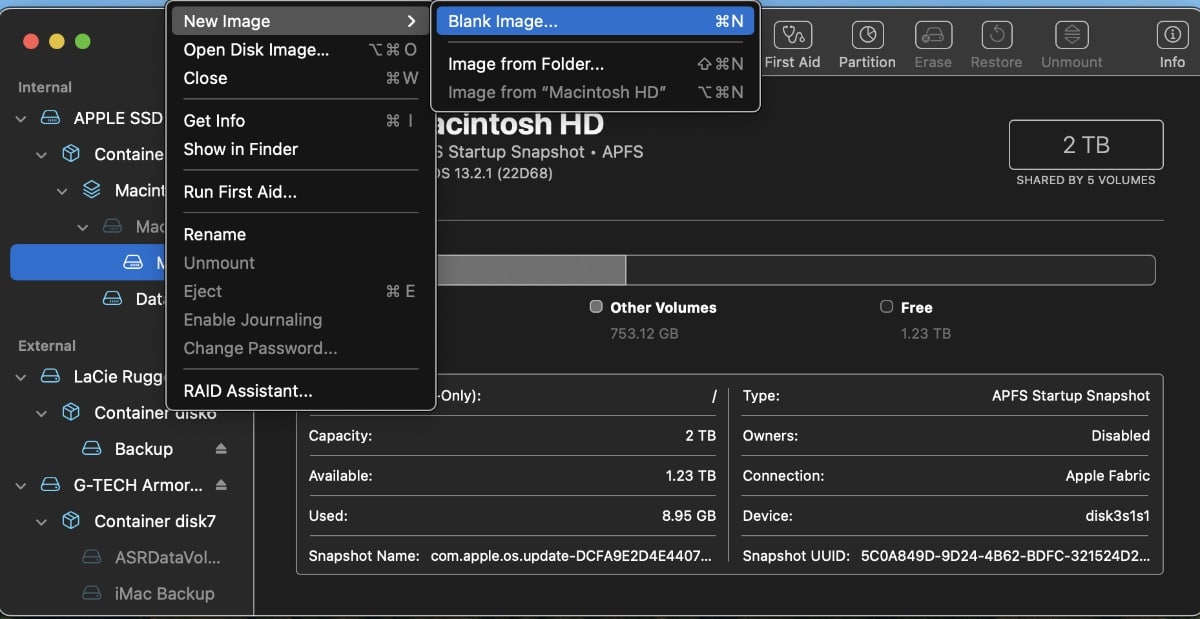
° Enter a filename for the disk image and add tags if needed.
° Choose where to save the file.
° In the Name field, enter the name for the disk image.
° In the Size field, enter a size for the disk image.
° Click the Format pop-up menu, then choose a format:
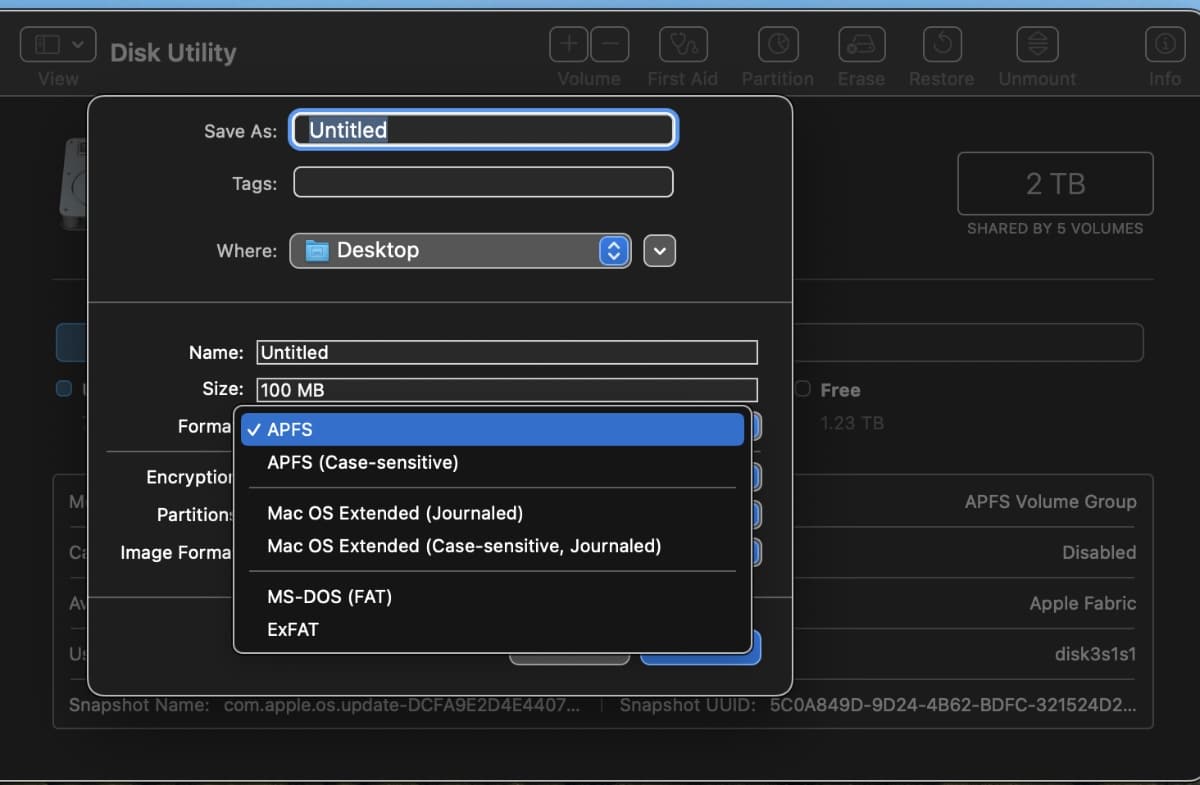
If you’re using the encrypted disk image with a Mac computer using macOS 10.13 or later, choose APFS or APFS (Case-sensitive). This include, of course, macOS Ventura.
If you’re using the encrypted disk image with a Mac computer using macOS 10.12 or earlier, choose Mac OS Extended (Journaled) or Mac OS Extended (Case-sensitive, Journaled).
° Click the Encryption pop-up menu.
° Choose an encryption option.
° Enter and re-enter a password to unlock the disk image, then click Choose.
(Be sure and save this password somewhere you can easily find it, if you don’t think you can remember it.If you forget this password, you won’t be able to open the disk image and view any of the files.)
° Use the default settings for the rest of the options:
Click the Partitions pop-up menu, then choose Single partition – GUID Partition Map.
Click the Image Format pop-up menu, then choose “read/write” disk image.
Disk Utility creates the disk image file where you saved it in the Finder and mounts its disk icon on your desktop and in the Finder sidebar.
In the Finder, copy the documents you want to protect to the disk image. Once you’ve finished, eject the disk image. As long as it’s available on your desktop, anyone with access to your computer can use the documents on it.
Accessing data on a disk image
To access the data in a disk image, just double-click it. It appears on your desktop, and you can add, remove, and edit files on it just as you would with a disk.



It used to be possible to create a DMG of the boot drive. But since the significant changes in the boot drive setup (split of System vs data, etc), ever since macOS 10.15 Catalina, old ways do not work using Disk Utility. Is there a Apple-bases solution for this?
I think the Apple solutions are Time Machine (only the data drive) and Recovery via Disk Utility with a restart. Another Apple solution is to take the computer to the Genius Bar at an Apple shop and get a reinstall (go early in the day because a reinstall takes hours).
SuperDuper and Carbon Copy once did backups of system software, but I don’t think that is now possible with the post-Catalina macOS.
Recovery via Disk Utility does not provide a backup of your setup… I want to preserve various states of the boot drive…virgin when first bought, then certain key states.
I am aware of SD and CCC and both still do backups of boot drive last I checked. But I want a portable DMG version that I can write-protect and easily transport, since it is a file. Although good tools and they fit in my backup strategy, SD and CCC are backups to another drive, which is does not meet my goal.
Maybe someone in the TidBITS blog group can help you. There’s quite a few members who have considerable expertise with things Apple.
macOS Sonoma is still buggy – best not to upgrade for the time being.