

Having enough RAM (random access memory) in your Mac has been an issue since the days when the first Mac shipped with 128K (kilobytes!) of memory. One of the complaints about the new M1 Macs with their unified memory (built into the M1 system-on-chip) is that up to this point, it’s only possible to specify 8 or 16GB (gigabytes) of RAM. Today’s apps love lots of RAM, so you may find yourself in a bind while running pro applications. Let’s take a quick look at how to free up RAM on your Mac.
How Can You Tell If You’re Short on RAM?
The symptoms of not having enough RAM available are fairly clear. If you see any of the following things happening, chances are good that your Mac is swapping out items in RAM to storage (hard disk or SSD). That disk-swapping really slows down your Mac! Here are the symptoms that can tell you that you need to free up RAM:
- The infamous “spinning beach ball” during regular operation
- Performance issues — things just taking forever to complete
- A lag when typing, the situation where you are typing faster than your Mac can handle the input
- Apps freezing or crashing
- Apps and web pages loading slowly
- The rare, but annoying “Your system has run out of application memory” error message
How Much RAM Is Enough?
Believe it or not, the 8 or 16GB available in the M1 Macs is enough for most users. Pro users often find that they need 32, 64, or even 128GB of RAM to run power-hungry photo and video editing apps. The rest of us using productivity apps — Apple or Microsoft — should find 8 or 16GB to be plenty.
How to Free Up RAM on Your Mac
When you start experiencing the symptoms of “RAM cram”, here are some quick ways to free up memory and resolve the issues.
Restart Your Mac
You know how that IT staff at your workplace always tells you to “restart your computer” when you have issues? There’s a reason for that: a lot of the time, a simple restart will resolve many issues.
Restarting your Mac empties RAM except for essential operating system functions, and also deletes any disk caches that have been created in order to free up RAM by moving information to disk storage. Unfortunately, it seems like many of the low-RAM issues occur right at the time you least want to restart your computer! If that’s the case, try this next tip.
Check Activity Monitor
Not sure what app is chewing up RAM and slowing down your Mac? Activity Monitor, found in Applications > Utilities, is your go-to utility for seeing just how much RAM is being used or if one app is hogging all of the resources on your machine.
Launch Activity Monitor to see detailed information about each process and app that are running on your Mac:
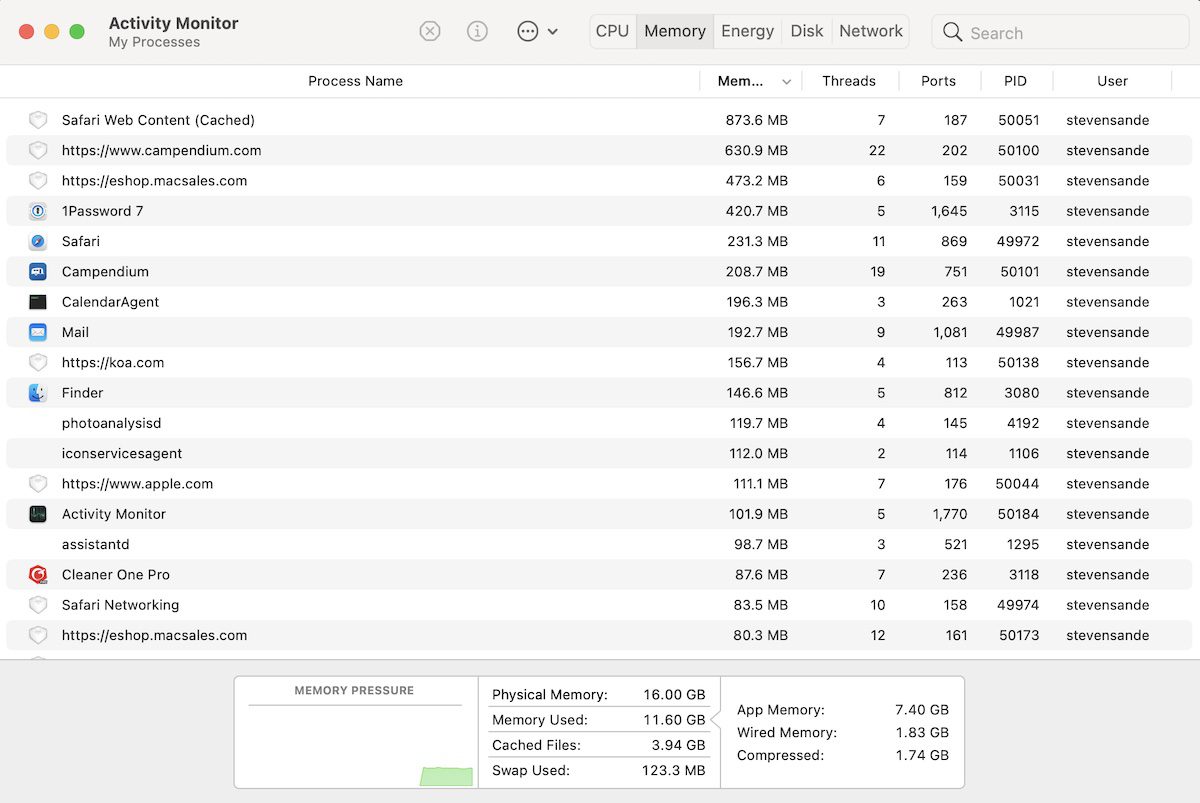
At the top of the Activity Monitor window are tabs: CPU, Memory, Energy, Disk, and Network. For our purposes, the Memory tab is the most useful. A graph at the bottom of the window shows “Memory Pressure”, an indication of just how RAM is being used on your Mac. If it’s showing “red” most of the time when you’re using your standard app suite, perhaps it’s time to consider getting more RAM. More about that later…
You’ll also see figures for App Memory, Wired Memory and Compressed. App Memory is what your apps are using while they are crunching away – think of the RAM used by a Numbers spreadsheet as App Memory. Wired Memory? It’s what the app must have in order to run, so this number cannot get smaller. Compressed memory is inactive memory that can’t be used by other apps. Add these all up, and you have the total Memory Used figure.
Cached Files is the unassigned memory that’s available for your Mac to use. Swap Used is memory used by macOS, and is accounted for in the calculations of Memory Used.
Use Activity Monitor To Free Up RAM
Activity Monitor is useful for freeing up RAM. Once you find an app that is using way too much of your Mac’s RAM and you realize you don’t really need to have it running, Activity Monitor can be used to relieve the pressure.
- Launch Activity Monitor and click the Memory tab
- Click the Memory column to sort running processes by the amount of memory used.
- When you see a suspiciously busy app, select it, then click on Information ( I ) on the menu. This shows how much memory is being used by that process, and it’s easy to stop the app in its tracks by clicking on Quit.
- When you click Quit, a dialog asks if you’re sure if you want to quit the process. You’re given the choice of Quit (a graceful exit from the process), Force Quit (akin to pulling the plug on the process), or Cancel (if you don’t want to quit). Force Quit is very useful if an app has frozen and is not responding.
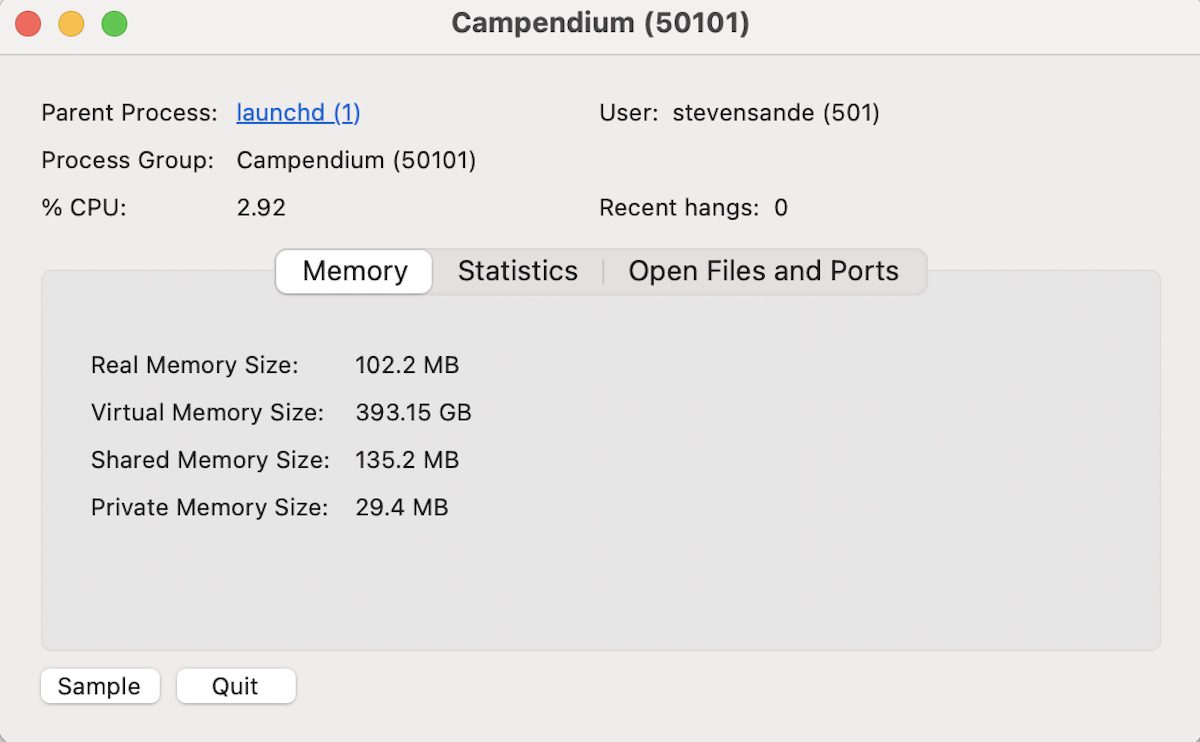
Oh, and a quick hint: if you’re not sure what a process or app is? Don’t Quit or Force Quit it. You could lose data or cause your Mac to crash.
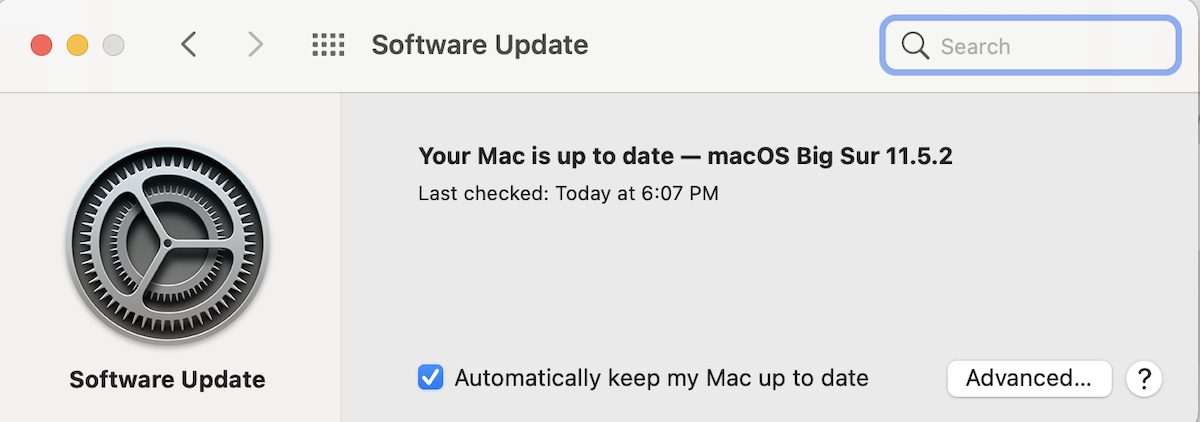
Update macOS
Now, I’m one of those people who can’t wait to update my Mac to the latest and greatest version of macOS. If you’re not like me — and many Mac owners are not — it may have been a while since you did an update. Well, Apple’s updates often include bug fixes that may very well address an issue that you’re running into.
Updating macOS is as easy as launching System Preferences, then selecting Software Update. If you’re not up to date, you’ll be offered the opportunity to update. If you are up to date, a dialog similar to this appears:
Are You Printing?
Have a printer? Sometimes sending a large print job to your printer can chew up a lot of RAM, and we don’t usually think about that fact when trying to get hard copies of our work.
If a big print job is causing issues, cancel it in the Print dialog, then consider splitting your print job into smaller and more manageable chunks.
Free Up RAM with Terminal
Another quick way to free up RAM on your Mac is to use a special command in the Terminal app (found in Applications > Utilities). Type in “sudo purge“, enter your administrative password when requested, and inactive memory is cleared immediately.
Other Methods of Clearing RAM
If none of the methods listed above work for you, or if you just want easier ways to handle the issue, here are some more hints!
Clean Up Your Desktop
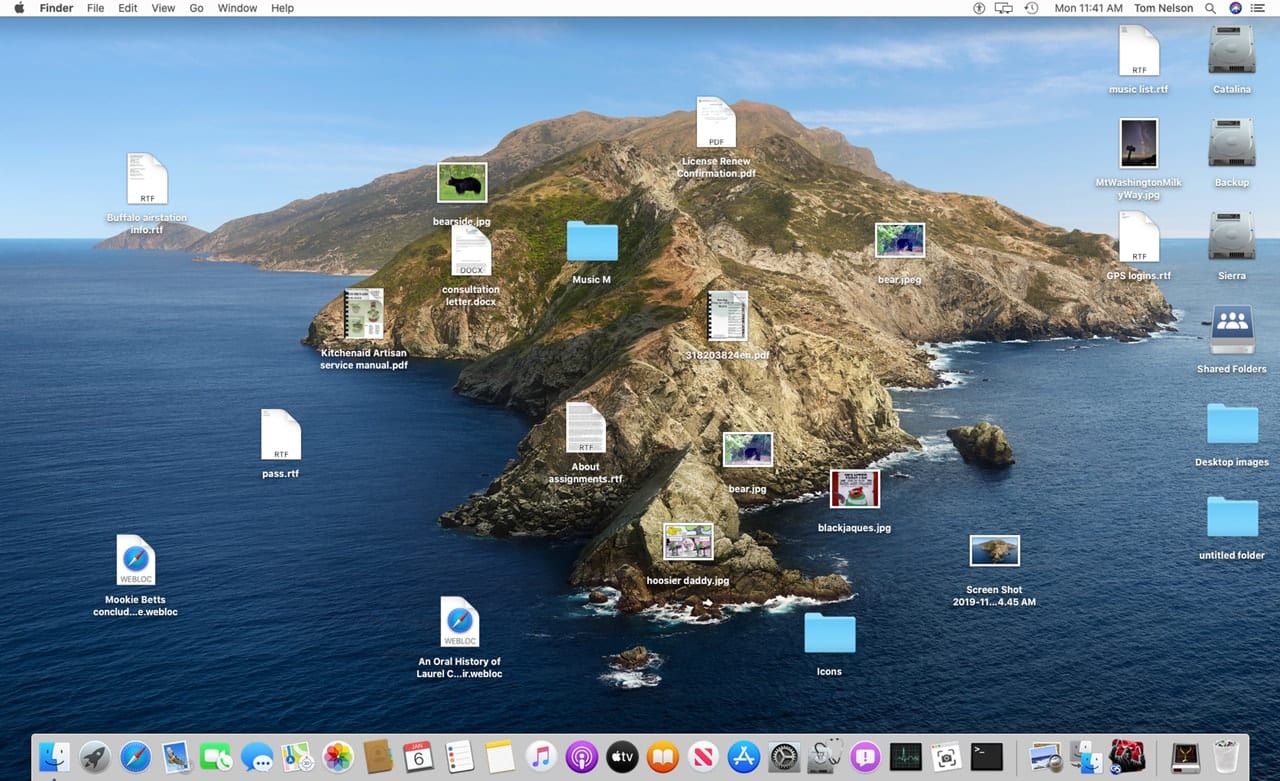
My wife is guilty of storing everything possible on her Mac desktop, despite having one of the world’s leading Mac nerds telling her not to… Well, if the Desktop is filled with photos and screenshots, documents, movie files, and so on, you might want to consider moving those into other locations or into a folder on the Desktop.
Why is this? macOS sees every icon on the Desktop as an active window, so filling the Desktop with icons chews up an amazing amount of RAM.
Change Finder Settings
Do you see “Recents” (also known as “All My Files” in older versions of macOS) when you open a Finder window? If you do, that setting can use a lot of RAM. The information about the location of the files displayed in Recents is stored in RAM.
If that’s the case on your Mac, change Finder settings to reduce the amount of RAM used. To do this, open a Finder window, then select Finder > Preferences.
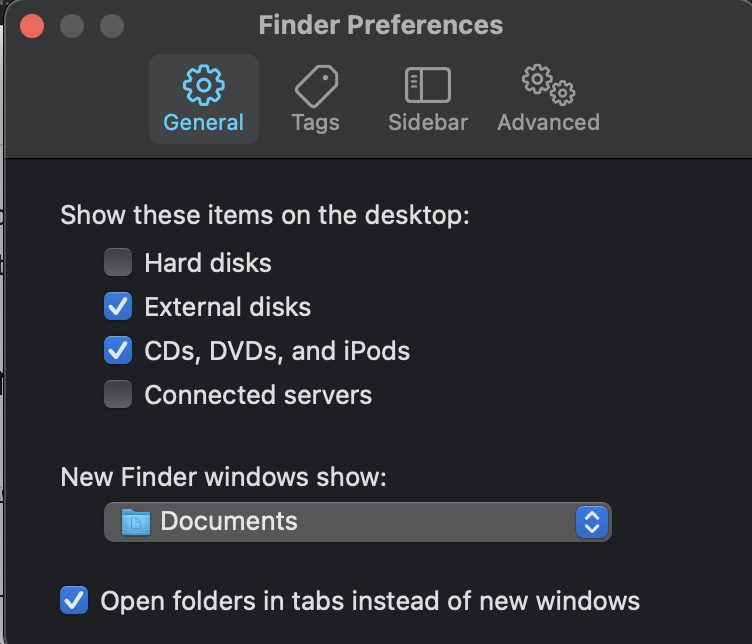
See the setting for “New Finder windows show”? Change that to anything but “Recents” to reduce the RAM used by Finder. Here I’ve selected the Documents folder.
Close / Merge Finder Windows
Another method of saving the amount of RAM used by Finder is to close Finder windows you’re not currently using or merge them all into one window. To do that while in Finder, click on Window > Merge All Windows.
Keep Apps From Launching Automatically at Startup
If you find that a lot of apps are launching automatically when you start up your Mac and eating away at your RAM, here’s how to stop that.
- Launch System Preferences, and click on Users & Groups
- Click your User name on the sidebar on the left if it is not already selected
- Click Login Items
- A list of applications that launches every time you start your Mac appears:
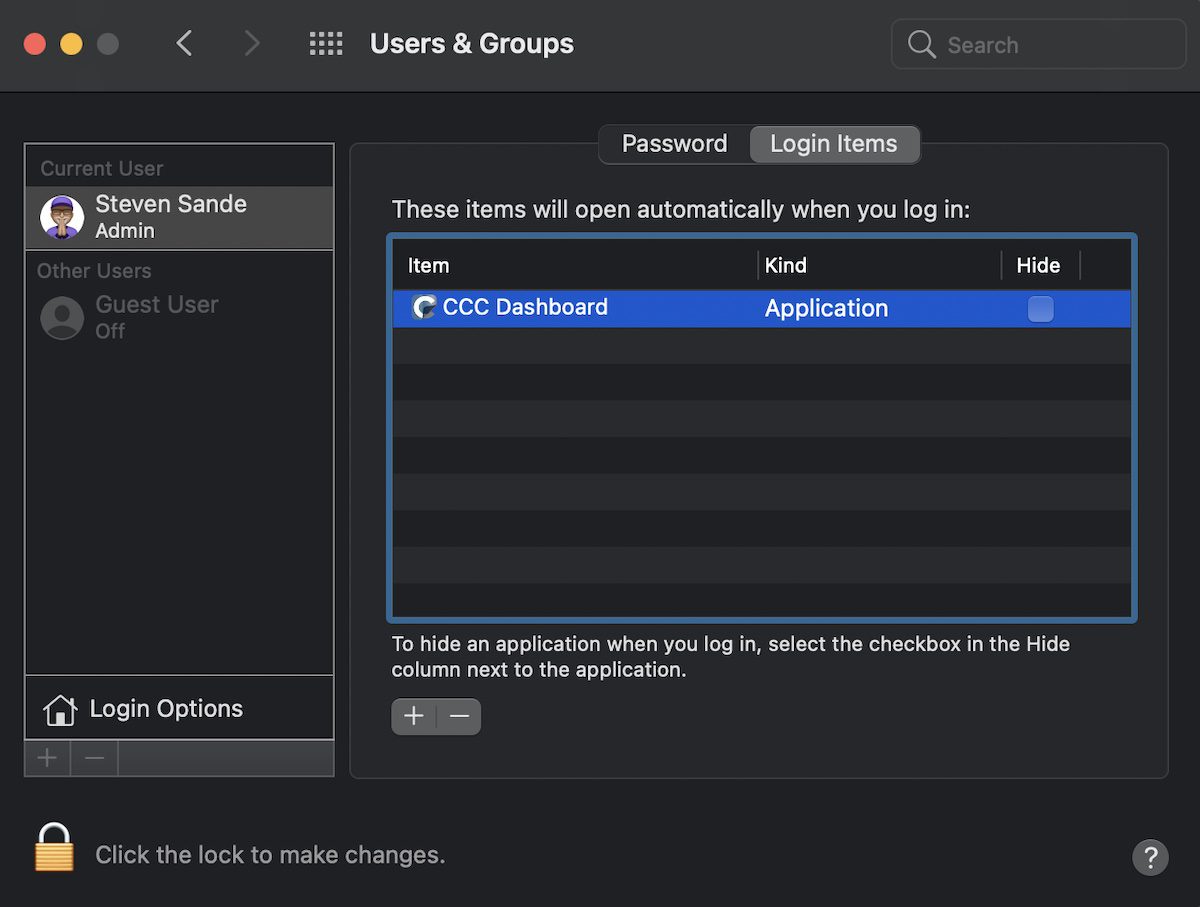
Don’t need one or more of them to be running all the time? Select the app in the list, then click the minus ( – ) button to remove it from the list.
Close Open Browser Tabs in Safari
Every open browser tab in Safari uses RAM. Some tabs that are actively running scripts or have a lot of images or video can eat up more than their share of RAM. Closing open browser tabs in Safari reduces the amount of RAM used. To do so,
- Right-click on a tab you don’t want to close
- Select “Close Other Tabs” to close all of the other open tabs
- Another choice is “Close Tabs to the Right”, which closes all tabs to the right of the currently open one
Pinned tabs are also notorious memory users. Pinned tabs generally aren’t live all of the time, but if you click on one, it becomes active and can use a lot of RAM. Use Activity Monitor to see if a pinned tab is using a lot of RAM, then close the process to free up that memory.
Delete Browser Extensions
Are you a fan of Browser Extensions? Although these extensions to Safari can provide a lot of utility, they’re also a prime candidate for gobbling your precious RAM. To remove a Safari browser extension:
- Open Safari Preferences
- Click the Extensions tab
- Select the extension you wish to uninstall, and click the Uninstall button (usually found under the description of the extension):

Upgrade Your RAM
One sure-fire way to resolve RAM issues is to upgrade the amount of RAM installed in your Mac. Sadly, many newer Macs — including all of the Apple Silicon machines — lack the ability to add more RAM. To quote the OWC Memory web page:
Although you can upgrade the memory of any 27-inch iMac or Mac Pro, the only MacBook Pro models that are upgradeable are non-retina models released up to 2016. No MacBook Pro models with “Retina Display” or “Touch Bar” can be upgraded. You can upgrade all Intel Mac mini desktops except for models released between 2014 – 2017 (Macmini7,1) and M1 Mac mini models (Macmini9,1). As far as MacBook Air, it is impossible to upgrade the RAM of any model since it is soldered directly to the board to make them thinner and lighter.
Since 1988, OWC has specialized in 100% Apple-compatible memory upgrades for nearly any Mac. To make memory installation as stress-free and straightforward as possible, we offer step-by-step installation videos to walk users through the upgrade process. We also provide expert technical support to assist you if any issues arise. All OWC brand memory is thoroughly tested and assured to perform flawlessly and is covered by a Lifetime Advance Replacement Warranty and a Money-Back Guarantee.
“Memory Upgrades for nearly every Mac”, https://eshop.macsales.com/shop/apple/memory/
For those Macs that can have their RAM upgraded, you’ll find the best pricing available and plenty of support from the OWC staff and website as well.
Third-Party Memory Management Apps
Have a Mac that isn’t upgradeable, and you don’t want to constantly fidget with some of the hints listed above? There are a number of third-party apps that can do the job of monitoring and clearing RAM for you.
Trend Micro Cleaner One Pro
Being a longtime Mac user, I was dubious that a “cleaner” app like Trend Micro Cleaner One Pro was going to help me. I was wrong. This utility shows me what percentage of my RAM is in use thanks to a menu bar “gauge”. Click on that RAM percent used number and buttons for clearing junk files and optimizing RAM are instantly available.
While writing this post, I was using about 77% of my RAM. With one click I was able to take that number down to 48%. No windows or browser tabs were touched during that optimization.
Parallels Toolbox
We’ve had a number of articles about Parallels Desktop, a wonderful virtual machine app for Mac that provides a way to run other operating systems like Windows and Linux on Mac hardware. Well, Parallels Toolbox comes with Parallels Desktop, so if you have Desktop you may have already installed Toolbox.
One of the tools in that Toolbox app is “Free Memory”, which frees up unused memory. Oh, and the other 30+ tools are quite useful as well.
Clean My Mac X
One other tool I’d recommend is Clean My Mac X from MacPaw. Once again, this is an app that can do a lot of good for a cluttered Mac and it excels at optimizing RAM.
Start Big
Here’s a final tip. If you’re considering a new Mac — particularly one of the non-expandable models — buy one with as much RAM as you can afford. When the next generation of Apple Silicon Macs arrives this fall, you may be able to purchase one with 32 or 64GB of RAM. While 8 or 16GB may be enough now, you might be using more RAM-intensive apps in the future.


Steve, thanks for sharing your knowledge – definitely a significant tutorial for the less knowledgable users. Please continue explaining MAC works.
You did not mention memory Clean 3 from Fiplab – I’ve been using this utility successfully for a number of years now, including on the M1 MacBook Pro with 16GB RAM I have today