Here’s Part 2 of Dr. Robert Bruce Campbell’s explanation of how he built his water-cooled, Octo-Core MacPro 1,1. If you haven’t already (or if you just want a refresher) we suggest reading the first part for a little background.
Considerations in Application of a GeoThermal Heat Exchange for Environmental Comfort Following the Upgrade of a MacPro1,1 with Two Over-Clocked Intel X5350 Engineering Samples that Necessitated the Addition of a Water Cooling System – Part Deux
-or-
“Hyperthalamic States and the Resultant Inability to Leave Well Enough Alone”
By Robert Bruce Campbell, DO
Materials and Methods Part 2: The How’s
I know this is the part everyone actually wanted from the start. Sorry to keep you waiting. OK, that’s a lie. I’m not at all. I’m just having a good time. None the less—here we go!
The BSEL Mod
This is the action. BSEL (AFAIK) stands for “Bus SELect” or something similar, and is integral to the regulation of clock and bus frequencies on certain chips.

Years back, a fella going by the moniker XeonTux mapped out the pins on the Intel Xeons for the purposes of altering these frequencies. The short form is that on certain Xeons, the clock frequency is directly tied to the Front Side Bus frequency.
So, If you had a chip with a 1333MHz frontside bus and a clock frequency of 3GHz and you were to do the BSEL mod to raise the FSB from 1333 to 1600, that would force a proportional increase in clock rate. Doing the math it looks like this:
1600MHz ÷ 1333MHz= 1.2 ratio
then applying that ratio to the clock frequency would give
3000MHz × 1.2= 3600MHz
Now, all of this is pre-supposing these alterations are supported by the hardware you are using. As Harry Callahan from San Francisco once said, “A man’s got to know his limitations.” In our case, he meant that the Intel 5000X “Greencreek” motherboard that the MacPro1,1 is based on has a FSB that pretty much limited to 1333MHz.
Given the known upper limit bus frequency, and with a list of native FSB speeds of Intel chips, we can choose our upgrade with some thought. What we need is a chip with a 1066 bus or lower with the highest clock frequency we can get.
A good choice for the MP1,1 would be the 5340. Its bus is 266 and clock is 2.4GHz. If we took its FSB to 333, we’d basically have a 5365 (333/3.0). But in my case I was able to land my hands on some 5350’s. Like the 5340, these came with a 1066 FSB, but a 2.6GHz clock. This would give a 333/3.3, clearly making it the best choice for maximizing clock speed within the FSB limitations of the MP1,1.
Again, the BSEL mod involves nothing more than placing a piece of insulating tape over a pin to insulate, or conductive pen between pins to connect for the purpose of bringing that contact either “up” (1) or “down” (0). So all we have to do is use Mr. Tux’s pinmap pic (you’ll see he did us a nice little grid that makes it easier than thinking—and a helluva lot easier than reading the official Intel paper on the processors) to find out which pins to modify. (As an aside, I figure Mr. Tux is probably a computer engineer. Just can’t see him as one of those pencil-necked PC gamer dweebs. So a shout out here is apropos: “Thank You XeonTux wherever you are.”)
Looking at the pinmap, we see that for a FSB of 266 BSEL pins 0, 1, and 2 are all “down” (AKA zero, grounded, or whatever you wish to call it). That means the starting config for the ES 5350’s (266MHz, 2.6GHz) is 0-0-0. Now what I wanted to do was take the FSB to 333MHz (which forces the CPU clock up the same fraction). That means BSEL 2 (G30) needed to go “up”. Well the way you take a pin “up” is by covering it with electrical tape and this would give the 1-0-0 configuration. Voilà!
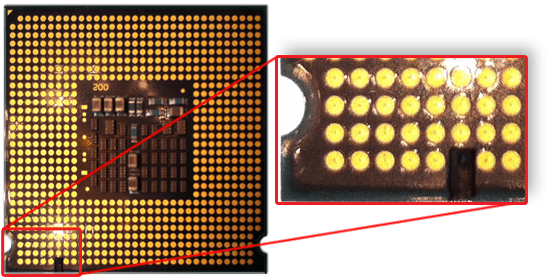
And ya know, I musta done this at least 5 or 6 times thinking I was messing it up somehow. I couldn’t get the damned thing to POST. Little did I know what I was in for…
But the BSEL mod really is easy to do and do right the first time. An easy cheap upgrade for the MacPro1,1 where the hardest part is getting the front fan cage off the motherboard for the very first time.
So what was wrong? Well, as James Tiberius Kirk would say, “Mr. Scott—I need more POWER!” and that brings us to…
The VID Mod

Yup. More power. (fill space with “Tim the Tool-Man Taylor” man-grunts)
So I had to
Google, Google, Google,
Read, Read, Read,
because I just KNEW I’d done the BSEL mod correct.
Turns out, to run some processors (maybe all, I don’t know) at higher clock rates, you’ve got to increase the voltage.
Now, I know what you’re thinking—that doesn’t make any sense, right? With these little switches going on-and-off really fast you’d need more current, not voltage. With more voltage you’d get more signal noise (meaning errors), and a delay in return to the pre-signal state (I think… remember, college physics was a long time ago for me). But I guess it’s kinda like the compression ratio/fuel efficiency thing. More oxygen= more complete combustion= more power with same fuel or same power with less fuel= improved efficiency. And following that logic then your car is most efficient when it burns 100% oxygen with 0% fuel. Sure, it makes sense to me—but I don’t imagine you’d make it to work on time like that.
So I guess the VID mod is more like bolting on a supercharger rather than getting your big block ported and polished.
Again, following that logic, I coulda taken Don Garlits for pinks in a ’73 Pinto as long as I had a blower with the output of an F3 aimed at a trailer park. Well, that and provided no one kicked the rear bumper on accident and sent me to Jesus a little early.
(And remind me to tell you sometime about riding shotgun on a run from Sierra Blanca to Junction in two hours and fifty minutes in a Boss 429. Great story. But for now, let’s get back to the VID mod.)
So the chip needs the increased volts to work, but there are limitations. Past a certain point, your 1’s and 0’s kinda merge in the noise—think having the intake and exhaust valves with overlapping “open” times. Sounds cool at the stop light (but not, let’s say, what you’d want for an ambulance) and at certain RPM’s and can catapult the quarter mile in 4 seconds (though occasionally the compressed fuel pre-detonates and sends your blower 150 feet into the air and destroys a $60k motor). Generally, no flames for the chip (unless you are reeeeeaally unfortunate), everything just stops. Or you get weird errata. Or hangs. Or just can’t pass Prime.
Getting right down to it though, doing the VID ain’t much different from the BSEL. Just “Downs” & “Ups” in a different spot. But now it’s time for the “conductive pen”.

It’s also probably a good time to mention that besides being a hot, fat, sweaty, and cheap bastard that lives to stick it to the Man, I’m also going deaf and blind. (The blind part happens to everybody exactly on their 40th birthday. The deaf part is more variable. Mine began about the same time, but was more due to an incident in Scotland on the shores of Loch Fyne involving shotguns and clay. In my defense however, alcohol was also involved.) So for this upcoming part, you may want to consider a magnifying glass. You may also want to put a hold on the caffeine. Up to you though.
So after doing some reading online, I’d noted most folks doing this mod were going in excess of 1.4 volts. Initially, I was pretty leery of this and tried 1.375 (tape and pen—ugh!).


And yup, you guessed right. It was just another opportunity to mount and remove heatsinks. I gotta learn to be more bold.
So if you will kindly reference the VID table at the beginning, you will see the different options for 1.4v and up. Please note how if you plan to make pure up-down, left-right connections that it just doesn’t seem doable for anything other than the 1.4125 combo of 1 down, 2 down, 3 down (and that’s only if you take 3 down by drawing thru 1). I really have no doubt that going diagonally is just as easy, but by this point I was getting rather tired and decided to go with what someone else had drawn on another ES Clover that worked—the 3-2-1 down combo. Glad I did.
It worked! I booted, POST’d, got to the Finder, hit encode, and lit up a “Hoyo de Monterrey” off of Processor B.
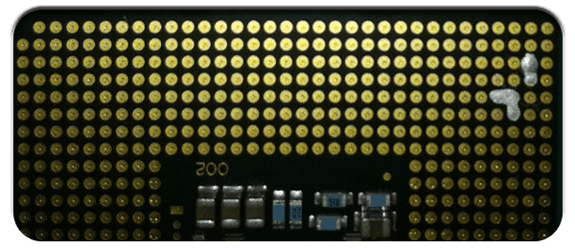
Follow the Waterblock Road
Sure, I could probably surfed the web, done email, and watched EyeTV all day long with the stock OEM heat sinks. But within moments of all cores going 100% with Handbrake, my doom was sealed. You couldn’t turn the fans up fast enough, and as I said before, a painfully low ambient and a shop fan blowing into the front of the MacPro case wasn’t enough.
See, copper and aluminum are great to absorb and radiate heat, but I don’t think aluminum can hold the heat without the temperature change that copper can. Whether it was something to do with the heat capacities (specific or volumetric) of the two materials in the OEM heat sinks or their interfaces, they couldn’t wick away the heat fast enough. It seemed if I could prevent the rapid rise in temperature of the heatsink initially, I could do some encoding but I’d have to intermittently pause the process to let things cool. So I’m thinking with a large enough all-copper sink, cooling probably could have been done on air, but I don’t think the MacPro1,1 has nearly enough space to make it work—though I did consider cutting a shaker hood or ram-air scoop into the side panel. (Which I still think would look pretty cool. But then, I was also considering getting a miniature “Velvet Elvis” poster and Disco ball for inside the case to compete with the PC Weenies and their neon lights and strobing fans that spell out “I’ve never done a dead-lift or had a date with a girl smaller than me in my life.” So consider the source.)
Hence the waterblocks.
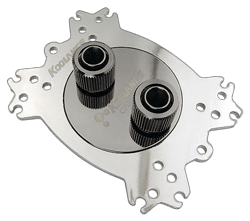
The Koolance CPU-340, a recently discontinued model at the time, is a circular nickel-copper alloy block that had been given fairly good reviews. Its main problem as I saw it was the sheer weight of the block given it would be mounted vertically. Generally you want heavy blocks for good contact with the processor, but that’s when you’ve got gravity working for you. Or even against you; as long as it would be directly against you (like upside down) and you could screw it down tight, but on it’s side you’ve got to wonder whether the force on the processors is being applied evenly.
It was the lack of choices for a 771 that really helped me decide though.
As you can see, the “mount” or “hold down plate” (call it what you will—but “mount” involves less typing) looks somewhat similar to a Bat’leth. What you can’t tell is it’s heavy too. But the real advantage to it was that accurate schematics were readily available on the Koolance website, and this was necessary because one way or the other I was going to have to alter its shape or fabricate a completely new mount. Altering seemed the best choice.
Taking the schematics into Photoshop, I used them to create a template that would allow me to grind down the mounts so that they would be able to clear the non-standard denizens of Apples interpretation of the 5000X motherboard and its particular cooling system. (Did a pretty good job too, though you may want to look at the bottom of the memory cage next to the procs.)
This was simple enough. Hit “Print”, then scissor, some “Elmer’s Glue”, and I was ready to grind. So here is “Shout Out” #2: “Thanks Dr. B!”
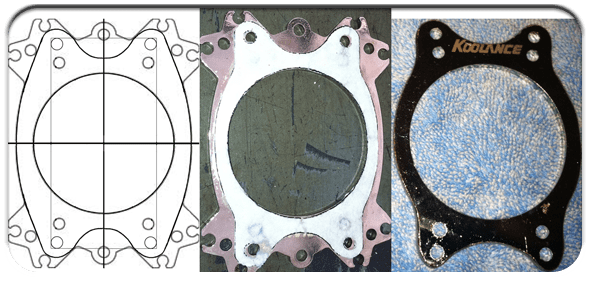
Yeah, good neighbors really are priceless. Particularly if they’re engineering types with a really well appointed shop in their garage.
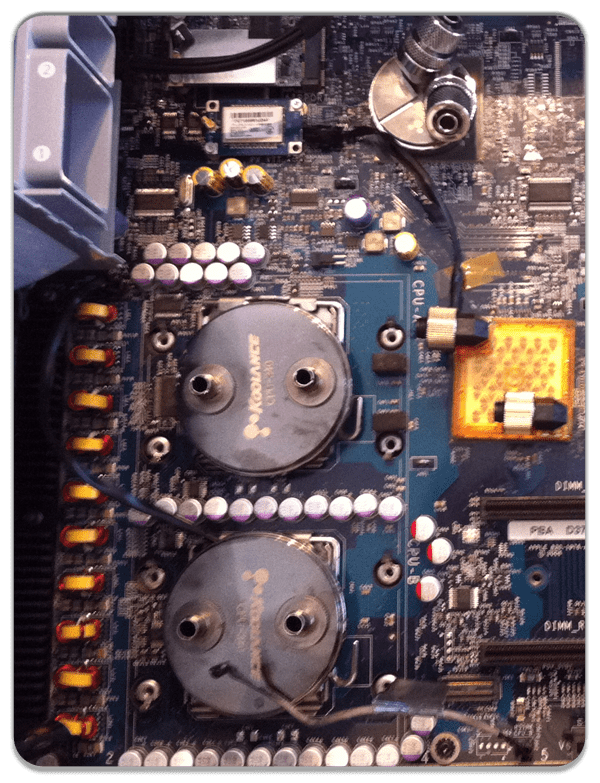
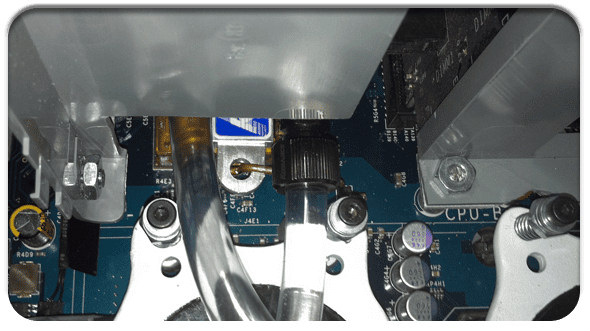
Now I was faced with actually mounting these bad boys. The Koolance stuff didn’t fit the studs on the back panel of the case behind the motherboard. Thank you Apple for the lessons in metrics.

So step in the guys at Micro Fasteners, Inc. with some 50mm M3.5 pan heads. These I screwed directly into the back panel as far as they would go, took measurements and adjusted for the height differences with the metric washers. And believe it or not, this worked out really well. As far as I can tell, there appears to be no droop or un-even tilting, even in the upright position with all of the tubes attached into the blocks. Given that my inflow/outflow temps are about the same as I’ve read about in various reviews, my guess is that I did at least an “OK” job with the mounts.
The final humungioma was finding a replacement heat sensor for heat sinks. I looked everywhere for something, but always to no avail. Finally, I stumbled across a fellow building a MacPro from parts. He had found a link where someone else had used a couple of 2N3904 transistors in T0-92 package that worked. Here is the thread. And guess what? They worked for me too. Thank God—that one took forever.
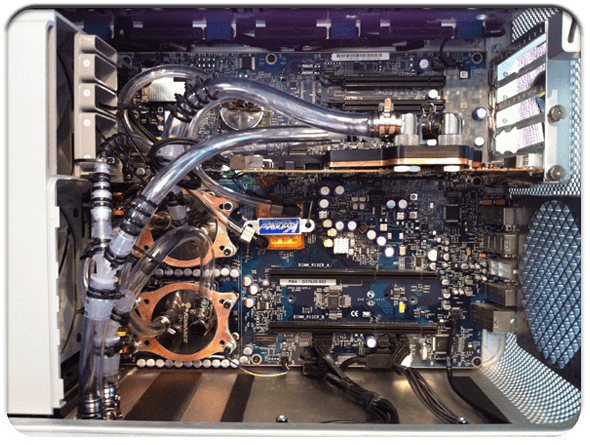
My 5770 I covered with an EK HD5770 waterblock; the Northbridge and Southbridge were covered by kind of generic Koolance CPU/GPU (GPU-180 & CHC-125 respectively) blocks. This was all very easy stuff that you could probably train a monkey to do—and I stand as evidence. Really, not worth mentioning.
But figuring how to plumb this thing was a nightmare (and a work in progress) and always make me think of Sybil’s mom screaming “Hold your water!” after which I go around humming “Rock of Ages” all day. Really sucks too, cause the only tune that can kick-out “RoA” when it’s stuck in your head is the theme song to “My Three Sons”. Don’t believe me? Give it a try… I double-dog dare you.
Which brings us to our next section…
Hoses, Pumps, and Alcohol—not just Charlie Sheen’s artificial heart.
Most of you folks reading this have probably already seen my YouTube video I did as proof of concept. I just wanted to show that overclocking was possible on a MacPro, even if it was just hardware. I might not have put it on the net except I’ve always hated how the PC weenies would go around blasting the platform for that one reason. But again, I also kinda don’t like that we don’t have any real overclocking tools for the Mac as well. So “Word” to Steve—C’mon pal, loosen up & let us live a little.
Initially, as seen in the video it was just pump, reservoir, ground exchange, and the Mac. Or so I wanted you to think. The initial setup didn’t have the ground exchange, and the little reservoir seen in the video would get so hot you couldn’t put your hand in it, and it did so quick! I wanted to demonstrate this by making tea with it, but wasn’t sure what that’d do to my system. The point being that I had no idea these computers cranked out so much heat. But that is also what finalized the decision for the ground exchange. All I can tell you is that intuitively I knew that was too much heat to keep in my office by using standard a PC radiator and fan setup.
What I’m trying to say is that I didn’t know diddly about what I was doing and had hardly anything resembling a plan. So since the YouTube video I’ve redone things completely at least twice. I’ve had an algal bloom as well as a blow-out in the case that spewed 1.5 liters of a 50:50 water-ethanol mix on to my hardwood floors. (And that was particularly foul. Try to remember the way your bottle strewn living room smelled in college the morning after a good party whilst you were nursing the hangover.)
But over time, I’ve developed a better understanding of how to do things, and what I’m going to tell you about is the current setup and what mods are still in store. Let’s leave the past in the past.
First, the flow diagram. The biggest change from the initial setup was the inflow-outflow port setup. The first had flow entering the case through the PCIe expansion slots. I never liked this, it just felt too flimsy (which it was) for mounting steel quick disconnects (this was demonstrated at the blow-out).
So on the blow-out rework I moved the in/out ports to the case bottom between the processors and the case door. After measuring (twice) I drilled into the case bottom (twice) and installed two 1/2 inch barbed panel/bulkhead mounts. On the underside (outside) these were attached to 90º swivel barbs to which the inflow-outflow tubing is connected. This is a quite solid solution that has the water hoses protected by the Mac itself.
In plumbing the waterblocks themselves, there are a couple of general principles to bear in mind: keep it short, minimize bends and splits, keep the internal diameters of the fittings (and entire coolant run!) as large as possible, run the flow from exchange-> CPU-> GPU->NB/SB/MOSFET/Memory, etc.-> pumps-> exchange, and consider running multiple lines.
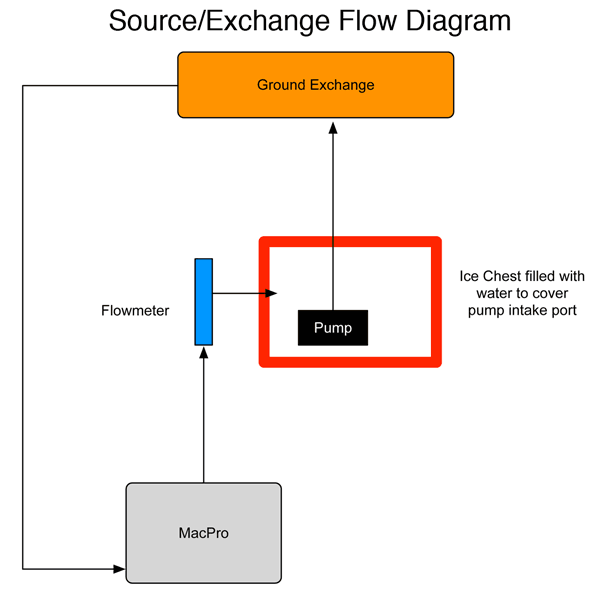
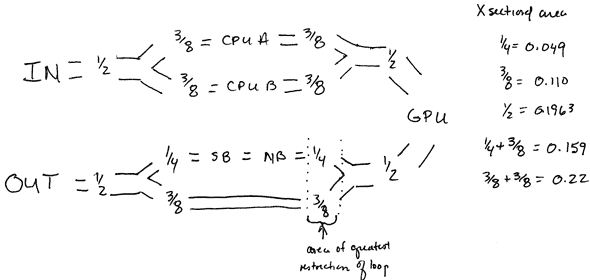
Looking at my current system diagram, I did my best to stick to these ideas, but the Mac case really doesn’t make it easy. Still, I was able to significantly increase my flow rates to this current build.
Fittings: Compression or Barb? Doesn’t matter just as long as you put them on correctly. If barb, use clamps or other means to secure the tubing. (As you can see above, I used multiple, multiple zip ties. Feel much safer with these. The only kind I’d feel safer with would be a worm clamp.) My suggestion? Check each connection at least three times, the final time being after at least 6 hours sleep.
Tubing: Tygon, just remember Tygon. ‘Nuff said.
Coolants: Bare minimum is distilled water. Distilled/De-ionized is better. Anti-corrosives? Nah. Use quality blocks and don’t mix metals with large differences in galvanic potential. Aluminum is muy no bueno. Antifreeze? Probably not. Just insulate to below the frost line and/or keep the pump running during the freezing weather. But if you feel you gotta then use a 30% mix of ethanol. You can use methanol as well, but methanol’s only advantage is in the added elimination of your girlfriends cat. Anti-algal/Biocide? Yup. One drop of copper sulfate (PT Nuke) per liter, or a silver coil in the reservoir. The best? JUST COMPLETELY DEPRIVE THE SYSTEM OF ANY LIGHT!
The Loop: This is where I got really creative. See the “No light” section just above? Remember the hot, fat, sweaty bastard that’s cheap? Well, he just wanted to get as much out of this as possible.
“As much out of what?”, you ask. Well, if you recall, the upgrade was for the video. The geothermal ground loop was because I was sick and tired of being so dang hot in my little “add-on” office. So what I’ve been trying to maximize has been the heat transport outside into the ground exchange while minimize the transfer into my office.

The major heat addition to the room I’m assuming is from the remaining non-watercooled components (the RAM, PSU, motherboard, etc.), and really the only way to capture this heat is by adding more waterblocks. If I were to go this route, my only real reasonable option would be to purchase some for the RAM. Harder to do would be fabricate a water cooling system for the PSU (though I expect the returns would be huge—the PSU pumps out gobs of heat!). This project, however, is drawing to a close and the next one is getting “money” and “mind” priority.
(And I may tell y’all about that “next one” sometime, but not now. Again, it’s something I’ve only read one inference to in multiple online searches. I’m thinking it’ll be a doozy, but then again, I impress easily…)
The next biggie I think is to reduce the loss of the already recovered heat. The heated water from the computer will have convective losses from the reservoir (and also that produced by the pump it contains), as well as from the tubing that transports it. The best way to do this is by containment and insulation.

So my most recent modification was to convert an insulated thermal container (just an ice chest) into the reservoir (that also contains the heat producing water pump), and to insulate the tubing to and from the computer. Why the “to” (the “In”, or “from” the exchange) line as well? How bout ‘cause the incoming water temp is 85º (the outflow is 90.7º). You must remember that a.) not all of the heat is immediately transferred into the dirt, nor does it immediately transfer away from that dirt to the rest of the planet (thermal inertia), and b.) the ground temperature (mid July along the Texas Gulf Coast) is about 80º at about dawn and continues to warm naturally from the sun during the day. I like it to be 72º in my house, so why would I want to transport that heat back in?

How’s it working? Remarkably well, I think. My office is subjectively cooler while my “Delta T” has increased by almost 2ºF.
One last thing, flow rate through a loop you want to keep at about 1.5 gallons per hour. Too little and you can’t pick up any heat (lack of turbulence), and too high sees diminishing returns for the power put in to the system. In my first attempts I used a single ViaAqua 1300 (6 feet of head and rated at 370 gph, 28 watts). This was giving me a flow rate of only about .67 gph with the 50:50 ethanol:water solution. (I could give Delta T, but I screwed things up.) So I went out and got a Pondmaster 700 gph pump with 18ft. head at 60 watts. Didn’t hardly change flow rate at all. For the fluid engineering types out there, mine is a 60+ foot long closed loop system with 50 feet of it being 1/2” nominal copper. But once inside the house, it narrowed to 3/8” flexible tubing. Finally, inside the computer, it narrowed to two 1/4” tubes in parallel.

After the blow out incident, in and out to the computer was 1/2” the whole way. If you refer to my flow diagram above, you’ll note how I added up the cross sectional diameters to help me decide on tubing size to the water blocks. The first loop narrowed to 1/4” + 1/4” tubes for a total internal diameter area of 0.98 in2. The second has a narrowest point of 3/8” + 1/4” or a total internal diameter area of 0.159 in2. So if all other things are about the same, and considering calculating flows through a series of pipe is WAAAAAAYYYYY to difficult for me (but let’s say that it, too, is about the same), then the resistance for a single pipe is proportional to the inverse of the radius to the fourth power. All that means is that a small increase in the radius results in a marked decrease in the resistance. Though I never calculated the whole thing, and yes I do realize that I’m summing 2 pipes in parallel, I feel this does strongly suggest improved flow.
Regarding the pumps, I placed the ViaAqua and the Pondmaster in series with the ViaAqua priming the Pondmaster. Pumping in series does not increase maximum flow rate, but the head for serial pumps is additive, and in highly restrictive systems you need a lot of head for things to flow well. It was probably the increased head that doubled the flow to 1.5 gpm as much as decreasing the restrictions! BTW, running nothing but distilled water with PT Nuke and one silver coil now.
Very, very last thing. The distance from the outflow of the priming pump to the main is 5 diameters of the main’s intake port to the main.
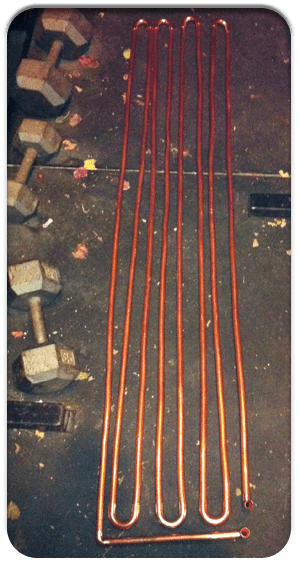
Finally, the ultimate last thing, the 40 feet of copper pipe I sweat together for the radiator? Learned it by watching YouTube. Never done anything like that before in my life. Had to order the return bends from Grainger because none of the hardware stores carry them. I also learned how to put in a GFCI as well. Really, there’s no end to what you can learn on the computer.
So stay with me folks. The interesting stuff is upcoming in a few weeks.
But as I said, consider the source…
Stay Tuned For…
“Summin’ it Up: Where We Are and Where We’re Going”

Plus a bonus article….“Remediation of the spouses’ kitchen table and flower bed”
Dr. Campbell again answers the question that seems to have escaped our Limey brothers from across the pond—this time as a pictoral and QuickTime presentation!
It’s the real “Don’t Miss” of the summer blockbusters!


