 Did you know?
According to an online survey conducted by Harris Interactive Inc. among 2,021 U.S. adults ages 18 and older in June., only 10% of users backup their data daily. That percentage remained unchanged from 2012.
So why don’t users backup on a daily basis?
Simply put – manually backing up you computer is a hassle. Time Machine goes a long way on changing that. It was designed as a “set it and forget it” backup solution. However, even automated backups can have a human component. For example, using Time Machine with a laptop means you regularly have to plug that backup drive into your computer. While that action is nearly automatic for some of us, for others it is easily (and often) forgotten.
But not to worry – OWC has you covered with the Data Doubler.
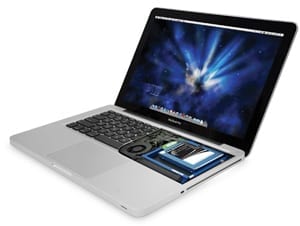
With an OWC Data Doubler installed in your laptop, your Time Machine backup is always with you. No extra drives to carry, nothing to remember to plug in. It truly completes that “set it and forget it” design and with the incremental backups, you don’t need to make sure you’ve attached something externally before you start working.
Accidentally deleted a file? Just restore it. No searching through backups hoping you had a Time Machine drive plugged in when you worked on the file last.
Time machine runs in the background and this is one case where capacity is King – not drive speed. Opting for a slower drive not only becomes a less expensive option, but a 5400RPM or even 4200RPM drive is plenty for keeping up with the most grueling of workflows.
Is the installation of a Data Doubler into my MacBook/MacBook Pro hard?
Not at all…it is three simple steps:
- Install your Data Doubler and secondary drive into your machine running OS X Leopard or later using our easy-to-follow DIY videos.
- Format the new drive, and …
- When the popup asking if you’d like to use this drive as a Time Machine backup comes up – choose “yes” and follow the prompts.
Is this option only for laptops?
Of course not. We have Data Doubler versions available for select iMac and Mac mini models as well. While using an external drive with a desktop machine runs less of a risk of forgetting to plug in the drive, keeping that drive internally can save room in your workspace. And that’s a few less cables to manage too.
Advantages –
- Compatibility: All machines that we offer a Data Doubler for can be setup this way – You just need to be using OS X Leopard or better and this option is available to you.
- Easy to setup: We’ve laid out all the prompts here so you can see how to set it up before you begin. Follow this link for some free Time Machine inspired drive icons as well.
https://eshop.macsales.com/Reviews/Framework.cfm?page=/time_machine/time_machine.html - Easy to recover from: If your main drive fails, you can restore your entire system from the backup drive.
https://eshop.macsales.com/blog/18064-bouncing-back-from-disaster-how-to-restore-from-your-backup - No drive matching: Your two drives not only can be different brands or capacities, but it is actually recommended that the backup drive be larger than the main drive.
Stay tuned to the OWC Blog as for the next article in this series I’ll be going over another automatic backup configuration for using the Data Doubler – Setting up a “Mirrored” RAID 1.


The backup should be separated from system being backed up.
Hello,
I have installed the Datadoubler and I am satistied of the solution. However, using the 2nd drive “datadoubler” to backup the first is not what I want. So, I wanted to use timemachine to backup both drive to an external one. The timemachine see the data of both drives and calculates the total amount of both drives and starts to backup. But at one point the second drive unmounts. I looked at the forum, and hardly enough I do not see a thread concerning this problem.
Is this a limitation, is there a solution to properly backup the data?
First drive is a SSD Mercury 1TB
Second drive is 2TB SATA
Thank you
Me, Myself I am using auto sync data in order to protect my files.. This is also, an online data back-up same with the dropbox..So, even disaster come to us, our data is truly protected.
In a the interest of reducing heat and saving battery energy, is there a way to only mount the backup drive on demand? or a shareware or an applescript to unmount it at login or with a single click?
You are able to unmount an internal drive from Disk Utility if you are not booted from the drive. I am not aware of a means of automating this task at login. An Applescript or third party software could exist for this.
That is great. I use both:
– Monthly backup with Time Machine and internal or external drive (as big as possible).
– Daily backup using SuperDuper! (script to save just the Documents folder) and SanDisk Extreme 128 GB SDXC Class 10 UHS-1 Flash Memory Card 45MB/s SDSDX-128G-X46.
And now that I think about it some more… while I can see the convenience factor, its not really good for non-laptops either. Consider that the new Mac Pro won’t allow this anyway. But regardless of that, what happens when a power surge from lightning, brown-outs, etc fry both your Mac and the drive in it? You’d be much better off having your Mac and external drive on separate power sources and/or UPS’s. The whole point of a backup is to plan for an unforeseen disaster. You need to keep them separate. Backups are the one scenario where you say “screw convenience” and go the extra work to ensure your backup will be ready when you need it. A data doubler as an internal TIme Machine drive is a bad idea for both portable and desktop Macs (and even PC’s too).
This is only a good idea until you consider two things: 1) the extra battery drain incurred unless you configure Time Machine to not backup unless on AC power and 2) when you realize you lose your primary data AND your backup if you lose (have stolen) or severely damage your laptop. I can see lots of GOOD usage scenarios for a data-doubler setup. I use one myself, so I’m not against the product. BUT… and this is a big BUT… using it as your Time Machine drive is STUPID, in my opinion, especially since Mountain Lion and newer have a local backup option already built in. Yes, it uses more space. I’ll give it that. And its meant to only hold you over til you get an external drive on there for a real backup. But anyone that uses the Data Doubler as they’re primary or only Time Machine backup is simply asking for trouble.
Different usage scenarios is the purpose of this blog series. While usage as a Time Machine backup is not ideal for your needs it certainly will be for others.
I personally rock an original 1.83GHz MacBook at home running 10.5.8. As it isn’t my main laptop anymore, it usually sits plugged in on a desk as the “community machine” in my house. The local backup option has come in quite handy there. I don’t worry about battery life on that one as it rarely leaves the little desk in my kitchen and when it does, I’m not expecting it to give me the “all day computing” that a more modern machine may. I then keep a separate clone of that drive on an external drive that I refresh about monthly…as often as someone in the house uploads the photos from their camera. So for that machine, this setup works just fine.
We’ve gone into detail several times on this blog on how to setup proper backups – and yes, redundancy is key, but that was not the focus of this article.
Backup articles on the OWC Blog you may be more interested in:
http://blog.macsales.com/12665-back-up-your-data-save-a-squirrel
http://blog.macsales.com/12401-take-it-from-a-tech-raid-≠-proper-backup
http://blog.macsales.com/13573-dont-be-an-april-fool-and-backup-for-world-backup-day
http://blog.macsales.com/3385-make-sure-your-backup-strategy-is-protecting-you
http://blog.macsales.com/1508-synchronicty