 With sales of Macs reaching an all-time high, there are a lot of new users who are coming over from the world of Windows PCs. After a few years, all computers seem to slow down somewhat, and new Mac owners might think back to the solution that they turned to on those Windows computers — defragging the hard disk drive (HDD). Well, they won’t find any command or utility to let them do that on a Mac. In this Tech 101, I’ll talk about why defragging is largely unnecessary on a Mac and how to do it if you’re one of the users who may need to defrag a HDD.
Note: SSDs do not use a spinning platter to store data; instead, data is stored and accessed from flash memory. Attempting to defrag an SSD or Fusion Drive is actually dangerous to the drive, as it can reduce its lifespan. So never defrag a SSD, OK? For more background on the difference between SSDs and HDDs, check out this recent Tech 101 post on the Rocket Yard.
What is defragging?
Defragging is short for “defragmentation”, the process of organizing the files on a hard disk drive to optimize how it reads and writes those files. HDDs use a magnetic read/write head to access a fast, rotating round platter, typically spinning at 5,400 or 7,200 revolutions per minute. As you’d expect, although the platter is rotating at a fixed rate, the outside edge of the platter is moving faster than the inside edge. As a result, new data is generally written on the outside of the platter, moving in towards the center as more data is stored over the years.
However, the data can’t automatically migrate itself to the outer edges of the platter to fill in available space, so after a lot of reads and writes have been performed, there are small gaps where big files can’t be written, so they are stored in places all over the drive platter. Since the moving read/write head has to travel all over the width of the platter to load files or applications, the entire system seems to slow down.
Defragmentation is the process of reading files, then rewriting them so that single files are written on the spinning platter in such a way that the drive head doesn’t need to move back and forth. A file that may have been splattered all over the platter is placed in a contiguous band, so loading apps and files speeds up.
Why Macs usually don’t need defragging
There’s a reason why Macs typically don’t need defragging — the Mac OS X file system is designed differently than Microsoft’s, and it automatically defragments files. Since OS X 10.3 “Panther”, the file system has used something called Hot File Adaptive Clustering (HFC) to perform that process.
You can think of HFC as constantly performing defragmentation, assuring that the HDD is as optimized as possible for reading and writing data. For most of us, HFC performs perfectly and you may never need to defrag a Mac’s hard drive.
There is an exception to most every rule, and in this case it comes in when people have hundreds or thousands of videos, audio files, or multimedia files that are larger than about 1GB in size. Those people are generally creatives who use big files as their stock in trade. Even then, HFC usually does a pretty good job of keeping things under control, but as time goes by these users may see the performance of their Macs suffer.
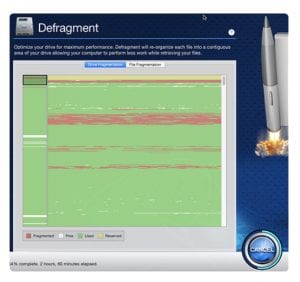 What if I do need to defrag?
Since there’s no defragmentation utility built into OS X, how would a creative be able to defrag a large HDD filled with big files? About the only — and best — way that we can recommend doing this is using Drive Genius 4 from Prosoft. This app is used by Apple employees at the Genius Bar when someone comes in with an extremely sluggish Mac that fits the criteria for defragging; in other words, the user has a lot of huge files stored on the HDD.
Drive Genius 4 is not a one-trick pony. It comes with a tool that lets you create a secondary drive so that you can defrag and otherwise optimize your main hard drive, can find and eliminate duplicate files, does secure erasure of drives, and lets you clone a drive if necessary.
What else can I do if my Mac is running slowly?
Sometimes it’s not your HDD that’s having problems. If you have a lot of applications running at the same time and you’re not using them all, consider quitting those apps that you don’t need. You can tell which apps are running by the dot below them on the Dock, and quitting them is as simple as right-clicking on those app icons and selecting Quit.
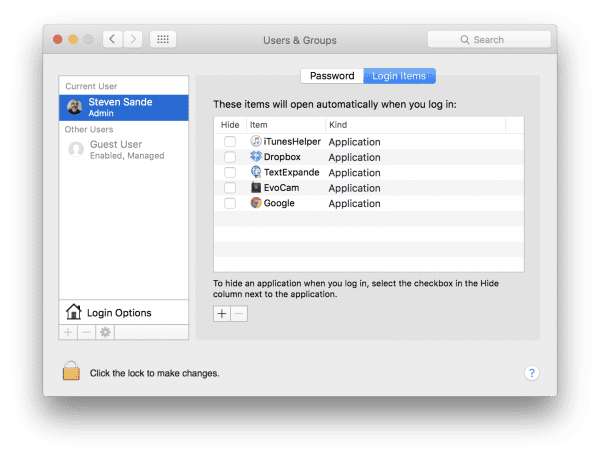
One issue I’ve personally seen with a lot of Mac users is that they have a large number of apps that launch at startup. Some of these run in background and are only visible in the menubar, so it’s hard to determine if they’re even running. You can stop those apps from loading at startup by opening System Preferences, clicking on Users & Groups, then clicking the Login Items tab. To remove an unused app that loads during startup, click on it to select it, then click on the minus sign ( – ) button below (see image below).
 There are some other reasons your Mac might be running slowly — there’s too much data on your HDD or your Mac doesn’t have enough RAM (memory). If you have less than about 10 percent of your HDD space free, your Mac may struggle finding the swap space that it needs when the data and apps being used overwhelm its memory.
Three solutions are possible here:
- Delete unnecessary or out-of-date files from your Mac
- Install a larger HDD
- Install more RAM
The first solution is usually quite easy, as you may find apps that you don’t use, duplicate files, or large files that can be moved to an external disk drive for archival purposes. Once again, Drive Genius 4 is a great solution for finding and removing duplicates.
As for the number two and three items on the list… well, you’ve come to the right place. OWC is the leader in providing do-it-yourself hard disk drive and memory upgrades, complete with instructional videos that show precisely how to go through the process. Check out our highly-acclaimed video series here: eshop.macsales.com/installvideos/










Hi, your blog is super helpful. I have a problem which seem to have no solution anywhere.
So I had defragged my HD thinking I will oneday install Windows, but I never had to and instead started running low on Startup disc while trying to download some pro apps, so thinking it might help, I Went to “disc utility” clicked on minus in the pie chart and mergeed it. Now to me my disc looks perfect now with about 218 GB freeout of 320.
Shockingly i my laptop became super slow, my laptop has never been slower. Do u think i screwd it up?
Any OWC documentation on whether DiskWarrior (http://www.alsoft.com/DiskWarrior/) can be run on a SSD without adverse effects?
Alsoft says it’s safe to do so (http://supportdb.alsoft.com:591/FMPro?-db=alsoftsupport&-lay=main&-sortfield=Date&-sortorder=descend&Keywords=SSD&Product=DiskWarrior&-op=lte&Date=%2f%2f&-max=15&-format=AlsoftSupport-qa.html&-script=counter&-token=194&-Skip=0&-find).
Hello Thomas,
We are very sorry but we do not have any documentation on DiskWarrior running without adverse effects.
Please feel free to contact our Technical Support Team for any further questions!
Appreciated the info on not defragmenting a SSD! I have found a great tool in Tech Tools Pro to do a lot more that defragmentation. I had an answer here from Rick on cloning. Great article.
So, nice hints – but it’s still not full list of measures. Sometimes, you know, the problem is fully by your actions – like reading too much files at one moment, or placing torrent-tracker downloads directly to this drive. It’s not all – here extra list of causes: https://hetmanrecovery.com/recovery_news/six-reasons-why-your-external-drive-may-get-slow.htm. By the way, the most hidden reason, I think is a low electricity power – you never know when this happens…
I have defragmented my Mac formatted external hard drive since it was painfully slow. I used Stellar Defrag application and it showed me chunks of fragments scattered all over the HDD. I wondered how it got them? But the hard drive was used for large & bulky applications and I never formatted it after I unbox it. Most of the videos were large and had various components probable that what made it fragmented. Reference http://www.stellarinfo.com/support/kb/index.php/article/defrag-mac-external-hard-drive
Outstanding article. Thank you for the explanation as I had pondered defragging on many occassions. Luckily, my Mac has never sent me on that chase.
Again, greatly appreciated.
h
Dear OWC,
The author failed to mention the easiest method of defragging your drive; clone it, erase the drive, and then clone it back. This is what Apple actually recommends in their Tech Training certification program. When the data gets copied back, it is automatically placed in the optimal sequence on the disk.
Thanks a lot. This was useful.. For those of us that were Apple II users back in the days of Unicorns.. we used to defragment also… when we could afford a hard drive. Also. my new 960 SSD and 32 GB of memory on my MacPro Tower Early 2009 performs flawlessly.. the speed improvement was phenomenal.
Glad to say I haven’t used my Drive Genius for defragging ever! I bought it when I got my 2006 Macbook and until the display finally failed it just kept cooking to the end! Good article, cleared up issues for me. I rarely use a lot of large files-most well under a gig so it has just kept chugging along. The swap space is very important though-I forgot about that! I will clear more free space on my 128G SSD-I normally only have a few Gbs clear.
You say “click on it to select it, then click on the minus sign ( – ) button below (see image below).”, but there are 2 “-” signs, one on the left below the Login Options, and one below the text referring to hiding an application. Which one do we use to actually stop the app/program from loading at startup.. and what does the other one do then?
The minus sign on the left below the Login Options is used to delete an existing user account on your Mac. The plus sign there does the opposite: it adds a bran new user.
The one below the text referring to hiding an application is NOT for hiding an application. It is for removing an app in the list from the “open at login” lineup.
This is the minus sign you can use if your Mac is running slowly because it has too many apps opening at login. Click an app in the list, then click the minus sign. Bingo, it’s gone from the list. If you then change your mind, use the plus sign to add it back again.
If you want to keep an application in the login lineup, but you don’t want to see it as it starts up at login, then click the checkbox to the left of the app name in the list. This is the message in the text above the minus sign. It is not a message about the minus sign.
A lot of helpful and useful info here. I am one of those who moved to a Mac from Windows. It will be a one-way trip. I work on computers as a side hobby and learning more about them is always good. Thanks.
and how about when you constantly see that spinning beach ball overtime you like on a folder; or you mac mail take 2 minutes to load new messages. My mac isn’t nearly as zippy as it was three years ago when I bought it, and if defragging it isn’t the problem, the hard drive is only half full, and I have the same amount of RAM I’ve always had, then what is the problem ?
I took my laptop to the Genius Bar at Apple because it was running so s l o w l y. One of the things the Genius did was to look at the list of processes in the Activity Monitor. He then quit all that he thought were not needed/useful, and the laptop ran much better. I would like to do that for my desktop; unfortunately, I don’t know what processes he stopped. But if one can find from Apple which ones are not needed (e.g., third party), that might help.
Top two reasons for the spinning beach ball are insufficient memory (check Activity Monitor for memory pressure) and disk drive starting to fail (check Console log for “I/O error” messages and Disk Utility for SMART status — note that SMART status often reports no problems until the problems become entirely obvious).
Simple But very useful pieces of advice…Greatly appreciated. Thank You .
An erase then copy from a backup clone on another drive / partition made using Superduper or CCcloner should also effectively defragment and may even be faster.
I use and love CC cloner. However, copying to a partition isn’t necessarily the same as copying to a just-wiped hard drive. IF you make a partition “live” on a drive that’s already got files on it, the partition will be logical but could already have blocks scattered about. So copying to it would actually lock you into a partly fragment drive. For the purpose of defrag, you only want to copy/clone onto a new or just-erased drive.