I’ve always enjoyed working with the latest releases of the Mac OS. Although Apple tends not to release new major versions of the Mac OS until the fall of each year, that doesn’t mean we have to wait till then to take a new OS out for a spin.
Apple has long provided developers with early beta versions of OS X and macOS, but only started providing betas to the general public a few years ago. The public betas have the advantage of letting you try out macOS before the general release, giving you the opportunity to participate in finding bugs, check out new features, or just make sure important software you use every day will work with the upcoming version of macOS. (Related: Check out our WWDC 2017 coverage here.)
macOS High Sierra
The latest version of macOS, which will enter public beta sometime in late June, is macOS High Sierra. This version of macOS has quite a few new features and capabilities, including APFS, which, for the first time, will be used as the default file system on the Mac, replacing the very old and long in the tooth HFS+ file system. (Related: See our First Impressions of ‘High Sierra’.)
I’m anxious to find out if some of my older software will still run under macOS High Sierra. Microsoft has said, when referring to the 2011 version of Office, “Word, Excel, PowerPoint, Outlook, and Lync have not been tested on macOS 10.13 High Sierra, and no formal support for this configuration will be provided.” So, I may end up looking for new office apps to use with High Sierra. But it’s not just older versions of Office that may not run correctly on macOS High Sierra, so finding out in advance which apps will work and which are in doubt is one of the many reasons to enroll in the Apple Software Beta Program, aside from just wanting to check out the new OS, that is.
Installing macOS High Sierra Beta
Before you begin installing macOS High Sierra beta, a few words of warning. It’s a beta, which means anything can happen, including crashes, lost data, and apps not working. At the extreme, it could cause data loss across an entire drive due to the new APFS file system that’s installed by default, and which will convert the drive you’re installing macOS High Sierra on to the new file system.
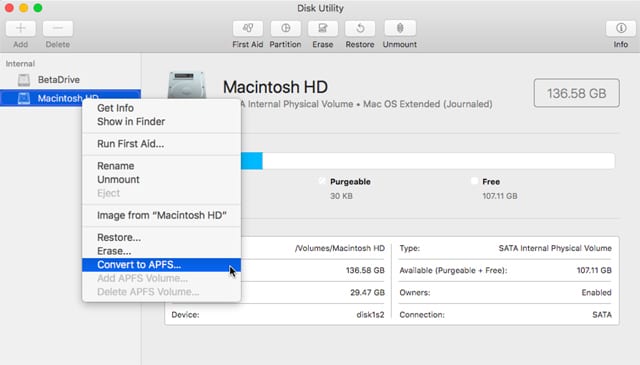
So, be sure to back up your Mac before continuing, and be sure to read the How to Get Ready for macOS Beta article. Most of all, remember this: DO NOT install the beta on your Mac’s current startup drive.
Note: This install guide will be updated when the public beta of macOS High Sierra is officially released. In the meantime, it’s based on earlier developer betas, though I don’t expect any major changes other than a few file names.
OK, let’s get started.
Download the macOS High Sierra public beta. You need to be a member of the Apple Beta Software Program. Once you’re a member, you’ll be able to download macOS High Sierra beta to your Mac. Follow the download instructions provided by the Apple Beta Software Program.
Once the download is complete, the macOS High Sierra installer will automatically start. At this point, it’s a good idea to quit the installer and perform a few housekeeping tasks before continuing.
Create a bootable copy of the installer on a USB flash drive. I highly recommend creating a copy of the installer on a USB flash drive. This will allow you to perform a clean install of the OS on any drive, including a Mac’s startup drive, or in a virtual environment, such as Parallels.
You can find details on creating the bootable flash drive in the article: Rocket Yard Guide: How to Make a macOS Sierra USB Installer Drive
The above guide was originally created for macOS Sierra, but it will work fine with macOS High Sierra, with just a small change to the installer name (originally “Install macOS Sierra Public Beta”; now “Install macOS High Sierra Public Beta”). Otherwise, the process is pretty much the same.
You’ll find instructions for using the flash-based installer in Parallels at the end of this guide.
Installing on a Drive Dedicated to macOS High Sierra Beta
During the beta process, installing macOS High Sierra on a drive dedicated to the beta is one of the preferred installation methods. You can use either a clean install process, which includes erasing the target drive and then installing the macOS High Sierra beta, or an upgrade install, which allows you to install the beta over an existing macOS or OS X drive.
Because this is beta software, I don’t recommend installing the macOS High Sierra beta over your existing startup drive. Instead, you can create a clone of your current startup drive to use as the destination for the install. This will allow you to run macOS High Sierra with all of your current apps and data, a good way to check compatibility while keeping your beta software and your everyday work environment completely separated.
For the clean install, start by erasing the drive you will use for hosting macOS High Sierra; remember, this will destroy all data on the drive. The drive should be a separate drive, not the one your current version of macOS or OS X is installed on.
If you choose to perform an upgrade install so you can test compatibility with your existing apps, start by creating a clone of your current startup drive, then use the clone as the upgrade install target.
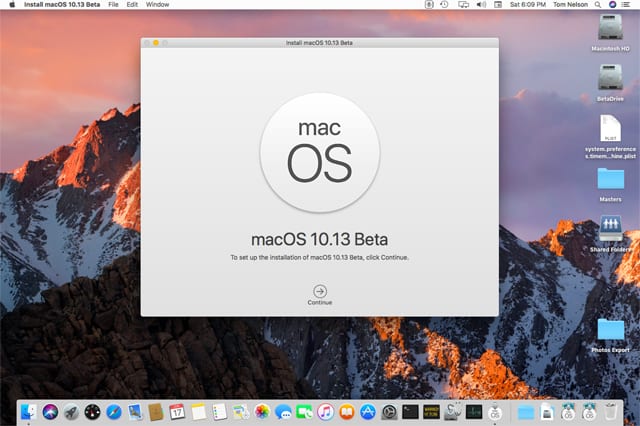
Once the target drive has been erased, or the clone created, launch the Install macOS High Sierra Public Beta installer, located in your /Applications folder. This is the same installer you quit from earlier in this guide.
Click the Continue button in the Install macOS 10.13 Beta window.
The software license terms will be displayed; click the Agree button.
A sheet will drop down asking if you really agree to these terms. Click the Agree button.
The installer will display your Mac’s startup disk as the default target for the install. Do not click the Install button; instead, click the Show All Disks button.
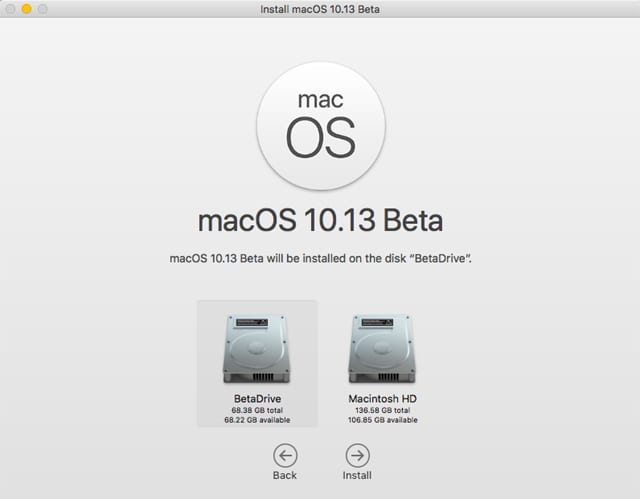
The installer will show a list of all drives that can be used as targets for the installation. Select the drive you wish to use (either the drive you erased or the clone you created in the steps above), and then click Install.
You’ll be asked to supply an administrator password to allow the installer to add a helper tool; the helper tool is required to complete the installation process. Supply your password, and then click the Add Helper button.
The install process will begin by copying files to the target drive and then rebooting. The initial copying process can take a few minutes, so be patient. The restart will happen automatically but you can speed things up slightly by pressing the Restart button when it appears.
After your Mac restarts, you’ll see a process bar with a best guess as to the remaining time to complete the install. Don’t believe it for a minute; go have lunch, take in a movie, get some work done; it doesn’t matter. From this point on, the install process is automatic and doesn’t need any input from you. Once the install completes, your Mac will restart and launch the Setup Assistant to walk you through creating your administrator account.
Installing macOS High Sierra Beta in Parallels
- Mount the bootable USB flash drive containing the macOS High Sierra Beta you created earlier.
- Launch Parallels (I tested this on Parallels Desktop version 12.2.0).
- Create a new virtual machine.
- Select the “Install Windows or another OS from a DVD or image file” option, and then click Continue.
- Place a checkmark in the Continue Without a Source box, and click the Continue button.
- Select macOS as the type of operating system to install.
- Give the virtual machine a name and verify the location where the vm will be created. Click the Continue button.
- If the vm starts up on its own, select Actions, Stop from the menu to turn the vm off.
- Select the new vm in the Parallels Control Center, and then choose Actions, Configure from the menu.
- In the Configuration window that opens, select the Hardware tab.
- In the Hardware sidebar, select the Boot Order item.
- Place a checkmark in the Select Boot Device on Startup box.
- Close the Configuration window.
- Start the vm.
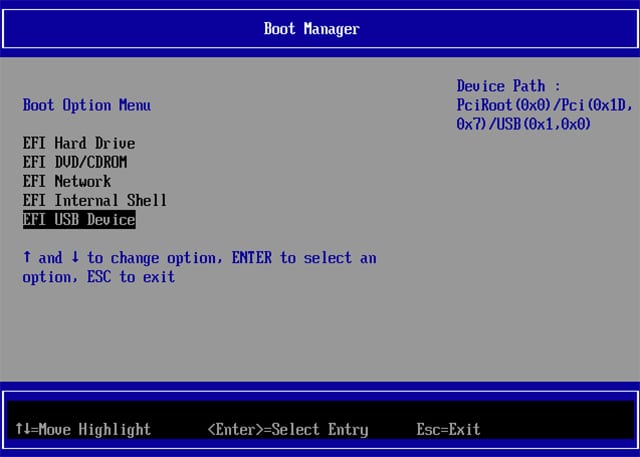
- As the vm is starting up, place your cursor into the vm window, and then wait until you see the phrase “Press any key to enter the boot device menu.” When you see this phrase, click once to enter the vm window, and then press any key on your keyboard to enter the Parallels boot device menu.
- Press the escape key.
- Press the control and option keys to release your cursor from the vm window.
- Select Devices, External Devices, and then select the bootable USB flash drive you created earlier.
- Place your cursor back in the vm window and click once.
- Use the arrow keys in Parallels to select Boot Manager, and then press the return key.
- Use the arrow keys to select EFI USB Device, and then press the return key.
- The vm will boot from the USB flash drive that contains the macOS High Sierra Beta installer. The process can be a bit slow, so be patient. After the boot up is complete, the installer will start automatically, asking you to select the language to use for the installation. Make a selection, and click the right-facing arrow.
- The macOS Utilities window will open. Select the Install macOS item, and then click the Continue button.
At this point, the standard macOS High Sierra installer will begin to run. You can follow the instructions above for installing on a separate disk, beginning just after the point where the installer is launched.
After the macOS High Sierra beta is installed, you can dive in to see what’s new and which apps still work. If you find an app that isn’t working and is important to you, be sure to leave feedback with both the app developer and Apple, using the Feedback Assistant (located in the Dock).
You can also leave a comment, letting others know how the beta is working for you!


No one has posted here for about a month so I am bumping it for the attention of OWC staff. Have you fixed this yet, now that High Sierra is on general release? I am still getting the “An error occurred while verifying firmware” problem so, as far as I can see, my 1Tb OWC SSD is space junk….
Does anyone tried to install from terminal using “–converttoapfs NO” option as described in https://www.tonymacx86.com/threads/guide-avoid-apfs-conversion-on-high-sierra-update-or-fresh-install.232855/#post-1602625
Does anyone tried to install from terminal using “–converttoapfs NO” option as described in https://www.tonymacx86.com/threads/guide-avoid-apfs-conversion-on-high-sierra-update-or-fresh-install.232855/#post-1602625
I use an OWC Mercury Electra 3G SSD in my old MacBook Pro and keep getting the following when I try installing: “An error occured while verifying firmware.”
I have gone so far as to use Command-Option-R to reinstal from new. I have erased the drive and formated, both in OS Extended Journaled and APFS. Both get same result. How can I fix this firmware problem?
Apple is forcing a Mac Firmware upgrade that is built into the installer. For some reason, Apple treats the Aura drives an external drives and not internal. The firmware checker fails as it’s looking for internal drive. The only fix for now is to replace the Aura drive with the original Apple drive, install High Sierra, shutdown. install the Aura drive, upgrade to High Sierra and this time it will install. Beware that I did not get the option to format the drive to you will need to boot from recovery or from another drive that is High Sierra. In my case, I booted up using the option key with the Apple drive connected via USB. I was able to format the drive as AFPS and then reinstall High Sierra. Took a LOT of time to go through all of these steps but I knew I could get it done. OWC said they are addressing it with Apple. Apple has issues with AFPS on iMac Fusion drives not supported so I suspect there is a need for Apple to address this.
Is there any way for those of us who no longer have the original Apple SSD to work around this issue, or are we dead in the water with an unusable Aura SSD until Apple develops a fix?
I have the same issue – please tell me there is a fix coming that does not require having the original SSD?
Has this OWC SSD compatibly issue with High Sierra been resolved yet? I am still getting these firmware issues that are preventing the install. Frustrating after having spent big money on these SSDs.
I have never been able to install High Sierra successfully, whether beta or GM on my 2013 Mac Pro with an Aura ssd replacement drive. The install always stops with error message “MacOS could not be installed on your computer. An error occurred while verifying firmware. Quit the installer to restart your computer and try again.
This is a known issue with the ssd and the firmware upgrade required to support the new file system. i have read about a successful workaround, that is quite involved. It requires uninstalling the Aura ssd. And replacing the Apple drive, then reinstalling the Aura drive after the upgrade.
When will there be a fix for this, or is the somewhere I can get the detailed workaround procedure?
It’s not an unique problem for OWC drive. My late ’12 iMac with Transcend SSD also gets firmware error while installing High Sierra.
I spoke with support about this issue on the 25th and told them I no longer had the original drive. They told me they were aware of the problem with their SSDs and that I should just wait for Apple to fix it. I told them they sold
me an expensive, defective product. This is their idea of customer service? Also, they are still selling their SSDs with no mention of this issue.
What??? OWC is saying to wait for Apple to fix it??? Does this suggest OWC isn’t even trying to fix it themselves?
OWC has been my go-to upgrade place for more Macs then I care to count. If compatibility is now being called into question, and their stance is to pass the buck, then that’s the END OF OWC for me.
I have tried many times to install High Sierra GM on my 2013 MacPro with 2TB Aura drive installed and no mater which way I install it hangs and ends with firmware error or never finishes. I have sent in a tech support request to OWC 2 days ago but have not had any response yet.
I did hear back from OWC tech support and they advised for now to re-install the original ssd, boot up and then install High Sierra which will update the firmware. Next, remove ssd, reinstall Aura, and then try high sierra install. It should work. They are working with Apple for a fix to the firmware issue.
This is the exact same thing they told me on the phone on 11/18/2017. This issue did not solve the problem for me. I do have High Sierra running on the original drive in my 6,1 Mac Pro. The 1TB Aura SSD drive I have now is useless until this firmware issue is resolved.
Same here using a OWC Aura SSD for Mac Pro 2TB upgrade. I hope OWC will have a solution for us anytime soon (Monday 25th is the release day).
I have a mid-2013 Core i7 MacBook Air with an OWC 1 TB Aura SSD installed. It’s upgraded repeatedly fine up to 10.12.6, but no version of the High Sierra installer works. I just get the “error verifying firmware” that many others with OWC drives talk about.
I am a professional developer, so if there’s anything low-level I can do to help diagnose and resolve this issue, let me know at the email address attached to this comment. Thanks!
Same thing here. Firmware error with Aura tTB on MacPro2013
I’m getting the same error verifying firmware, also with an Aura SSD upgrade in a late 2013 Mac Pro. Has anyone had any luck with a fix for this?
I am having the firmware error too (2013 MacPro desktop , Aura PCIE SSD). I have tried deleting and redownloading the installer as one poster mentioned, but it did not help.
I chatted an OWC support rep today and was told that they would not begin to develop new firmware until after High Sierra goes GM and is publically released.
I suggest no one on this thread hold their breath on it being supported.
That would be pretty tragic!
We are sorry to hear about these troubles and we are working on getting everything tested and working before High Sierra is out of the beta stages. Once that time comes, we are fully expecting OWC SSDs to run flawlessly!
Thank you for the reply.
High Sierra is now GM Candidate. We look forward for your instructions / firmware update!
Dear OWC, drop me link to the post with solutions for incompatibilities in my case both Aura and Mercury series of SSDs. Two out of my four Macs are bricked until the solution is found. Customer deserves a little credit. Cheers
I have not been able to install 10.13 due to getting firmware errors. It seems to be related to the Aura ssd upgrade i installed in my late 2013 Mac Pro. I’ve also tried installing to external drive but have same problem. Has there been any resolution to the issue yet?
A touch late into the game here but can’t install High Sierra to an external USB3 drive (Late 2013 27″ iMac).
Came back to this article to see if I may have done something screwy trying to install High Sierra Beta.
As many others on the first pass I get the hardware verification issue.
If I do as suggested and reboot and try again, the installer bails complaining it can’t find a path to OSInstall.mpkg.
Tried a couple times including one time with only the drive and ethernet connected to iMac (mouse and keyboard are Apple Bluetooth).
May give the VM route a shot after a bit more Googling.
I am also getting an error while verifying firmware. I have a Mac Pro which I upgraded the internal flash drive with one from OWC.
Could you provide any information on this issue?
Hey Greg! We are still testing the beta for macOS 10.13 and trying to replicate these firmware errors. Once we are able to find out why this is happening, we will be happy to update further.
Thank you for your patience.
I upgraded my Macbook Pro with an OWC drive last year. When I try to update to the High Sierra Beta I get an error message, “macOS could not be installed on your computer, An error occurred while verifying firmware.”
Could this be related to the OWC drive?
We are very sorry to hear about this. I will be sending you an email shortly so we can look into this further!
I am having this same issue.
I was able to get the install to work today. I deleted the previous download and downloaded it again from the Apple Store. The install ran all the way through this time. Version 10.13.Beta 17A344b
Receving error when trying to install High Sierra of: The installer information on the recovery server is damaged.
Anyone else?
You need to register your Mac with Apple’s Beta Software service and then download and install the macOS Public Beta Access Tool before you download the publich beta of macOS High Sierra.
You can register your Mac and download the needed tool here: https://beta.apple.com/sp/betaprogram/
Does Aperture still run?
Running Aperture on Sierra required making one change in one option for some. But otherwise seems OK. But it’s been about four years since an update and maybe two years since Apple announced that it was abandoning it.