![]() The Dock on your Mac is highly versatile, letting you customize its look, location, and content. You’ve likely already customized the Dock by adding apps to it, beyond those initially supplied by Apple. You may also have come across the Dock’s split personality; one side for apps, and the other for, well, just about anything else: documents, servers, drives, trash, and web pages, in the form of URLs.
The Dock on your Mac is highly versatile, letting you customize its look, location, and content. You’ve likely already customized the Dock by adding apps to it, beyond those initially supplied by Apple. You may also have come across the Dock’s split personality; one side for apps, and the other for, well, just about anything else: documents, servers, drives, trash, and web pages, in the form of URLs.
It’s that last Dock capability we’re going to explore in this Rocket Yard Guide.
Managing Favorite Websites
You’ve probably already configured your browser to house your favorite websites in an easy-to-access space. This can be in the form of a favorites bar, sidebars, and/or menu entries. The actual method for managing your website favorites depends on the browser you use. But they all have one common characteristic: the browser must be open for you to access your favorite websites.
Using the Dock to Store Websites
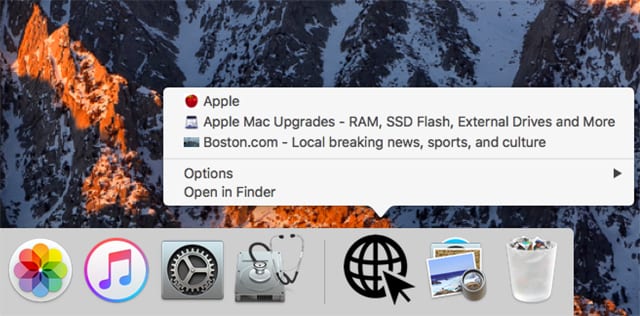
There’s another way to store websites, and that’s directly in your Dock. The advantage of this method is that your favorite web browser doesn’t need to be open; a simple click on the website’s Dock icon will launch your browser and load the website.
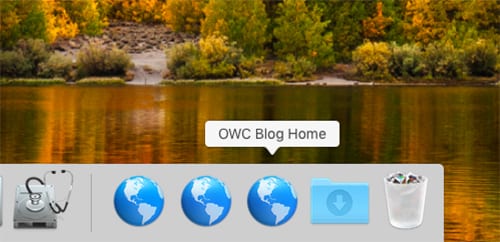
Of course, there are at least two drawbacks to using the Dock to manage browser favorites. The first is that your Dock is going to get crowded once you save more than a few websites to it. The second is that the Dock uses the same icon for all the website URLs you save, making it a difficult task to pick the right Dock icon at a glance.
However, both problems have solutions, so let’s get started with fixing them, and get you using your Dock as a website launcher.

Replacing the Default URL Icon With a Custom One
We’re going to use a simple technique for replacing the generic URL Dock icon with the one you would like to use instead. The process is similar to changing a drive’s icon on your desktop. You can find out more about changing drive icons in the article: How to Switch to New OWC, Time Machine Drive Icons in macOS
With the above guide as background, let’s start the process.
Launch your browser and load up a favorite website. For our example, we’re going to head over to MacSales.com.
Safari: Once the site loads in the browser, click once in the URL field to reveal the site’s favicon (the little icon at the far left of the URL field). You can use the favicon to drag the website URL to your desktop.
Chrome, Firefox, and Opera: Wait for the site to load, then drag the URL from the URL field to the desktop. You can also drag by the website name shown to the left of the URL field.
Note: Some websites don’t have a favicon; instead, there may just be a blank space in front of the URL. You can still drag the URL to your desktop by dragging from the blank space.
Customization note: If you don’t wish to customize the Dock icon, you can forgo dragging the website URL to the desktop, and simply drag the URL directly to the right-hand side of the Dock.

With the URL now located on your desktop, you can change its icon from the generic one to a custom icon of your choice. This brings up the question of where to get custom icons from. One method is to use the favicon associated with the website. This will work, but favicons are generally only 16 pixels x 16 pixels, making them very small for the Dock. But if you would like to use the favicon anyway, you can download it using this simple Google tool: http://www.google.com/s2/favicons?domain=www.SITENAME.com
Simply replace the SITENAME part of the URL with the sitename of the website whose favicon you wish to download, then copy the entire URL to your browser and press return.
The favicon will be displayed in the browser. You can then use the browser’s File menu to save the image to the desktop.
You can also use any of your own personal pictures you may already have on your Mac.
Another source for images is to check the website for a press, newsroom, media, or about section that may contain images the site will allow you to download and use.
You can also check one of the many free image sources, such as Pixabay, kaboompics, and others, to download an appropriate picture to use.
And as a final place to look, consider using Google’s images search. Just be sure to click the Tools button, and set the Usage rights to an appropriate setting, such as “Labeled for noncommercial reuse.”
Note: The Mac is pretty good at resizing an image to use for a Dock icon, but in general, you’ll get the best results if the image is between 1024×1024 and 128×128 pixels. A one-to-one aspect ratio (square) is best, but not a requirement.
Now that you have the image on your desktop, open it using the Preview app located in /Applications.

From the Preview Edit menu, choose Select All.
From the Edit menu, select Copy.
This will copy the image to your Mac’s clipboard.
You can close Preview.
On your desktop, right-click the website URL you saved earlier. From the popup menu, select Get Info.
In the Get Info window that opens, click once on the thumbnail image of the current icon. The thumbnail is located in the top left corner of the window.
The thumbnail should now be selected and display an outline around it.
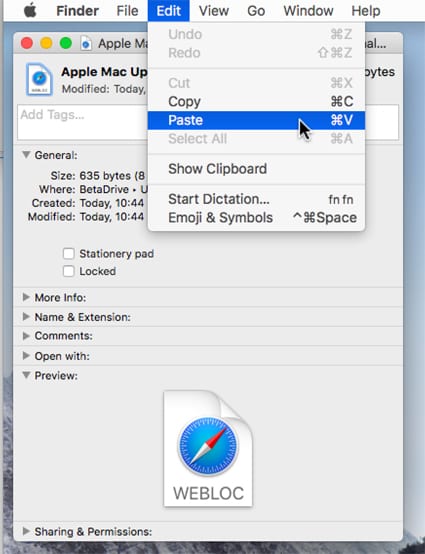
From the Finder’s Edit menu, select Paste. The thumbnail should change to the new image you selected earlier.
You can close the Get Info window.
Drag the website URL document from the desktop to a spot on the right-hand side of the Dock.

Organizing Dock URLs
If you add more than a few URLs to the Dock, it’s going to get a bit crowded. You can alleviate this problem by adding a folder to the Dock to store all your URLs in. You can create an empty folder on your desktop and give it an appropriate name, such as URLs. You can also customize the folder’s icon, just as you did with the website URLs.
Next, drag the website URLs that are still on your desktop to the URLs folder.
Finally, drag the folder to a spot on the right-hand side of the Dock.
Don’t forget to clean up the Dock by removing any existing website URL documents.


Thank you so much!!! Very clear instructions that anticipated my questions.
Thank you for the newsletter. I subscribe to MacLife. This newsletter is sometimes better, offering really good tips in a clear, easy to understand format. On a commercial note, it helps keep OWC in my mind when I think of Mac products and accessories.
Hi, Alan. Thanks for the kind words! We plan to keep them coming :)
It worked for me! Very cool. If you Google the company plus the word “logo” ex. “Chase logo” you can get higher quality images that are very clear. These were very easy with the cut and paste process.
Good idea! Thanks for reading Bill!
Oh man…you lost me after the get Info…way too much work when the bookmarks folder does a good job by keeping tons of them organized into folders. Or for Sarari…about 15 or so fit nicely into the Favorites folder.
Thank You, Thank You, Thank You