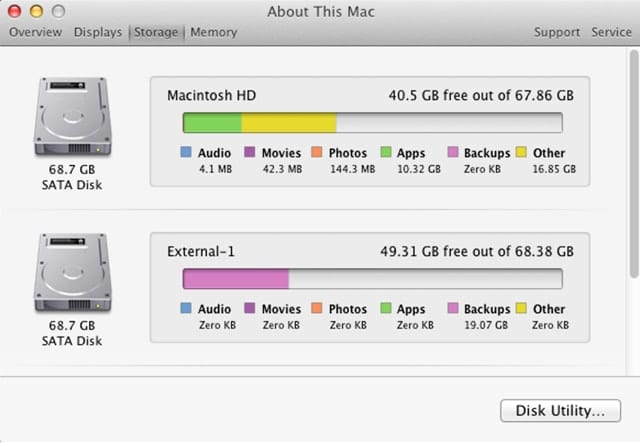
One of the niceties in the Mac OS is the ability of the system to display how your storage space is being used. Originally introduced in OS X Lion as part of a feature upgrade to the System Information app, the Storage tab displays how much free space is available on each disk attached to your Mac, as well as how a disk’s storage is being used, by category.
If you’re not sure how to find the categories, click the Apple logo in the menu bar in the Finder, select About This Mac from the dropdown menu, and then click the Storage tab. Mouse over a color bar, and a text balloon will pop up, telling you what the category is and how much disk space it’s using.
The categories change as new versions of the OS are released, but the current categories include System files, Documents, Apps, iTunes, Backups, Other, Audio, Music Creation, Photos, Movies, and Purgeable space.
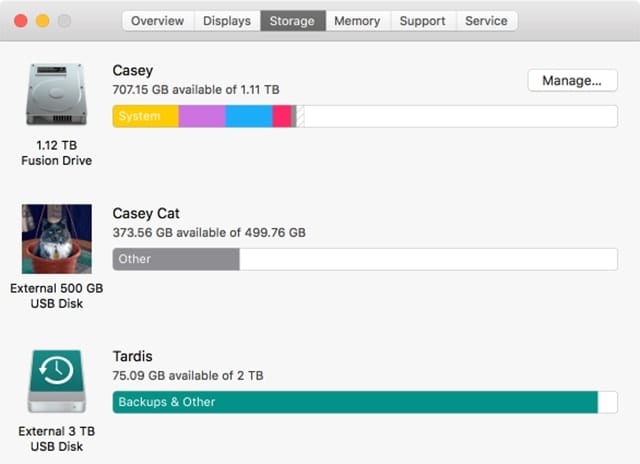
Purgeable space is more or less unique to the Mac; you can find out more about it in the Rocket Yard Guide: What is Purgeable Space in macOS? The next category that seems to get a lot of attention is Other. So, just what is included in Other?
That’s a common question, one you may often ask yourself, especially when you need to free up space when your drive starts to fill up. When that happens, I think most of us tend to look at the Other category and think, there’s a lot of space being used by Other. If I don’t know what it is, and the system doesn’t seem to know either, then why can’t I just delete those files?
What’s in the Other Category
The type of files the operating system assigns to the Other category in the Storage display changes a bit from OS version to OS version, but there was a big shakeup in storage management when Apple introduced macOS Sierra, which caused the Other category to become better defined.
Because of the changes, we’re going to provide two lists for the type of files that are assigned to the Other category: pre macOS (OS X) and post macOS.
Other File Types in OS X
The Other category in OS X was a catchall; it included the following:
- PDF, doc, and PSD documents and files; essentially most document types that weren’t stored within the Documents folder in a user’s home folder.
- Disk images, archives, and compressed files, including zip, dmg, pkg, and iso.
- Files located in the System folder that weren’t installed with the system. This could include most temporary files, swap files, even voice files you added to personalize your Mac’s speaking voice.
- User installed items, such as screen savers, wallpaper, most iCloud support files, and Application Support files added along with app installations.
- Both user and system caches, browser caches, and other cache files created by various apps.
- App plug-ins, app extensions, and app add-ons; this includes all browser add-ons.
- Any file type not recognized by Spotlight. This includes Boot Camp files, Windows partitions and files, and virtual machine files.
The above list gives you an idea of what may be in the Other category under OS X, and why the Other category tended to be quite large sometimes.
Other File Types in macOS
When macOS was introduced, the Other category, along with the entire Storage system, received a bit of a makeover. Apple went through how files were allocated to categories, and moved many of the former Other files to more appropriate categories. This change was mostly made to accommodate the new Store in iCloud and Optimize Storage features that allowed infrequently used files to be moved to the cloud automatically and free up local space.
The Other category is now used for:
- Web browser caches and most caches created by apps.
- Apple Music streams.
- Photos previews.
- Most items in the Downloads folder, including installer packages.
- iOS device backups.
How to View the Amount of Storage Space Taken Up by Other
From the Apple menu, select About This Mac.
OS X Mavericks and earlier: Click the More Info button, and then select the Storage tab.
OS X Yosemite and later: Click the Storage tab.
A stacked bar graph will be displayed for each disk attached to your Mac. It may take a few moments for the bar graph to fill in. When complete, the graph will show how each disk’s storage is being used, broken down by category, including the Other category.
Removing Other Files
Chances are most of the space reported under Other is going to be coming from cache and temporary files, downloaded files, and iOS device backups. We’re going to concentrate on those three types, and show you how to remove their unwanted files.
Cache and Temporary Files: The Rocket Yard has a great guide to finding and removing cache and temp files, so we’re going to direct you to: Tech 101: How to Clear Cache and Temp Files from Mac OS.
Downloaded Files: Some of us tend to download a lot of files. For me, it comes from trying out a lot of different apps. Most of the time, I don’t find the apps that useful and end up deleting them from the /Applications folder. But too many times, the installer package gets left behind in the Downloads folder. To delete the installers, or any other files you’ve downloaded and forgotten about, follow these steps:
Open a Finder window and select Downloads from the sidebar, or select Downloads from the Finder’s Go menu.
Examine the list of files and folders in the Downloads folder. To help you decide which files should be deleted, you can select the Size column to organize the list by the size of the files. This makes it easy to find the largest files that may be impacting your storage space.
When you find a file you wish to remove, right-click (or control-click) on the file and select Move to Trash from the popup menu. You can also drag the file directly to the trash.
Don’t forget to empty the trash to permanently remove the files from your Mac and free up disk space.
The Mac offers another method for removing downloaded files using the Reduce Clutter feature in the Manage Storage tool; we’ll cover that option below.
Device Backups: If you’re using an iOS device, chances are you have multiple backups of the device stored within your iTunes app. Device backups can be a big part of the Other category, depending on how many different devices you have backed up.
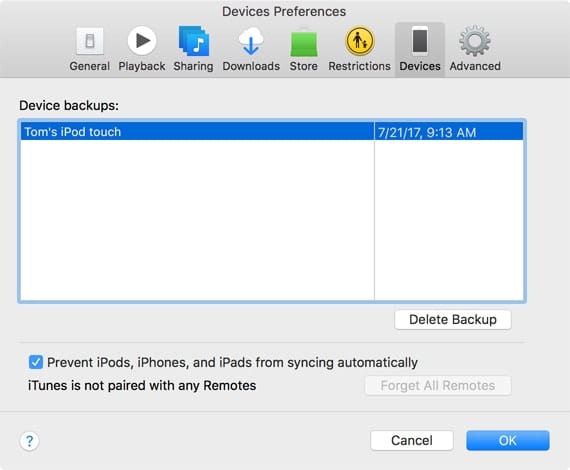
Launch iTunes, and select Preferences from the iTunes menu.
Select the Devices button in the Preferences windows toolbar.
Select the device backups you wish to delete from the list. It’s a good idea not to delete the most recent backup, unless the device has also been backed up to your iCloud account.
Make your selection(s), and then click the Delete Backup button.
Reduce Clutter
The Mac has a number of storage tools you can use to help manage your storage space. One of these is the Reduce Clutter tool, which can help you find, view, and delete files. To access the Reduce Clutter tool, perform the following steps:
Open the Storage view as outlined above, under the heading: How to View the Amount of Storage Space Taken Up by Other.
In the System Information window, make sure the Storage tab is selected, and then click the Manage button.
In the window that opens, select Recommendations, which can be found at the top of the sidebar.
Recommendations will reveal a number of options, including Store in iCloud, Optimize Storage, Empty Trash Automatically, and the option we’re interested in, Reduce Clutter.
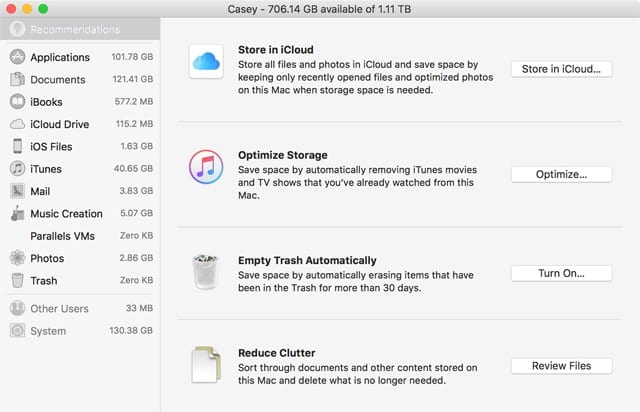
Click the Review Files button in the Reduce Clutter section.
Select the Documents item in the sidebar.
There are three filters you can apply to help you in finding files to remove: Large Files, Downloads, and File Browser.
Large Files: This filter shows files on your Mac organized with the largest files displayed first, a pretty good way to make big changes to how much space is being taken up on your disk.
Downloads: This will display files in your Downloads folder. The files are organized in the display in groups: Older than 1 year, Older than 6 months, Older than 3 months, and Recent. Within each group, files are presented from largest to smallest.
File Browser: This sets up the display of files similar to how the Finder shows files in Column View mode. Files are organized by size, with the largest appearing on top.
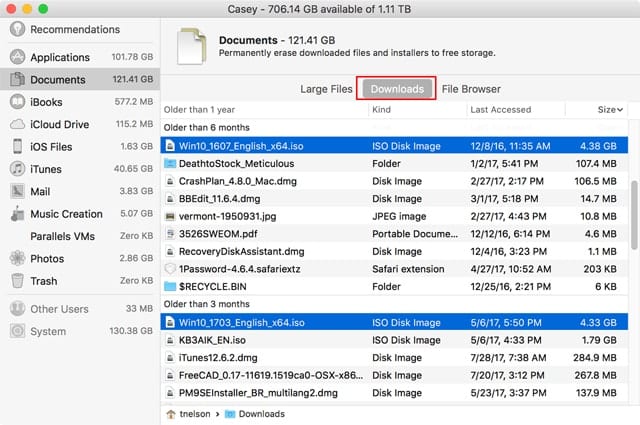
When in the Large Files or Downloads view, you can examine a file or move it to the trash by hovering over the file name. After a moment, two small icons will be displayed: an X, which when clicked will move the selected file to the trash, and a magnifying glass, which when clicked will open a Finder window with the selected file highlighted. When in File Browser mode, right-clicking on a file will produce a popup menu with a single option, to move the file to the trash
Although the Reduce Clutter feature doesn’t offer an automatic method of removing unused or unwanted files, its filtering system lets you quickly discover the files that are taking up the most space; it also provides a convenient way to remove them.




Great Stuff as usual Tom! Thanks!
Well, it’s nice idea, but poorly implemented. I find the assignment of categories to be pretty random: for instance, I have a 38 GB Photos Library file that shows up in System files, not Photos. The same file on another disk is included in “Other”, as are all other 630GB of files on that disk, some of which are clearly System files, audio files, etc. I think this feature could use a little work . . .
Not seeing the color bar chart, Just one gray bar labeled “Used space”. Waited several minutes for the OS 11.13.1 to maybe build a more complete chart. What am I doing wrong? The manage button -> Reduce Clutter did find a couple of discardable files.
I didn’t know about Reduce Clutter, that was very useful. Thanks.
One question! Regarding device backups, went into iTunes and found there was only one backup for most devices. Is there a setting in iTunes 12.7 that causes it to auto-delete old backups when a new backup is done?
ED…That’s what I’ve found right after completing a new backup.The old one is appended to or overwritten and only that new one is left standing to access. Much to my frustration. You can though, take those older backups and move them to another secure folder for safekeeping before doing that newest backup. Which is exactly what I’ve learned to do. Just hold down that command key and drag them out of there.