This is the last of our four-part guide to using the Mac’s accessibility features. If you missed the previous installments, you can catch up by reading:
- macOS 101: Getting Started With the Mac’s Accessibility Features
- macOS 101: Using Accessibility’s Vision and VoiceOver Options
- macOS 101: Using Accessibility’s Interacting Features
Our last group of Accessibility options includes the Media and Hearing options, plus a couple of general tips.
To open the Accessibility preference, launch System Preferences by clicking its Dock icon, or by selecting System Preferences from the Apple menu.
In the System Preferences window that opens, select the Accessibility preference pane.
Scroll down the list on the left-hand sidebar until you come to the Media section.
Accessibility Media
The first media option we’ll look at is Descriptions.
Descriptions: This is Apple’s implementation of Audio Descriptions, which involves playing back narration that has been added to the soundtrack of movies, videos, TV programs, and other visual media.
The narration service attempts to describe what is displayed on the screen with concise descriptions of settings, costumes, even sight gags. The narration occurs during pauses between dialog, songs, or major sound effects.
Not all video media includes Audio Descriptions.
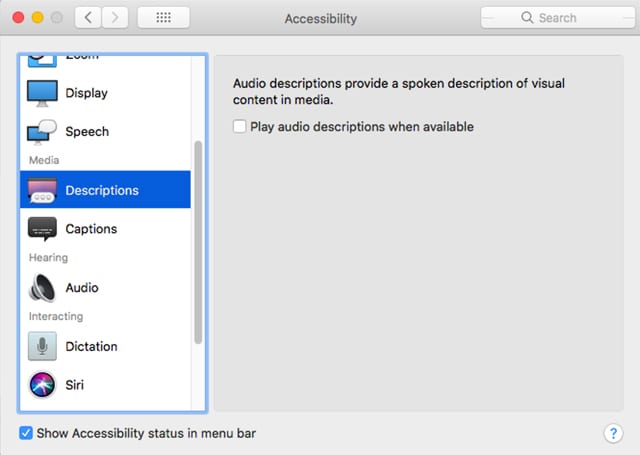
To enable Audio Descriptions, launch System preferences, and select the Accessibility preference pane.
Select Descriptions from the list in the Accessibility sidebar.
If Siri is enabled, you can use Siri to bring up the Descriptions configuration by saying, “Hey Siri, open Accessibility Descriptions.”
To turn the description service on, place a checkmark in the box labeled Play audio descriptions when available.
Captions: The Mac’s accessibility options include the ability to display subtitles and closed captions from any media that has embedded captions. Captions are available in two different formats (when provided by the media being viewed): as standard closed captions or as subtitles for the deaf and hard of hearing (SDH).
The primary difference between closed captions and SDH is their appearance on the screen; additional contextual clues are included in SDH, such as who is speaking, background sounds, or music lyrics. SDH also uses a more film-friendly font format that doesn’t block as much of the screen as standard closed captions.
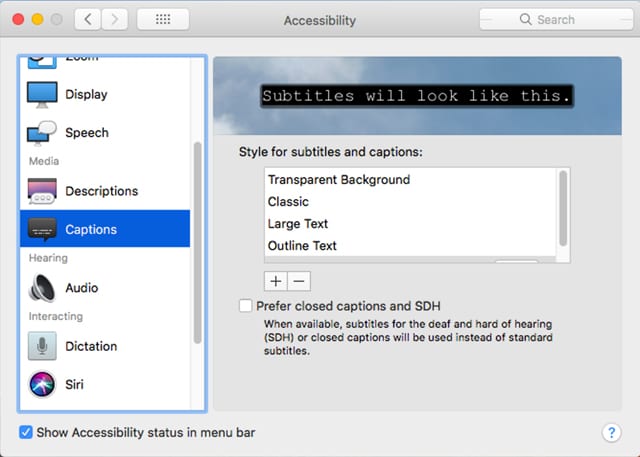
To configure Captions, bring up the Accessibility preference pane and select Captions from the sidebar.
Once you select the Captions item in the sidebar, you can select or create a subtitle style to use. The Captions feature comes with a few styles already created; you can choose one of the available styles from the list or create your own.
Subtitle styles are displayed in the box above the style list, so you can easily see how each style will look.
To create your own style, select one of the existing styles to use as a template. New styles you create inherit the settings of the currently selected style. Press the plus (+) button below the list of styles.
In the dropdown pane that appears, enter a name in the Style Name field.
Set the color that will appear behind the caption text using the Background Color dropdown menu. You can select from various predefined colors.
The Background Opacity can be set using the dropdown menu. Choose from:
- Opaque
- Semi-Transparent
- Transparent
Set the caption’s color with the Text Color dropdown menu. You have the same color choices as the Background color menu. Remember not to pick the same color or the text will vanish into the background.
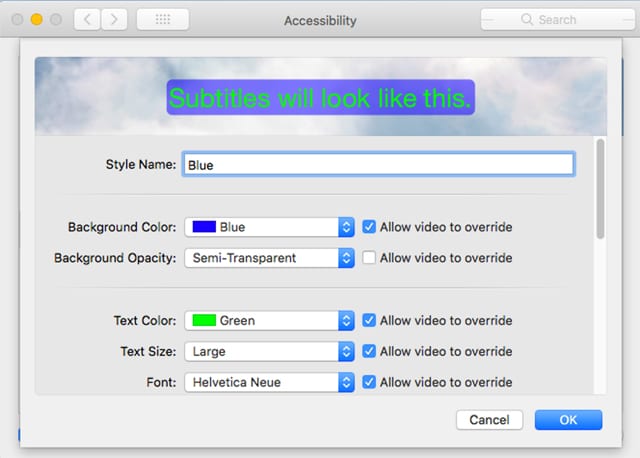
Use the Text Size dropdown menu to choose:
- Extra Small
- Small
- Medium
- Large
- Extra Large
Use the Font dropdown menu to choose any installed font on your Mac.
You’ll also find that each dropdown menu has a checkbox next to it labeled Allow video to override. Selecting this option allows the embedded settings for the captions to take precedence over the style you created. If you want to ensure your style is always used, remove the checkmark from every “Allow video to override” box.
You may want to let the embedded caption settings override the Background Color and Text Color selections to ensure good visibility against the video. You can always force your style to be used after trying the settings out.
Once you’ve made your choices, click the OK button.
Your caption style will be added to the style list, and will become the selected style. If you would like a different style to be the default, you can select it from the list of styles.
If you would prefer the closed captions to use subtitles for the deaf and hard of hearing (SDH), place a checkmark in the box labeled Prefer closed captions and SDH.
Hearing
The Hearing category contains a single entry, Audio, that allows you to configure your Mac to produce a screen flash when an alert occurs. You can also force any stereo audio content to be played back as mono.
To configure the Audio options, return to the Accessibility preference pane, and then select Audio from the sidebar.
The first option allows any system alerts, such as a bouncing Dock icon, a Dock badge being updated, a notification being delivered, or any system alerts that would normally play the general alert system sound to also cause the screen to flash.
Having the screen flash can be helpful for many reasons, but it can also be useful for those who run apps in full screen mode that may prevent alerts from being seen.
To have the display flash whenever an alert occurs, place a checkmark in the box labeled Flash the screen when an alert sound occurs.
You can also see what the screen flash will look like by clicking the Test Screen Flash button.
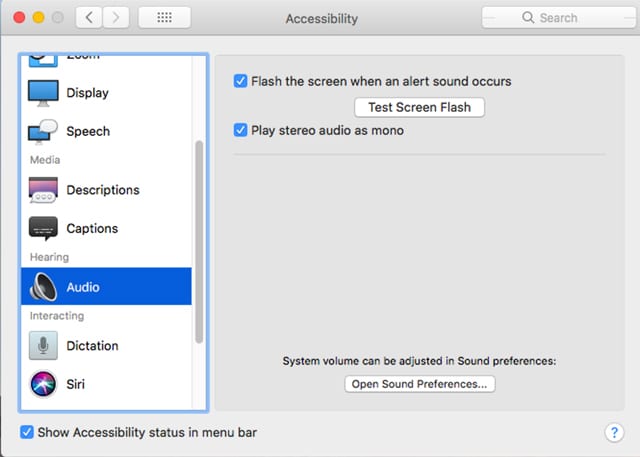
The second and last option in the Audio category forces your Mac to play all stereo sound tracks as mono, resulting in equal volume and content in both the left and right speakers, or in headphones connected to your Mac.
This can be helpful for anyone with partial hearing impairment, as well as for anyone using earbuds in an environment where they need to pay attention to their surroundings, or when someone needs to get their attention quickly. Just use a single earbud, which will play both stereo tracks together in one ear, leaving the other ear unencumbered by an earbud, and able to hear what is occurring in the environment.
To convert all sound from stereo to mono, place a checkmark in the box labeled Play stereo audio as mono.
General Accessibility Tips
To wrap up our look at the Mac’s Accessibility features, we’re going to include a few tips that don’t fit into a specific category. These tips can be useful not only with the Accessibility features, but also for general Mac access or troubleshooting.
Navigating Menus
You can use your keyboard to navigate and select items from various menus. This can be helpful for those times when your pointing device (mouse, trackpad, or other device) is acting up on you. In order for the keyboard to be used for menu navigation, you must first have a menu open. This can be accomplished with the following keyboard shortcut that selects the Apple menu:
Control + F2
Once the menu is selected, you can use the keyboard’s arrow keys to navigate the menu system:
Move from menu to menu: Left or Right arrow keys.
Expand a menu or move to an item within a menu: Up or Down arrow keys.
Choose the currently selected menu item: Return key.
Jump directly to a menu item: Type the menu item’s name (you may only need to type the first few letters).
Close all menus without selecting any item: Press the Esc key.
Asking Siri for Assistance
Siri can perform a number of tasks, but for many of us, discovering what Siri can do is mostly hit or miss. Siri has a built-in list of commands that are supported; unfortunately, it isn’t a complete list, but it’s a good starting point to discover what Siri can do for you.
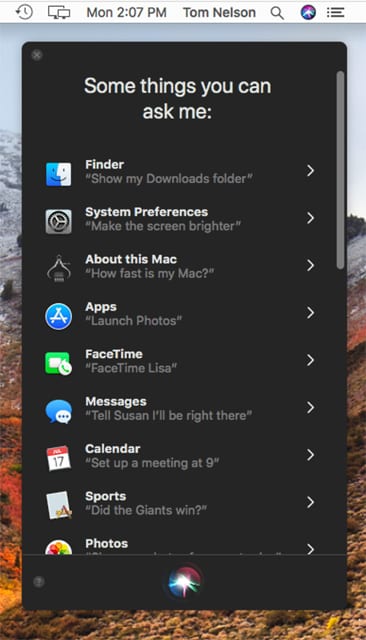
To access the list, do the following:
Open Siri by clicking on the Siri icon in the Dock, in the menu bar, or on the Touch Bar.
Siri will open and say, “What can I help you with?” Instead of asking a question, click within the Siri pane.
The Siri pane will expand and list a few things that you can ask Siri.
Click the question mark icon in the lower left-hand corner.
The pane will change to display a list of categories that Siri knows about. Select a category for brief examples of what Siri knows how to do in that category.
If you find Siri can’t help you with a specific action you want to take on your Mac, there’s a good chance that you can create your own voice command using the Advanced Dictation features we covered in the third installment of this guide: Using Accessibility’s Interacting Features.
