![]() This is the third installment in the Using the Mac’s Accessibility Features series. If you missed the previous installments, you can catch up by reading:
This is the third installment in the Using the Mac’s Accessibility Features series. If you missed the previous installments, you can catch up by reading:
- macOS 101: Getting Started With the Mac’s Accessibility Features
- macOS 101: Using Accessibility’s Vision and VoiceOver Options
In this installment, we will look at the Interacting category of the Accessibility preference pane.
Accessibility’s Interacting category covers how you can interact with the Mac’s user interface. It includes a number of features that allow you to use dictation for both typing text and controlling basic Mac functions, modify how the keyboard, mouse, and trackpad work, and set up and use alternate physical controllers to interact with the Mac.
Dictation
The Mac’s dictation system is controlled using two preference panes. Basic dictation, that is, using dictation to enter text wherever you would normally type text, is configured from the Keyboard preference pane. Controlling your Mac by speaking, or by creating custom dictation commands, is configured using the Accessibility preference pane’s Dictation options.
Basic Dictation Services:
Launch System Preferences, and select the Keyboard preference pane. You can let Siri perform the task by saying, “Hey Siri, open keyboard preference pane.”
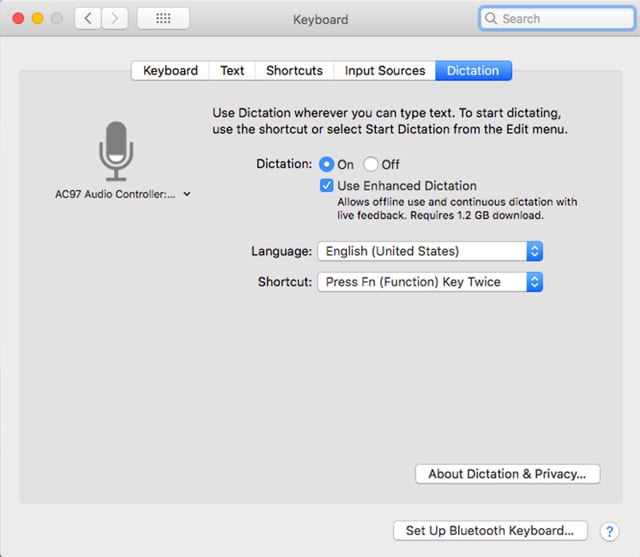
With the keyboard preference pane open, select the Dictation tab.
Use the Dictation radio button to turn dictation on or off.
The option to enable enhanced dictation is available by placing a checkmark in the Use Enhanced Dictation box. I recommend using this option. When it’s selected, Apple will download an extension to Dictation that allows the service to be used offline; the extension also enables dictation commands, a very powerful part of the dictation service.
Use the Language dropdown menu to select the language you wish to use for dictation.
Use the Shortcut dropdown menu to select a keyboard shortcut for turning dictation on and off. This is an important shortcut to remember, as you probably don’t want your Mac trying to convert everything you say to text.
Dictation can use any of the Mac’s audio inputs. You can change the default microphone by clicking on the Microphone icon, and then selecting a mic from the dropdown menu.
Advanced Dictation Features:
Advanced Dictation features are also available from the Accessibility preference pane. In order to use them, the basic dictation system must first be enabled, using the instructions above.
Open the Accessibility preference pane, and select the Dictation item from the sidebar.
Click on the Dictation Commands button to see a list of preconfigured dictation voice commands you can use. You can also create new voice commands here.
Most of the supplied dictation voice commands are used for controlling how text is entered, edited, and viewed. Each command has a checkbox that allows you to enable or disable the command. Disabling unused commands can make the Dictation process seem slightly more responsive. It’s also helpful when creating custom commands that may conflict with an existing command.
To see a few additional voice commands, as well as enable the ability to create custom commands, place a checkmark in the Enable Advanced Commands box.
Additional Application and Document manipulation commands will be displayed in the list.
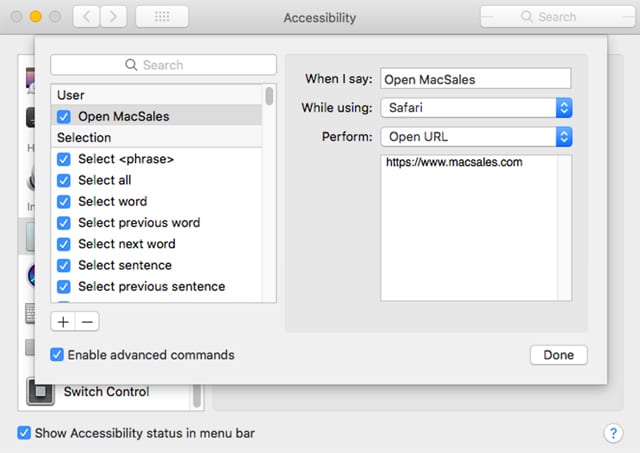
To create a custom command, click on the plus (+) button.
Enter a phrase to use to trigger the custom voice command.
Use the While using: dropdown menu to select an app (including Any Application) that the voice command will be used with.
Use the Perform dropdown menu to select what the command will do. You may be taken aback by seeing only a few options available, such as Open Finder Item, Open URL, or Paste Text. But within the list are three very powerful options:
Press Keyboard Shortcut: This allows a voice command to be used to cause any keyboard shortcut to be performed. Most apps have a large number of keyboard shortcuts available, and if the function you wish to perform doesn’t have a keyboard shortcut, you can either create one using the Keyboard preference pane, or use the next option below.
Select Menu: Enter a menu name exactly as it appears in the app’s menu.
Run Workflow: This will allow you to run any Automator workflow you have created. The Automator item must have been saved as a workflow, and not one of the other options.
Click the Done button when complete.
You start Dictation using a voice command by placing a checkmark in the box labeled Enable the dictation keyword phrase. Once you place a checkmark here, enter a phrase to use to activate dictation.
The last two options are:
Play sound when command is recognized.
Mute audio output while dictating.
Place a checkmark in the appropriate box to enable the above options.
Siri
Siri can be configured to respond to typed requests instead of spoken ones. Place a checkmark in the Enable Type to Siri box.
Keyboard
There are a number of options to make using a keyboard easier, as well as a number of changes to this accessibility item between macOS Sierra and macOS High Sierra. In Sierra and earlier, the Keyboard item only contained the Sticky Keys and Slow Keys settings, while High Sierra added a tab to control a new on-screen keyboard. The Dwell option, which was a separate item in Sierra and earlier versions of Accessibility, was moved to under the Keyboard item’s Accessibility Keyboard tab, and expanded with additional settings.
Hardware Tab:
We’ll start by listing the options under the Hardware tab, which also correspond to the Keyboard item settings from earlier versions.
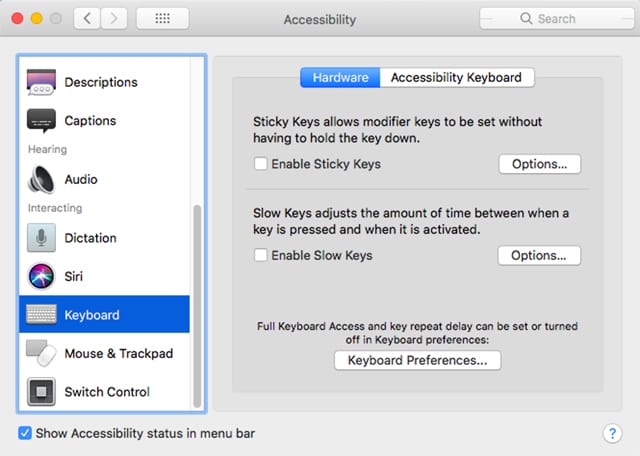
Sticky Keys: Many keyboard shortcuts require multiple keys to be pressed simultaneously. Sticky Keys allows you to press the keys one at a time. Use the Stick Keys Option button to modify the Sticky Keys behavior.
Slow Keys: This option delays the time between when a key is pressed and when it is recognized. This can help if you frequently accidentally press keys. Use the Options button to adjust the delay time.
Accessibility Tab:
Enable Accessibility Keyboard: Placing a checkmark here will allow you to use an onscreen keyboard that can be manipulated with the mouse, trackpad, or other devices. Clicking on the Panel Editor button allows you to customize the onscreen keyboard, or create new panels with custom controls.
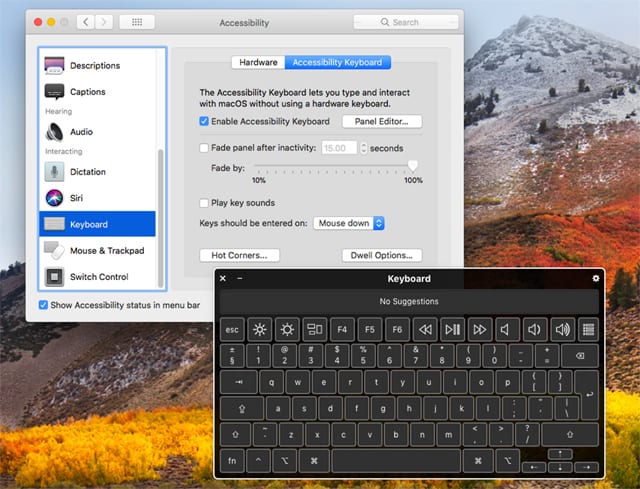
Fade panel after inactivity: Selecting this option will cause the onscreen keyboard or panel to fade from view after the time period selected. Use the slider to control how transparent the keyboard becomes.
Play key sounds: If enabled, causes the keys to produce a sound when selected.
Keys should be entered on: Use the dropdown menu to specify whether the key press occurs on mouse up or mouse down.
Hot Corners: Use this button to specify a hot corner to bring up the Accessibility Keyboard. It can also be used to assign custom Accessibility Panels to different corners.
Dwell Options: This button brings up the Dwell options that are used to specify how long a pointer or cursor must remain over an item without moving before it is recognized. Dwell settings are useful when used with head or eye tracking technology, or other external switches.
Using the Dwell settings, you can set the default dwell time and panel dwell time. You can also set the dwell tolerance in pixels. Tolerance determines how much movement is allowed by the cursor, measured in pixels. The larger the number, the more movement is allowed while testing for dwell time.
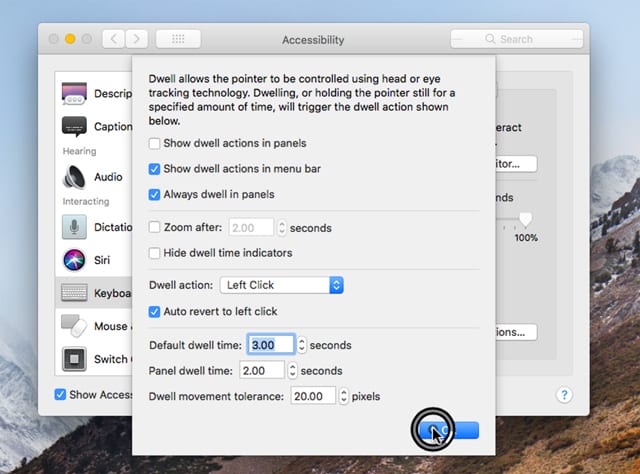
Show dwell actions in panels: Displays an additional panel in the onscreen keyboard that shows available actions, such as scroll menu, option-click, and drag-n-drop. The selected action is performed once the dwell time is met.
Show dwell actions in menu bar: This will display the same dwell actions mentioned above but display them as a menu item in the menubar.
Always dwell in panels: Lets the dwell function be performed in various panels.
Zoom after xx seconds: The area occupied by the pointer will be shown zoomed in after the amount of time set is reached. Use this to get a better view of congested areas when trying to select an object via dwell.
Hide dwell indicator: The dwell indicator is a ring that is filled as the dwell time is reached. You can turn this indicator on or off.
Dwell Actions: This dropdown menu lets you select the action to be performed when dwell is met. These are the same actions available in the Dwell panel or Dwell menu item.
Mouse & Trackpad
These settings allow you to fine-tune how the mouse and trackpad work. The options displayed are dependent on the type of pointing device connected to your Mac.
Enable Mouse Keys: Mouse keys allow you to use the keyboard number pad to control the mouse cursor.
Double-click speed: Use this slider to set the reaction time between successive clicks to register a double-click.
Spring-loading delay: Use the slider to set the amount of time the pointer has to hover over a folder before the folder automatically opens.
Ignore built-in trackpad when mouse or wireless trackpad is present: Use the checkbox to disable a built-in trackpad when you’re using an alternate pointer device.
Additional settings to control scrolling and dragging are available by clicking on either the Mouse Options button or the Trackpad Options button.
Switch Control
Switch Control lets your Mac be controlled by external devices, including gamepads, joysticks, special keyboards, and head or eye tracking systems.
Switch Control uses three tabs: General, Switches, and Navigation
General Tab:
Place a checkmark in the Enable Switch Control box to turn the function on; the Switch Control panel will be displayed. This panel allows you to select what function the attached switch control hardware will perform. The available items include Keyboard, Pointer, App, Dock, Menu Bar, System, Custom, Location, and Devices.
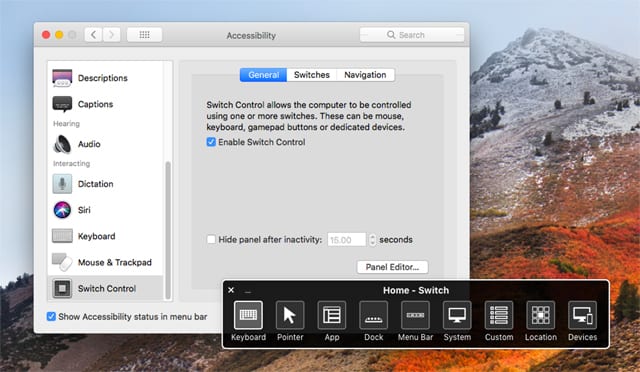
The Panel Editor button allows you to customize the appearance and which functions are included in the Switch panel.
Switches Tab:
The Switches tab is where you add or delete switches, assign functions to a switch, and set options for how switch functions are scanned.
Use the plus (+) button to add a new switch.
Use the minus (-) button to remove an existing switch.
To assign an action to a switch, double-click the switch item’s name, or select the switch and click on the gear icon. Either method will open a panel where you can assign a name, action, and what happens when the switch is held instead of clicked.
Navigation Tab:
Use the Navigation tab to define how items in a panel are navigated.
While Navigating: Use this dropdown menu to select Do Nothing, Speak Selection, Play Sounds, or Play Sounds & Speak.
Restart position: Use the dropdown menu to determine where to restart a scan when rescanning a panel, group, or window.
Auto scanning after select: Auto scanning within a panel, group, or window is usually paused whenever you make a selection. You can change this behavior to automatically resume the scan using the dropdown menu.
When pointer reaches the edge: Use the dropdown menu to define what the pointer will do when it reaches a boundary within a user interface element. You can select Do nothing or Bounce back.
Switch cursor size: Select Small, Medium, or Large.
Pointer precision: Set the precision when selecting an item with the pointer. Choose Low or High.
Loops: Select the number of times a panel, group, or window is automatically scanned. You can select from one to 10 times.
Use the Timing button to set cursor speed and scanning speed.
Dwell
See Dwell in the Keyboard section for details on setting dwell options.


can I move the dictation cursor to the side of the screen?
how can I move the small dictation/cursor window so it doesn’t cover text when I am dictating?