The Preview app is a handy tool for viewing and working with PDF (Portable Document Format) files, as outlined in the Rocket Yard guide: macOS 101: Mark It Up with Preview. In Part Two of the guide, we’ll look at how Preview can be used for viewing and editing images.
We’ll be using Preview’s Markup toolbar, which is usually hidden. You can use the instructions from the Mark it Up with Preview guide, linked above, to access the Markup toolbar.
While it’s not a full-featured image-editing app, Preview does have some remarkable capabilities that make it a good choice for working with images, especially when you consider it’s supplied free as part of the macOS.
Destructive Editing, Auto-Save, and Versions
Preview is one of the apps that work with the Mac’s auto-save system. This means that Preview will automatically save a document as you work on it. The practical aspect to this is that Preview will use destructive editing by automatically periodically saving the changes you make to the file you’re working on. In other words, if you want to change an image back to the way it looked earlier, chances are it’s too late. Earlier versions of the image are history.
For this reason, I highly recommend that you work on a duplicate of the image file. This can be done by after opening an image in Preview by selecting Duplicate from the File menu. Give the file a new name, then use Save from the File menu. This will ensure any changes won’t affect the original file.
Optionally, you can make use of the Revert to command in the File menu to return to a previous version of the file that existed before you made any edits. This means you will lose all of the edits you made, even the ones you might want to keep.
Remove Objects from an Image
Preview has a number of tools that allow you to select an object and copy or remove the selected object from the image. One of the problems with selecting an object is the difficulty in performing a precise selection to isolate the object from the background. Preview offers two tools to perform this task: the Selection tool, which allows you to draw a rectangle, an elliptical, a free-form lasso, or a smart lasso around the desired object, and the Instant Alpha tool, which can perform a selection based on colors of objects.
Instant Alpha: This tool has been included with the Preview app for some time. It allows you to remove an object from an image, or remove the background from around an object. Instant Alpha works by making selections based on color matching, making it an ideal tool when there’s distinct difference between the object and the background.
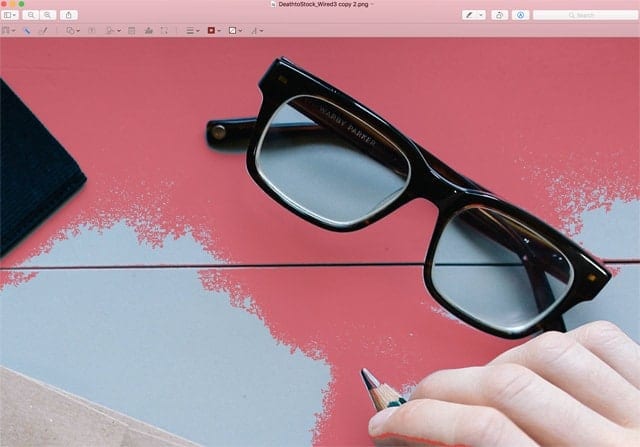
The instant alpha tool can be found in the Markup toolbar. It looks like a magic wand, and is usually the second tool from the left in the Markup toolbar.
To use the Instant Alpha tool, make sure the object within the image is visible in the Preview window. You may want to use the Zoom in or Zoom out icons in the standard toolbar to better focus on the object you wish to work with.
Once everything looks right, click or tap the magic wand icon.
Place your cursor near the object above the background you wish to remove.
Click and hold the mouse or touchpad while very slowly dragging the cursor over the background.
As you drag, you’ll notice the background starts to turn pink. The more you drag, the larger the area of the background is turning pink. What is happening is, as you drag the cursor, the Instant Alpha tool adjusts the range of color it will accept as a match. This lets you select more of the background as a wider color match is used. If you select too much area, you can simply drag in the opposite direction to reduce the match range.
Once you have the background selected, stop dragging, and release the mouse or trackpad button.
The pink highlight will be replaced by a dotted selection line.
Click the Delete key on the keyboard, or select Delete from the Edit menu, to remove the selected background.
You’ll likely see a sheet appear asking if it’s OK to convert the image format to PNG. This is done to ensure the deleted areas of the image are replaced with a transparent background.
You may need to repeat the process to remove background areas near the desired object that were a different color.
Once you’ve removed the background around the object, you can use any of the Selection tool types to select the object, and then select Copy from the file menu.
The selected object will be saved to your Mac’s clipboard for use in other apps.
You can save the object to a file by selecting File, New from Clipboard.
Preview will open a new image file with the object you just copied.
You can then select Save from the file menu.
Smart Lasso: The Smart Lasso tool is part of the Selection tool’s options. It allows you to draw a freeform selection line around the object you wish to copy or delete. The smart lasso will attempt to automatically adjust the selection path based on color intensity. This allows it to conform to the object you’re attempting to select.
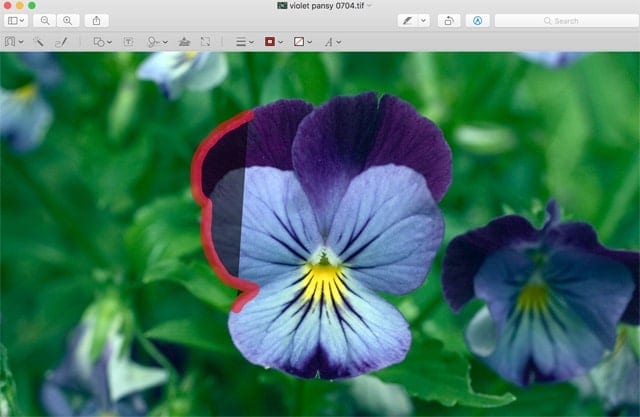
To use the Smart Lasso, make sure the object of your desire is visible within the image. Adjust the zoom in or zoom out settings as needed.
Click or tap the chevron just to the right of the Selection tool.
In the dropdown menu that appears, make sure that Smart Lasso is chosen.
Place the cursor along one of the edges of the object, then click and hold the mouse or trackpad. Start dragging a line around the object. As you drag, you will notice the freeform line being drawn has a thick border. Make sure the edge of the object you wish to extract is within the thick border of the line you are drawing.
Finish the Smart Lasso by completely surrounding the object, and returning to the starting point.
Release the mouse or trackpad; the thick line will become a dotted selection line hugging the selected object.
You can now delete the object (hit the delete key or select Delete from the Edit menu), or you can copy the object using the Edit menu, or pressing the Command + C keys on the keyboard.
If you wish to save the object to use at another time, select File, New from Clipboard. Preview will open a new image document. You can then use File, Save to save the image.
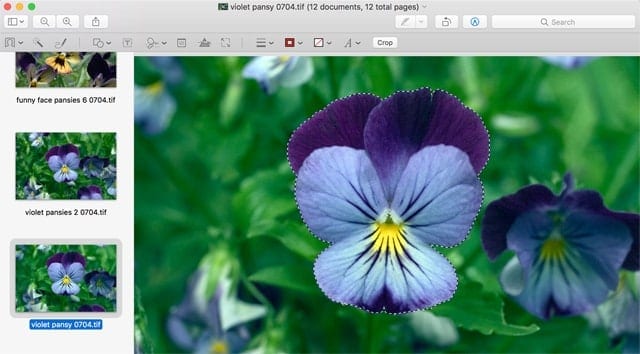
The best option to use depends on the image, what the background looks like, and the sharpness of the object you’re attempting to extract. In many cases, you’ll find it’s not a question of selecting one over the other; sometimes both methods are needed for a clean object extraction.
Tip: You can invert the selection for either the Instant Alpha or Smart Lasso tool. This allows you to decide what is being selected: the object or the background. You’ll find the invert command under the Edit menu.
Tip within a tip: You can tell if you’ve selected the background or the object by noticing the direction the dotted selection line moves. Dots moving counterclockwise indicate a normal selection for the tool in use; dots moving clockwise indicate an inverted selection.
Image Cropping
Cropping an image is a common practice that Preview can take care of for you.
You can use the selection tool to create a crop using any of the supported forms (Rectangle, Ellipse, Lasso, or Smart Lasso) to define the area of the image you wish to keep.
From the Tool menu, select Crop.
You may be asked to convert the image format to PNG in order to support a transparent layer used in the image crop.
Resizing an Image
Preview offers a number of options for changing the size of an image.
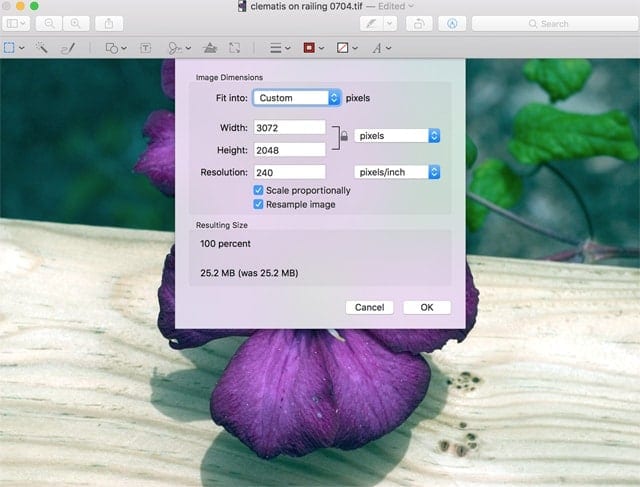
To resize an image, select the Adjust Size tool located in the Markup toolbar.
Image size presets: To fit the image into a predefined size, use the Fit into: dropdown menu to select a common image size, then click or tap the OK button.
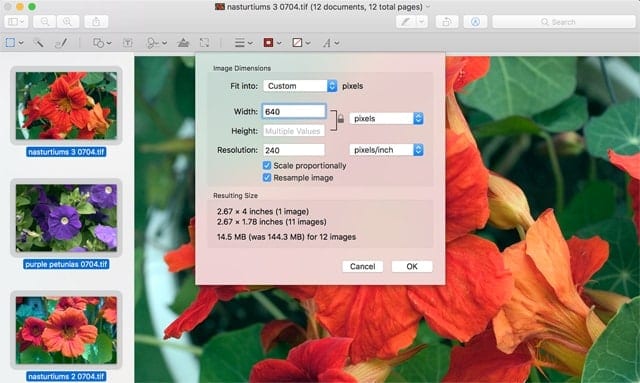
Custom sizes: To manually pick a size, set the Fit Into menu to Custom.
You can now enter the desired width and height of the image. Image size can be expressed in pixels, inches, cm, mm, points, or even as a percentage of the current size. Use the dropdown menu to the right of the Width and Height values to set the value types.
Scale Images: When changing the image size, you can choose to have the image keep its original proportions by placing a checkmark in the Scale proportionally box. Once selected, any changes you make to either the width or height will cause the other dimension to change to keep the proportions intact.
Resolution: The image resolution can also be adjusted to match the resolution of where the image will be used. This can dramatically decrease the file size for images used on the web, or increase the file size when images are to be used for other purposes, such as printing.
If you’re increasing the resolution, you may see better image quality if you place a checkmark in the box labeled Resample image. If you’re decreasing the resolution, you may want to try removing the checkmark from the Resample image box.
Adjusting Color
Preview has the ability to perform color adjustments so the image has the best appearance possible. While not as sophisticated as some color adjustments seen in dedicated image editing apps, it still provides enough control for most uses.
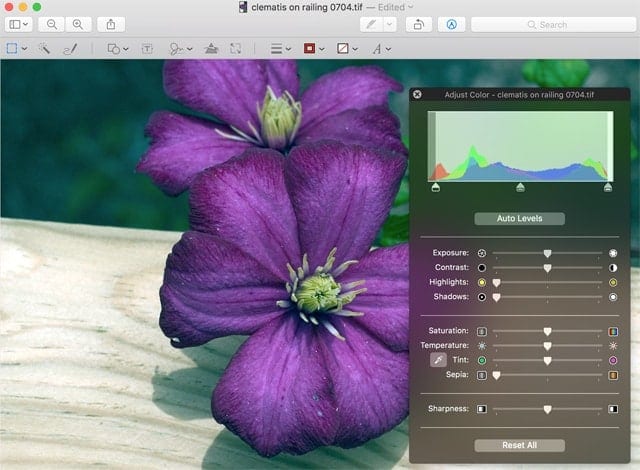
To access the Adjust Color tool, locate its icon in the Markup toolbar or select Adjust Color from the Tools menu.
The Adjust Color panel will appear. The panel allows you to adjust Exposure, Contrast, Highlights, Shadows, Saturation, Temperature, Tint, Sepia, and Sharpness. It includes a histogram at the top that can be used to set the shadow, mid-tone, and highlight levels.
You can also use the Auto Levels, which will make the adjustments for you.
If, after making adjustments, you find the original settings were a better option, or you just wish to start the adjustment process over, you can use the Reset All button to return to where you began.
Rotate and Flip
Our final tool to examine allows you to rotate an image in 90-degree increments, or flip an image. You’ll find the rotation and flip functions in the Tools menu.
Batch Changes
Preview allows you to perform basic batch conversions, letting you resize images or convert file formats. The process requires you to open all the files to which you wish to apply a change. You can do this by selecting multiple files in the Finder, then right-clicking any one of the selected files, and picking Open With from the popup menu.
After a short time, a list of apps will appear for opening the files. Select Preview from the list.
Preview will open all the selected files.
Select Thumbnails from the View menu, or choose Thumbnails from the sidebar icon in the toolbar.
All the open files will be displayed as thumbnails in the sidebar.
Select all the thumbnails in the sidebar. (You can click on the first one and shift-click on the last, or drag to select all.)
With all the images selected, you can now use the Adjust Size tool, as outlined above, to change all of the images to a new size.
You can also use the Export Selected Image command in the File menu to batch change image formats. When the Export to window opens, click the Option button to select a new file format.






Thank you! Super helpful article!!
This is great, who knew this process, Thanks, Paul