


In macOS, System Preferences controls many of the settings that make your Mac different from every other Mac. While most of us are familiar with a handful of these preferences, today we’ll look at some that are less well known.
Getting More Out Of System Preferences
Some people have an innate fear of poking around System Preferences. The thing to remember is that almost any System Preference you change can be returned to its initial state by simply unchecking a box you checked.
To learn more about System Preferences, launch the app, click on a specific button for a pref, and then click the small question mark button in the lower right corner of the screen.
That button brings up information in the macOS User Guide for the preference. In the screenshot below, you see the guide’s info about Apple Marketing Emails:
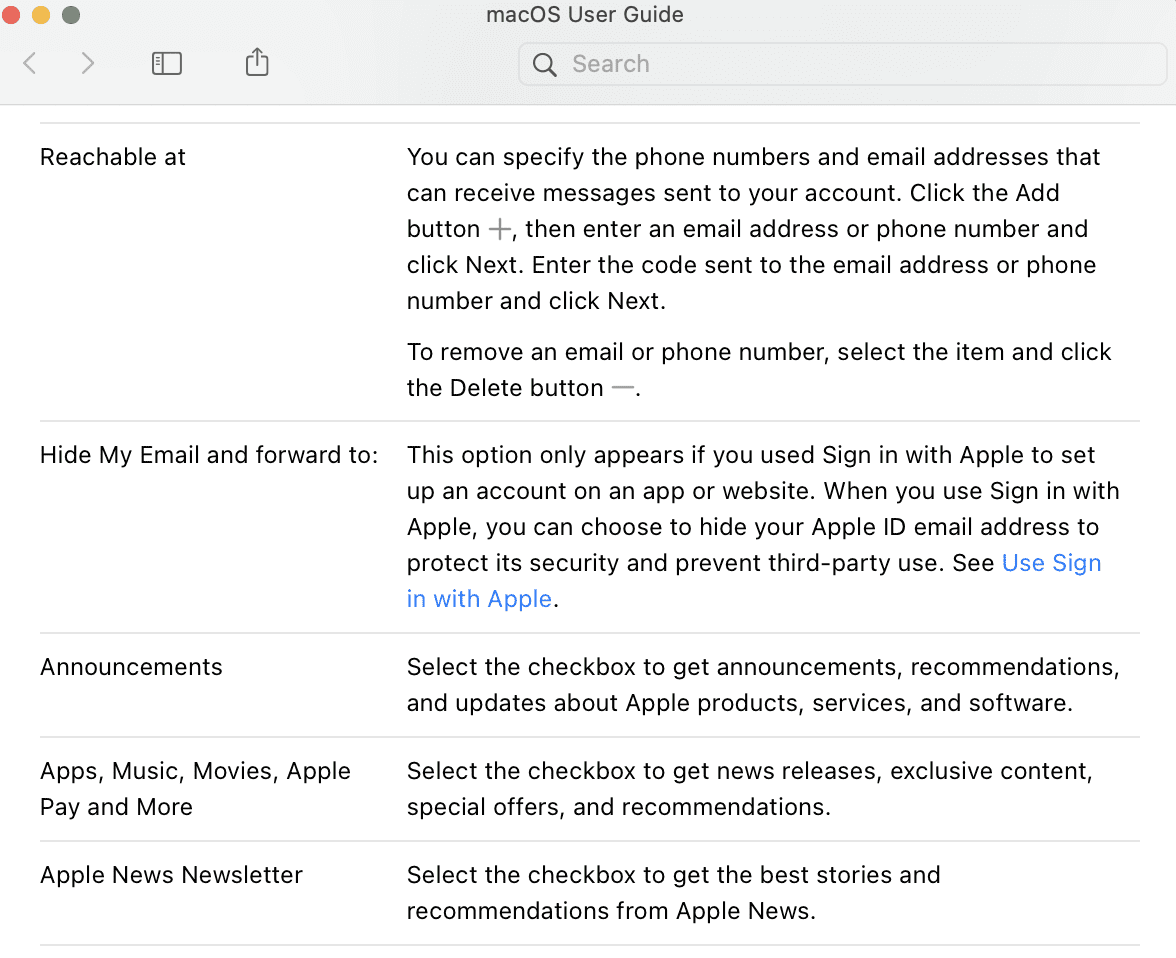
Apple Marketing Emails
Do you feel like you get way too many marketing emails from Apple? If so, there’s a somewhat hidden way in System Preferences to get fewer emails.
Click on System Preferences, then click the Apple ID settings button at the top. On this preference pane, click Name, Phone, Mail. Near the bottom of the screen are three checkboxes for Announcements; Apps, Music, TV, and More; and Apple News Newsletter.
Uncheck all of these and you’ll receive very few marketing emails from Apple. Check them all and you’ll get announcements about products, software and services, a constant stream of emails about new apps, music, TV shows and more, as well as the “best stories” from Apple News.
Do Not Disturb
I used to teach a lot of Mac and iOS classes at the local community college. When I’m making a presentation, it’s annoying to see messages and notifications from friends, relatives, or marketers show up on the screen.
The System Preferences Notifications pane starts off with Do Not Disturb, and it’s possible to keep notifications from interrupting during specific times, when the display is sleeping or the screen is locked. For those presentations, there’s a checkbox for “When mirroring to TVs and projectors”.
That’s the box you want to check if you want to avoid having potentially embarrassing notifications show up on the screen during your presentation. Not that it’s ever happened to me, of course… 🙄
Computer Name
I like to name all of my Apple devices. On the Mac, the name is usually the default, which is my first name followed by the type of computer — for example, Steven’s MacBook Pro. You can name your Mac anything you’d like!
The computer name is most useful when you’re sharing data with another person, which is why it shows up under the Sharing system preference. To change the name from the default to something different, launch System Preferences > Sharing and then click the Edit… button below the Computer Name.

In the dialog that appears (see screenshot above), type in the new name. In this example, I’ve changed the name from Steven’s MacBook Pro to Denali, since all the rest of my Apple devices are named after US National Parks as well.
The Menu Bar Clock
The Mac menu bar has a feature that I use all the time — a clock. It’s usually the rightmost item on the menu bar, and on my Macs it shows the day of the week, the month and date, the time, and whether it’s AM or PM.
In macOS Big Sur, customizing the Menu Bar Clock is done through the Dock & Menu Bar System Preference. You’ll need to scroll down a bit on the sidebar to find the Clock settings.

As you make changes by clicking the various checkboxes and radio buttons (see screenshot above), you can see your settings reflected in the blue simulated menu bar clock in the upper right of the pane.
Date and day of the week are optional. Don’t like the digital clock? Clicking “Analog” does away with all of the other info and simply shows a tiny analog clock.
Keep the digital clock and you have the choice of using a 24-hour clock (for example, 4:30 PM is 16:30) or showing AM/PM, flashing the time separator once a second, or displaying the time with seconds. One other setting allows you to have the time announced every hour, every 30 minutes or every 15 minutes.
Sounds
Since the dawn of Mac back in 1984, the computer has always had a startup sound. Early on it was a beep, then it changed into the iconic tone that we hear today. Apple removed the startup sound in macOS 10.15 Catalina, causing much distress among Mac users. The ability to turn the startup sound on or off is now available in macOS 11 Big Sur.
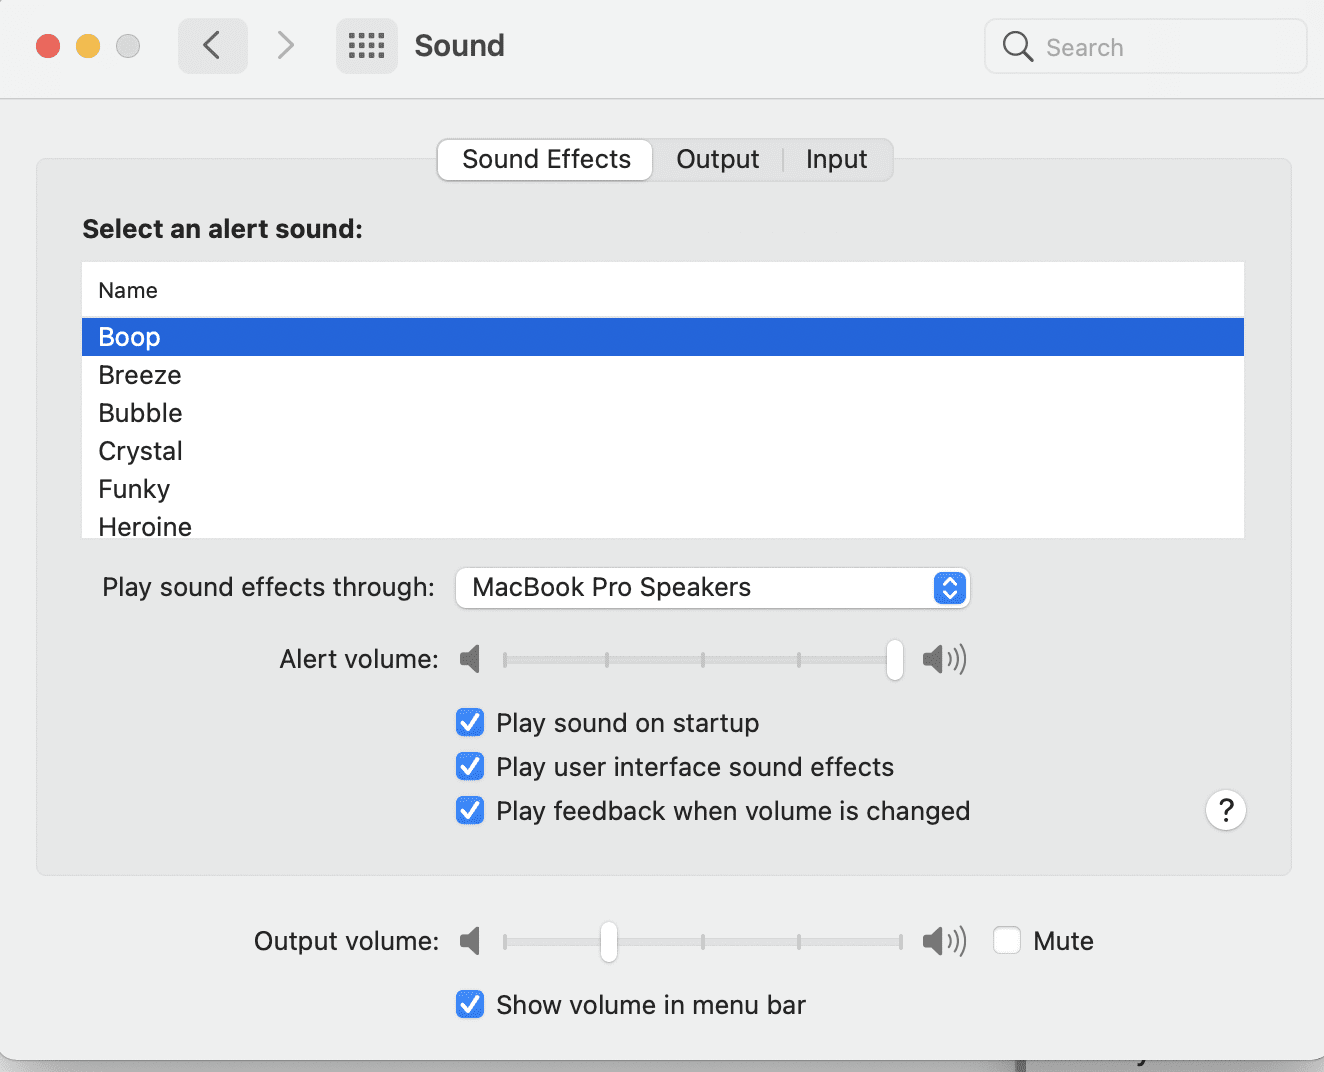
While in System Preferences, click Sound, then open the Sound Effects tab (see screenshot below). There’s a choice of alert sounds, a way to choose which speaker(s) the sound effects are played through, a way to set the alert volume, and then the all-important checkboxes.
Those checkboxes let you decide whether or not to play the startup sound, have sound effects play while using the Mac user interface (like when emptying Trash or copying a file), or to “Play feedback when volume is changed.”
Show a Lock Screen Message
Did you know you can show a message on your screen when someone tries to unlock it? This can be useful if you want to display contact information or a message for a sneaky co-worker who wants to access your Mac.
In System Preferences, select Security & Privacy. Click the lock in the lower-left corner and enter your password. You can then check the “Show a message when the screen is locked” checkbox, click the Set Lock Message, and then type in your message.

Click OK, and the next time your Lock Screen appears, the message is displayed.
System Preferences: Displays
The last set of little-known macOS System Preferences we’ll look at all have to do with displays. These prefs are useful when you have more than one display attached to your Mac, but can also help if you’re having issues reading text on your screen.
When you have more than one display, each display shows its own Display settings. For example, when I have a 27-inch LG HDR 4K display attached to my MacBook Pro and bring up the Display system preference panel, I see the appropriate settings window on each display:
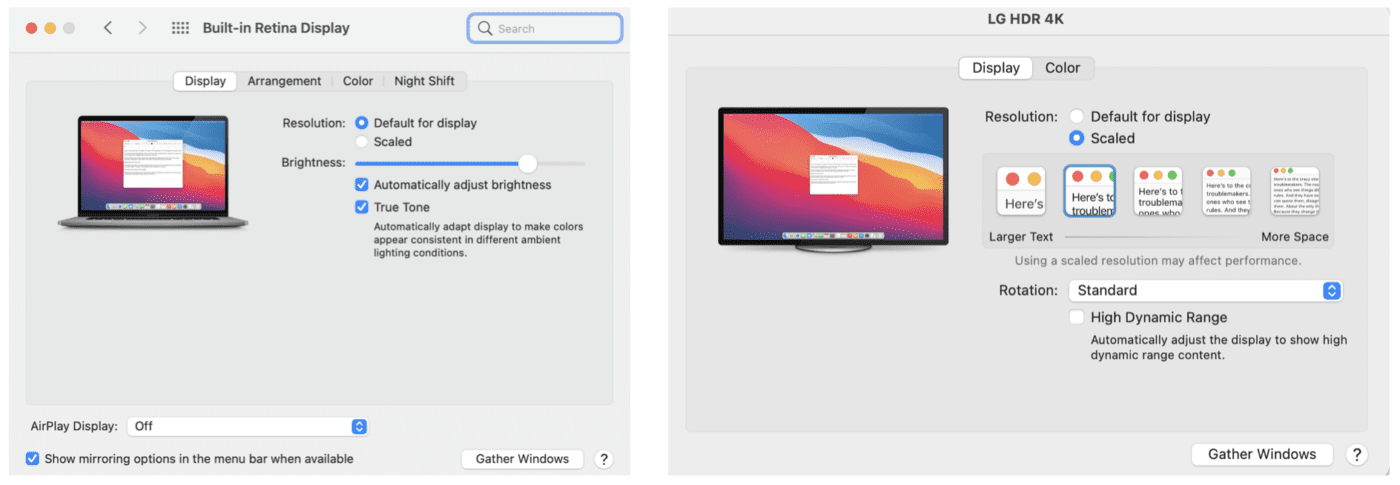
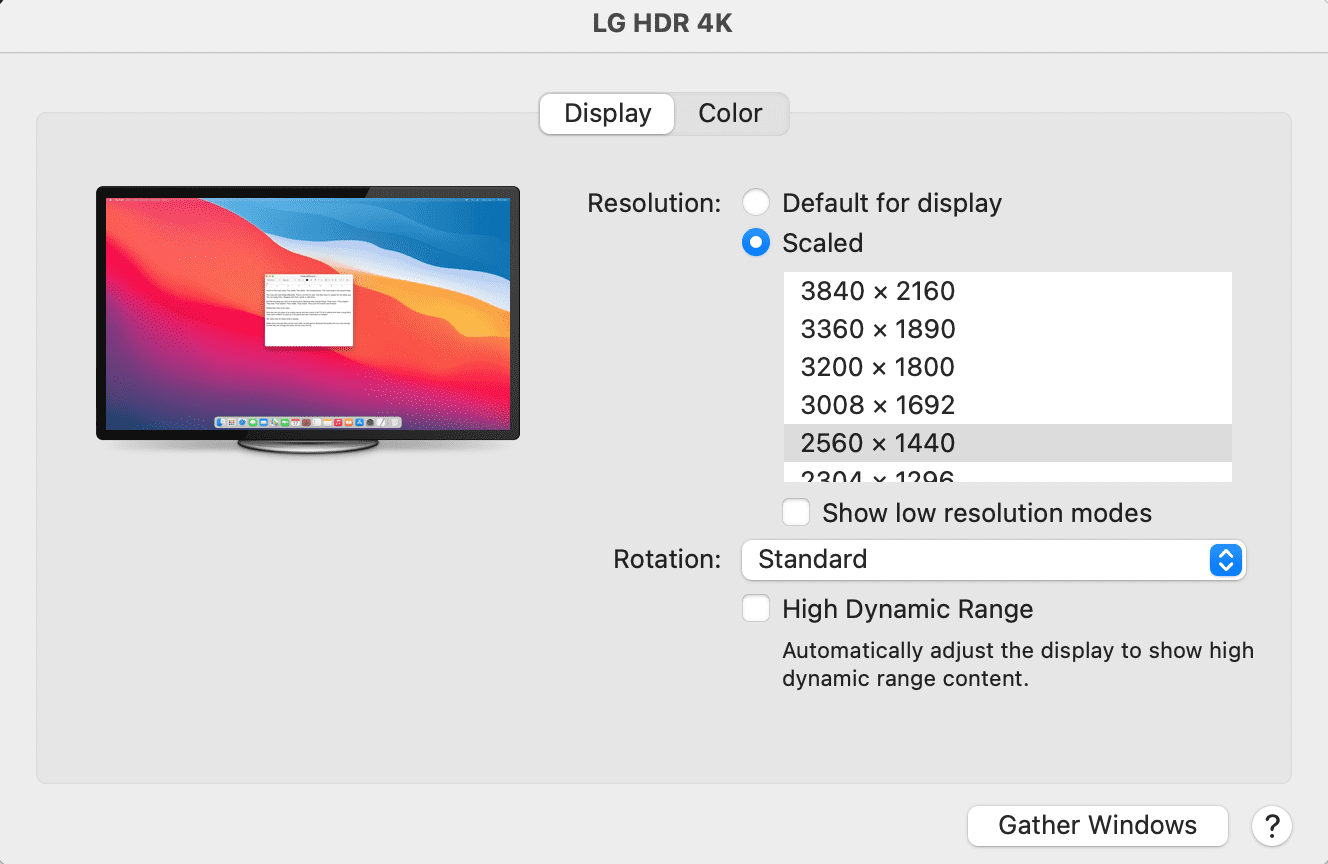
In the settings for the LG HDR 4K display, you’ll notice that it just shows a slider with five options for Scaled. If I want to see the actual resolution that is being displayed, I can hold down the Option key and click on Scaled to view a list of the available screen resolutions:
With multiple displays, you might not know that the Arrangement tab on the main display gives you some options. As you see below, I have my LG display sitting above my MacBook Pro. The menu bar is shown on the lower (built-in) display, but I can make the big LG display my primary display by dragging the white menu bar up to the big screen.
Working the Night Shift
One other setting that I find useful is Night Shift. This is Apple’s display control that shifts the color of screens (not only the Mac screen, but any other attached display) toward warmer colors in the evening. Why do they do this? The usual cooler bluish light of a display tends to make people less sleepy, so Apple found that giving the display a warmer (more orange) hue toward bedtime made it easier for people to fall asleep.
The default is to have Night Shift scheduled between sunset and sunrise, but you can click on Schedule to change it to a custom schedule or turn it off completely. The Manual checkbox lets you turn on Night Shift until the next sunrise. The Color Temperature slider? It’s there to help you if you find the orange twilight hues to be TOO orange or not orange enough.
By the way, if you’d ever like to hide some of the System Preferences panes from inquisitive youngsters or annoying co-workers, here’s a tip on how to make them disappear (and reappear).
Those are some of the lesser-known System Preferences. If there are any others that you would like to know more about, let us know in the comments area below.


Thank you.
“Why do they do this? The usual cooler bluish light of a display tends to make people less sleepy, so Apple found that giving the display a warmer (more orange) hue toward bedtime made it easier for people to fall asleep.”
Yeah, uh, about this… a couple studies say differently.
https://www.insidehook.com/daily_brief/personal-tech/apple-night-shift-ineffective
The study you cite only concerns 18-24 year old iPhone users. I wouldn’t assume their sleep has the same kinds of issues as older adults (or younger kids). Not macOS users with bigger screens. It doesn’t mention about controlling screen brightness or the warmth setting for Night Shift. I didn’t try to get access to the full paper so maybe that would be mentioned in the full details. I usually set my screens to minimum brightness and most warmth when I’m near bedtime. I think it makes some difference to me.
I have a M1 Mac mini running macOS Big Sur 11.3.1. When I try to toggle off the Startup sound by clearing it’s checkbox, it will not take (when I exit the Sound preferences panel and the reopen it, the check box is again checked), effectively making it impossible to disable the Startup sound. I’d like to know if anyone else has experienced this bug? And of course, is there a fix for it? Restoring the firmware using DFU mode has not helped. Likewise, trying to disable the Startup sound through NVRAM terminal commands has not been effective. Help, please.
Further research provided more information. I used DFU mode to restore my M1 Mac mini to Big Sur 11.0.1 – at this firmware version, there was no problem with toggling the Startup Sound on or off. I turned off the Startup Sound and confirmed that there was no sound with rebooting. Then I used Software Update to update to 11.3.1 – – – and I found that I could no longer turn the Startup Sound back on. It seems that for 11.3.1, at least, the Startup Sound setting in NVRAM cannot be altered, whether by using the Sound Preferences panel, or by trying to alter its setting from the Terminal – – – – and the problem persists even when using the BPUTIL from within the One True Recovery partition to unlock NVRAM. I think that this must be a bug, otherwise the setting in the Sound Preferences panel would at least be “greyed out” to indicate that the setting was not changeable.