

Most new Macs are equipped with fast, quiet, and efficient solid state drives (SSDs) for storage. Unlike hard disk drives (HDDs) that use spinning platters to store data, SSDs have no moving parts. That makes them less likely to fail, although all SSDs eventually reach a point where it’s impossible to write to the drive. Today we’re looking at three ways to check the health of the SSD in your Mac.
1. System Information
The first method of checking the health of your Mac SSD is to use the System Information utility. While this method is easy to use, it doesn’t provide any details other than one of three words:
- Verified: The drive is working within design parameters
- Failing: The drive has an issue that will result in failure in the near future
- Failed: The drive is unusable
To check your Mac’s SSD, click the Apple menu and select About This Mac. On the Overview tab of the About This Mac window, click System Report. In the left sidebar of System Report, scroll down to and click on Storage.
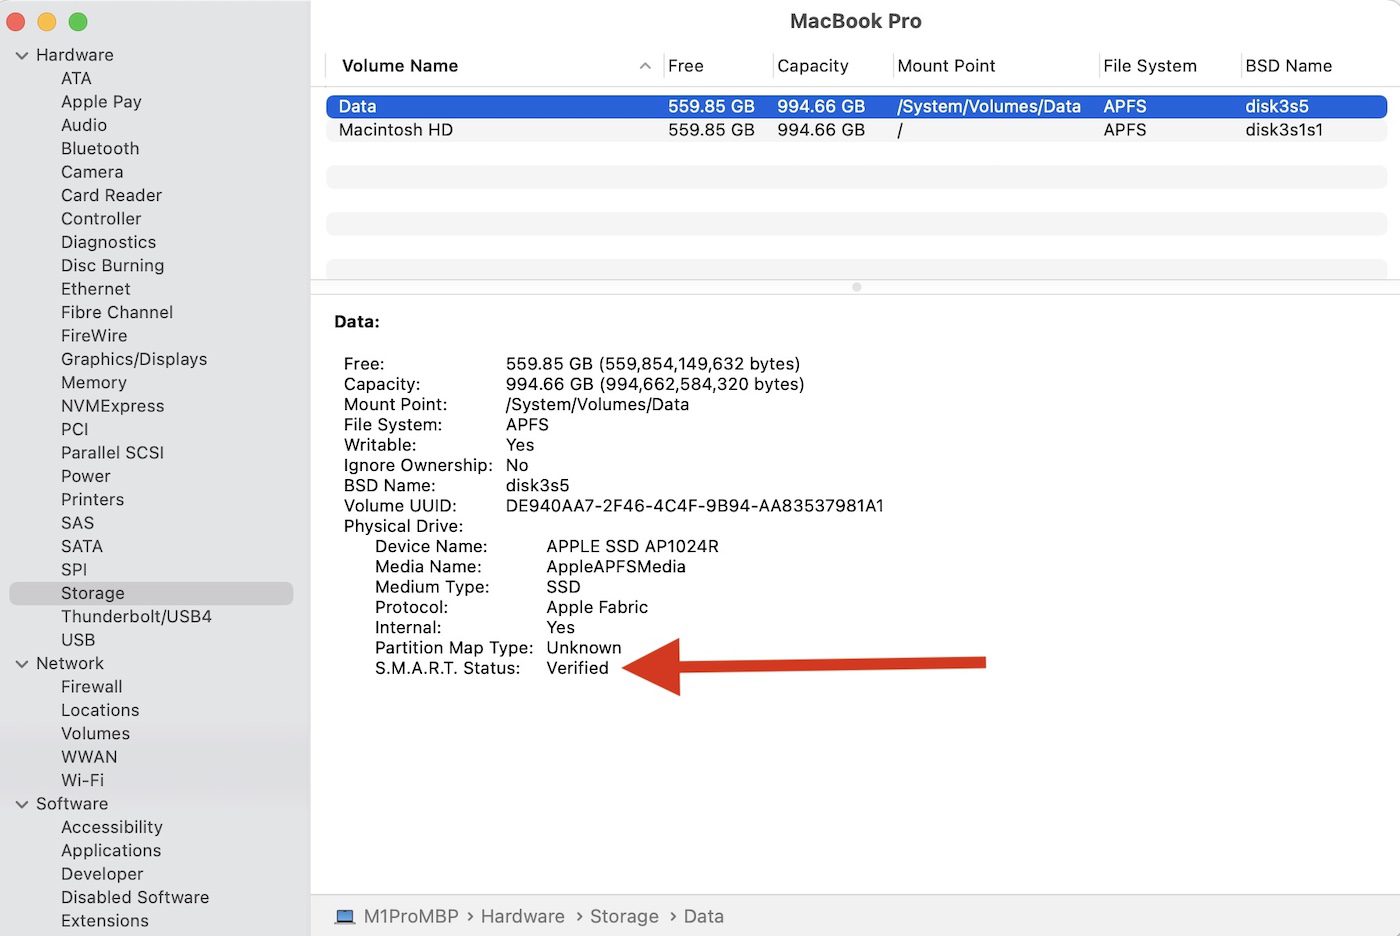
Here you see that the S.M.A.R.T. (Self-Monitoring, Analysis and Reporting Technology) status is shown to be “Verified.” The drive is healthy. While this is helpful news, it doesn’t tell you a lot about potential issues with the SSD. That’s where our next two methods come in handy.
2. The Terminal app and smartmontools
The second method is to use the Mac Terminal app (found in Applications > Utilities) with a command-line tool called smartmontools. If you’re not comfortable with using Terminal and the command-line interface it provides, I suggest jumping to part 3 of this article. Also, make sure that you have a lot of time to spare, as this process takes a while to set up the first time. Once the tools are installed, you can use them frequently.
Installing smartmontools is a somewhat lengthy process. First, you need to install Apple’s Xcode developer tools. Next, you install a package manager called Homebrew. You install smartmontools using Homebrew, then use Terminal to run smartmontools.
Install Xcode
Developers shouldn’t need to do this, as they’ll already have Xcode installed. The vast majority of Mac users won’t have Xcode, but it’s fast and easy to install. Launch the App Store, search for Xcode, then install it on your Mac. Once installed, launch Xcode from the Applications folder. Agree to the software license, enter your Mac admin password when requested, and agree to the Terms and Conditions. Once this is done, Quit Xcode.
Install Homebrew
At this point, launch Terminal from the Utilities folder. Copy the command line listed below, and paste it at the Terminal prompt.
/bin/bash -c "$(curl -fsSL https://raw.githubusercontent.com/Homebrew/install/HEAD/install.sh)"
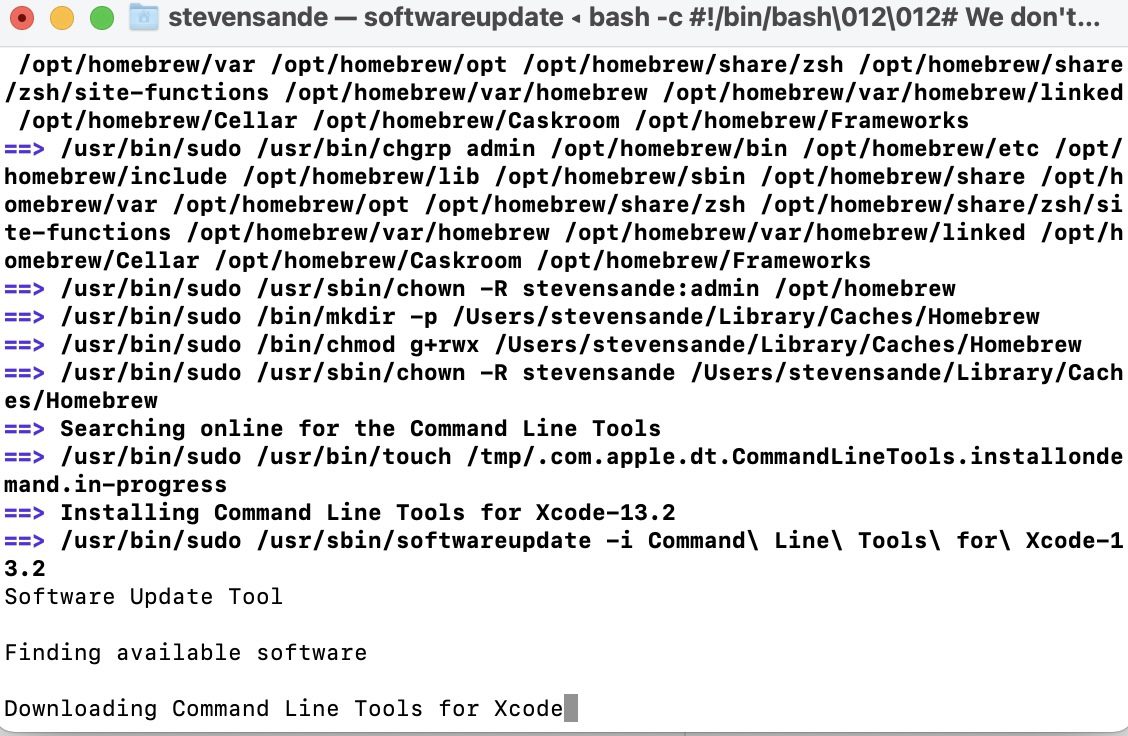
Press Return, and you’re asked to enter your admin password to allow sudo (“superuser” do) access, allowing you to run programs that require security access. Terminal provides no visual feedback of your password, so type carefully, then press Return. A lot of commands now fly by in the Terminal window. At one point, all the action appears to stop. If you look closely, the command line shows “Downloading Command Line Tools for Xcode”:
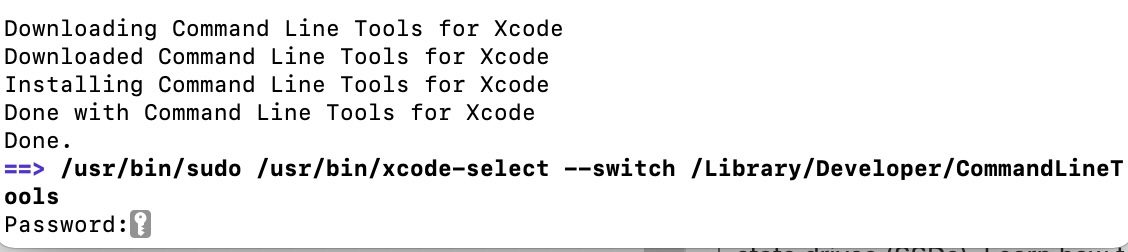
Be patient, as this takes a while — eventually you see a password prompt again:
At this point, your Mac begins to download and install Homebrew. Once again, it’s gonna take a while! Play some Wordle, have a cup or two of coffee, go for a walk… Installation of Homebrew is complete when the following appears in Terminal:
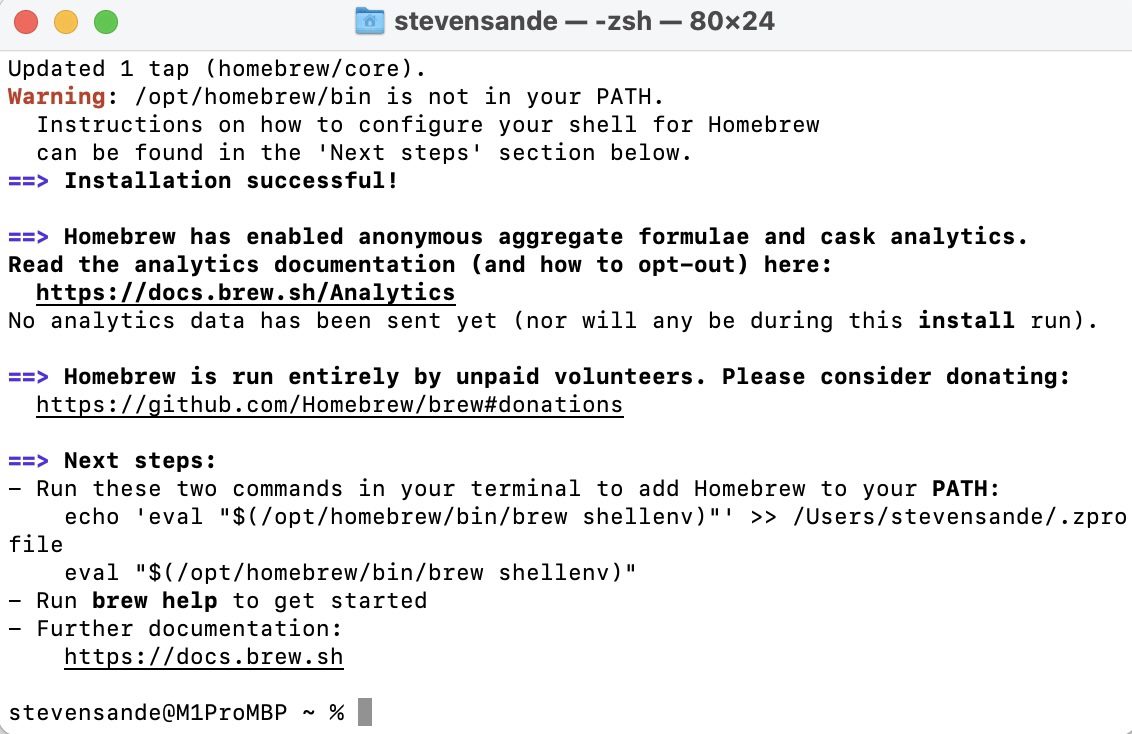
Not done yet…
Yes, the Homebrew installation is complete, but we’re far from finished with this process. As seen in the image above, two commands must be run to add Homebrew to the PATH – where Terminal finds executable code. Those commands (echo ‘eval… and eval “$…) can be copied and pasted to the command-line prompt and run by pressing Return.
Next, we have to set up Z shell as the user interface for executing commands. That’s a simple command entered at the Terminal prompt:
nano ~/.zshrc
Press Return, and a new window appears in Terminal:

At the prompt in the Z Shell, enter the following command. Don’t press Return!
export PATH=/usr/local/bin:$PATH
To save this file, we enter Control – O (letter O, not zero) to see the file name that will be written. Press Return, then enter Control – X to quit the Z Shell. Quit Terminal, then relaunch it.
Install and run smartmontools
We’re not there yet! After all of that work, we still need to install smartmontools to check our SSD health. To find out more about smartmontools, there is a website with full details.
At the Terminal prompt, enter the following command and press Return:
brew install smartmontools && sudo smartctl --all /dev/disk0
Code is downloaded, and you’re asked to enter your admin password, at which time smartmontools runs and displays the health of your SSD.
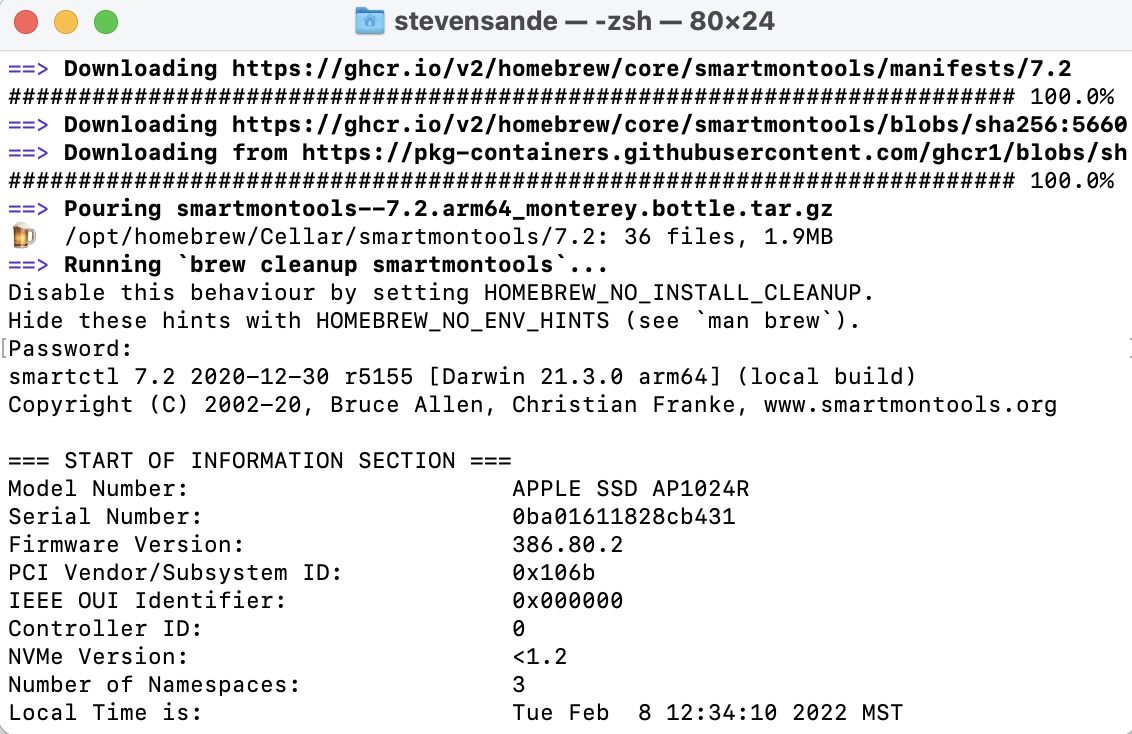
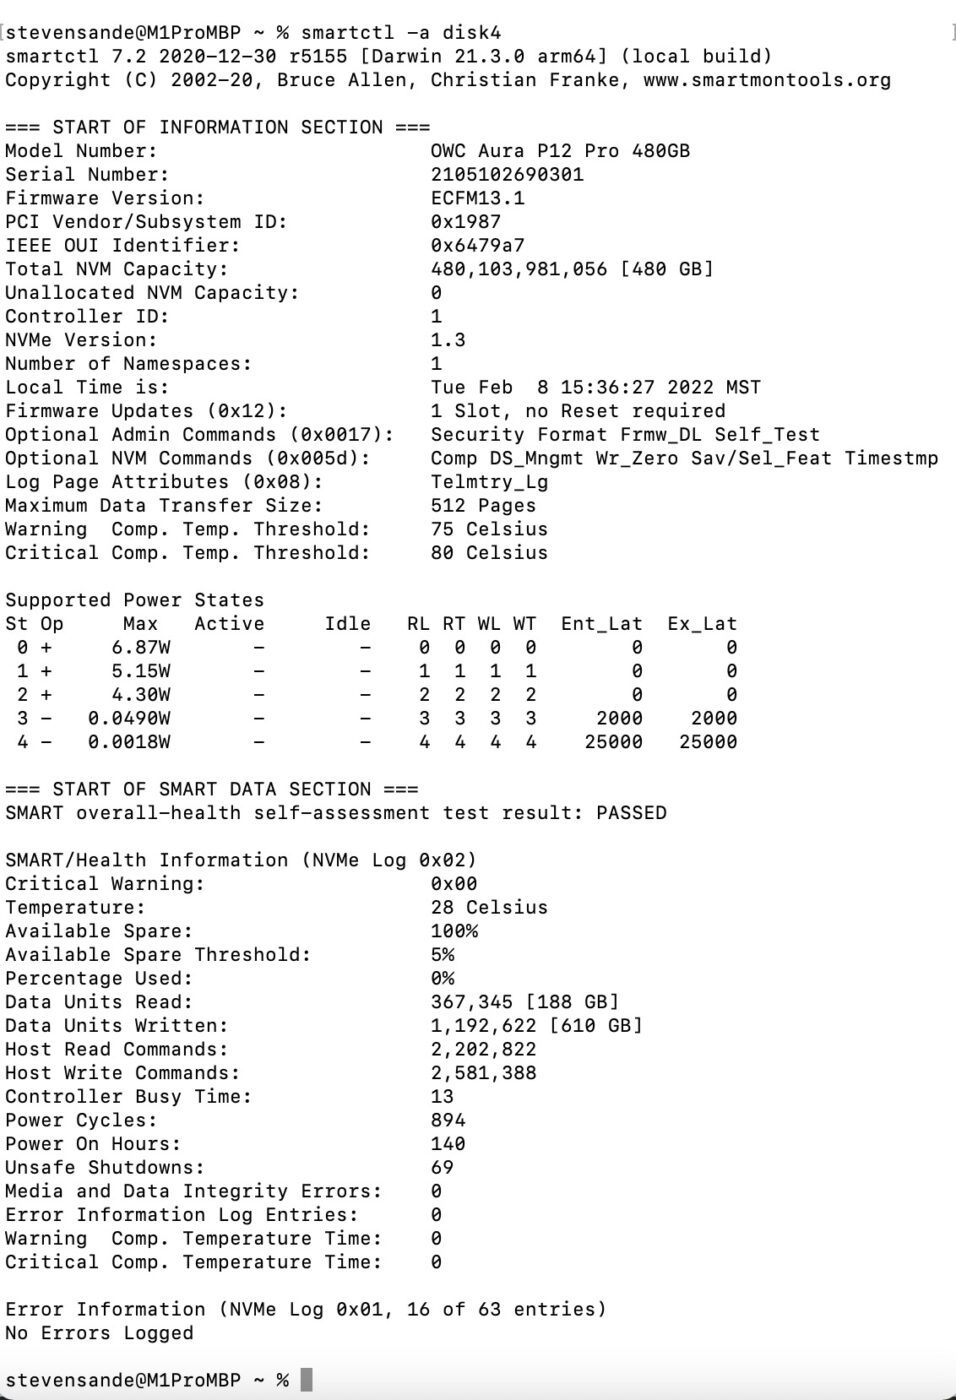
Scroll down to the next section to see the S.M.A.R.T. information:
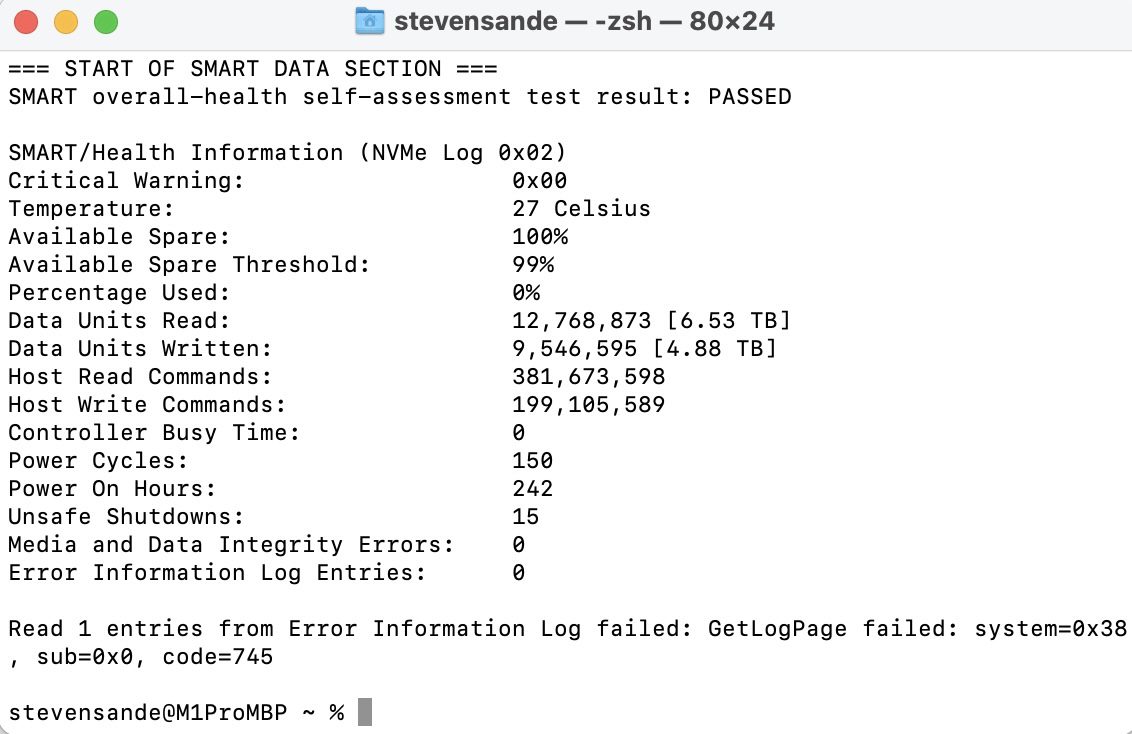
This PDF document provides a great deal of information about the S.M.A.R.T. results gleaned from smartmontools.
Running smartmontools in the future
Now that you’ve gone through all of the time-consuming work of installing Xcode, Homebrew, and smartmontools, you don’t have to go through it again. The next time you want to check on your SSDs, here’s all you need to do:
1 – Launch Terminal, then type diskutil list at the prompt and press Return. This displays information on any internal and external drives connected to your Mac. In this case, we have the internal drive denoted by /dev/disk0 and an external OWC Envoy Pro FX SSD denoted by /dev/disk4 (both highlighted by red arrows).
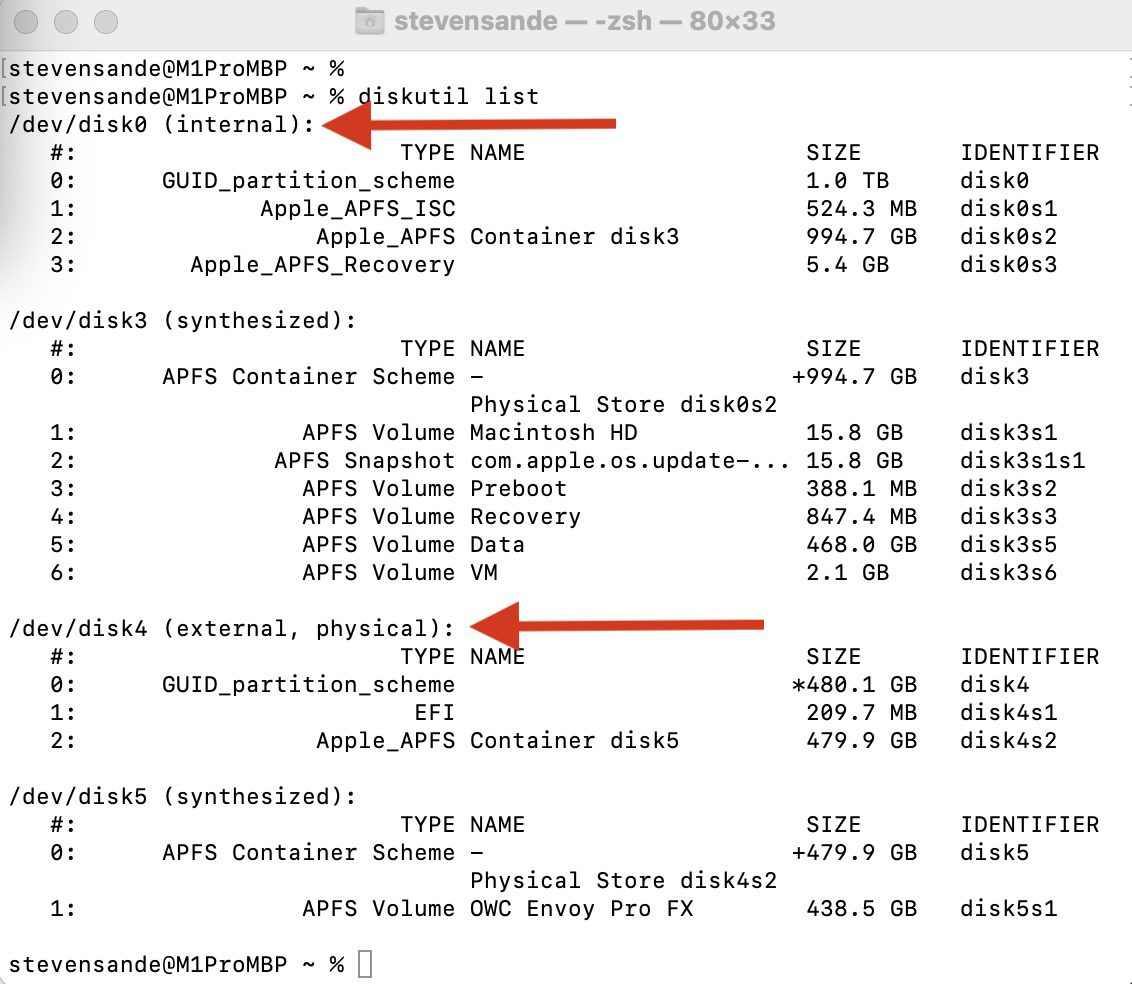
The disk number is important, as it is used to “point” smartmontools to the SSD you wish to get information about.
2 – To get results for the internal drive (disk0), we’d enter smartctl -a disk0 and then press Return. For the external drive (disk4), the command would be smartctl -a disk4 followed by Return:
Although installing all of the necessary software to run smartmontools is a lengthy process, it is free and fast to run, producing very detailed results on the health of your SSD.
3. DriveDx
The third method we’ll demonstrate today is a third-party app called DriveDx. The app is free to download and try; if you decide to keep it, DriveDx costs $19.99 to use on up to three Macs.
Regardless of whether you try or buy the app, you’ll download it to your Mac as a zip file. Double-click the zip file to unpack the app, then drag DriveDx to your Applications folder.
Now launch DriveDx. The first time the app is run, you’re provided with instructions on how to change a security setting in System Preferences to give the app access to your SSDs. Perform that task, and you’re ready to roll.
DriveDx takes no time at all to check any SSD you point it to. The user interface is quite easy to understand:
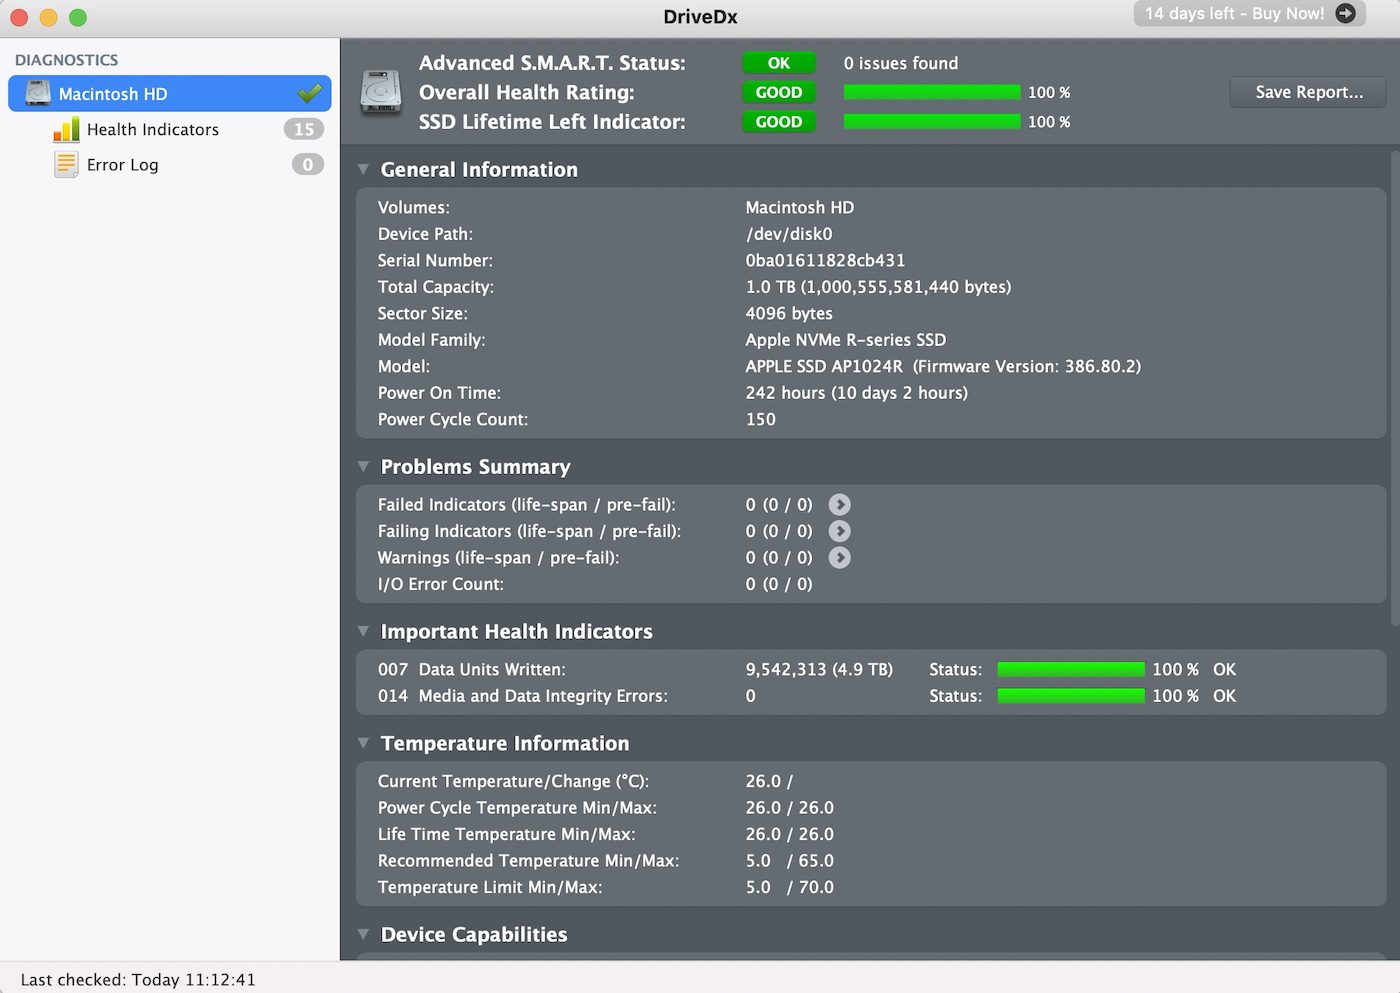
This shows no issues with the built-in SSD, 100% life remaining, and other statistics like power cycle count. Click the Health Indicators link in the sidebar, and more detail is revealed:
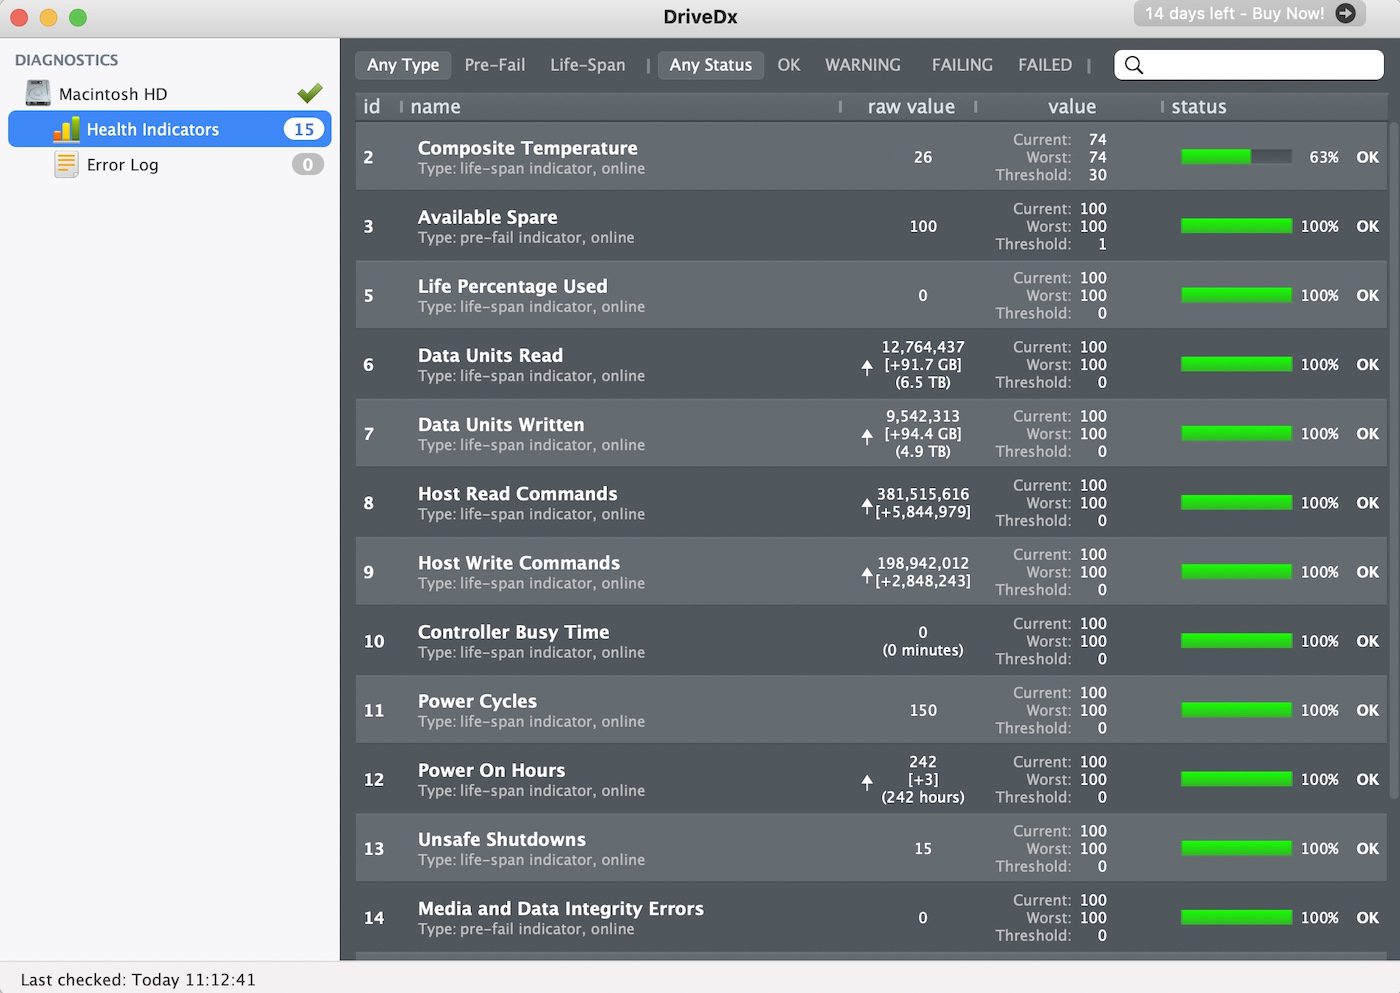
Once again, every indicator is green, showing that the status is OK in every respect. The only item not showing 100% is “Composite Temperature.” Should I be concerned? Clicking on the word “Composite Temperature” brings up an explanation of the indicator:
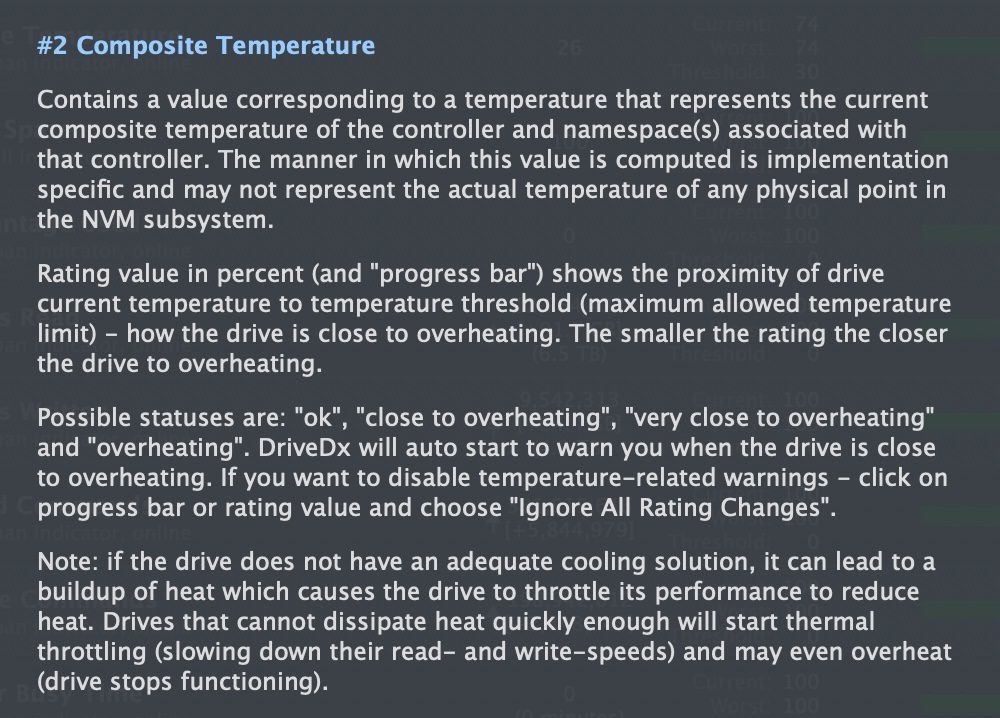
Since the composite temperature meter isn’t displaying “overheating,” I can rest assured that all is fine. However, running any apps that cause the fan to kick in (a rarity) might be a reason to run DriveDx at the same time and see if the SSD is overheating.


DriveDX is VAPORWARE! All the links on the web site are non-working, even if you BUY the software!
Very useful article — too bad presently DriveDx is impossible to freely download for testing purposes though.
Thanks for this. DriveDx helped med confirm the state of my second hand MacBook Pro. Looks like it’s in good health.
You don’t mention using the regular Apple Disk Utility here at all. Does it work on SSD’s?
Does DriveDX give the S.M.A.R.T. status of external drives?
Hello, in method #1 above: my system report displays no “S.M.A.R.T. Status:” line- the last line is “Partition Map Type: Unknown”
should I be concerned?
Another far less cumbersome way to get smartmontools is to download option 4 (or similar disk checking tools like SMARTReporter), and pull out smartctl from the contents>resources directory of the application. This can be done by first right clicking on the application and selecting Show Package Contents and then navigating to the above directory. Copy/paste smartctl to wherever you want and run via terminal. Pretty much all these tools use smartmontools internally.
Steve,
Thanks for a great article. When checking on my SSD I found that no SMART status is listed. I have a 2016 15″ MacBook Pro running Mojave, 10.14.6 The following is from the system report:
Available: 359.44 GB (359,435,898,880 bytes)
Capacity: 1 TB (1,000,240,963,584 bytes)
Mount Point: /
File System: APFS
Writable: Yes
Ignore Ownership: No
BSD Name: disk1s1
Volume UUID: 1DF135B5-C3FF-3980-82E2-26CDFDFF7B02
Physical Drive:
Device Name: APPLE SSD SM1024L
Media Name: AppleAPFSMedia
Medium Type: SSD
Protocol: PCI-Express
Internal: Yes
Partition Map Type: Unknown
Appreciate any thoughts you have. Without SMART can I gain info on my drives health?
Thanks, John
DriveDx is awesome. And GUI, as Mac users expect!