

I don’t know about you, but sometimes I get really tired of the boring blue folder icons in macOS. That’s why I occasionally add a touch of fun to my folders by changing that icon to an image. The image can be any picture, preferably something with a background that can be made transparent. Let’s have some fun and change your folder icons to images!
Find an image for your folder icon

The first thing to do is find a suitable image for your folder. For example, I have a folder named Linux on my desktop. Wouldn’t it be more interesting to have Tux the Linux mascot replace that blue folder icon? Sure it would!
Using Google Image Search, I typed in “Tux the Linux mascot” and quickly had a page full of smiling penguins. There was one with a plain white background. Clicking on it showed that it was actually a transparent PNG file –perfect! I downloaded it to my Mac by right-clicking and choosing Save Image to Downloads. We’ll get back to Tux in a minute…
Handling images without transparent backgrounds
I prefer images with transparent backgrounds simply because they look better as folder replacements. However, you may find the perfect image only to find it it has an opaque background. No problem! Let’s change it.
A cute kitten rolling on its back made the perfect folder icon for a boring “archive” folder. Saving it, I discovered that it was a JPG image. Double-clicking the image opened it in the default Preview app, where I can make it into a PNG file with a transparent background.
With the image opened in Preview, I selected View > Show Markup Toolbar. This adds a toolbar with one very important tool (highlighted in red): the Instant Alpha tool.

Instant Alpha
This tool adds a transparency or “Alpha” channel to an image. PNG files store that Alpha channel, so using the tool requires us to save it as a PNG file.
Click the Instant Alpha tool and move the cursor over the photo. You’ll see that it turns into a small +. Next, place the tool over the background color (in this case, white), and then drag it across the image.
The areas to be converted to transparency turn a reddish tint. Dragging a little turns part of the background transparent; dragging a lot actually starts picking up some of the kitten. We want to find a happy medium, with most of the background turned transparent and the kitten fully rendered.

After playing around for a bit, the kitten is surrounded by red with a slim white outline. Perfect! To turn the white background into transparency, just press “delete” on the keyboard. Doing this displays a message:
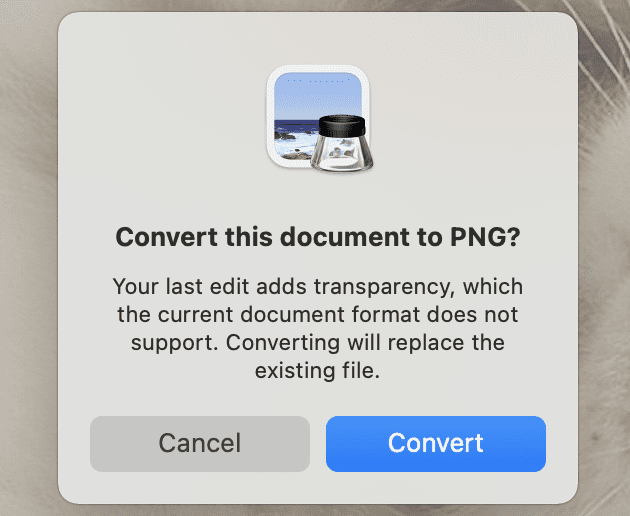
We do want to convert the image to PNG format, so click Convert to save it.
Change Your Folder Icons to Images
Enough of that, let’s make some fun folders. First, I’ll open the Tux the Linux mascot image in Preview, press Command ( ⌘ ) + A to select all, then Command ( ⌘ ) + C to copy the image.
Now I click on my Linux folder to select it, and press Command ( ⌘ ) + I to display the Get Info screen. Click on the small folder icon at the top of the Get Info dialog to select it, then press Command ( ⌘ ) + V to paste the image. Tux is in business, turning the folder from boring blue to penguin perfection:
The same process is followed to turn the archive folder icon into a kitten:
By the way, if you ever wish to get back to those blue folders, just Get Info on the folder, click the image at the top of the Get Info dialog, and press Delete. Your image disappears, and the default blue folder returns.
Sure, this isn’t a productivity hack or a way to run virtual machines on your M1 Mac, but it’s certainly a lot of fun to change your folder icons to images! Let us know in the comments what you end up using as folder icons.


The downside to all this fun is a bug in iconservicesagent that reliably eats up prodigious amounts if VM, bringing your Mac to a standstill, when it comes across a custom folder icon that (for some reason) sets it off… until you kill it with Activity Monitor. And until you shut the Finder window showing that icon, it will immediately start up again.
I ran into this bug in Mojave, against an archival disk containing custom icons I created decades ago. I have no idea if it was ever fixed in later releases because I’ve been avoiding later releases (too much software I don’t care to re-buy).
https://discussions.apple.com/thread/8559574
Hi Steve
Yep non productive BUT FUN
Cheers
I think sometimes I’d rather see the image within the frame of a blue folder.
Thanks for the tip! I also use Image2icon (formerly Img2icns).
Hi… you can make an invisible icon…If you create a solid color PNG…
And with instant alpha remove the color, making it clear.
You can hide folders in plain sight…With names like – or
What a great idea! That’s the perfect way to hide personal information in plain sight. Thanks for the idea, John!
Steve